

wilsonhomelab
-
Posts
24 -
Joined
-
Last visited
Content Type
Profiles
Forums
Downloads
Store
Gallery
Bug Reports
Documentation
Landing
Posts posted by wilsonhomelab
-
-
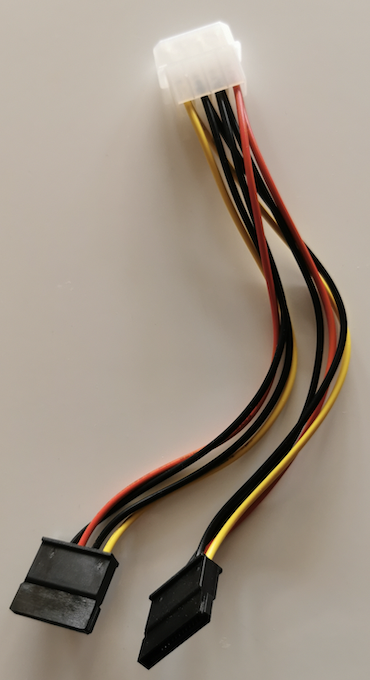
I think I finnally found the culprit. The I/O errors actually came from, I believe, the insufficient sata power. I used a molex-to-2x-15-pin-sata cable to power the silverstone 5HDD hot-swag cage due to the clerance problem. And I never ran into problems untill I populated all 5 HDD into a single cage (I have two of the cages). I found a simular issue, which prompted me to try power the cage with two dedicated sata cable straigh from the PSU.
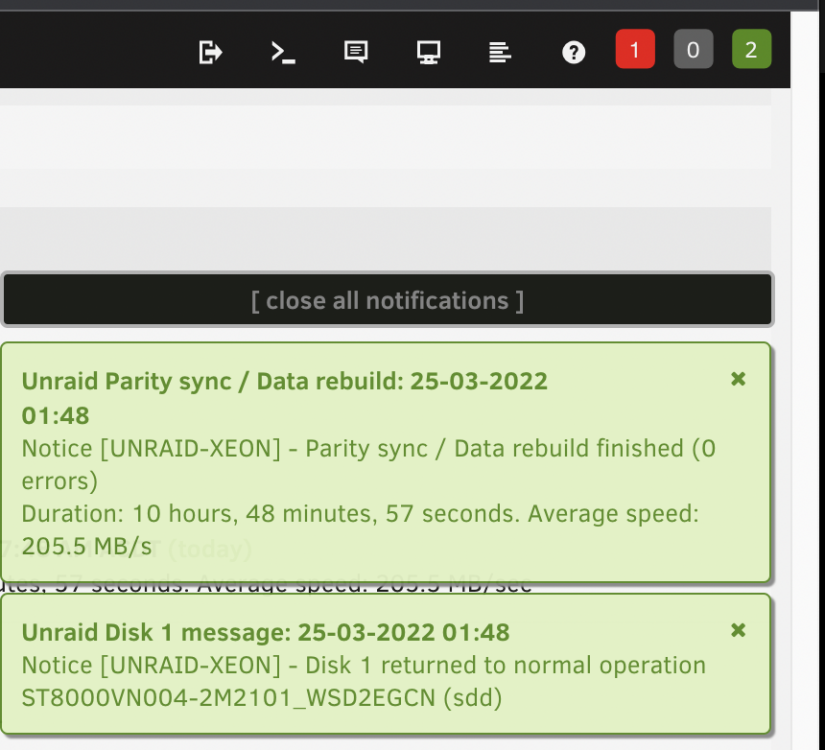
THE end result is that the disk 1 was pre-clear at double of data rate at 200+MB/s instead of 90MB/s . The rebuild process was done in 10 hrs with average 202MB/s. I wish the system log could be more precise about the I/O error (" hard resetting link") , or the drive itself should have reported under-power issue. I hope this will be helpful for someelse.
-
 1
1
-
-
On 5/4/2011 at 8:16 AM, madburg said:
Another read from the LSI KnowledgeBase "Using drives >2TB in capacity with LSI SAS HBAs":http://kb.lsi.com/KnowledgebaseArticle16399.aspx
In case someone has trouble to look for this KB article. The URL is now here
Just to clarify, LSI 1086E will support SAS drives greater than 2TB, but not SATA drives. Confirmed this in my Dell R410 with SAS 6/iR HBA. All 4 x 3TB SAS drives are recognised.
-
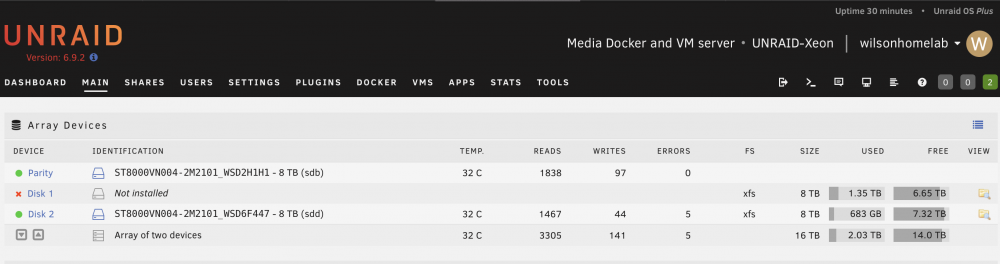
While disk 1 is performing pre-clear, disk 2 came up 5 errors🤨. Should I repeat the same procedure? start as maintenance mode and do check-and-repair xfs file system again? I think I am still not getting the cause of the disk error problems. unraid-xeon-diagnostics-20220322-0936.zip
-
I went ahead with the -L option. Now I can see the disk 1 content!😀
If I understand correctly, will the parity start rebuilding the physical disk 1 once I restart the array with disk 1 plugged in?
I also want to make sure whether this issue is an indication of a failing drive. May I perform a pre-clear of disk 1 first to see if it can withstand the heavy read / write process? If it is good, I put it back to the array for rebuild.
root@UNRAID-Xeon:~# xfs_repair /dev/md1 -L
Phase 1 - find and verify superblock...
        - reporting progress in intervals of 15 minutes
Phase 2 - using internal log
        - zero log...
ALERT: The filesystem has valuable metadata changes in a log which is being
destroyed because the -L option was used.
        - 04:55:12: zeroing log - 119233 of 119233 blocks done
        - scan filesystem freespace and inode maps...
        - 04:55:13: scanning filesystem freespace - 32 of 32 allocation groups done
        - found root inode chunk
Phase 3 - for each AG...
        - scan and clear agi unlinked lists...
        - 04:55:13: scanning agi unlinked lists - 32 of 32 allocation groups done
        - process known inodes and perform inode discovery...
        - agno = 0
        - agno = 15
        - agno = 30
        - agno = 16
        - agno = 17
        - agno = 1
        - agno = 31
        - agno = 18
        - agno = 2
        - agno = 19
        - agno = 20
        - agno = 21
        - agno = 22
        - agno = 3
        - agno = 23
        - agno = 24
        - agno = 25
        - agno = 26
        - agno = 27
        - agno = 28
        - agno = 4
        - agno = 5
        - agno = 29
        - agno = 6
        - agno = 7
        - agno = 8
        - agno = 9
        - agno = 10
        - agno = 11
        - agno = 12
        - agno = 13
        - agno = 14
        - 04:55:24: process known inodes and inode discovery - 148992 of 148992 inodes done
        - process newly discovered inodes...
        - 04:55:24: process newly discovered inodes - 32 of 32 allocation groups done
Phase 4 - check for duplicate blocks...
        - setting up duplicate extent list...
        - 04:55:24: setting up duplicate extent list - 32 of 32 allocation groups done
        - check for inodes claiming duplicate blocks...
        - agno = 0
        - agno = 3
        - agno = 2
        - agno = 7
        - agno = 9
        - agno = 11
        - agno = 12
        - agno = 21
        - agno = 22
        - agno = 23
        - agno = 13
        - agno = 28
        - agno = 5
        - agno = 1
        - agno = 8
        - agno = 19
        - agno = 17
        - agno = 6
        - agno = 18
        - agno = 20
        - agno = 4
        - agno = 15
        - agno = 24
        - agno = 25
        - agno = 26
        - agno = 10
        - agno = 27
        - agno = 16
        - agno = 29
        - agno = 30
        - agno = 14
        - agno = 31
        - 04:55:24: check for inodes claiming duplicate blocks - 148992 of 148992 inodes done
Phase 5 - rebuild AG headers and trees...
        - 04:55:25: rebuild AG headers and trees - 32 of 32 allocation groups done
        - reset superblock...
Phase 6 - check inode connectivity...
        - resetting contents of realtime bitmap and summary inodes
        - traversing filesystem ...
        - traversal finished ...
        - moving disconnected inodes to lost+found ...
Phase 7 - verify and correct link counts...
        - 04:55:31: verify and correct link counts - 32 of 32 allocation groups done
Maximum metadata LSN (6:909635) is ahead of log (1:2).
Format log to cycle 9.
done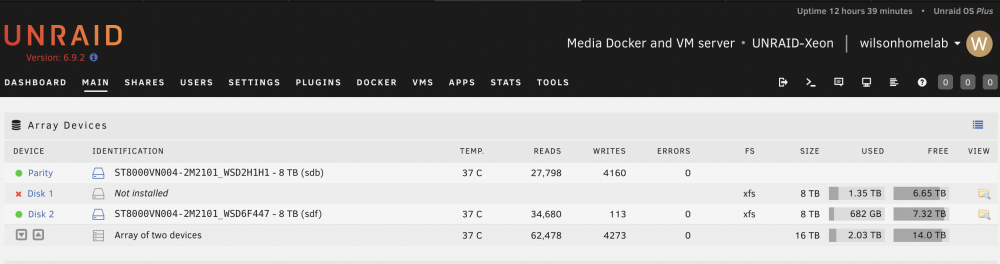
-
I click the "CHECK" button under "disk1 setting", and nothing happen. So I typed the command as follow
root@UNRAID-Xeon:~# xfs_repair /dev/md1
Phase 1 - find and verify superblock...
        - reporting progress in intervals of 15 minutes
Phase 2 - using internal log
        - zero log...
ERROR: The filesystem has valuable metadata changes in a log which needs to
be replayed.  Mount the filesystem to replay the log, and unmount it before
re-running xfs_repair.  If you are unable to mount the filesystem, then use
the -L option to destroy the log and attempt a repair.
Note that destroying the log may cause corruption -- please attempt a mount
of the filesystem before doing this.
Could you please explain what the "ERROR" session ? Thanks
-
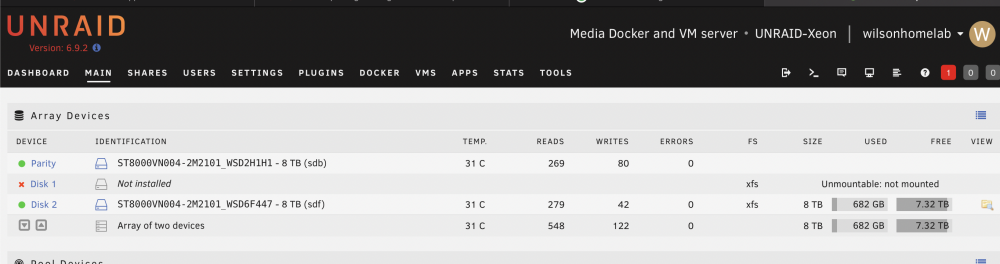
I removed the disk 1, and restarted Unraid. As I expected, the parity drive doesn't emulate the missing drive. Please help!
My priority will be recovering the missing data from parity. I hope it will be still possible. Then test the problem drive as it is still under warranty.
-
A month ago, I transferred my array (Ironwolf 8tb x2, 8 months old) from desktop hardwares to server hardwares (dual Xeon E5-2680 v4, 64GB Samsung ecc memory, Supermicro X10DRL-i server mobo ). Unraid recognised all drives (parity, disk 1) in the array and ran smoothly for couple of weeks. 10 day ago, I purchased an additional Ironwolf 8tb (disk2) and added to the array after preclear. I ran parity check without any problem with 220MB/s average speed.
Last week, the disk 1 started showing errors after I transferred some media files from unassigned drives using Krusader (docker container). So I tried swapping SATA cable / SATA ports, but the disk errors only seemed worse (from 4 errors to 80 errors). Then I tried parity check which only gave me KB/s speed (I paused it). I knew something was wrong. I quickly checked the diagnostic and showing "ata6: hard resetting link", "ata6: link is slow to respond, please be patient (ready=0)" unraid-xeon-diagnostics-20220312-1735.zip
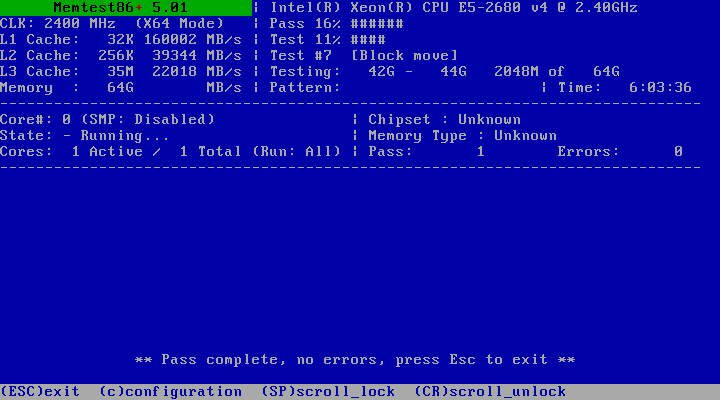
Last night, I saw the accumulated disk 1 errors as high as 800 (after a week), so in order to rule out the potential problems from the mobo SATA ports and the SATA calbles I used, I installed a working reliable LSI SAS2008 with a working reliable SFF8087-to-4-SATA cable. After booting up Unraid, all disks were recognised, but disk1 and disk 2 were both "unmountable" with option to format. unraid-xeon-diagnostics-20220321-0240.zip
I then upgraded the mobo BIOS to the latest and ran 6 hrs of Memtest86+ without error.
This morning, I restarted Unraid and saw disk 1 "unmountable"; parity and disk 2 are working. Shares stored in disk 1 is not showing up (not emulated at all). I just wonder why emulation is not working with only one disk down? unraid-xeon-diagnostics-20220321-0909.zip
Could you please also advise what should I do now? repair the xfs file system? Please help~
-
On 9/4/2016 at 9:36 AM, RobJ said:
Clear an unRAID array data drive (for the Shrink array wiki page)
This script is for use in clearing a drive that you want to remove from the array, while maintaining parity protection. I've added a set of instructions within the Shrink array wiki page for it. It is designed to be as safe as possible, and will not run unless specific conditions are met -
- The drive must be a data drive that is a part of an unRAID array
- It must be a good drive, mounted in the array, capable of every sector being zeroed (no bad sectors)
- The drive must be completely empty, no data at all left on it. This is tested for!
- The drive should have a single root folder named clear-me - exactly 8 characters, 7 lowercase and 1 hyphen. This is tested for!
Because the User.Scripts plugin does not allow interactivity (yet!), some kludges had to be used, one being the clear-me folder, and the other being a 60 second wait before execution to allow the user to abort. I actually like the clear-me kludge, because it means the user cannot possibly make a mistake and lose data. The user *has* to empty the drive first, then add this odd folder.
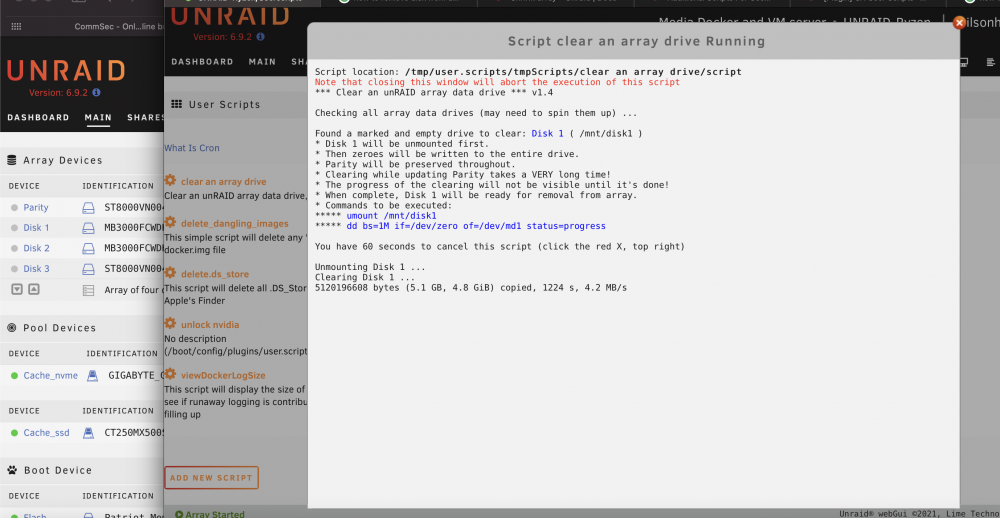
#!/bin/bash
# A script to clear an unRAID array drive.  It first checks the drive is completely empty,
# except for a marker indicating that the user desires to clear the drive.  The marker is
# that the drive is completely empty except for a single folder named 'clear-me'.
#
# Array must be started, and drive mounted.  There's no other way to verify it's empty.
# Without knowing which file system it's formatted with, I can't mount it.
#
# Quick way to prep drive: format with ReiserFS, then add 'clear-me' folder.
#
# 1.0  first draft
# 1.1  add logging, improve comments
# 1.2  adapt for User.Scripts, extend wait to 60 seconds
# 1.3  add progress display; confirm by key (no wait) if standalone; fix logger
# 1.4  only add progress display if unRAID version >= 6.2

version="1.4"
marker="clear-me"
found=0
wait=60
p=${0%%$P}              # dirname of program
p=${p:0:18}
q="/tmp/user.scripts/"

echo -e "*** Clear an unRAID array data drive ***  v$version\n"

# Check if array is started
ls /mnt/disk[1-9]* 1>/dev/null 2>/dev/null
if [ $? -ne 0 ]
then
   echo "ERROR:  Array must be started before using this script"
   exit
fi

# Look for array drive to clear
n=0
echo -n "Checking all array data drives (may need to spin them up) ... "
if [ "$p" == "$q" ] # running in User.Scripts
then
   echo -e "\n"
   c="<font color=blue>"
   c0="</font>"
else #set color teal
   c="\x1b[36;01m"
   c0="\x1b[39;49;00m"
fi

for d in /mnt/disk[1-9]*
do
   x=`ls -A $d`
   z=`du -s $d`
   y=${z:0:1}
#   echo -e "d:"$d "x:"${x:0:20} "y:"$y "z:"$z

   # the test for marker and emptiness
   if [ "$x" == "$marker" -a "$y" == "0" ]
   then
      found=1
      break
   fi
   let n=n+1
done

#echo -e "found:"$found "d:"$d "marker:"$marker "z:"$z "n:"$n

# No drives found to clear
if [ $found == "0" ]
then
   echo -e "\rChecked $n drives, did not find an empty drive ready and marked for clearing!\n"
   echo "To use this script, the drive must be completely empty first, no files"
   echo "or folders left on it.  Then a single folder should be created on it"
   echo "with the name 'clear-me', exactly 8 characters, 7 lowercase and 1 hyphen."
   echo "This script is only for clearing unRAID data drives, in preparation for"
   echo "removing them from the array.  It does not add a Preclear signature."
   exit
fi

# check unRAID version
v1=`cat /etc/unraid-version`
# v1 is 'version="6.2.0-rc5"' (fixme if 6.10.* happens)
v2="${v1:9:1}${v1:11:1}"
if [[ $v2 -ge 62 ]]
then
   v=" status=progress"
else
   v=""
fi
#echo -e "v1=$v1  v2=$v2  v=$v\n"

# First, warn about the clearing, and give them a chance to abort
echo -e "\rFound a marked and empty drive to clear: $c Disk ${d:9} $c0 ( $d ) "
echo -e "* Disk ${d:9} will be unmounted first."
echo "* Then zeroes will be written to the entire drive."
echo "* Parity will be preserved throughout."
echo "* Clearing while updating Parity takes a VERY long time!"
echo "* The progress of the clearing will not be visible until it's done!"
echo "* When complete, Disk ${d:9} will be ready for removal from array."
echo -e "* Commands to be executed:\n***** $c umount $d $c0\n***** $c dd bs=1M if=/dev/zero of=/dev/md${d:9} $v $c0\n"
if [ "$p" == "$q" ] # running in User.Scripts
then
   echo -e "You have $wait seconds to cancel this script (click the red X, top right)\n"
   sleep $wait
else
   echo -n "Press ! to proceed. Any other key aborts, with no changes made. "
   ch=""
   read -n 1 ch
   echo -e -n "\r                                                                  \r"
   if [ "$ch" != "!" ];
   then
      exit
   fi
fi

# Perform the clearing
logger -tclear_array_drive "Clear an unRAID array data drive  v$version"
echo -e "\rUnmounting Disk ${d:9} ..."
logger -tclear_array_drive "Unmounting Disk ${d:9}  (command: umount $d ) ..."
umount $d
echo -e "Clearing   Disk ${d:9} ..."
logger -tclear_array_drive "Clearing Disk ${d:9}  (command: dd bs=1M if=/dev/zero of=/dev/md${d:9} $v ) ..."
dd bs=1M if=/dev/zero of=/dev/md${d:9} $v
#logger -tclear_array_drive "Clearing Disk ${d:9}  (command: dd bs=1M if=/dev/zero of=/dev/md${d:9} status=progress count=1000 seek=1000 ) ..."
#dd bs=1M if=/dev/zero of=/dev/md${d:9} status=progress count=1000 seek=1000

# Done
logger -tclear_array_drive "Clearing Disk ${d:9} is complete"
echo -e "\nA message saying \"error writing ... no space left\" is expected, NOT an error.\n"
echo -e "Unless errors appeared, the drive is now cleared!"
echo -e "Because the drive is now unmountable, the array should be stopped,"
echo -e "and the drive removed (or reformatted)."
exit
The attached zip is 'clear an array drive.zip', containing both the User.Scripts folder and files, but also the script named clear_array_drive (same script) for standalone use. Either extract the files for User.Scripts, or extract clear_array_drive into the root of the flash, and run it from there.
Also attached is 'clear an array drive (test only).zip', for playing with this, testing it. It contains exactly the same scripts, but writing is turned off, so no changes at all will happen. It is designed for those afraid of clearing the wrong thing, or not trusting these scripts yet. You can try it in various conditions, and see what happens, and it will pretend to do the work, but no changes at all will be made.
I do welcome examination by bash shell script experts, to ensure I made no mistakes. It's passed my own testing, but I'm not an expert. Rather, a very frustrated bash user, who lost many hours with the picky syntax! I really don't understand why people like type-less languages! It only *looks* easier.
After a while, you'll be frustrated with the 60 second wait (when run in User Scripts). I did have it at 30 seconds, but decided 60 was better for new users, for now. I'll add interactivity later, for standalone command line use. It also really needs a way to provide progress info while it's clearing. I have ideas for that.
The included 'clear_array_drive' script can now be run at the command line within any unRAID v6, and possibly unRAID v5, but is not tested there. (Procedures for removing a drive are different in v5.) Progress display is only available in 6.2 or later. In 6.1 or earlier, it's done when it's done.
Update 1.3 - add display of progress; confirm by key '!' (no wait) if standalone; fix logger; add a bit of color
Really appreciate the tip on 'status=progress', looks pretty good. Lots of numbers presented, the ones of interest are the second and the last.
Update 1.4 - make progress display conditional for 6.2 or later; hopefully now, the script can be run in any v6, possibly v5
I was trying to shrink my array. I followed the instructions here. I started "clear_an_array" script, and kept the window open for more than 24hrs now. There is no progress showing anymore, and all disks in the array sprung down already. Am I safe to close the script window and proceed to the next step ("Go to Tools then New Config")?
-
我Array有两个SAS 硬盘,两个SATA硬盘,6.9.2下确实不能spindown. GOOGLE了一下,我的解决方案
- 安装SAS Spindown插件, 好像是必须,unraid用了sata代码,SAS drives不能spin down
- 安装cache drive, 把appdata的cache选项prefer, 然后启动mover, 把folder移到cache drive。注,appdata在cache drive没有parity保护。
Sent from my VOG-L29 using Tapatalk -
Thank everyone. I stop all dockers and vms, then rsync those folders to the nvme cache. It seems to work.
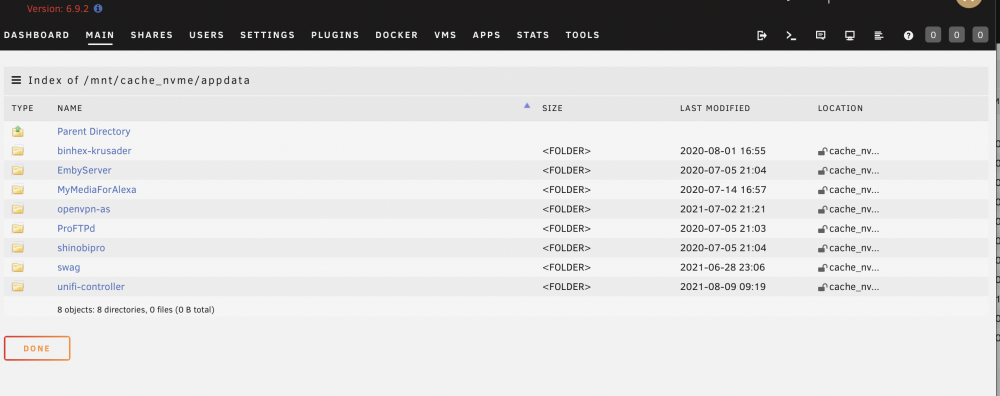
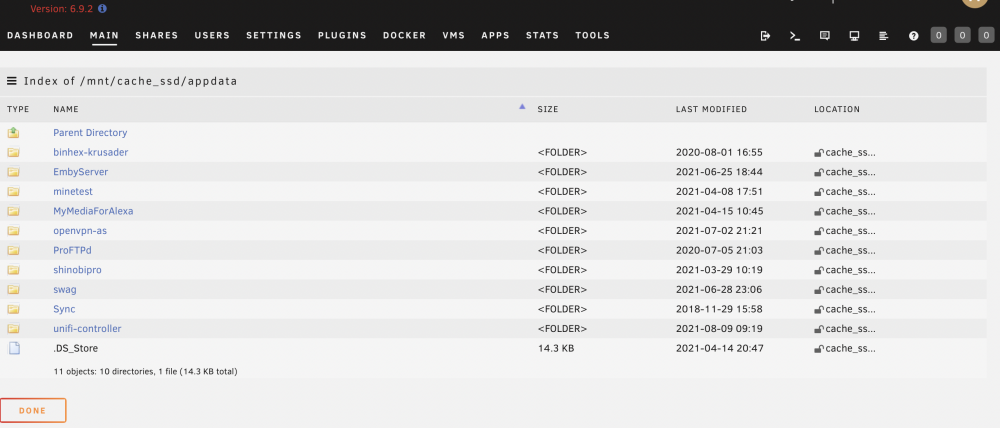
When I rename the appdata folder to "appdata_" in the cache_ssd, for the sake of keeping a backup, a new share "appdata_" appears.
Sent from my VOG-L29 using Tapatalk -
I know this is an old thread. But I have encountered this exactly same issue and couldn't figure out why. This happened after I had a potentially bad mini sas cable and force me to rebuild disable disk, and (after swapping another cable) also upgraded to a higher capacity parity drive, as well as adding an extra 1TB ssd nvme cache drive (on top of an existing 240GB sata SSD cache drive). All of a sudden, when I used noVNC to connect to any VM or docker GUI, I had this annoying red window of message error "noVNC encountered an error: script error". Here is a diagnostic file. unraid-ryzen-diagnostics-20210830-1222.zip
I noticed that under logs folder, libvirt.txt
2021-08-30 02:39:11.351+0000: 11053: info : libvirt version: 6.5.0
2021-08-30 02:39:11.351+0000: 11053: info : hostname: UNRAID-Ryzen
2021-08-30 02:39:11.351+0000: 11053: warning : networkNetworkObjTaint:5292 : Network name='default' uuid=28cda2d7-3c5e-4367-8d0e-b710f66e1910 is tainted: hook-script
2021-08-30 02:39:15.395+0000: 11037: error : virNetSocketReadWire:1826 : End of file while reading data: Input/output error
2021-08-30 02:39:17.377+0000: 11037: error : virNetSocketReadWire:1826 : End of file while reading data: Input/output error
2021-08-30 02:39:20.654+0000: 11037: error : virNetSocketReadWire:1826 : End of file while reading data: Input/output error
2021-08-30 02:46:03.365+0000: 11038: warning : qemuDomainObjTaint:6075 : Domain id=1 name='Windows 10 Lite' uuid=82d34170-e0fd-6590-b65e-1fa1ecd5a2de is tainted: high-privileges
2021-08-30 02:46:03.365+0000: 11038: warning : qemuDomainObjTaint:6075 : Domain id=1 name='Windows 10 Lite' uuid=82d34170-e0fd-6590-b65e-1fa1ecd5a2de is tainted: host-cpu
2021-08-30 02:47:49.286+0000: 19530: error : qemuMonitorIO:578 : internal error: End of file from qemu monitor
I think it might be the error related to noVNC?! not sure
Any suggestion is appreciated!
-
I tried to set appdata, domains, system "yes" of "use cache pool", then invoked mover, but nothing happened. Files are not moved and still sitting in both cache pool. Please help
Can I manually move files between cache pools?
Sent from my VOG-L29 using Tapatalk -
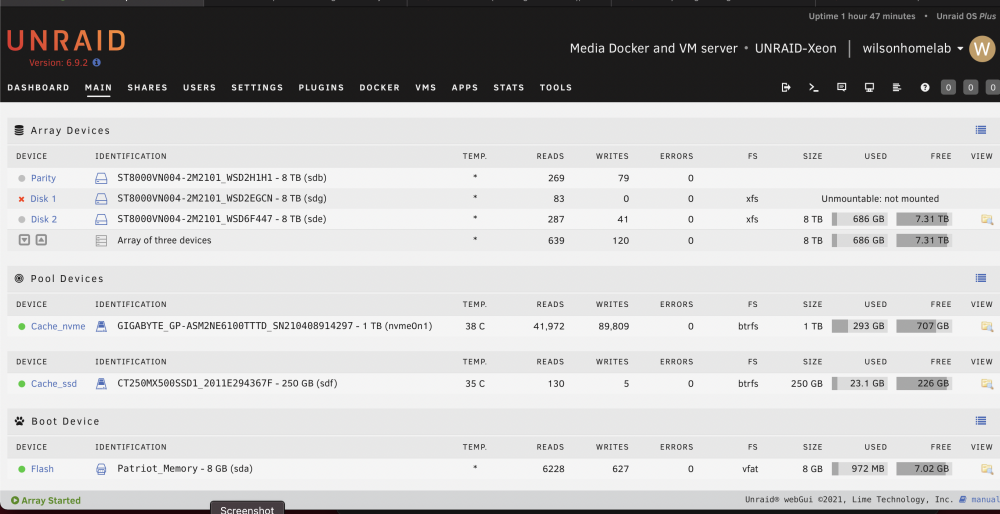
I recently purchase a 1TB NVME drive for cache in Unraid (6.9.2) along with an existing 250GB SATA SSD cache drive.
I setup two cache drives. like this

My plan is that Cache_nvme is reserved for appdata, system, domains shares, while Cache_ssd is for cacheing SMB copy via 10 GBE (then mover will move data off Cache_ssd later to array).
I setup appdata share as this.

Somehow mover moved most of appdata to Cache_nvme. Now I've got two (almost) duplicate appdata share in both cache drives. I can't remember how this happen. I think I need to use "Yes" option to let mover move appdata back to array first, then change to "prefer" -> invoke mover to move it again to cache (in this case, new cache_nvme). I am pretty sure that I didn't do this step, but now I have duplicate appdata in both cache drives. (I did invoke mover a few times to shift other shares)
So my questions
How do I consolidate appdata share to cache_nvme only?
Can I manually delete appdata share in cache_ssd? (command line or Krusader)
If I write data to "appdata" share, will it update to both cache drives?
Thanks
-
34 minutes ago, JorgeB said:
Both disks look fine, but there are no complete long SMART tests to confirm.
The UnRaid behaves as normal. I just backup a few important folders onto my desktop and went ahead the parity drive upgrade. (reported 19hrs at 113MB/s).
RE the suspected faulty mini SAS cable, what should I do to test it after the parity drive upgrade? It could be a faulty SAS controller port (port A) it connected to.
-
22 minutes ago, itimpi said:
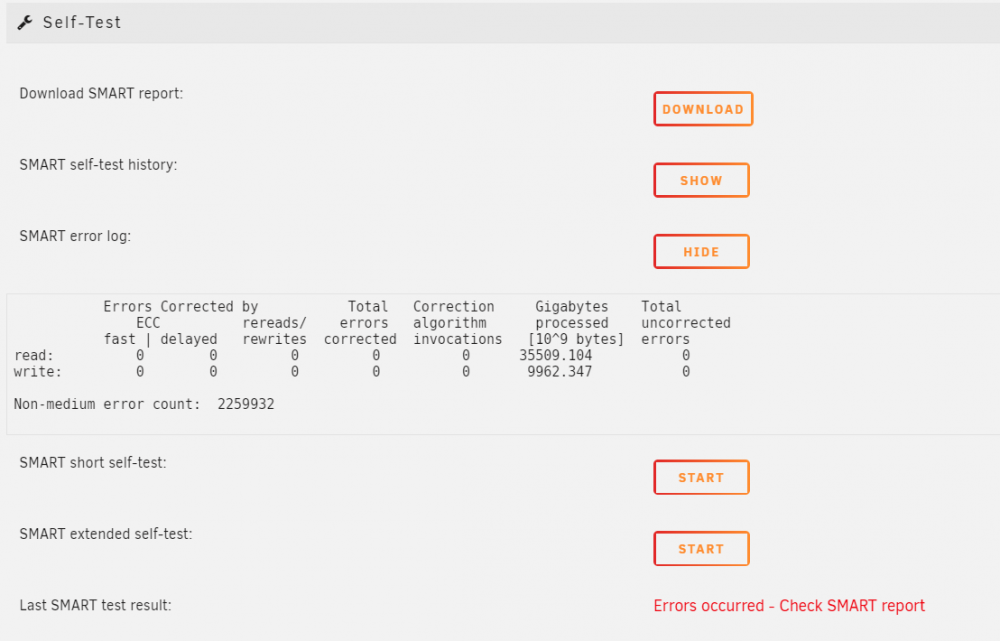
SMART reports
3 minutes ago, JorgeB said:SMART report
disk 2 unraid-ryzen-smart-20210823-1956.zip
disk 1 unraid-ryzen-smart-20210823-1954.zip
diagnostic unraid-ryzen-diagnostics-20210823-1812.zip
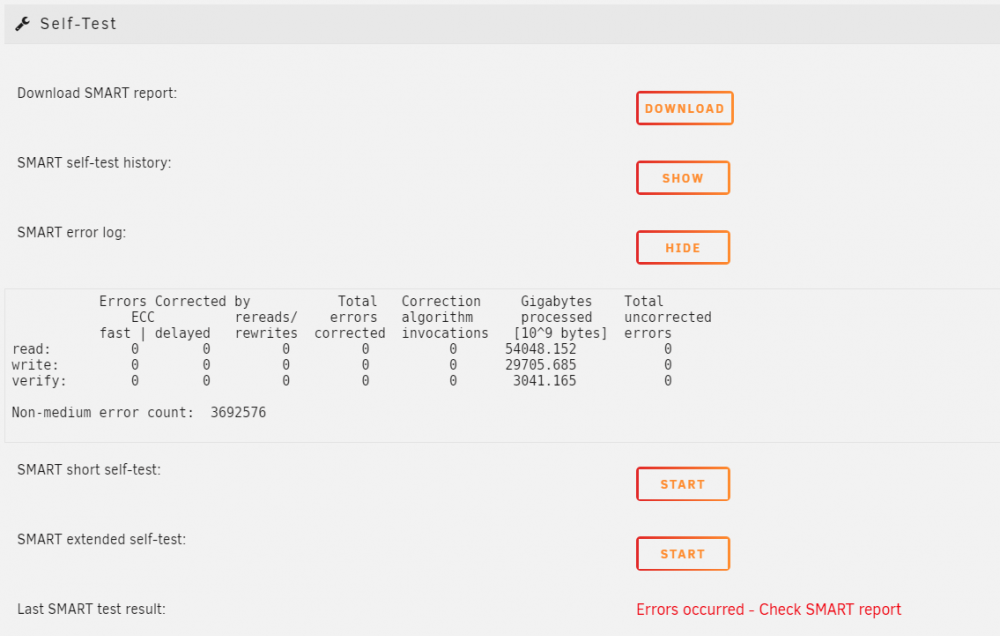
I don't have enough knowledge for the SMART report. but this section caught my attention.
In disk 1 report, it says
QuoteBackground scan results log
Status: scan is active
Accumulated power on time, hours:minutes 21942:06 [1316526 minutes]
Number of background scans performed: 564, scan progress: 16.72%
Number of background medium scans performed: 564I did click the "SMART extended self-test" before. Is the SAS drive performing an extended self-test? The spin-down is enable. Looks like the self-test may be interrupted when spin-down.
11 minutes ago, JorgeB said:it's a GUI issue
It makes me quite worried. So it is a false alert!
So, am I safe to go ahead for parity drive upgrade?
-
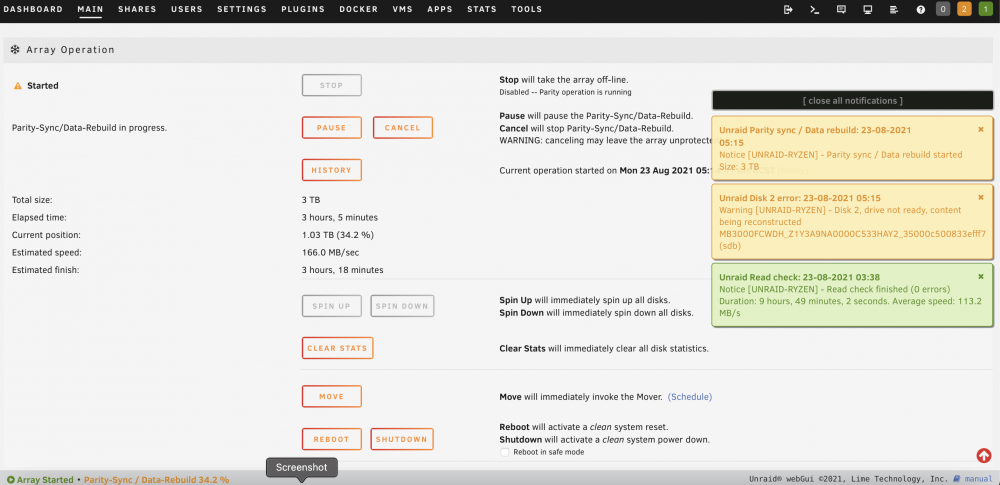
So the rebuild of disk2 finished.
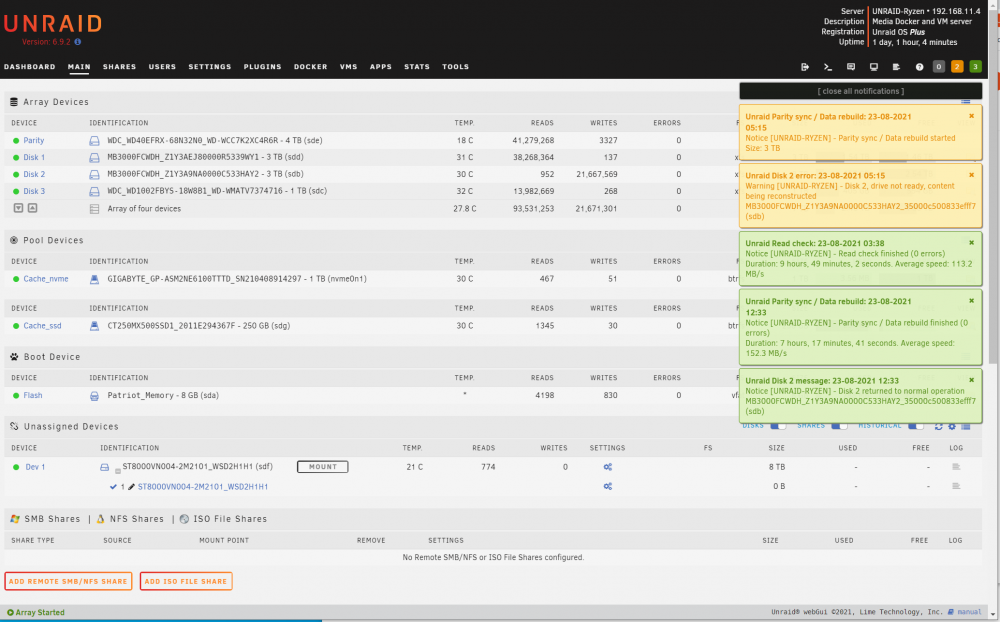
Next, I will upgrade the 4TB parity to 8TB drive. Before I move on, will I need to make sure that the disk2 is rebuilt properly? please advise
Both disk 1 and disk 2 still have SMART errors.
disk 1
disk 2
-
3 hours ago, trurl said:
So did you rebuild disk2 again after those diagnostics?
I am currently rebuilding disk2. I am quite happy with 166MB/s speed. About 3hr left. Will report back the result.
-
48 minutes ago, JorgeB said:
Swap cables/slot on disk2 and see if the problems stays with the disk or the cables/slot.
Thanks JorgeB. I swap the disk 2 to the old "reliable" cable and running a parity check at the moment. I am just wonder if the "new" cable is the culprit, would the disk rebuild I performed over this cable be ok ? There is no error reported after the rebuild.
-
Please give me some advice for what to check in the diagnostics. I have been using Unraid for two years now, but consider myself still new to this OS.
-
Hi,
May I ask for help for the problem I have recently RE disable disk?
I have been transferring my UnRaid server from old hardware (Dell R410 with Perc H200a HBA controller) to a new desktop hardware (Ryzen 2600, Gigabyte B450 Aorus Pro, 8GBx4 DDR4 Corsair 3200 LPX, Quadro P1000 4GB GPU, same Perc H200a HBA controller in IT mode). I recently purchased a new 8TB Ironwolf and planning to upgrade my parity drive.
I first problem I had is the pre-clear the new 8TB drive. The post read wasn't successful. After hours of googling, I found it is due to my memory error. At this point, I do realise how reliable of the old R410 with ECC memory which I used to pre-clear many disks without any problems. The solution is to swap slots for those 4 DDR4 memories, and I managed to pass the memtest64. (Note: I performed the pre-clear procedure in another mini PC I have without any problems. So I didn't test the pre-clear after I fixed the memory problem)
2nd problem, the disable disk. After I reorganise the disks in my hotswap bays (5 hot swap bays x2, plus two internal slots, so total 12 HDD slots), I had the disk2 showing "disable" error. SMART report here.MB3000FCWDH_Z1Y3A9NA0000C533HAY2_35000c500833efff7-20210822-1133.txt I couldn't figure it out what went wrong. So I went ahead to rebuild the disable drive following this wiki steps.
After 8hrs of disk rebuild, I have got 4 green lights back for my array. To make sure everything is right, I clicked the parity check. Somehow the "disable disk" error came back for the same disk 2. I download the diagnostics unraid-ryzen-diagnostics-20210822-1110.zip straight away. Please give me some helps and point me out what went wrong?
I suspect the mini SAS 8087 to 4 SATA cable I purchased off eBay may be to blame. But I wasn't sure. It looks quite good quality cable. I also have another mini SAS 8087 to 4 SATA cable I originally used in R410, which it doesn't seem to have problem last couple of years.
-
Just play around and found out Unraid APCUPSD supports HP T1500 G3 UPS.
JUST Connect USB cable from back of UPS to Unraid host PC
GO TO "setting" -> "UPS settings"
set "Start APC UPS daemon" Yes
Set "UPS cable" USB
Set "UPS type" USBClick Apply, you will see all info under "UPS details"
It is very confusing that the built-in UPS package is called "APC". You couldn't help but think it only supports APC brand. But after a quick look at the manual, I am lucky to get it up and running in the first try. Hope other ppl will find this useful!

-
1
-
-
It is an old thread, but same question here
-
I would love to run Krusader (docker container) in root mode. "Tools" -> "Start Root Mode Krusader"
However, a pop-up window asks for kdesu password. I tried to use my Unraid root password which didn't work.
Could you please advise what is the kdesu password packed in this container? Thanks


Disk in parity slot is not biggest with 3 identical drives
in General Support
Posted
I remembered Spaceinvader one in his channel said SSD cannot be used for parity in array.
Sent from my VOG-L29 using Tapatalk