k11su
Members
-
Joined
-
Last visited
-
Stumbled on this, maybe it can help someone - https://gist.github.com/PhialsBasement/c34e908352bd2e8a49197edc70df2d94 Probably not usable 1:1, but concepts should carry over (it also has some Windows guest specific stuff that may be of use). I had bunch stability issues, locked in D3, VM (and host) crashes etc for a long time, but seems to be working now with following settings (or maybe it just fixed itself with 7.3 and/or its kernel upgrade). My (seemingly) working setup (PowerColor Reaper 9070 XT, Asus Pro WS X570-ACE, Unraid 7.3.2, running Bazzite VM). VM start, shutdown, restart etc seems to work both inside the VM and from Unraid. Not sure that exactly all of this is necessary, but can't be bothered to test it all out (not going to touch a working setup for now). If anyone sees unnecessary stuff, feel free to respond. Boot parameters (first 3 are togglable options in Unraid /Settings/BootParameters, last one I added as a custom parameter) : initcall_blacklist=sysfb_init pci=noaer pcie_aspm=off iommu=pt No pcie_acs_override or binding it to vfio at boot. I also run this user script before first start of VM (snippets compiled from the scripts in the link above). #!/bin/bash set -uo pipefail VGA=$(lspci -D -d 1002:7550 | awk '{print $1}') # Lock GPU in D0 BEFORE unbinding amdgpu echo 0 > /sys/bus/pci/devices/$VGA/d3cold_allowed echo "on" > /sys/bus/pci/devices/$VGA/power/control # Unbind amdgpu echo "$VGA" > /sys/bus/pci/devices/$VGA/driver/unbind 2>/dev/null || true sleep 1 # Resize BAR2 to 8 MB (Navi 48 requirement) echo 3 > /sys/bus/pci/devices/$VGA/resource2_resize sleep 1 # Force D0 setpci -s "${VGA#0000:}" CAP_PM+4.w=0x0000 2>/dev/null || true sleep 1 # Bind amdgpu BY PCI ADDRESS (modprobe alone does nothing) modprobe amdgpu 2>/dev/null || true echo "$VGA" > /sys/bus/pci/drivers/amdgpu/bind 2>/dev/null || true sleep 3 To find arguments for VGA line (1002:7550). for d in /sys/kernel/iommu_groups/*/devices/*; do n=${d#*/iommu_groups/}; n=${n%%/*} printf 'IOMMU Group %s ' "$n"; lspci -nns "${d##*/}" done | sort -VVM xml has no special configurations (no GPU BIOS specified or anything) just passed through GPU (with multifunction=on) & it's audio part.
-
Exactly the same here.
-
Yep, this results in VM not booting - eventually it will get to windows startup repair and only way to fix it (that i have found) is combination of: and which effectively just undoes the change (as far as I can determine).
-
This was described here: And unfortunately, as mentioned, it resulted in same error: Failed to start the virtual machine 'DockerDesktopVM' because one of the Hyper-V components is not running. (conf attached). ptvm_2.xml
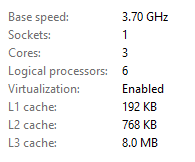
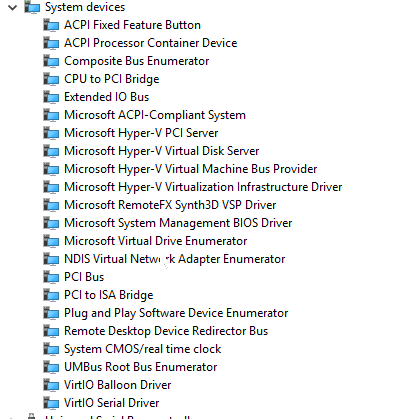
-
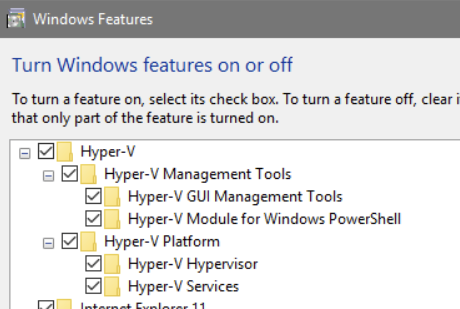
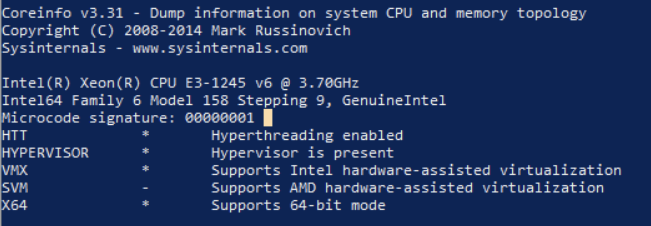
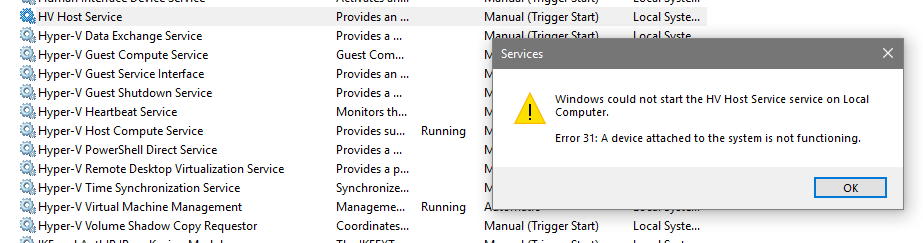
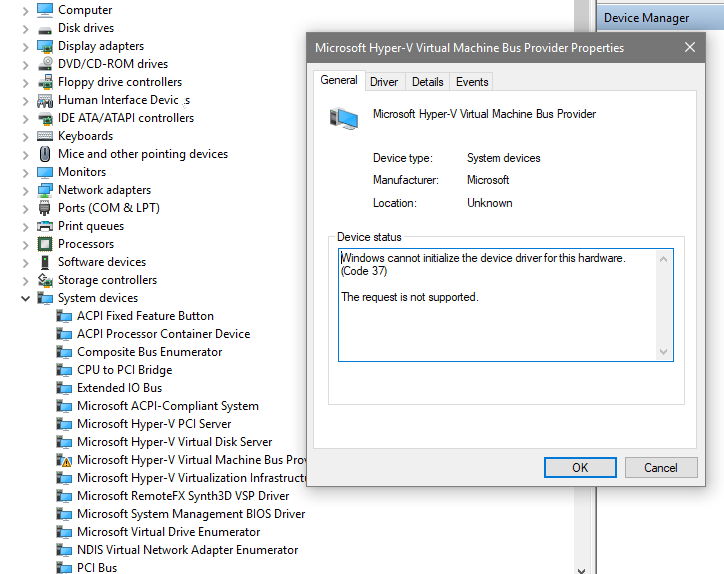
Unraid 6.8.3 TLDR: How to get docker desktop running inside W10 VM (if it is even possible)? (and yes, there is specific reason why I would like to run docker inside the VM and not just connect to unraid's daemon) As far as i can determine, it should be working, but it simply isnt. I have enabled nested-vm in unraid: systool -m kvm_intel -v | grep nested nested = "Y" I could enable hyper-v features in W10 VM and as far as I can determine they should be working: Docker Desktop installs fine, but it won't actually start: Docker.Core.DockerException: Docker.Core.Backend.BackendException: Unable to start Hyper-V VM: 'DockerDesktopVM' failed to start. Failed to start the virtual machine 'DockerDesktopVM' because one of the Hyper-V components is not running. ... I am assuming it is because one of the hyper-v services is not running and won't start (in a physical machine with docker working, it is running) : I also assumed the service issue was caused by this driver problem: I have retried disabling-enabling features and reinstalling docker desktop with same end result. I have also tried: <kvm> <hidden state='on'/> </kvm> Which didn't seem to do anything. Then I tried (separately): <feature policy='disable' name='hypervisor'/> Which resulted in W10 not being aware that it is a VM: "Virtualization: Enabled" seemed lika good thing and it also seemingly fixed the driver issue: But the HV Host Service behaves still in the exact same manner (so maybe this driver thingy is not relevant at all?) And when I try to run Docker Desktop, it fails with a new message: Hardware assisted virtualization and data execution protection must be enabled in the BIOS. See https://docs.docker.com/docker-for-windows/troubleshoot/#virtualization-must-be-enabled I also tried: https://forums.unraid.net/topic/70040-guide-vms-in-vm-intel-nested-virtualization/ but it didn't seem to change behaviour. https://youtu.be/2-saWn6ZbHc?t=663 describes same behaviour 3 years ago and attributes it to a bug that I assume should be fixed by now? At this point I'm out of ideas and my google-fu has let me down. Any help would be appreciated. Base VM conf (without all the fix attempts): <?xml version='1.0' encoding='UTF-8'?> <domain type='kvm' id='53'> <name>ptvm</name> <uuid>ce31c424-4f6a-1f98-4667-de7ffad64628</uuid> <metadata> <vmtemplate xmlns="unraid" name="Windows 10" icon="windows.png" os="windows10"/> </metadata> <memory unit='KiB'>8388608</memory> <currentMemory unit='KiB'>8388608</currentMemory> <memoryBacking> <nosharepages/> </memoryBacking> <vcpu placement='static'>6</vcpu> <cputune> <vcpupin vcpu='0' cpuset='1'/> <vcpupin vcpu='1' cpuset='5'/> <vcpupin vcpu='2' cpuset='2'/> <vcpupin vcpu='3' cpuset='6'/> <vcpupin vcpu='4' cpuset='3'/> <vcpupin vcpu='5' cpuset='7'/> </cputune> <resource> <partition>/machine</partition> </resource> <os> <type arch='x86_64' machine='pc-i440fx-4.2'>hvm</type> <loader readonly='yes' type='pflash'>/usr/share/qemu/ovmf-x64/OVMF_CODE-pure-efi.fd</loader> <nvram>/etc/libvirt/qemu/nvram/ce31c424-4f6a-1f98-4667-de7ffad64628_VARS-pure-efi.fd</nvram> </os> <features> <acpi/> <apic/> <hyperv> <relaxed state='on'/> <vapic state='on'/> <spinlocks state='on' retries='8191'/> <vendor_id state='on' value='none'/> </hyperv> </features> <cpu mode='host-passthrough' check='none'> <topology sockets='1' cores='3' threads='2'/> <cache mode='passthrough'/> </cpu> <clock offset='localtime'> <timer name='hypervclock' present='yes'/> <timer name='hpet' present='no'/> </clock> <on_poweroff>destroy</on_poweroff> <on_reboot>restart</on_reboot> <on_crash>restart</on_crash> <devices> <emulator>/usr/local/sbin/qemu</emulator> <disk type='file' device='disk'> <driver name='qemu' type='raw' cache='writeback'/> <source file='/mnt/user/vm/ptvm/vdisk1.img' index='2'/> <backingStore/> <target dev='hdc' bus='virtio'/> <boot order='1'/> <alias name='virtio-disk2'/> <address type='pci' domain='0x0000' bus='0x00' slot='0x05' function='0x0'/> </disk> <disk type='file' device='cdrom'> <driver name='qemu' type='raw'/> <source file='/mnt/user/isos/virtio-win-0.1.141-1.iso' index='1'/> <backingStore/> <target dev='hdb' bus='ide'/> <readonly/> <alias name='ide0-0-1'/> <address type='drive' controller='0' bus='0' target='0' unit='1'/> </disk> <controller type='usb' index='0' model='ich9-ehci1'> <alias name='usb'/> <address type='pci' domain='0x0000' bus='0x00' slot='0x07' function='0x7'/> </controller> <controller type='usb' index='0' model='ich9-uhci1'> <alias name='usb'/> <master startport='0'/> <address type='pci' domain='0x0000' bus='0x00' slot='0x07' function='0x0' multifunction='on'/> </controller> <controller type='usb' index='0' model='ich9-uhci2'> <alias name='usb'/> <master startport='2'/> <address type='pci' domain='0x0000' bus='0x00' slot='0x07' function='0x1'/> </controller> <controller type='usb' index='0' model='ich9-uhci3'> <alias name='usb'/> <master startport='4'/> <address type='pci' domain='0x0000' bus='0x00' slot='0x07' function='0x2'/> </controller> <controller type='pci' index='0' model='pci-root'> <alias name='pci.0'/> </controller> <controller type='ide' index='0'> <alias name='ide'/> <address type='pci' domain='0x0000' bus='0x00' slot='0x01' function='0x1'/> </controller> <controller type='virtio-serial' index='0'> <alias name='virtio-serial0'/> <address type='pci' domain='0x0000' bus='0x00' slot='0x04' function='0x0'/> </controller> <interface type='bridge'> <mac address='52:54:00:6f:03:42'/> <source bridge='br0'/> <target dev='vnet2'/> <model type='virtio'/> <alias name='net0'/> <address type='pci' domain='0x0000' bus='0x00' slot='0x03' function='0x0'/> </interface> <serial type='pty'> <source path='/dev/pts/2'/> <target type='isa-serial' port='0'> <model name='isa-serial'/> </target> <alias name='serial0'/> </serial> <console type='pty' tty='/dev/pts/2'> <source path='/dev/pts/2'/> <target type='serial' port='0'/> <alias name='serial0'/> </console> <channel type='unix'> <source mode='bind' path='/var/lib/libvirt/qemu/channel/target/domain-53-ptvm/org.qemu.guest_agent.0'/> <target type='virtio' name='org.qemu.guest_agent.0' state='connected'/> <alias name='channel0'/> <address type='virtio-serial' controller='0' bus='0' port='1'/> </channel> <input type='tablet' bus='usb'> <alias name='input0'/> <address type='usb' bus='0' port='1'/> </input> <input type='mouse' bus='ps2'> <alias name='input1'/> </input> <input type='keyboard' bus='ps2'> <alias name='input2'/> </input> <graphics type='vnc' port='5901' autoport='yes' websocket='5701' listen='0.0.0.0' keymap='en-us'> <listen type='address' address='0.0.0.0'/> </graphics> <video> <model type='qxl' ram='65536' vram='65536' vgamem='16384' heads='1' primary='yes'/> <alias name='video0'/> <address type='pci' domain='0x0000' bus='0x00' slot='0x02' function='0x0'/> </video> <memballoon model='virtio'> <alias name='balloon0'/> <address type='pci' domain='0x0000' bus='0x00' slot='0x06' function='0x0'/> </memballoon> </devices> <seclabel type='dynamic' model='dac' relabel='yes'> <label>+0:+100</label> <imagelabel>+0:+100</imagelabel> </seclabel> </domain>