KINO
Members
-
Joined
-
Last visited
-
I found out that there was a Python script I wrote that was inadvertently eating up all of my resources, rendering the OS unusable when it was running. Thank you for the help, Jorge!
-
I am not seeing any inconsistencies with uptimes that could help determine which container is constantly restarting. Would you be able to show which lines in the syslog or diagnostics is showing that? I appreciate your help!
-
It has happened since the syslog was enabled, and is actively still happening. Stays on for about 2 hours and then I have to do an unclean shutdown to restart it as it hangs. The only idea I have is that there is some sort of memory leak that makes the OS unstable after some time, but I can't pinpoint why this is happening all of sudden, if that's even the case.
-
Thank you for the response, Jorge. I've attached the syslog as well. This is just since I setup the syslog server a few days ago, but the issue was happening before that too. syslog
-
Hi all, happy holidays. I've noticed in the past week that my server has been more and more unreliable in terms of staying online. I've had this server running for close to 5 years and I've had sporadic issues in the past, but this one is really odd to me. I will start my server, it'll start all its docker containers, and after that's done, it'll run smoothly. Then all of a sudden, it's unreachable, and so are all the containers. Things I've tried so far: - switching from macvlan to ipvlan - removing unused docker containers - removing non-essential User Scripts - waiting ~10 minutes after boot before manually starting the array and then manually starting the docker containers another 10 minutes later (to see if this would have any effect, it did not, still crashed) - setting up a syslog server on another computer to track any errors or warnings: noticed that after some time a bunch of "pool www child exited on signal 9 started appearing over and over", but unsure if related I have attached the last 2 diagnostics I was able to grab, from two separate times the server crashed today. Thank you in advance for the guidance! kino-diagnostics-20241225-2330.zip kino-diagnostics-20241225-1825.zip
-
I have not - but that seems to require me to connect a display, as I'm running in headless mode - is that correct? The only thing I can think of is that the cache drive is failing, but I'm unsure if corruption always = dying drive
-
Thank you for looking into the diagnostics, @trurl - is there any specific way I should go about fixing that? I'm unsure how this just corrupted all of a sudden when it seemed to be working flawlessly for a while. Nonetheless, when I go into the cache drive itself, I see this option, will this do me any good?
-
Hi there, I've been using unRAID for many years and this is the first time I've had this consistent of an issue spanning multiple days. For some reason, the server will load up fine, and so will docker, but after about 30 minutes, I see this and my containers are no longer working: I have tried deleting the docker image and reinstalling all my docker containers to no avail. I have attached my diagnostics file, in the hopes that someone on the forum will possibly understand what's going on here. Please let me know if there is anything I should try. Thank you so much in advance! kino-diagnostics-20230821-1741.zip
-
Seems to be fixed on my end now!
-
@ironpfist - Thank you, I'm glad it was useful for you! Good idea! I haven't tested, but does clearing the inbox also clear the monthly usage? I think it still keeps count of how many emails have come in over the course of that month. Correct me if I am wrong, though and I will add that to the guide as a final step if it works differently than I imagined.
-
Yeah, I got it setup and really like the Watching role that it assigns to users currently watching shows. The quiet hours idea sounds like it would work, if you ever add that, I'll definitely use it to it's full potential a lot more. Great job on this!
-
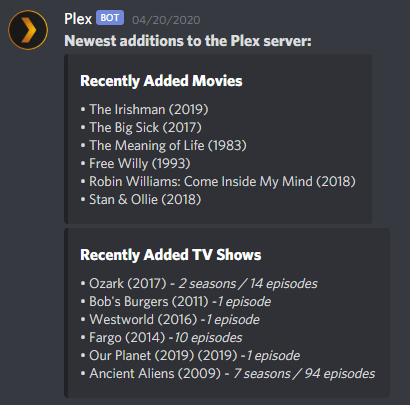
If you are like me and don't like the idea of pushing Recently Added notifications to your Discord server for each new addition to your Plex server, I may have the solution for you. By the end of this tutorial, we will have a functioning notification that lists Recently Added shows and movies in 1 message, and fires off once per day - more on why I picked 1 time per day will come later in this post. It will look something like this: It does require multiple steps, but I will try and explain them as best as possible - if you have any questions about the process, let me know and I will help as much as I can! To start, we will need a few things (apart from obviously, a Plex server): - Tautulli (fully setup, apart from this notification) - A free mailparser.io account - A Discord server for the Webhook to send this information to - My customized newsletter template - Optional: A code editor, if you want to edit my template (I use Brackets myself) Essentially, what we will be doing is setting up a custom newsletter in Tautulli, routing this newsletter to the email generated on MailParser.io and then using the Parsed Data we grab on MailParser to send a Webhook to Discord with the info. This is meant to be automated and will require little to no changes once set up the first time (unless something were to change on Tautulli's end in the future). Step 1: Assuming you have already created your account on MailParser, you will want to make sure you Create A New Inbox. You can name it whatever you like, mine is just named Discord. This email will be where we will be sending the Tautulli newsletter to. You don't have to copy this just yet, but you will need to later on. Note: MailParser.io's free plan offers you to receive 30 emails to your account per month - this is why I picked to have the notification send once a day, but if you have their paid plan, you are able to go ahead and trigger this more often. Step 2: I have created a customized version of the default Tautulli Newsletter, which strips it of the show/movie description, rating, genre, language. All this has is the poster art (which I left in, but you can take out if you like), the show/movie title, the year of the release and how many seasons, episodes were added. - Download my template here - Once you do, add it to the following directory (on the system where Tautulli is installed): /tautulli/data/interfaces/custom-newsletters - this directory may not exist, just create the folders and put the recently_added.html in the custom-newsletters folder. - Optionally, edit this template to your liking. Step 3: Once you've done that, you will need to open the Tautulli web interface. Once there, click the cog wheel in the top right corner, go to Notifications & Newsletters and then Show Advanced settings for this page. In the advanced settings, you will see a setting called Custom Newsletter Templates Folder, it should be empty, let's change that. - You will want to put /config/data/interfaces/custom-newsletters in this box. - Save this page. Step 4: While still in the Tautulli Settings, you will want to go to Newsletter Agents in the left sidebar. You will want to Add a new newsletter agent, pick Recently Added and configure each tab like so: Configuration Tab: - Make sure to check the box to Enable the newsletter - Schedule: I have this set to Simple, Every day at 16:00, with the Time Frame set to Last 1 days - but this is personal preference, so tinker around with it all you like. - Included Libraries: I have this set to all of my libraries, but you can pick just specific ones if you like. Saving & Sending: - Enable the option to Send Newsletter as an HTML Formatted Email, if it isn't already enabled. - From name: Whatever you like, doesn't matter - From: Your personal email - To: The email that you generated on MailParser in the 1st step. - SMTP Server: smtp.gmail.com if your personal email is a Gmail email - SMTP Port: 587 - again if you're using a Gmail email. - SMTP User: Your Gmail username (everything before @gmail.com) - SMTP Password: Generate a Gmail App Password for Tautulli and input it here - Enable the TLS checkbox option. All other settings should be set to their default selection. Step 5: You can now send a test email of your newsletter to the MailParser email by going to the Test Newsletter tab of the Newsletter settings and clicking Test Recently Added Newsletter. Your email should show up in MailParser within a few minutes. It's pretty quick. Once you see that email come in, we can move on to the configuration of MailParser: - Within the MailParser Web Interface, we will want to open up the Parsing Rules option on the left hand sidebar. - Now, you will want to Add A New Parsing Rule - The website should automatically pull in the Tautulli Newsletter we just sent to it as the sample email to build our configuration - but if it doesn't, hit Change Sample Email on the top right of your page and select the email you just sent to it. - In the Select Data Source section, make sure to choose Body and HTML in their respective sections. - Now we will move on to the Crop, Modify & Find Patterns With Filters section to make the actual parsing rule. - We will be making a few parsing rules, and we will configure them like so: - Movies: - Add text filter -> Replace and Remove -> Remove Lines and Entities -> Remove Link URLS - Add text filter -> Set Start & End Position -> Find Start Position -> Text match: after -> Recently Added Movies - Add text filter -> Set Start & End Position -> Define End Position -> Text match: before -> Recently Added TV Shows - Add text filter -> Replace and Remove -> Remove Lines and Entities -> Remove Empty Lines - Add text filter -> Set Start & End Position -> Find Start Position -> After [x] lines -> 1 - Add text filter -> Set Start & End Position -> Define End Position -> Crop last [x] lines -> 1 - Make sure the output shows the movies as a list and then save this parsing rule by clicking the button that says OK, looks good! - Name this field Movies, and click Validate & Save - Shows: - Add text filter -> Replace and Remove -> Remove Lines and Entities -> Remove Link URLS - Add text filter -> Set Start & End Position -> Find Start Position -> Text match: after -> Recently Added TV Shows - Add text filter -> Set Start & End Position -> Define End Position -> Crop last [x] lines -> 1 - Add text filter -> Replace and Remove -> Remove Lines and Entities -> Remove Empty Lines - Add text filter -> Set Start & End Position -> Find Start Position -> After [x] lines -> 1 - Make sure the output shows the shows as a list and then save this parsing rule by clicking the button that says OK, looks good! - Name this field Shows, and click Validate & Save - Movies Title: - Add text filter -> Set Start & End Position -> Define End Position -> Text match: before -> Recently Added Movies - Add text filter -> Set Start & End Position -> Define End Position -> Text match: after -> Recently Added Movies - Add text filter -> Replace & Remove -> Search & Replace Text -> Text replace -> Search for: Recently Added Movies -> Replace with **Recently Added Movies** (This will make the title bolded in our Discord Embed, I just personally think it looks better) - Add text filter -> Refine Parsed Results -> Set Default Value -> **No Recently Added Movies** (if no movies are found in the Tautulli Newsletter for the period of time specified, it will spit out that no movies were recently added) - Click OK, looks good, then name this field Movies Title, and click Validate & Save - Shows Title: - Add text filter -> Set Start & End Position -> Define End Position -> Text match: before -> Recently Added TV Shows - Add text filter -> Set Start & End Position -> Define End Position -> Text match: after -> Recently Added TV Shows - Add text filter -> Replace & Remove -> Search & Replace Text -> Text replace -> Search for: Recently Added TV Shows -> Replace with **Recently Added TV Shows** - Add text filter -> Refine Parsed Results -> Set Default Value -> **No Recently Added TV Shows** - Click OK, looks good, then name this field Shows Title, and click Validate & Save Step 6: After creating our Parsing Rules, we will need to configure the connecting between MailParser and Discord - to do this, click Webhook Integrations on the left-hand sidebar of MailParser. - Click Add New Integration - Select a Generic Webhook - Basic Options: - Name: Discord - Payload Format: JSON - Target URL: Your Discord Webhook URL (created by going to your Discord Server, Server Settings & then Webhooks) - Advanced Options: - HTTP Verb: POST - Repeating Data Behaviour: One request per row - Data Structure: Custom - provide your own template - Structure Template: { "content": "**Newest additions to the Plex server:**", "embeds": [ { "title": "{{movies_title}}", "description": "{{movies}}" }, { "title": "{{shows_title}}", "description": "{{shows}}" } ] } - Next, you will want to click Save & Test, and you should quickly see your parsed data sent as a message in your Discord channel! That should be all, if you have any questions or if you're stuck anywhere, please do let me know, I'd love to help as much as I can!
-
KINO changed their profile photo
-
Hey there! Thank you for the wonderful work on this - I did have a question, though. I currently have customized Tautulli to send Recently Added notifications like so (it took me sending a newsletter to an email and then setting it up to be parsed into a Discord Webhook). I do this on purpose, I don't like spamming my discord with a bunch of notifications, and would rather have this fire-off into the server once per day. Is there a way for me to setup your bot to detect which shows are in this list and, in turn, tag that role? Thank you so much in advance!