de-sascha
Members
-
Joined
-
Last visited
Everything posted by de-sascha
-
aspm compare ubuntu unraid.txt
-
I enables this BIOS settings, as my best knowledge I learned here in this Thread. Is this enough? Or did I missed something? Also set the values in /boot/config/go like: root@Tower:~# cat /boot/config/go #!/bin/bash # Start the Management Utility /usr/local/sbin/emhttp & # ------------------------------------------------- # Set power-efficient CPU governor # ------------------------------------------------- /etc/rc.d/rc.cpufreq powersave # ------------------------------------------------- # Disable CPU Turbo # ------------------------------------------------- [[ -f /sys/devices/system/cpu/intel_pstate/no_turbo ]] && echo "1" > /sys/devices/system/cpu/intel_pstate/no_turbo [[ -f /sys/devices/system/cpu/cpufreq/boost ]] && echo "0" > /sys/devices/system/cpu/cpufreq/boost # ------------------------------------------------- # Enable power-efficient ethernet # ------------------------------------------------- # enable IEEE 802.3az (Energy Efficient Ethernet): Could be incompatible to LACP bonds! for i in /sys/class/net/eth?; do dev=$(basename $i); [[ $(echo $(ethtool --show-eee $dev 2> /dev/null) | grep -c "Supported EEE link modes: 1") -eq 1 ]] && ethtool --set-eee $dev eee on; done # Disable wake on lan for i in /sys/class/net/eth?; do ethtool -s $(basename $i) wol d; done # ------------------------------------------------- # powertop tweaks # ------------------------------------------------- # VM writeback timeout for i in /proc/sys/vm/dirty_writeback_centisecs; do echo '1500' > $i done # Enable SATA link power management echo med_power_with_dipm | tee /sys/class/scsi_host/host*/link_power_management_policy # Runtime PM for I2C Adapter (i915 gmbus dpb) echo auto | tee /sys/bus/i2c/devices/i2c-*/device/power/control # Autosuspend for USB device echo auto | tee /sys/bus/usb/devices/*/power/control # Runtime PM for disk echo auto | tee /sys/block/sd*/device/power/control # Runtime PM for PCI devices echo auto | tee /sys/bus/pci/devices/????:??:??.?/power/control # Runtime PM for ATA devices echo auto | tee /sys/bus/pci/devices/????:??:??.?/ata*/power/control Thanks Sascha
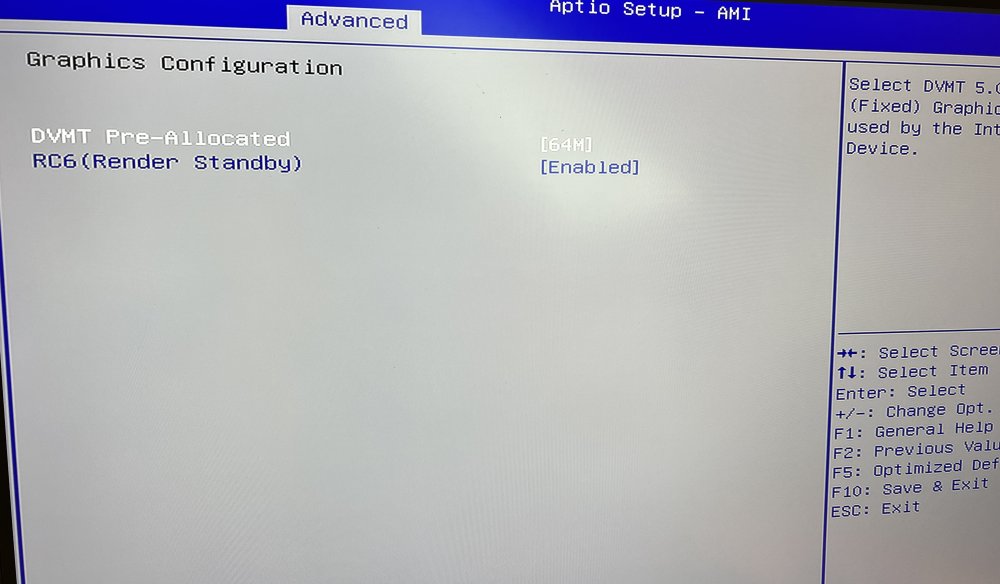
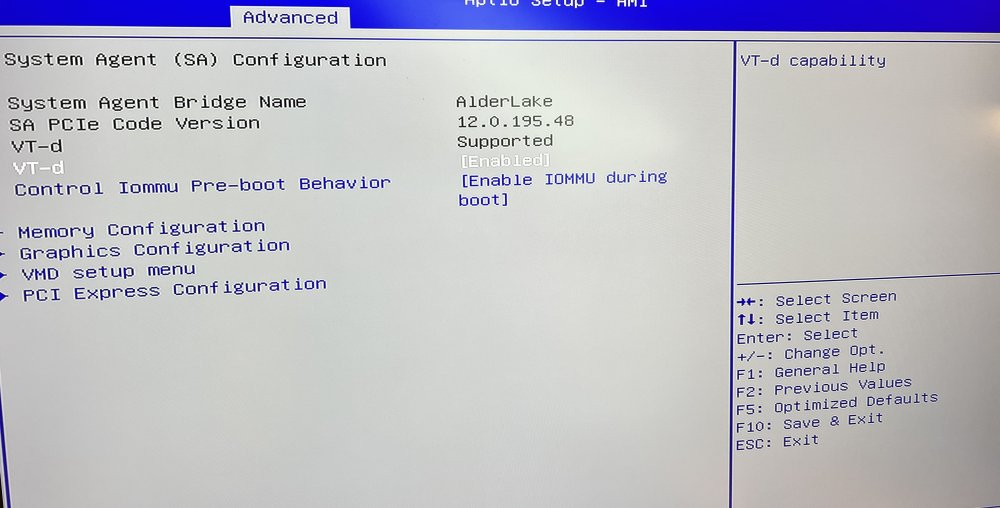
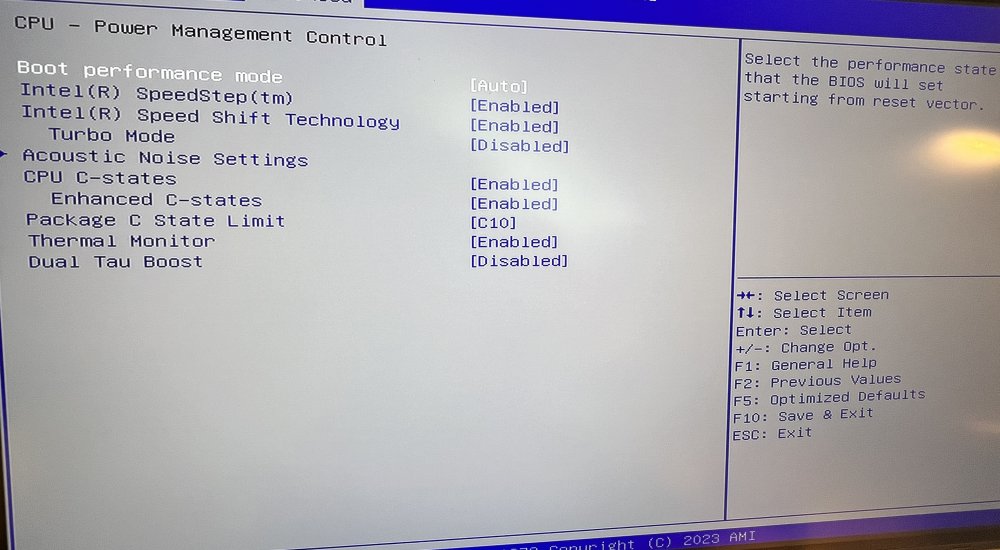
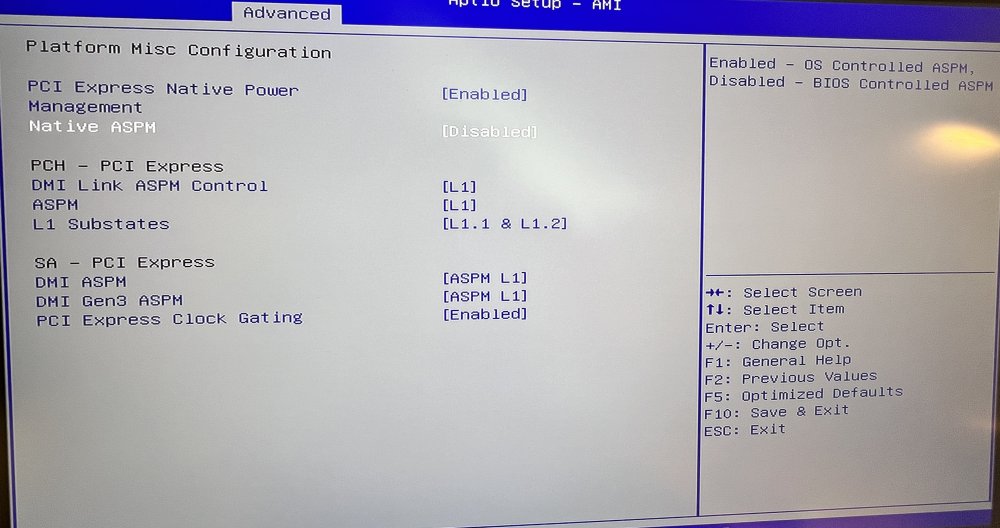
-
Is the only thin I need to change in the script and run it? This is what I understood from the documentation. Do I need a reboot to see results? What I also not understand, why do we need to run this script if lspci -vvPPDq shows ASPM enabled? # You just need to modify these three values: #ROOT_COMPLEX="00:1c.1" ROOT_COMPLEX="00:1c.0" ---- (Intel Corporation Alder Lake-S PCH PCI Express Root Port) ROOT_COMPLEX="00:1c.2" ---- ( Intel Corporation Device 7aba) #ENDPOINT="03:00.0" #ENDPOINT="05:00.0" ENDPOINT="02:00.0" ---- (Ethernet controller: Realtek Semiconductor) root@Tower:~# lspci -vvPPDq | awk '/ASPM/{print $0}' RS= | grep --color -P '(^[a-z0-9:./]+|:\sASPM (\w+)? ?((En|Dis)abled)?)'; 0000:00:1c.0 PCI bridge: Intel Corporation Alder Lake-S PCH PCI Express Root Port #1 (rev 11) (prog-if 00 [Normal decode]) LnkCtl: ASPM L0s L1 Enabled; RCB 64 bytes, Disabled- CommClk- 0000:00:1c.2 PCI bridge: Intel Corporation Device 7aba (rev 11) (prog-if 00 [Normal decode]) LnkCtl: ASPM L1 Enabled; RCB 64 bytes, Disabled- CommClk+ 0000:00:1c.2/02:00.0 Ethernet controller: Realtek Semiconductor Co., Ltd. RTL8111/8168/8411 PCI Express Gigabit Ethernet Controller (rev 15) LnkCtl: ASPM L1 Enabled; RCB 64 bytes, Disabled- CommClk+
-
Based on my lspci output, Root_Complex and Endpoint is than like this? root@Tower:~# lspci -t -[0000:00]-+-00.0 +-02.0 +-0a.0 +-0e.0 +-14.0 +-14.2 +-15.0 +-16.0 +-17.0 +-1c.0-[01]-- +-1c.2-[02]----00.0 +-1f.0 +-1f.4 \-1f.5 ROOT_COMPLEX=00:1c.2 ENDPOINT=02:00.0
-
I enabled all related setting in the BIOS related to C Stated and ASPM from Page 1. But I'm not sure is in the unraid OS beside powertop --auto-tune needs to be done. Here I'm really new with this unraid OS. The only diff I can see ist the Kernel Versions from the Ubuntu and Unraid. Hence my idea was this may come from the kernel. Did some check if ASPM Enabled: root@Tower:~# lspci -vv | awk '/ASPM/{print $0}' RS= | grep --color -P '(^[a-z0-9:.]+|ASPM )' 00:1c.0 PCI bridge: Intel Corporation Alder Lake-S PCH PCI Express Root Port #1 (rev 11) (prog-if 00 [Normal decode]) LnkCap: Port #1, Speed 8GT/s, Width x1, ASPM L0s L1, Exit Latency L0s <1us, L1 <4us LnkCtl: ASPM L0s L1 Enabled; RCB 64 bytes, Disabled- CommClk- 00:1c.2 PCI bridge: Intel Corporation Device 7aba (rev 11) (prog-if 00 [Normal decode]) LnkCap: Port #3, Speed 8GT/s, Width x1, ASPM L1, Exit Latency L1 <64us LnkCtl: ASPM L1 Enabled; RCB 64 bytes, Disabled- CommClk+ 02:00.0 Ethernet controller: Realtek Semiconductor Co., Ltd. RTL8111/8168/8411 PCI Express Gigabit Ethernet Controller (rev 15) LnkCap: Port #0, Speed 2.5GT/s, Width x1, ASPM L0s L1, Exit Latency L0s unlimited, L1 <64us LnkCtl: ASPM L1 Enabled; RCB 64 bytes, Disabled- CommClk+ Thanks @bagican i need to look on and come back. Thanks guys for the support. Really very helpful.
-
Hello all. Im try to find the reason why I don´t come over C3. In the current Ubuntu Live USB (ubuntu-22.04.3-desktop-amd64 ) my system goes to C8 and once HDMI plugged out C10. Can you help me ? My System is: ASUS MB PRO H610T -CSM Intel i3 12100 Crucial RAM CT32G4SFD832A 32GB DDR4 3200MHz LEICKE ULL 19V 6,32A/6,3A 120W Transcend 32GB JetFlash 780 TS32GJF780 (Bootstick) No HDD at the moment Unraid 6.12.6 Thanks Sascha