





Milvus
Members
-
Joined
-
Last visited
-
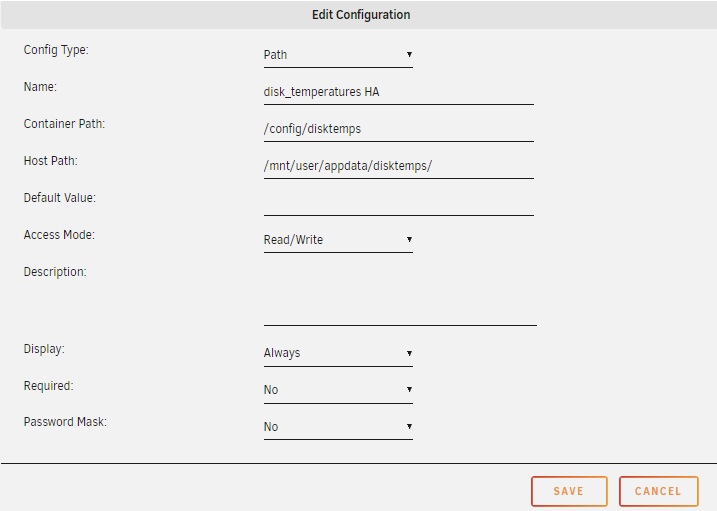
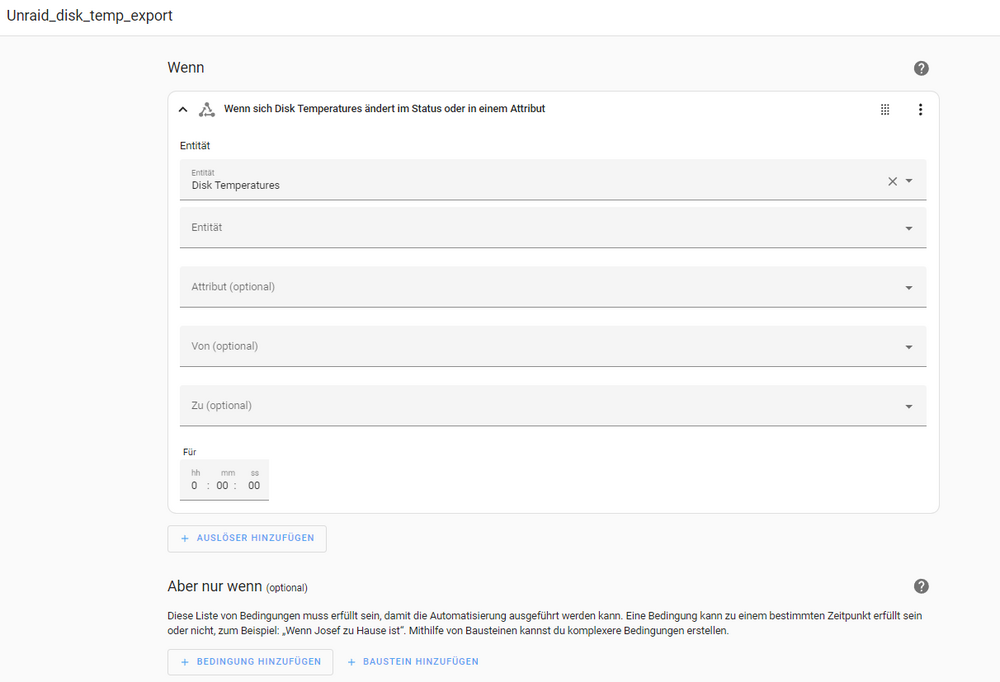
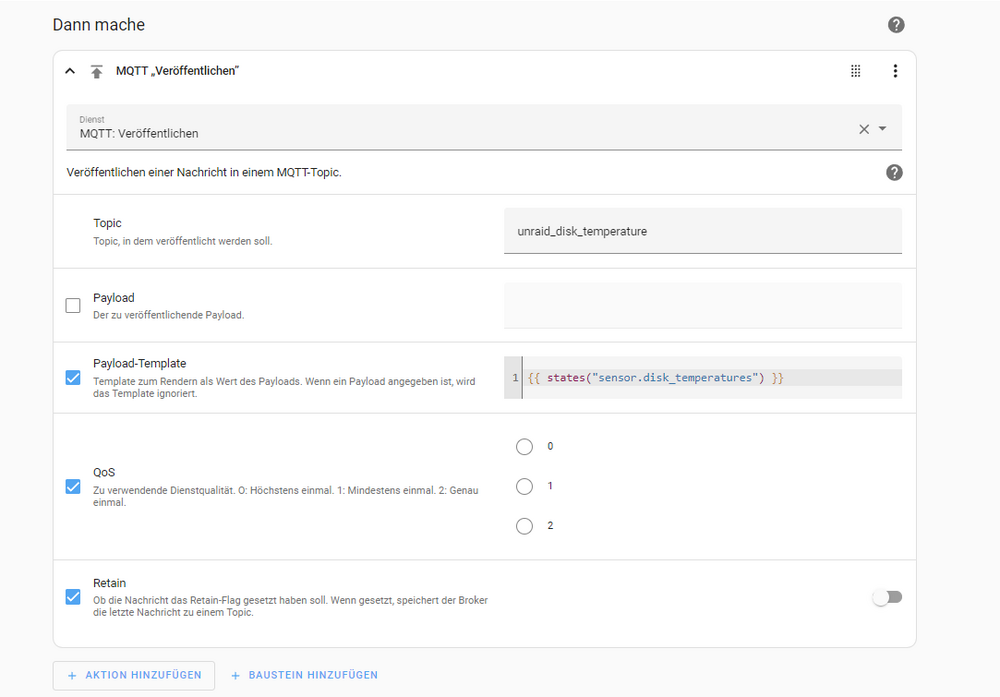
Edit 06/15/2024: editet the user-script cronjob: the original made the disks spin up. Now the "hdparm" checks, if the disks are alive. If not, the temperature will not be taken, so the disks stay asleep. Alright, I got it, with the help of ChatGPT: What I did in brief words: Unraid System collects the disc-temperatures and writes them into a .txt file. Home Assistant Docker has access to the .txt file Mosquitto Docker installed Setup HomeAssistant MQTT Created an automatism in HA, which takes the Info from the file and sends it via MQTT to my SmartHome Smart Home evaluates, if Discs get too hot, and turns on a Fan, if temp of one disc is too high For anyone who faces the same issue, here a small manual until sending the data via MQTT. The processing to turn on a Fan is very individual I assume, that is why I leave it out here create a folder "disktemps" (or any other name you like) in folder /mnt/user/appdata/ Install the app "User Scripts" Configure a CronJob in User scripts, with the following script: #!/bin/bash output_file="/mnt/user/appdata/disktemps/disk_temps.txt" mkdir -p $(dirname "$output_file") > "$output_file" # Datei leeren # Liste der existierenden Geräte filtern for dev in /dev/sd?; do if [ -b "$dev" ]; then # Prüfe, ob die Festplatte im Standby-Zustand ist status=$(hdparm -C "$dev" | grep -i 'standby') if [ -z "$status" ]; then temp=$(smartctl -a "$dev" | grep -i 'Temperature_Celsius' | awk '{print $10}') if [ -n "$temp" ]; then echo "$dev: ${temp}°C" >> "$output_file" fi fi fi done This creates a .txt file with the disk-temps in it Install HomeAssistant Docker Add an additional Path "Add another Path, Port, Variable, Lable or Device" The host path from the Unraid system, which we have created and in which the temperatures are written by the “User Scripts” app, is therefore routed to the container path. In other words, the files in the disktemps folder become available in the container (normally containers do not have access to data outside the container). Set Up HomeAssistant Now we have to edit the “configuration.yaml” of the HomeAssistant Docker. Here we have to tell HA that we want to have a new data point in Home-Assistant in which we want to have the temperature data. Important: We do this via the Unraid console, not from the Docker! The Docker does not support Sudo or Nano. Open the console in Unraid Navigate to the installation folder of the HA container: cd /mnt/user/appdata/Home-Assistant-Container Open the configuration.yaml nano configuration.yaml Copy the following command one line below the existing content: command_line: - sensor: name: Disk Temperatures command: "cat /config/disktemps/disk_temps.txt" scan_interval: 120 The scan_interval: 120 means that a new temperature is checked every 2 minutes. Set it according to your wishes restart Home Assistant in WebUI via “Settings->System->Restart” (top right corner) In HA WebUI, go to Developer tools and then States. The entity “sensor.disk_temperature” should now be found here. Install mosquitto Docker. I used the following manual for that: https://unraid-guides.com/2021/02/25/how-to-install-an-mqtt-broker-mosquitto-on-unraid/ install MQTT in HomeAssistant Settings -> Devices and services -> Add integration -> MQTT Now enter the IP and credentials of the external system (like IoBroker or else) in the settings! So name and password. set up new automation in HomeAssistant Settings -> Automations & scenes -> Create automation -> Create new automation Enter the following (sorry for being in German, you surely can translate easily via a translator ) : Safe, close, try. Now, the data should be send to the other system via MQTT. Thanks for your replies earlier, they set me on the correct path!
-
Thank you for sharing the code. The problem I face is, that the temperature of the disks are not stored in a file, but need to be taken via the smartctl. But maybe I am able to create a file and use that one then. Something to try in the next week. Thank you so far!
-
Alright, sorry for the delay, I tried glances now, but it unfortunately does not tell the temperatures of the Disks. So I went to the Home Assistant idea: Installed a Docker, did a bunch to get it to work, but it refuses to show me anything in HA. Here is what I've done: 1. setup a sh file which would get me the temperatures. File is in the docker container. Content: #!/bin/bash devices=(/dev/sda /dev/sdb /dev/sdc /dev/sdd /dev/sde) for dev in "${devices[@]}"; do temp="" # Try different device types for type in sat usbsunplus scsi; do smartctl_output=$(smartctl -a -d $type "$dev" 2>/dev/null) if echo "$smartctl_output" | grep -qi 'Temperature_Celsius'; then temp=$(echo "$smartctl_output" | grep -i 'Temperature_Celsius' | awk '{print $10}') if [ -n "$temp" ]; then break fi fi done if [ -z "$temp" ]; then echo "$dev: N/A" else echo "$dev: ${temp}°C" fi done 2. edited the configuration.yaml with following: sensor: - platform: command_line name: Disk sda Temperature command: "/config/disk_temps.sh | grep '/dev/sda' | awk -F: '{print $2}' | xargs" unit_of_measurement: "°C" scan_interval: 300 value_template: "{{ 'unavailable' if value == 'N/A' else value }}" - platform: command_line name: Disk sdb Temperature command: "/config/disk_temps.sh | grep '/dev/sdb' | awk -F: '{print $2}' | xargs" unit_of_measurement: "°C" scan_interval: 300 - platform: command_line name: Disk sdc Temperature command: "/config/disk_temps.sh | grep '/dev/sdc' | awk -F: '{print $2}' | xargs" unit_of_measurement: "°C" scan_interval: 300 - platform: command_line name: Disk sdd Temperature command: "/config/disk_temps.sh | grep '/dev/sdd' | awk -F: '{print $2}' | xargs" unit_of_measurement: "°C" scan_interval: 300 - platform: command_line name: Disk sde Temperature command: "/config/disk_temps.sh | grep '/dev/sde' | awk -F: '{print $2}' | xargs" unit_of_measurement: "°C" scan_interval: 300 3. restarted HomeAssistant, hoping to see the datapoints. Nothing happened. Took me also a while to make the Docker able to use smartctl. @Vr2Io, how did you manage to get the data in? Could you give a more detailed input? Would be thankful for any help!
-
Thank you both very much! Very cool ideas! Haven't noticed this glances yet, as I am using Dynamix tools for internal surveillance. Home-Assistant as a local solution on the unraid-system to send it then via a mqtt to the other hardware might also lead to a point. I will definitely check that out and report in the next one and a half weeks! Thank you two!
-
I understand now, that it is too elaborate, to do it, so even though I don't like it, I let it rest. Thank you for your support.
-
Hey, I realized that my disks are getting quite hot sometimes, so I want to cool them down with an external Fan, by automatically turning it on via my Smarthome (iobroker on another hardware than the UNRAID system). To do so, I need the disk temperatures exported somehow to my iobroker. What I found out so far is, that the temperatures are nowhere to be found in a file, but can only be read via a smartctl command: #!/bin/bash for dev in /dev/sd?; do temp=$(smartctl -a "$dev" | grep -i 'Temperature_Celsius' | awk '{print $10}') if [ -n "$temp" ]; then echo "$dev: ${temp}°C" fi done I also found out, that dockers generally don't have access to the smartctl commands, which makes sense. I already set up a script via User Scripts App, but I have no clue, how now to send it somehow? Can anybody help? Please explain your answer a bit, as I am really a newbie. Thanks in advance!
-
yes, that is true, but assuming I would set up the FTP inside my home, directly on the router, it should work. If the plates get robbed, I could still stop the FTP running.
-
Thanks for your reply! That was exactly the thought: someone grabs the disks and takes them with him. So leaving the key on the USB would really make no sense. That is why I was interested in the way of saving it on a FTP Server and get it at boot. But I didn't find a description, which is up to date to the recent Unraid version.
-
Ah, thank you very much for clarifying. Actually, the Unraid shall serve as a NAS and SmartHome-Center, so the data on it would already be the backup, anyway I want to store data also somewhere else additionally. So in that case, from a professional point of view, would you not even advise to use encryption? For that, the question then still remains, how to get along with a passkey on a ftp server. Sorry again for maybe easy questions, but am a noob, trying to achieve some good outcome. Thank you all in advance!
-
thank you for your reply! but what exactly does it mean? Also read that in the manual, but don't really get it. Is there a further / deeper explanation possible or a source where to learn more about it? So it is not adviced to do that extra level of security? Sorry for all these questions, but I would really like to set the Unraid up and also migrate the whole ioBroker onto it. Thank you in advance!
-
Hey people, I am a newbie, setting up the UNRAID from scratch. I wanted to encrypt the Arrays for an extra level of security. Now I saw some video for an older version of Unraid to use a FTP Server to get the keyfile and automatically start the array. I am referring to this one: I tried that, found out it didn't work, did some research and seems that with the latest version of UNRAID this way does not work anymore, due to some changes. I saw several posts with people wondering what to do. Now my question is, if someone has a manual how to do it? FTP Server is running. In the manual to UNRAID I saw that it is not necessarily recommended to use an encryption. Why ist that? I would appreciate any help, thanks in advance!

