peteopp
Members
-
Joined
-
Last visited
-
That should be fine. I resolved emulated disk5 and all appears well.
-
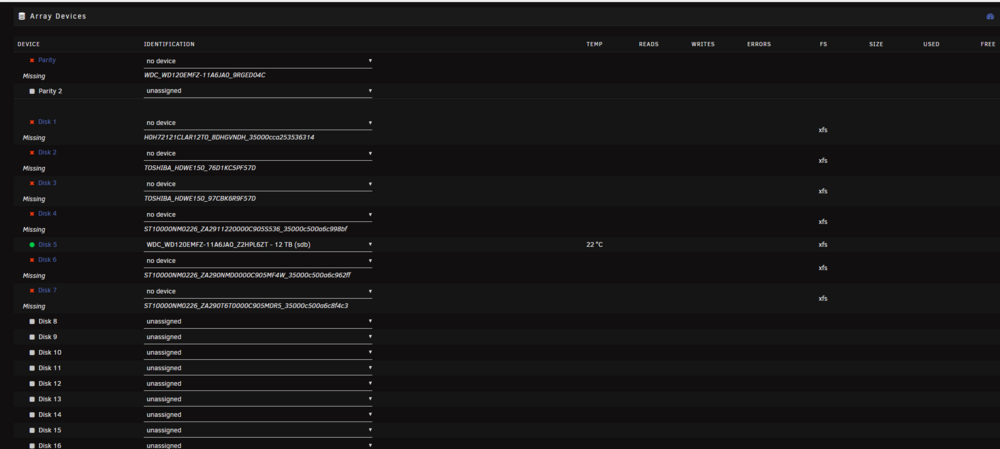
I’m arguing with AI on this and could use an Unraid lesson. My current array . All smart passes Parity - 12tb. Old -data1 - 10tb - good -data2 - 10tb - good -data3 - 10tb - good -data4 - 10tb - good -data5 - 12tb - MISSING -data6 - 5tb - very old -data7 - 5tb - very old I bought two 18tb drives. I’m trying to upgrade the parity and data5 disk without putting stress on the system given the age of a couple of the drives. Can I just follow parity swap section or does that not apply here ? 1 . Move 18tb into parity Move 12tb parity into data 5. Hit button to copy parity to new parity. Then start array and allow new parity and data disks to rebuild onto data5 (which is the old parity disk)
-
Disk5 smart attached. disk5_smart.txt
-
Correct, perfect 1st pass with 0 read and no other errors.
-
With disk5 emulated, I did a filesystem check and repair. Output for both attached. disk5_xfs_fix.txt Looks like a clean repair. I don't see a Lost+found folder in disk5 and currently have the array started in normal mode emulating disk5. Path forward.... I unfortunately have 4 10TB drives that I could put into the system, but disk5 is 12TB. If it's the best path, i can purchase a new drive. I also purchased a 18TB that I was planning to replace my 12TB parity with. Given I've successfully did a ddrescue image of disk5, is there any real danger/risk to just reusing disk5 and let parity rebuild on-top of it? Given - i have a ddrescue .img of disk5 preserved. 1. Buy a new 12TB drive and rebuild disk5 off parity. This allows me to reserve disk5 in-case i need to walk backwards. 2. Format/clean disk5 and let unraid treat it as a new drive and have parity rebuild onto original harddrive. 3. Rebuild physical disk5 using xfs repair, add back into the array and rebuild parity. Not sure why i would like this option? Really appreciate the help JorgeB and trurl! Almost done.
-
I have the parity plus all disks (minus disk5) working in the array. Disk5 is successfully emulated. I already pulled all my essential data to a backup drive (YAY!). Attaching diagnostics which should have recent SMART runs. I believe everything is passed. given the xfs report i reported for disk5 up above, would you recommend just putting a new disk in and rebuilding disk5 off the emulation? Or is it easier and faster just to repair disk5, as you said it most likely reflects parity anyways.fridge-diagnostics-20260118-2127.zip
-
I’m currently using ddrescue and doing 4. I don’t quite follow the comment on 1. Though. Disk 5 “wrong” disk got kicked out of the array , that was the original problem that started this spiral of crap. Wouldn’t the parity be able to rebuild a new disk correctly if I just removed disk 5 from the system and booted up the array? Do this vs repairing xfs repair disk 5 and accepting data loss.
-
Do i have any other better options? What would you recommend? Disconnect the wrong disk w/ a new disk and see if i can boot the rest of the drives (including parity) and then rebuild the wrong disk. If I went this route, could I check the health of the parity drive first to determine if it's still in a good state? run xfs repair and accept the data loss. I believe this would invalidate my parity drive? boot up all drives, start array in maintenance mode if possible, and try and run xfs repair on the wrong disk drive, which would maintain parity.
-
I first went down the road of mounting my 'wrong disk' drive into a linux environment and tried to inspect the drive. This is the output i got (Sorry looks like formatting is bad): xfs_repair_wrong_disk.txt
-
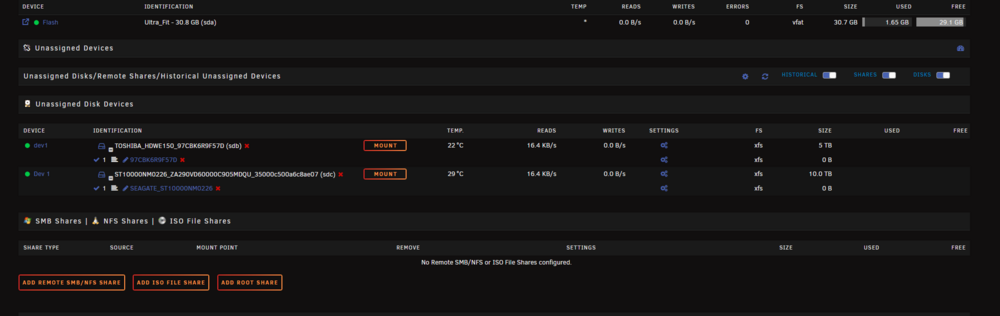
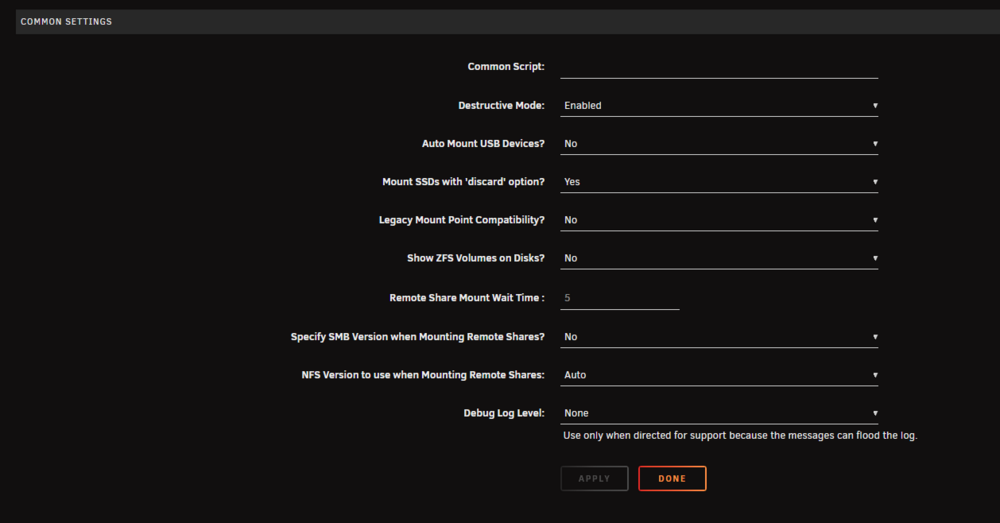
I booted two drives. One is a brand new drive. (10Tb), the other is from the array. (5TB). The link mostly talks about starting in the array, which i assumed didn't apply here. All i did was remove the disk from the array to make it visible in the unassigned. Even if i can get the drive/s mounted as unassigned, how can i pull or transfer the data w/o dockers or shares up? EDIT, seems like Midnight commander would be a good option. I also found my unassigned settings to be in destructive mode. Seems like a good idea to take that off for now? Do you want me to execute this workflow? (Won't this ruin my parity potentially?) XFS automatic repair workflowXFS file system repair is fully automated through the WebGUI: Click the CHECK button (no options to enter) Check results: No corruption detected: Shows "no filesystem corruption detected" and the CHECK button remains Corruption detected: Shows "filesystem corruption detected" and a FIX button appears Click FIX to automatically repair the file system If needed, a ZERO LOG button may appear Shows "filesystem repaired" when the process is complete This automated system eliminates the need for users to manually enter repair options and ensures the correct repair sequence is followed.
-
I believe they should all be xfs (first screenshot). just to be clear, i just used the ui and buttons. Didn't do any commands.
-
I already tried mounting one of the drives as unassigned and it threw and error and didn't let me. Jan 16 13:42:04 Fridge unassigned.devices: Mount of 'sdd1' failed: 'mount: /mnt/disks/HITACHI_H0H72121CLAR12T0: mount() failed: Function not implemented. dmesg(1) may have more information after failed mount system call.' Jan 16 13:42:04 Fridge unassigned.devices: Partition 'HITACHI H0H72121CLAR12T0' cannot be mounted.
-
First, I want to sincerely thank you for the guidance you’ve provided so far. It’s been incredibly helpful. I wanted to ask for your advice regarding data preservation. If protecting the data on Disk 5 is the most important priority, would I have a better chance of securing the critical files by mounting that drive in a Linux environment first and manually copying off the most important data before attempting to recover the array? I really value your insight and want to make sure I take the safest approach possible. Thank you again for your time and support. commands sudo fdisk -l sudo mkdir /mnt/<source_disk> sudo mount -o ro /dev/sdb1 /mnt/<source_disk> ls /mnt/<source_disk>
-
Given my test results on the parity drive, Tested the parity drive. 2 seconds of slight clank noise on startup. Went away. Discovered in bios. Turned off. Full clanking sound on spin down. Concerned about the health of that drive more so than disk5. would you boot up w/ the parity too to capture all diagnostics and smart report?
-
I booted just the 'wrong disk' disk 5 drive by itself. output running command on disk5. blkid /dev/sdX1 fdisk -l /dev/sdX root@Fridge:~# blkid /dev/sdb1 /dev/sdb1: UUID="7cc35300-8d3a-4f85-ab57-2ef1ef23a753" BLOCK_SIZE="512" TYPE="xfs" PARTUUID="3eb93511-f9ca-461d-a5d4-151667d662cd" root@Fridge:~# fdisk -l /dev/sdb Disk /dev/sdb: 10.91 TiB, 12000138625024 bytes, 23437770752 sectors Disk model: WDC WD120EMFZ-11 Units: sectors of 1 * 512 = 512 bytes Sector size (logical/physical): 512 bytes / 4096 bytes I/O size (minimum/optimal): 4096 bytes / 4096 bytes Disklabel type: gpt Disk identifier: F13208B8-A644-444D-AE9E-27348004A00D Device Start End Sectors Size Type /dev/sdb1 64 23437770718 23437770655 10.9T Linux filesystem root@Fridge:~#