





matthope
Members
-
Joined
-
Last visited
Everything posted by matthope
-
What I mean is once you have edited the VM configuration in the XML view, you cannot edit the VM with the form view (look at the slider in the top right). Doing so will erase any modification done in the XML. However, rebooting the server or the VM should not change the settings. If the audio is working then don't bother to install the sound driver. Seeing the device in the peripheral manager is a good sign, it should work.
-
Have you installed the sound card driver? By default windows will provide a generic driver. It is also possible that there is some magical VM voodo going on.
-
Well, If you save anything with the GUI, it will overwrite any modification done in the XML. This is a known issue for quite a long time now. Sadly, this will happens to every VM that you will create.
-
I don't know either why you cannot see it through the GUI, but since you've added it manually, the VM should recognize it. What happens when you launch the VM? No error message?
-
Change this line : <address type='pci' domain='0x0000' bus='0x00' slot='0x06' function='0x0'/> For this one : <address type='pci' domain='0x0000' bus='0x00' slot='0x08' function='0x0'/> Or whatever slot number that you are not currently using, it doesn't matter.
-
Try adding it manually. Paste this code between inside the <devices></devices> bracket. <hostdev mode='subsystem' type='pci' managed='yes'> <driver name='vfio'/> <source> <address domain='0x0000' bus='0x00' slot='0x1b' function='0x0'/> </source> <alias name='hostdev1'/> <address type='pci' domain='0x0000' bus='0x00' slot='0x06' function='0x0'/> </hostdev>
-
You need to activate the intel vt-d or amd-vi feature in your bios. You can watch this video if you want more information :
-
Can you send a picture with the IOMMU groups? You cropped out this information in the last picture. Also sometimes you need to add it directly in VM XML instead of using the VM GUI, it should look like this: <hostdev mode='subsystem' type='pci' managed='yes'> <driver name='vfio'/> <source> <address domain='0x0000' bus='0x00' slot='0x1f' function='0x3'/> </source> <alias name='hostdev1'/> <address type='pci' domain='0x0000' bus='0x00' slot='0x06' function='0x0'/> </hostdev> Finally make sure to remove the AC power when resetting, some motherboard need to be completely shut off.
-
Well that ain't a good error. Sadly, you cannot fix this. The solution would be to continue to use a USB sound card or to add a PCI sound card. For the USB controller, on my side, after stubbing it in the syslinux, it automatically appeared in the VM config.
-
Can you be more specific about your issue ? Telling me it doesn't work isn't really useful 😆 Also, your append line seems to be correct, however, it might be misplaced inside your syslinux configuration. Can you send your syslinux file ?
-
You can't.
-
Indeed. I suggest you to purchase a separate audio card. If you can PCI card is the way to go, since USB audio card have sometime the infamous "demonic audio" issue.
-
You want to select the [8086:a348] 00:1f.3 Audio device: Intel Corporation Cannon Lake PCH cAVS (rev 10) device.
-
I'm not sure of what you are trying to do. You want to have audio from a remote computer? If this is the case, I suggest you to open a new thread since this is off topic. However, if you are trying to have sound from a bare metal VM, you would need speaker to make it work.
-
Good ! Sorry I didn't have the time to answer you in the first place. However, I never tested it with your hardware setup and I don't see any apparent mistake. Have you tried to remove AC plug from the computer ? In some case (like mine) motherboard seems to keep the control of the audio chip even with the i2c blacklist. A power off won't work, you will need to completely remove power from your server. If you want to retry someday, I will be happy to help.
-
VirGL is now part of Mesa and work with QEMU/KVM. Also spice is already available in KVM with QXL, since it's way faster than VNC, I think it would be a nice feature to add to unRAID.
-
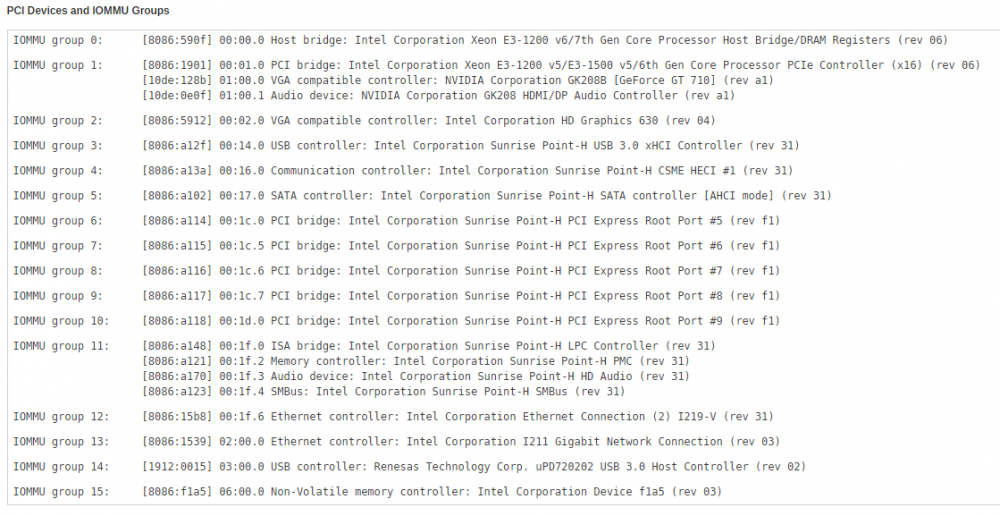
Hi @CiaoCiao Replace this line of your syslinux : append vfo-pci.ids=1912:0014 initrd=/bzroot with this one : append vfio-pci.ids=YOURDEVICEADDRESS modprobe.blacklist=i2c_i801,i2c_smbus initrd=/bzroot If this doesnt work, can you make a screenshot of your IOMMU group ( Tools -> System Devices ) ? It should look like this : Also what is your hardware configuration (CPU,GPU, MOBO, etc) ?
-
bump
-
If your provider block the port 80, the only other way at the moment is the dns challenge, I suggest you to read the forum from this post. However, it require you to use a dns provider with an API, such as cloudflare, and 2 scripts specific to your dns provider.
-
Yup, just tell me how. However, If you want me to try the dns branch on github, I almost certain it won't work, since you cannot use the parameters --non-interactive and --manual together with certbot. I suggest you to use thoses three parameters instead of --non-interactive : --agree-tos --manual-public-ip-logging-ok --no-eff-email. Also the parameter --preferred-challenges=http should be --preferred-challenges=dns instead. Github: 50-config [line 147] certbot certonly --non-interactive --renew-by-default --manual --preferred-challenges=http --manual-auth-hook /config/authenticator.sh --manual-cleanup-hook /config/cleanup.sh --rsa-key-size 4096 $EMAILPARAM --agree-tos $URLS
-
I had this issue me too, but i've slightly modified the script and it's now working for me. The issue is happening when you try to create the txt file for the top domain. authenticator.sh #!/bin/bash # Get your API key from https://www.cloudflare.com/a/account/my-account API_KEY="SOMETHING" EMAIL="SOMETHING" echo "Currently creating a txt entry for $CERTBOT_DOMAIN." # Strip only the top domain to get the zone id DOMAIN=$(expr match "$CERTBOT_DOMAIN" '.*\.\(.*\..*\)') # If $CERTBOT_DOMAIN is already the top domain if [ -z "$DOMAIN" ]; then DOMAIN="$CERTBOT_DOMAIN" fi # Get the Cloudflare zone id ZONE_EXTRA_PARAMS="status=active&page=1&per_page=20&order=status&direction=desc&match=all" ZONE_ID=$(curl -s -X GET "https://api.cloudflare.com/client/v4/zones?name=$DOMAIN&$ZONE_EXTRA_PARAMS" \ -H "X-Auth-Email: $EMAIL" \ -H "X-Auth-Key: $API_KEY" \ -H "Content-Type: application/json" | python -c "import sys,json;print(json.load(sys.stdin)['result'][0]['id'])") # Create TXT record CREATE_DOMAIN="_acme-challenge.$CERTBOT_DOMAIN" RECORD_ID=$(curl -s -X POST "https://api.cloudflare.com/client/v4/zones/$ZONE_ID/dns_records" \ -H "X-Auth-Email: $EMAIL" \ -H "X-Auth-Key: $API_KEY" \ -H "Content-Type: application/json" \ --data '{"type":"TXT","name":"'"$CREATE_DOMAIN"'","content":"'"$CERTBOT_VALIDATION"'","ttl":120}' \ | python -c "import sys,json;print(json.load(sys.stdin)['result']['id'])") # Save info for cleanup if [ ! -d /tmp/CERTBOT_$CERTBOT_DOMAIN ];then mkdir -m 0700 /tmp/CERTBOT_$CERTBOT_DOMAIN fi echo $ZONE_ID > /tmp/CERTBOT_$CERTBOT_DOMAIN/ZONE_ID echo $RECORD_ID > /tmp/CERTBOT_$CERTBOT_DOMAIN/RECORD_ID # Sleep to make sure the change has time to propagate over to DNS sleep 15
-
+1 Right now we must go through the docker bash to add/edit the scripts, which is quite painful. Also the modification made to the 50-config script will be deleted whenever the container is updated. I would use this features for sure if it's added.
-
In my case, my internet provider block the port 80 so the HTTPVAL fix wont work. Since TLS-SNI challenge is deactivated and I can't use HTTP challenge, I'm obligated to use the DNS-01 challenge. I've found a way to use it with this docker and cloudflare. You will need those 2 scripts ( here ) and you will need to modify the script /etc/cont-init/50-config inside the docker. docker exec -it [DOCKERNAME] /bin/bash vi /etc/cont-init.d/50-config In the file comment this line : certbot certonly --non-interactive --renew-by-default --standalone --preferred-challenges $PREFCHAL --rsa-key-size 4096 $EMAILPARAM --agree-tos $URLS And add this one : certbot certonly --agree-tos --manual --manual-public-ip-logging-ok --preferred-challenges=dns --manual-auth-hook /app/authenticator.sh --manual-cleanup-hook /app/cleanup.sh --rsa-key-size 4096 $EMAILPARAM --no-eff-email $URLS However, this is a one time fix since any modification to the docker is reverted when restarted. @aptalca It would be nice if the DNS-01 challenge could be added definitively to this docker.
-
Hi, The issue: At the moment, there is two way to use a 3D application in a VM with unRAID. First way is to passtrough a GPU to it. While this solution is nice and work well if you have only 1 or 2 VM's that need GPU acceleration, it's not ideal when you need multiples accelerated VM's. The second way is to use the intel GVT capabilities, however, the UPT is not super well implemented yet and the graphical power of those IGD are not that great. The solution: It would be nice if you could include GPU virtualisation (vGPU) solution, there is more than one solution to achieve this, but I think virtio-gpu and virGL is our best shoot. There is also MxGPU with the AMD GIM driver or Nvidia GRID but it require expensive gpu card to work. If virtio-gpu is implemented, it would be nice to see spice implemented as well since its more efficient than a VNC. Also I might dreaming here, but if there was a way to use one GPU to display more than one VM desktop. Example, if there 3 hdmi output on the card, display the desktop on the VM 1 on the HDM1 and the VM 2 on the HDMI2 and so on. Some interestings links : https://www.spice-space.org/spice-user-manual.html https://www.kraxel.org/blog/2016/09/using-virtio-gpu-with-libvirt-and-spice/ https://www.kraxel.org/slides/qemu-gfx-2016/ Regards, Mathieu
-
Thanks, it's working properly with the added file.


