





something fishy
Members
-
Joined
-
Last visited
-
Here is the Fusion 360 archive file for all parts but the side panels (I think). The disk caddies are there but their three constituent bodies are not displayed at present (just toggle them on when the archive has uploaded to the Fusion workspace). I'm very much a Fusion amateur and this was a very iterative design so lots of things will be more complicated than they need to be, but I hope that this helps. N3_Hat Disk caddy.f3z
-
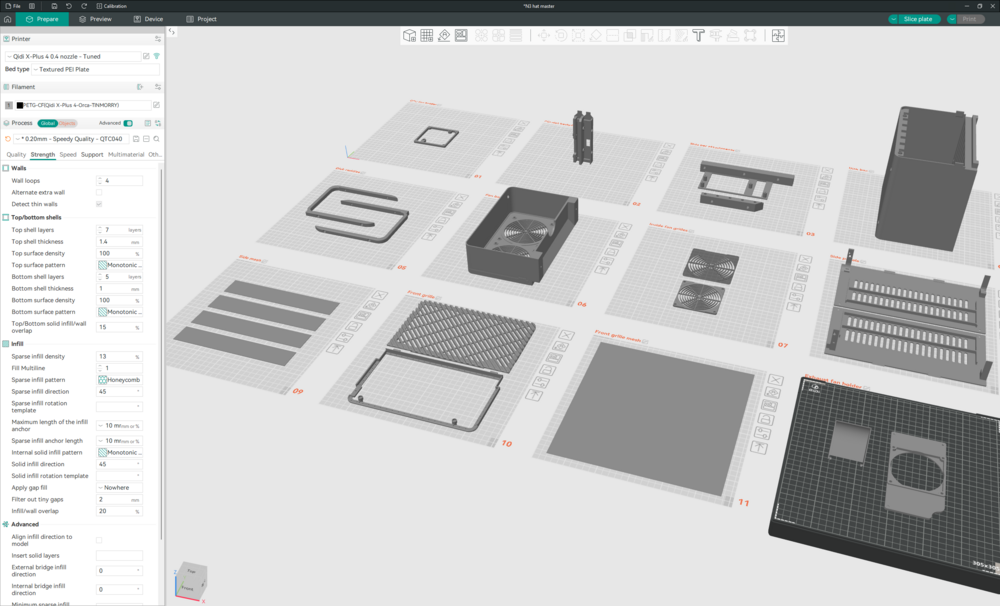
The flat meshes on plate 9 of the 3mf file are glued into the sides. If you split the stl files in the middle (bisecting of the oval holes) that would IMO work best. The two pieces could be rejoined using the mesh rectangles that are glued behind the holes. More generally you should get good results using a Bambu A1. I would recommend the Tinmorry carbon fibre loaded PETG that I used. Tinmorry publish profiles for it on their Github page, it's dimensionally stable and the black gives an excellent surface match to the Jonsbo case. Use the textured plate for everything apart from the two meshes (plates 9 and 11). These will work better printed onto a smooth plate. Assuming that you are using a normal mITX mainboard with a standard 16x PCIE slot (rather than the Gigabyte MJ11-EC1 mainboard that I used) you can cut off the outrigger off the right hand bracket in plate 3 in the slicer (it is used to hold the 16x PCIE daughter board). That done your build order should be The two mounts in plate 3. Set M4 heat set inserts into the side holes and screw to the N3 frame (the mounts only fit one way and the face on the build plate should be upwards). There are more vertical holes than you need (design was a work in progress at this point). So wait until after stage 2 before putting heat set inserts into the vertical holes. Print the main disk caddy (plate 4). When printed you will see that there are four holes through the base that line up with the correct holes in the mounts. At this stage put heat set inserts into mounts' vertical holes. Attach the back plane from the inside of the disk caddy. You can either use M3 heat set inserts or (as you have unrestricted access to the back) loose nuts (I used nuts). If you have bought a replica of the Jonsbo backplane it should fit perfectly (powering using both of the molex connectors is fine). Feed your power and SATA connectors upwards at the back of the N3 case. Unscrew the two screws that hold the N3's perforated front grille in place. Slide the disk caddy into place from the back and screw into place into the heat set inserts you placed in step 2. You will need M4 screws about 25mm long with a small head (I made the diameter of the holes quite small, sorry). They can either be attached with a short screwdriver/allen key working inside the disk caddy or a long screwdriver through the aligning holes in the top of the disk caddy. Gently screw 2x 15mm M3 countersunk screws to hold the perforated front grille into place. Don't use too much force as these screws will cut their own threads in the plastic. Print some of the disk caddies (plate 5). You will need short 'disk caddy screws' such as these from Amazon: disk caddy screws The disk caddies should be in some relatively soft material (ASA, regular PETG, PA, TPU etc) Connect the data and power cables to the back of the backplane and test alignment and electrical function in all eight of the SATA bays (BTW the Jonsbo backplane works fine with SAS disks attached to an HBA). Assuming no problems in step 8 print the back fan box on plate 6 and two of the 92mm fan guards on plate 7. There are two 3pin fan headers on the backplane. The fan box screws into the mounts you printed at the start in a similar way to the disk caddy, so at this stage locate the required M4 heatset inserts into the two mounts. Because there is no access when the fan box is mounted you will need a long screwdriver/allen key at this stage (the screws need to be a similar length to those you used earlier but 'small head' requirement is relaxed. Print the side panels (plate 8) and the side panel grills (plate 9). Glue the grills into place (reassembling the split side panels if needed). When the left are right sides are assembled fit them into place. At the bottom they use the Jonsbo allen screws that held the metal top on. At the top back they click into place under the fan box (you will likely have to loosen the fan box screws to get them to fit). At the front you will have to remove the 15mm M3 screws in step 6. Double check that everything works as intended. The build is now functionally done. Everything else is cosmetic. Place the original Jonsbo lid on top and line up. Drill four 2.5mm holes to hold the cover in place (I chose not to put the holes in the stl files because of the risk of small misalignments). With 2.5mm holes use black countersunk M3 allen bolts - these will cut their own threads in the PETG, so tighten carefully. Length at the back is not important (15mm works). For the front the screws should be about 8mm long assuming (as I did) that you use nuts to reinforce. Insert and glue 2x 6mm diameter magnets into place at the top. Print the two halfs of the front grille (plate 10) and the thin mesh that goes between them (plate 11). Insect screen would work just as well. Cut the mesh to size and either glue or screw (I used tiny screws from spectacle repair kit) together in a sandwich. Use a small piece of suitable fabric to mimic the Jonsbo branded handle on the bottom grille. Glue two 6mm magnets to mate with those at the front of the disk caddy. Let me know if you need anything else. AFAIK the Jonsbo backplanes don't do staggered spin-up so you will need a PSU with a robust 12v line to handle 16 disks.
-
@meismook What format do you need. The 3mf file I posted earlier has all the 3d printer files. I should be able to export Fusion 360 archives if you need those also.
-
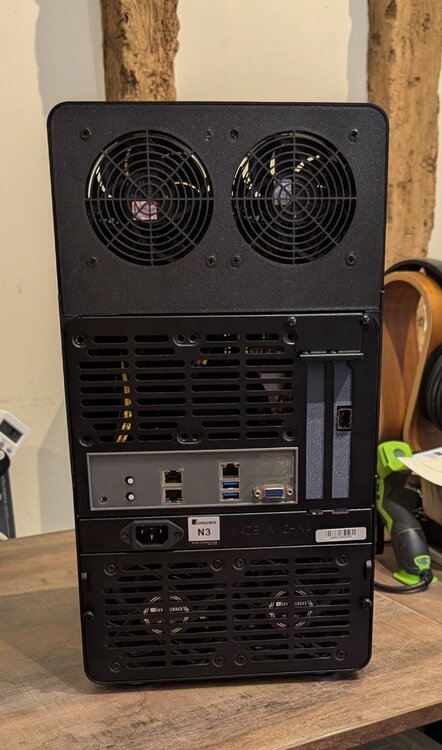
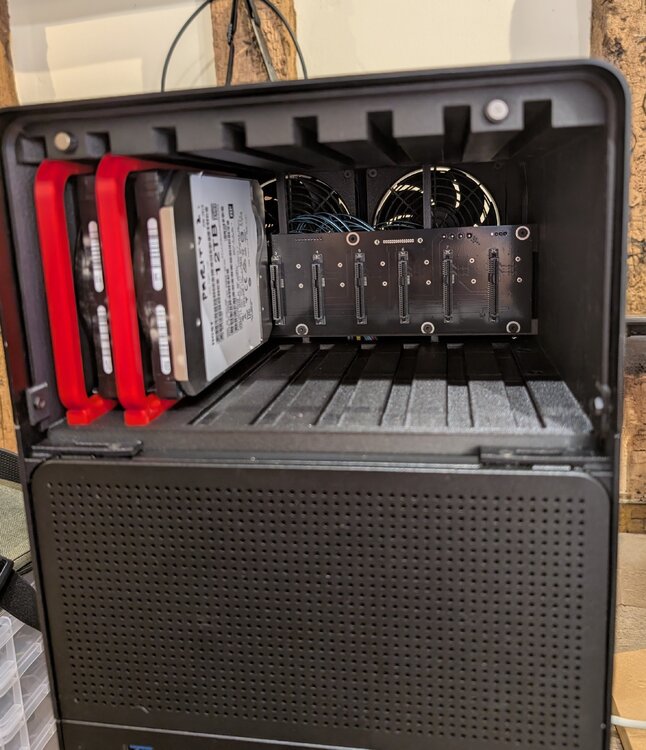
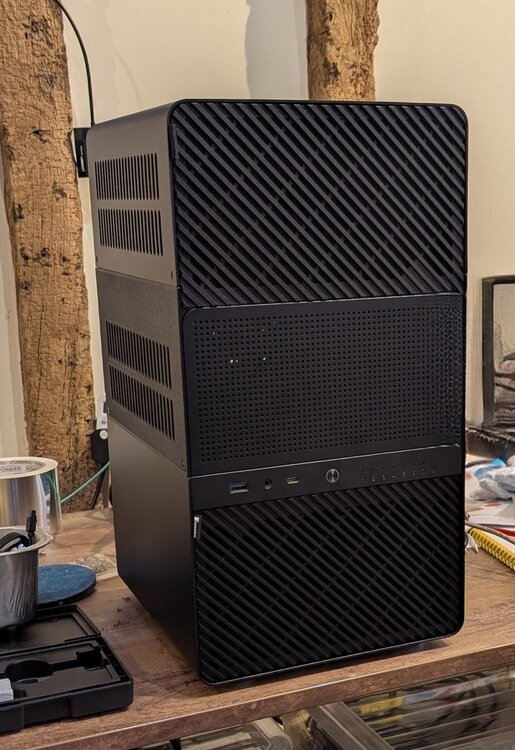
I 3d printed an additional 8-disk drive bay for my Jonsbo N3 to turn it into a 16 hard disk tower. The drive bay sits above the mainboard cavity, under the existing steel lid with two new side panels 3d printed to bridge the gap. This is the result printed in Tinmorry PETG-CF: From the back (I used two 92mm fans as in the stock drive bay) showing the I/O shield for my Gigabyte MJ11-EC1 and my custom PCI bracket for the HBA card and a SFP+ 10 gig network card: The drive bay uses a second N3 back plane purchased from AliExpress. The front panel is held on by magnets as in the original and I just used a simple “gravity latch” to hold the HDDs in place): The disk caddy is 227mm wide and 191mm high and should print on most printers. However, the sides are 262mm long and will need splitting in two to fit on standard 255x255x255mm print beds. All parts were printed on a Qidi Plus4 using Black Tinmorry PETG-CF filament (I get great results with Tinmorry CF and GF loaded filaments using their published profiles on Github) using the "0.20mm - Speedy Quality - QTC040 profile" from Stew675 here: GitHubPlus4-Wiki/content/orca-slicer-settings/Print_Profiles at...Contribute to qidi-community/Plus4-Wiki development by creating an account on GitHub.Except: The front and side meshes were printed using zero top and bottom layers and honeycomb infill (side) and rectilinear infill (front) The disk holders were printed in red Flashforge ASA (regular PETG would also work, I had the ASA to hand). I am attaching the Orcaslicer 3mf file which has all the 3d printed parts I used in this build (screenshot below). The CPU fan holder and PCI bracket are not strictly part of the drive bay conversion but might be useful for anyone using the same Epyc Mini-ITX mainboard: https://forums.servethehome.com/index.php?threads/gigabyte-mj11-ec1-epyc-3151-mystery.41395/ I’m happy to provide more detailed build information and the Fusion360 files if there is interest. N3 hat master.3mf
-
This problem has been solved. Embarrassingly the disk activity was caused by the Home Theatre app on a Zidoo media player. With its access to the NFS shares deleted, problem goes away.
-
I am have been swapping disks in my array for larger and faster versions. And following one disk swap the array will no longer spin down. The disk swap was done by adding the new disk, emptying the old disk using Dynamix file manager. Removing the old disk and using <New Config>, <reserve current assignments: all>. Before rebuilding parity. I have looked through as many of the "Array won't spin down" threads but none are helping resolve my case. My symptoms are that if I spin down all disks they are woken up within a minute by what look to be small read/writes (always first to one disk and parity, then to the remaining array drives). None of this is being recorded by the File Activity plugin. And the open files plugin does not show anything open on the array. I use docker (vdisk is /mnt/cache/docker.img) but the behaviour persists with all dockers off and the docker subsystem shut off. The duplicate files script detailed here: https://forums.unraid.net/topic/33535-unraidfindduplicatessh/ Reports that there are no duplicates on the array. Watching the Main screen alongside a terminal window running iotop -o confirms a disk write but does not list any processes. Any help gratefully received. shortie-diagnostics-20241009_1709.zip
-
It doesn't have files on the array according to the "compute" button in the shares tab and verified with Midnight Commander. I used to have some orphan appdata files and I forced them off under 6.10.2. As I've said, all was normal with the cache directories plugin operating in 6.10.2 and all seems normal in 6.10.3 without the plugin. Thanks
-
This is for me? Yes I'm sure. Appdata is cache only and my sageTV recording directory is on a pool drive not on the array. These shares were excluded from cache directories and were working as expected in 6.10.3: asleep when not used. With the plug in removed, expected behaviour has returned to all disks. The only disks spun up are those that have current file activity. For eg, at time of writing I have a scheduled windows disk image running so one array drive and parity are spun up, plus cache (an SSD). The remaining 6 array drives are asleep. SageTV has just started recording so its dedicated pool drive spun up around 3 minutes ago. Thanks
-
I appreciate that. Thank you. I've removed for the moment. It was working as designed on 6.10.2 (no impact on disk sleep that I could see or any other negative side effects) and with the same settings carried over appeared not to work as designed on 6.10.3.
-
Removing Dynamix cache directories and rebooting appears to have sorted it. Smart requests in the log no longer spin up the disk and unused disks spin down on schedule. Thanks, this is mostly static, infrequently accessed data so spindown is important on heat and power grounds. Cheers Eric
-
Is there reason that array disks won't spin down after this upgrade. After upgrade (smooth, no problems) to 6.10.3 all but one of my array disks are staying spinning with no file access. If i spin the array down manually (using the little down arrow button under the disk listing) they almost immediately spin up in response to a smart request. This is copy and past from the live log: Jun 17 15:03:43 shortie emhttpd: spinning down /dev/sdj Jun 17 15:03:43 shortie emhttpd: spinning down /dev/sdk Jun 17 15:03:44 shortie emhttpd: spinning down /dev/sdh Jun 17 15:03:45 shortie emhttpd: spinning down /dev/sdi Jun 17 15:03:46 shortie emhttpd: spinning down /dev/sdf Jun 17 15:03:46 shortie emhttpd: spinning down /dev/sdg Jun 17 15:03:47 shortie emhttpd: spinning down /dev/sdd Jun 17 15:03:49 shortie emhttpd: read SMART /dev/sdj Jun 17 15:03:49 shortie emhttpd: read SMART /dev/sdg Jun 17 15:03:49 shortie emhttpd: read SMART /dev/sdf Jun 17 15:03:58 shortie emhttpd: read SMART /dev/sdk Jun 17 15:04:08 shortie emhttpd: read SMART /dev/sdh Jun 17 15:04:08 shortie emhttpd: read SMART /dev/sdd Jun 17 15:04:08 shortie emhttpd: read SMART /dev/sdi With 6.10.2 the array was spun down as expected. I have Dynamix cache directories installed and one disk is reporting as over temperature (server in marginally cooled location and its hot, ironically, because the array is spun up). Thanks Eric
-
I bought an old QNAP 1079 Pro on ebay https://www.qnap.com/en-uk/product/ts-1079 pro for the express purpose of running unraid. It was the cheapest way that I could get a compact 10 bay hotswap enclosure. Its serving well and appears to have great cooling. I doubt that I could have built better for twice the second hand price I paid. This is an i3 machine and mine came with 16Gb of RAM. It has 2x onboard NICs and mine came with an extra dual NIC card (removed see below). A few observations - I had to load the QNAP OS and switch off "environmental energy management" (or something like that) to enable boot on power restore (for a UPS). The setting is not exposed in the BIOS. Power cycle it a few times to make sure its working - sometimes the setting did not stick for me. This was maybe a flat cmos battery - To change the cmos battery requires the mainboard being removed. This needs six screws removing (4x ordinary and both the locking screws on the vga port) the SATA backplane removing (do this without disks present!) and pretty much all mainboard cables pulling. It's not hard but it is very fiddly and the chassis edges are sharp. - I couldn't get the front LED working either, I unplugged it. - CPU cooling looked marginal to me (slowing the case fans down caused a kernel panic before HDD temps became a problem). I wedged a noctua fan on top of the CPU heatsink (there are spare fan headers). Switch the fan control for the case fans to fixed speed in the BIOS and Dynamix fan control plugin seems to work. - I stuck a cheap sata card into the spare pcie slot (designed for a second NIC card) for a SSD cache drive. A 2.5 inch HDD/SSD can sit loose above the drive bay (where the PSU lives). You will need a special card backplate (one came with the NAS in my case) as standard low profile backplates don't work. This done all ten drive bays are free for the array. - I'm only using one of its two onboard NICs but as far as I can tell unraid is perfectly happy in this hardware and I can see no reason why it wouldn't work - Started off by pulling the QNAP DOM module. But there is a second on board USB header (presumably for a redundant DOM?) and I fashioned a short flying lead so that my unraid flash drive is stored internally (attached to the base of the case behind the drive bay). Just select the correct boot order in the BIOS. - It seems to reboot once during a start up sequence for reasons I don't understand. But I think using the QNAP OS it does this several times. The unraid webui is available about 90 seconds after boot which is 3-4 minutes quicker than the QNAP web UI. - Its as quiet as the N54L HP microserver that preceded it. The HDDs seem happier spinning down than they did in the microserver. The unraid system info reports the NAS as: Model: N/A M/B: ICP/iEi QA61 Version V1.0 - s/n: To be filled by O.E.M. BIOS: American Megatrends Inc. Version 4.6.4. Dated: 01/19/2012 CPU: Intel® Core™ i3-2120 CPU @ 3.30GHz HVM: Not Available IOMMU: Not Available Cache: 128 KiB, 512 KiB, 3 MB Memory: 16 GiB DDR3 Multi-bit ECC (max. installable capacity 32 GiB) Network: eth0: 1000 Mbps, full duplex, mtu 1500 eth1: interface down Kernel: Linux 5.10.28-Unraid x86_64 OpenSSL: 1.1.1j Uptime: 0 days, 04:09:09




