





TreksterDK
Members
-
Joined
-
Last visited
Everything posted by TreksterDK
-
Do you have custom colors. What we found the last time is that while installing and there is no custom colors (meaning defaults), then it failed. But if you had it it worked when installing. I don't know if it is the same error now, but the same behaviour as you describe (can't reproduce it), we also saw back then: But @Mainfrezzer managed to reproduce it back then, by removing the default color, and then installing the connect plugin again.
-
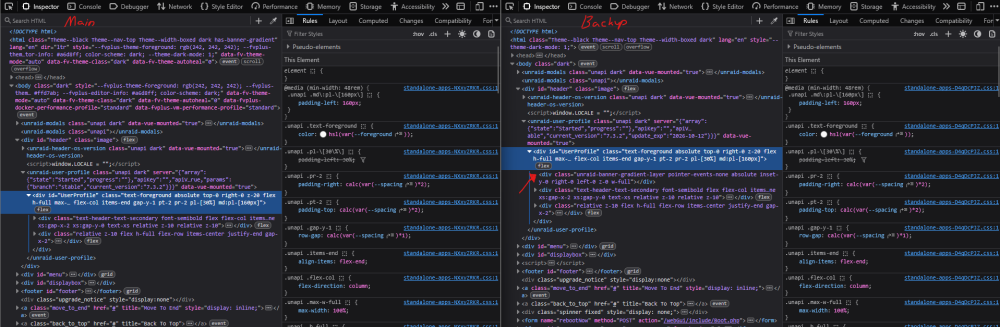
Are you using the same display settings? Because this matters. The last time I think the error was only on the dark theme: And under certain conditions. It seams the error has reverted back to that. I can see if I can find the original thread where it was discovered what happened.
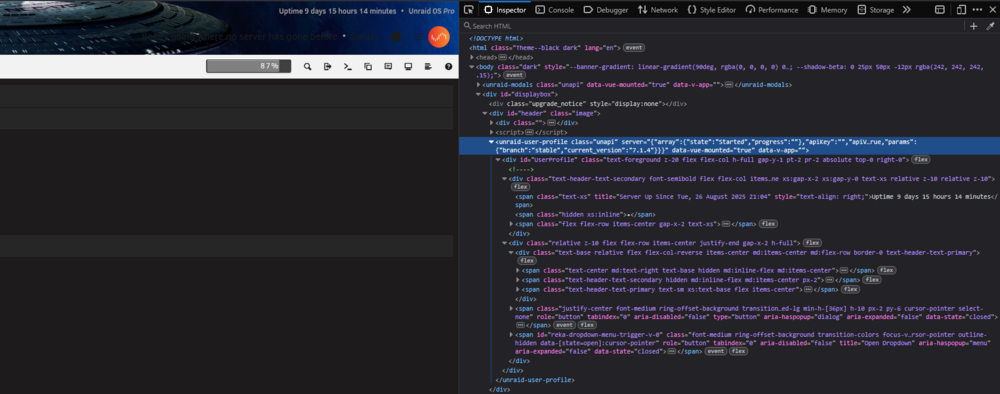
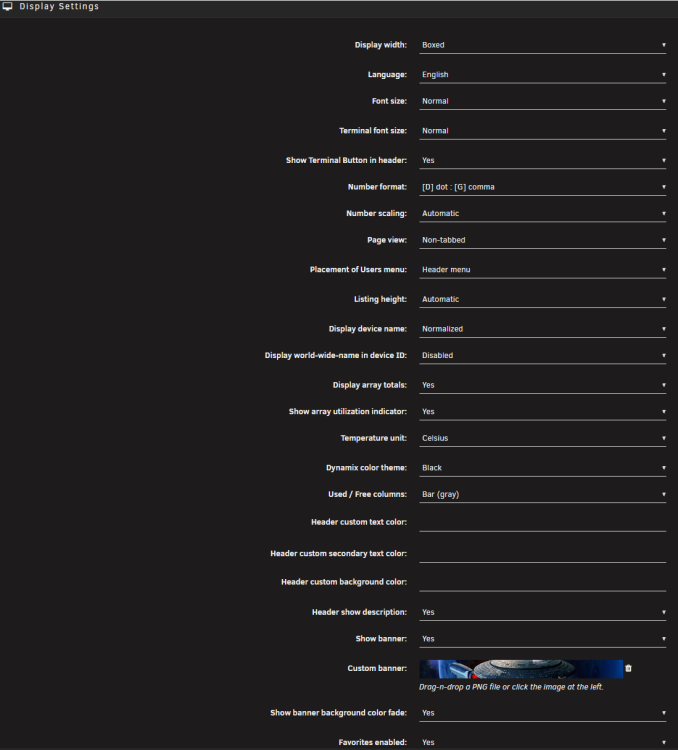 Both servers run Unraid 7.3.2, as mentioned in the first post ;)Main server on the left, Backup server on the right. Main is updated and gradient is not showing. Backup is not updated, and gradient is showing. It has an extra div, as the red arrow shows - that is not present on the updated server. That Div is the gradient.
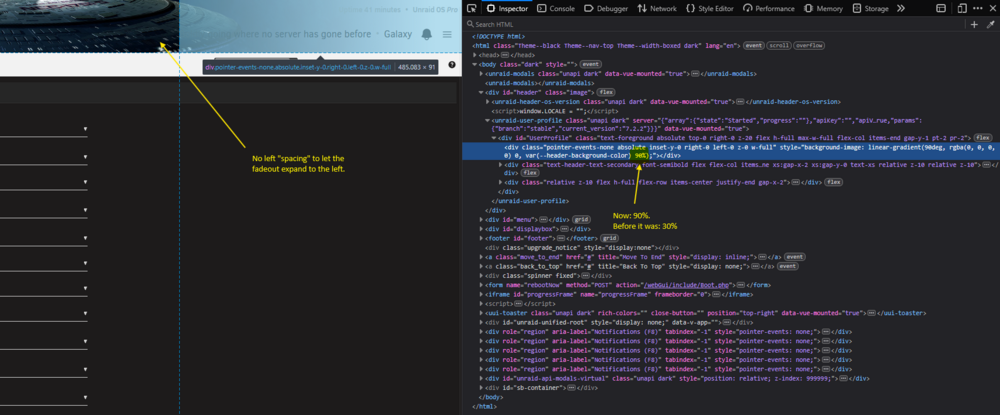
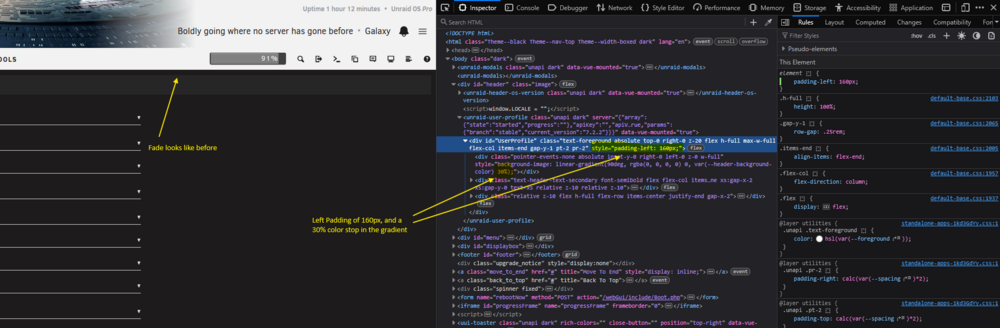
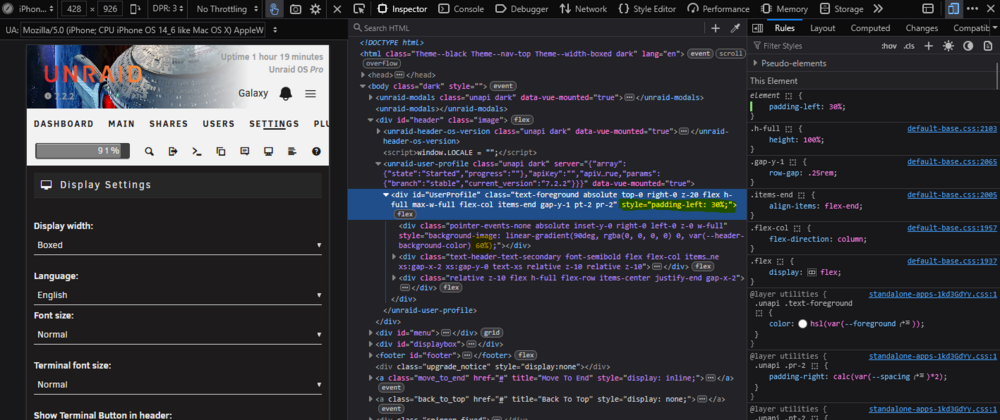
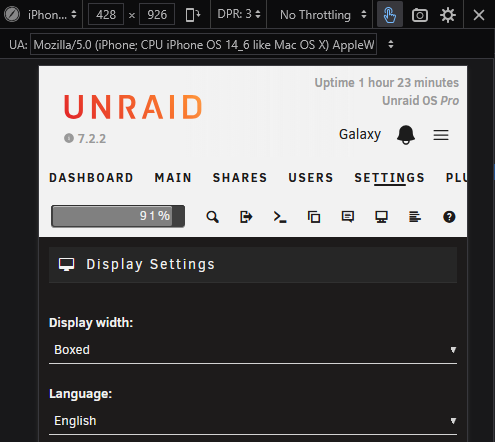
 @JorgeB @elibosley This bug is back after updating Unraid Connect to "2026.08.12.1944" Today. My backup server is on "2026.06.18.1729" and it does not have the problem. Both run Unraid 7.3.2This seams to work now - as far as I can see.I uninstalled Unraid Connect previously, because I didn't like this bug - it looked too broken. I deliberately waited to install Unraid 7.2.2 because I had hoped this would be fixed, after a few bug fixing rounds. But unfortunately It is still not fixed 😞 - It got worse actually, because now it is also broken even without the Unraid Connect plugin installed. Yes, there is a fade now - at least 😉, but it is obviously not the intended look. I have added a screenshot of how it looks here: The color stop in the gradient is now 90% whereas it was before 30%. Also there is no spacing to the left: I messed around in the Firefox inspector and got it to kind of look similar as before, by adding a style of "padding-left: 160px" to the UserProfile div, and then setting the color stop to 30% as before. It works - in desktop, but it breaks in "responsive mode" (I have no idea how many breakpoints you have). So in "responsive mode", you could run with something like: "padding-left: 30%" on the UserProfile div, and then set the color stop to around 60%. This is just me doing some quick hacking, but it could work like that. Another idea. Maybe turn off the background image in responsive mode - by default, and then have a new option to preserve background image on responsive, or even better have a custom responsive image for that 🤩. Example with the image off: Hope this bug gets fixed soon. You tend to look at this interface quite often, and it is just an eye sore - and looks so broken. As as UX designer, I hope you also prioritize visual stuff like this 🙂 Thanks!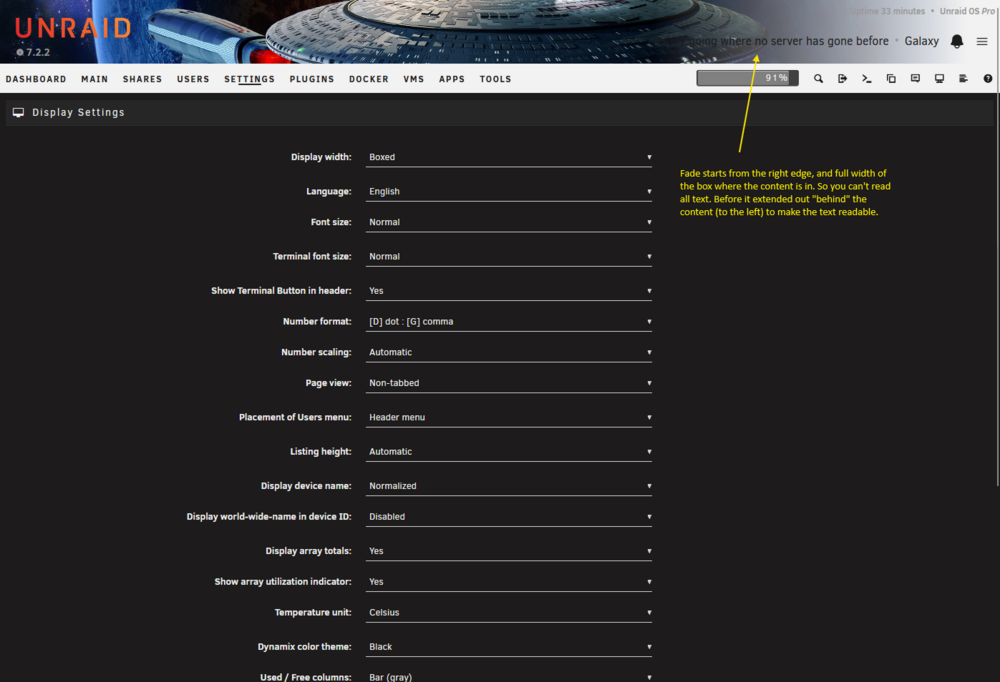
 Hey This bug "seems to be back". Reference to the previous thread: https://forums.unraid.net/topic/186992-unraid-connect-breaks-default-css-of-header/#findComment-1576801 I posted there first, but I am opening a new thread since the behavior is a bit different now I found. Summary Installing the Unraid Connect plugin while having no custom colors set removes the header fade. The setting Display Settings -> “Show banner background color fade” has no effect. Expected With no custom colors and "Show banner background color fade" = Yes, the header shows the gradient fade based on the default theme color. Actual The fade is missing. On reload, the gradient appears for a split second, then disappears. In DevTools the child element that renders the gradient is present when the plugin is not installed, but is removed from the DOM once Unraid Connect is installed and the page finishes loading. In contrast to the old bug, the theme color variable now resolve to a value (with a slightly different name). So the issue is not a missing CSS variable like before, but that the gradient container div is gone after the plugin initializes - at least that is what I figured out. Screenshots Working (no plugin) - 2 Screenshots: Gradient element present with inline background-image: linear-gradient(...) on the absolute child. Broken (plugin installed) - 2 Screenshots: That gradient element is missing from the HTML. Steps to reproduce Settings -> Display Theme: Black Ensure no custom colors are set Set “Show banner background color fade” = Yes Install Unraid Connect Refresh Result: header fade is gone. Browsers tested: Chrome and Firefox Notes Setting Header custom background color does not restore the fade, like in the old bug. It looks like Unraid Connect is rewriting the header markup and dropping the gradient container. If needed I can provide a a short screen recording?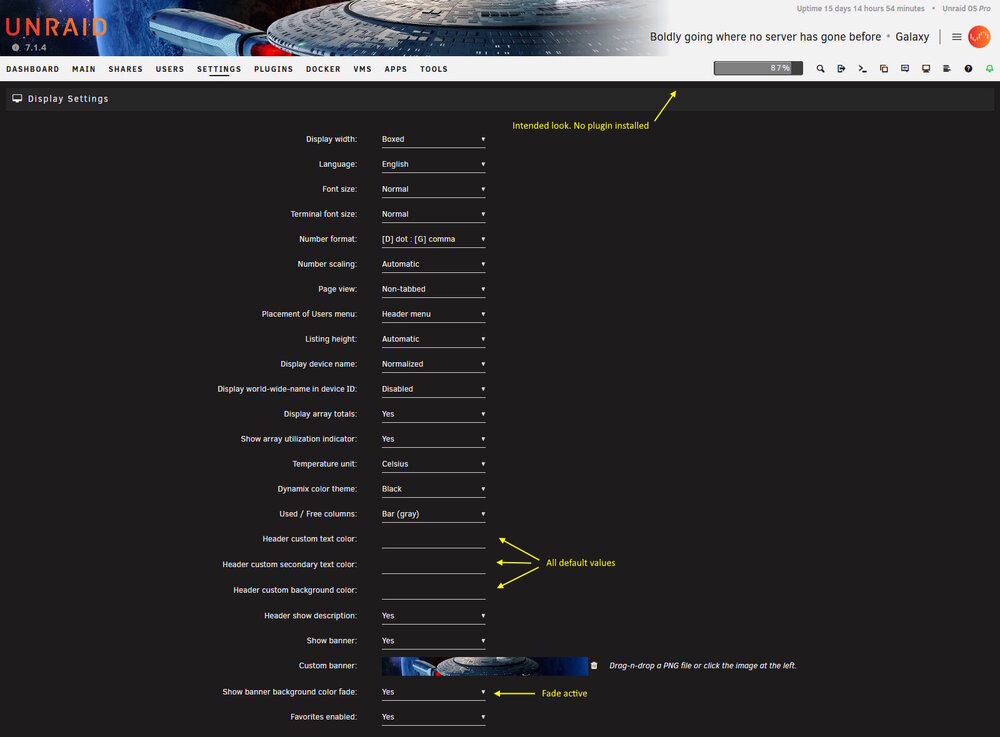
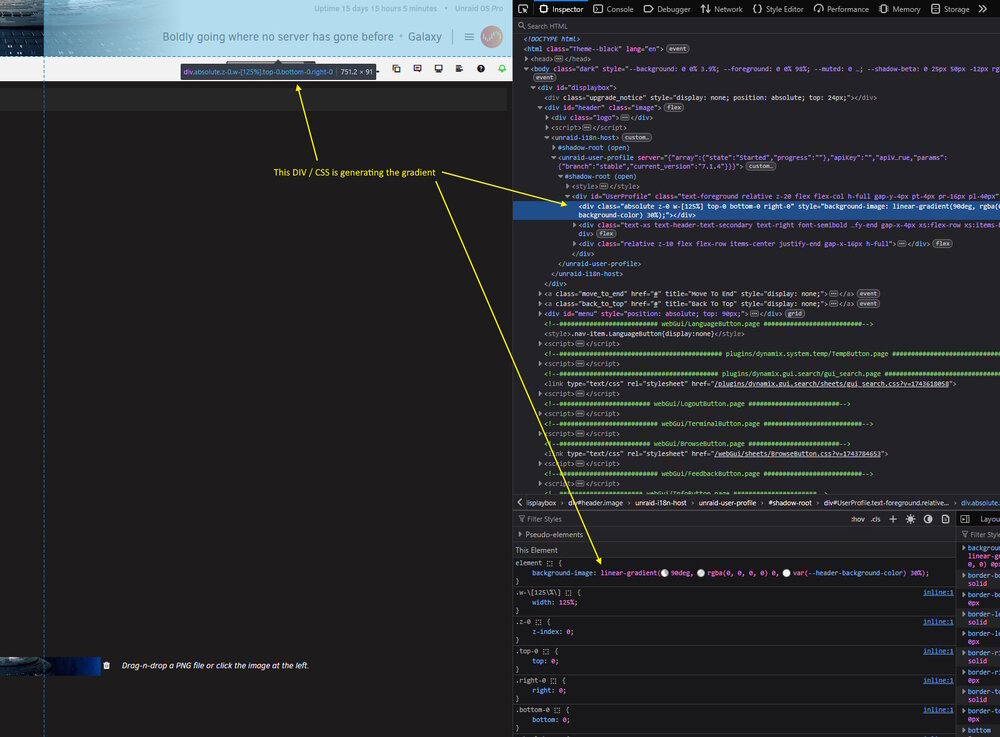
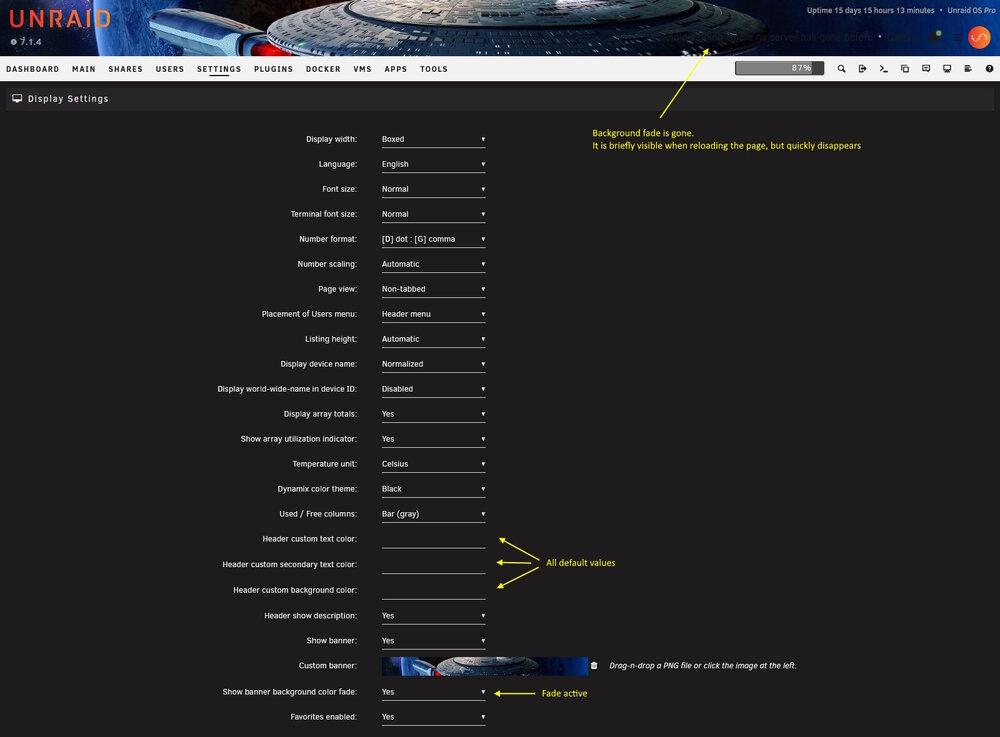
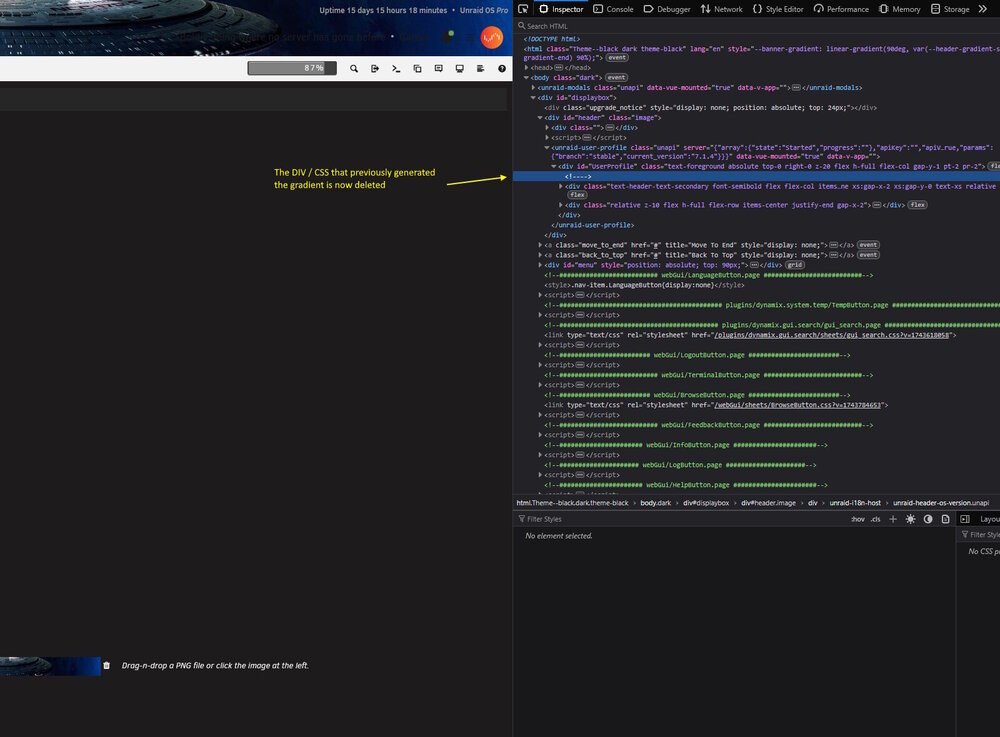 @pujitm This bug has returned :( It seems to me that the div that had the gradient background before, is simply just deleted now? You see it briefly when reloading the page, and then it disappears.
 Regarding the ITE IT87 plugin. Hey. I'm running Unraid on a Gigabyte Z790 UD motherboard with an Intel i7-14700 CPU. Earlier this month, I installed the ITE IT87 plugin because I was not able to see any fans on my new system. I had been using Dynamix Auto Fan Control previously on my old setup, but it did not detect any fans on this new HW - your plugin made them visible. My plan was originally to control my fans in Unraid, but I later changed my mind and decided to just let the BIOS handle all fan control. Since then (beginning of this month) I have really only used the plugin to monitor fan RPMs in the dashboard (collecting the data in Home Assistant). Everything was actually running nice for some days but after a power outage yesterday, my system started acting strange. My front fans now ramp up to full speed even though the system is idle and CPU/motherboard temps are totally normal. What is strange is that this does not happen immediately after boot. The system can run normally for several hours before the fans suddenly spike. When I check the sensor output at that point, I see acpitz-acpi-0 Adapter: ACPI interface temp1: +16.8°C temp2: +27.8°C nvme-pci-0100 Adapter: PCI adapter Composite: +31.9°C (low = -273.1°C, high = +81.8°C) (crit = +84.8°C) Sensor 1: +31.9°C (low = -273.1°C, high = +65261.8°C) Sensor 2: +31.9°C (low = -273.1°C, high = +65261.8°C) gigabyte_wmi-virtual-0 Adapter: Virtual device temp1: +86.0°C temp2: +35.0°C temp3: +35.0°C temp4: +31.0°C temp5: +32.0°C temp6: +30.0°C it8689-isa-0a40 Adapter: ISA adapter in0: 708.00 mV (min = +0.00 V, max = +3.06 V) in1: 2.03 V (min = +0.00 V, max = +3.06 V) in2: 2.02 V (min = +0.00 V, max = +3.06 V) in3: 1.99 V (min = +0.00 V, max = +3.06 V) in4: 1.52 V (min = +0.00 V, max = +3.06 V) in5: 768.00 mV (min = +0.00 V, max = +3.06 V) in6: 1.99 V (min = +0.00 V, max = +3.06 V) 3VSB: 3.36 V (min = +0.00 V, max = +6.12 V) Vbat: 3.10 V fan1: 936 RPM (min = 0 RPM) fan2: 2089 RPM (min = 0 RPM) fan3: 1991 RPM (min = 0 RPM) fan4: 1182 RPM (min = 0 RPM) temp1: +86.0°C (low = +127.0°C, high = +127.0°C) sensor = disabled temp2: +35.0°C (low = +127.0°C, high = +127.0°C) sensor = disabled temp3: +35.0°C (low = +127.0°C, high = +127.0°C) sensor = Intel PECI temp4: +31.0°C (low = +127.0°C, high = +127.0°C) sensor = thermistor temp5: +32.0°C (low = +0.0°C, high = -119.0°C) sensor = thermistor MB Temp: +30.0°C (low = +127.0°C, high = +127.0°C) sensor = thermistor intrusion0: OK coretemp-isa-0000 Adapter: ISA adapter CPU Temp: +36.0°C (high = +80.0°C, crit = +100.0°C) Core 0: +35.0°C (high = +80.0°C, crit = +100.0°C) Core 4: +33.0°C (high = +80.0°C, crit = +100.0°C) Core 8: +34.0°C (high = +80.0°C, crit = +100.0°C) Core 12: +30.0°C (high = +80.0°C, crit = +100.0°C) Core 16: +35.0°C (high = +80.0°C, crit = +100.0°C) Core 20: +34.0°C (high = +80.0°C, crit = +100.0°C) Core 24: +34.0°C (high = +80.0°C, crit = +100.0°C) Core 28: +33.0°C (high = +80.0°C, crit = +100.0°C) Core 32: +35.0°C (high = +80.0°C, crit = +100.0°C) Core 33: +35.0°C (high = +80.0°C, crit = +100.0°C) Core 34: +35.0°C (high = +80.0°C, crit = +100.0°C) Core 35: +35.0°C (high = +80.0°C, crit = +100.0°C) Core 36: +31.0°C (high = +80.0°C, crit = +100.0°C) Core 37: +31.0°C (high = +80.0°C, crit = +100.0°C) Core 38: +31.0°C (high = +80.0°C, crit = +100.0°C) Core 39: +31.0°C (high = +80.0°C, crit = +100.0°C) Core 40: +33.0°C (high = +80.0°C, crit = +100.0°C) Core 41: +33.0°C (high = +80.0°C, crit = +100.0°C) Core 42: +33.0°C (high = +80.0°C, crit = +100.0°C) Core 43: +33.0°C (high = +80.0°C, crit = +100.0°C) nvme-pci-0200 Adapter: PCI adapter Composite: +33.9°C (low = -273.1°C, high = +84.8°C) (crit = +84.8°C) Sensor 1: +33.9°C (low = -273.1°C, high = +65261.8°C) Sensor 2: +30.9°C (low = -273.1°C, high = +65261.8°C) The high 86 degree readings seem to be what is triggering the BIOS fan response (I guess?) - even though actual temps are in the 30–35°C range. If I reboot, there is nothing in BIOS (normal temps), and after reboot the system is then back to normal. But after a while it spikes again. So far I have seen it twice. So of course I asked ChatGPT for thoughts 🙂 (Yes, I know I can not rely on it on it's own, which is why I am asking here 😉 - but it's here for context), and it's theory is that after a full power loss, the hardware may boot into a slightly different state. When the plugin (or the driver) initializes the sensors, it may be exposing or activating something that the BIOS then responds to - even if Unraid is not actively controlling the fans. Have you seen this behaviour before, and do you know the fix for it? I would like to just have the fans visible in my dashboard really. I have added my diag file. Thanks in advance! galaxy-diagnostics-20250708-1043.zipJust wanted to say thanks - everything went smoothly! 👍 The missing disk has now been successfully rebuilt using the cloned drive (which is actually a borrowed disk): Duration: 14 hours, 45 minutes, 42 seconds Average speed: 150.6 MB/s Next step: I will remove the cloned disk and rebuild it onto a new 8TB drive. A huge thank you to everyone here for the invaluable help and guidance - it is truly appreciated! 🙏Data-Rebuild is running! 🤞 Will keep you posted. Thanks so much!! - for all the help - so farHere is diagnostics galaxy-diagnostics-20250404-1757.zip@trurl, @JorgeB, @itimpi I did everything up to: "Unassign the disk you want to rebuild" And now I want to start the array up again in Normal mode. But I cant click the "Start" button. I guess I have to click this checkbox "Start will disable the missing disk and then bring the array on-line. Install a replacement disk as soon as possible. [ ] Yes, I want to do this" ...right? Just want to make sure. Hope I did not mess this up already 😓So I have the cloned disk now. I am starting the process now...Quick update: I have now completed extended SMART tests on all remaining drives, and they all passed without errors. No signs of damage from the earlier power issue, so that is a relief. Thanks again for the guidance so far! Still waiting on the Clone - will probably get it next week sometime.I executed the tests. They will be done tomorrow morningI informed the expert to go ahead an create the clone (will take some days) After that phone call I got concerned that the other disks in the array might have been affected by the overvoltage (that damaged the two 6TB Barracudas). So to be safe I ran SMART health checks and short self-tests on all of the remaining drives (parity disk plus four data disks) using the console. All drives: Report SMART overall-health: PASSED Show zero reallocated or pending sectors Completed short self-tests without any errors Have clean logs (no UDMA CRC errors, command timeouts, or other warnings) So as far as I can tell, everything appears healthy and unaffected 🤞 If there is anything else I should check or if you have any suggestions for other stuff to check while I wait for the cloned disk, I would very much appreciate it.Yes. You are right. I just want to make sure it is possible before I ask him to do the work (It is not cheap ) So, thank you all for the help so far. I never did this before. I have restored other disks previously from parity, but this - using a new config, is new to me. So, just to make sure I fully understand the correct process before I proceed (when I get the cloned disk): The situation: I have 2 failed data drives and 1 working parity drive (8TB) My data recovery expert will create a 1:1 sector clone of one of the failed drives on a new 6TB identical disk (I will make sure I note which of the disks it is a clone of) My goal is to use that clone + parity + remaining drives to rebuild the second failed drive (on a new 8TB disk) Based on what you said, here is how I understand the process: Go to Tools > New Config, select Retain all, and click Apply Reassign: The cloned disk into the same slot as the original failed drive A new replacement disk (the new 8TB drive) into the slot of the second failed drive Check “Parity is already valid” and “Maintenance mode”, then start the array (I don't know how much time is used here - what the system does?) Stop the array immediately again Unassign the replacement 8TB disk (so Unraid sees it as missing) Start the array (now in normal mode) Unraid should now emulate the missing disk (the other broken 6TB Baracuda drive). If it looks OK and diagnostics confirm it is mountable (I will send that here): Stop the array again, reassign the replacement disk, start the array, and let Unraid rebuild it Is this the process? Is there anything I am missing or need to be extra careful about? And again, thanks for all the support so far! I really appreciate it.Yes I get that. It's because I said I also wanted to replace the cloned disk afterwards, because it is too small anyways.I guess that the array then starts to rebuild the other broken disk from: parity, the functioning drives and the clone of the other broken drive, right? Sorry I am just a bit uncertain here, because in the next part you mention: By "Unassign the disk you want to rebuild", do you mean the "clone disk" that I also want to rebuild afterwards? Or? I just want to make 100% sure i do this right.Here is the full story. I recently started rebuilding my old Unraid server with a new case, power supply and hardware. This is the case and the PSU Case: JMCD 12-bay NAS rackmount from Alibaba PSU: Corsair SF750 (2024 version) The case manufacturer recommends distributing power to the HDD backplane (MOLEX) across multiple rails and avoiding daisy-chained cables. So I ordered some custom cables for that purpose. I suspect one of these custom cables caused the two disks to basically fry, but I am not completely sure. After encountering the problems, I switched back to the standard power cables (except for one single Molex cable – also custom), and all drives were recognized – except for the two drives that are broken (6TB Barracuda drives). I have tested those two in different ports and with different power/data cables on the new server, but they show no signs of life. They do not spin up and are completely silent, unlike the other drives which work fine across various configurations. I also tried powering them directly via the motherboard using SATA power from the PSU, and with an older Molex-to-SATA cable (one without the 3.3V line) – still no response. They are not detected in Windows either, even in Disk Management. I tested other working drives from the server in Windows also – they show up fine (not as accessible drives in Windows, since they use XFS – but still visible), so I know the system is functioning properly now – just too late for those two drives. I even tried putting them back in the old server – still dead. Both drives have now been inspected by a data recovery expert. He confirmed that they were both exposed to overvoltage. Each of them has two short-circuited diodes and two damaged resistors. Electrically, the repairs were straightforward, but unfortunately, both drives have additional issues. One drive now spins up but never becomes ready. It has damage to the preamp circuitry and reports failure in the read/write heads, which would require a head swap. That would make the drive readable only by specialized equipment. The other drive does not spin up and reports a ROM code error. The expert believes the ROM issue can likely be corrected, and if that is the case, it might be possible to make the drive operational again. However, it is unknown if it also has preamp damage. The expert said that the cost will be the same regardless of which repair option I choose. At the moment, I am considering going with the clone option, as he believes that offers the best chance of getting a functional drive. This is why I wanted to make sure I could use that cloned drive as "the original drive" to restore the other drive. I will also replace the cloned drive afterwards with a bigger drive. I have some backup, but not everything. It's 12TB of data. A lot of it is unimportant, but some of it is photos etc.What does the "New Config" feature specifically do? Just lets you re-assign any disks or? Maybe I am just a bit worried here, sorry I appreciate your help! - But could you perhaps show me some screenshots, to make sure I do this the right way. Never did this before, and just don't want to mess this up. Also, any recommendation to the guy making the clone? He said: "A cloned disk from here is always a 1:1 full sector copy.". Is that good enough?





