





b1ue
Members
-
Joined
-
Last visited
-
Please see this thread for updated information, and Android build
-
Ever want to control unraid from your phone? I did, so I made Server Remote, and it is free and open source: Features: - Native iOS/Android app - All code compatible with Android, coming soon (if there is demand) - FaceID/Touch ID - Docker control / details - VM control / details - File/Folder download/upload/move etc. Android: I NEED YOUR HELP!!! I need 12 testers to use the app for my 14 days before I can publish a production release 1. Join "server-remote-android-testers" google group at https://groups.google.com/ 2. Download App from https://play.google.com/store/apps/details?id=app.reflect.serverremote iOS: 1. Install from app store: https://apps.apple.com/us/app/server-remote/id6480093477 Using the app: 1. Enable SSH -- terminal access -- on your unraid server (if it isn't already enabled) https://docs.unraid.net/legacy/FAQ/terminal-access/ 2. Connect to your server! Feedback Please report bugs/request on https://github.com/jowparks/server-remote/issues
-
Ever want to control unraid from your phone? I did, so I made Server Remote. Features: - Native iOS app - All code compatible with Android, coming soon (if there is demand) - FaceID/Touch ID - Docker control / details - VM control / details - File/Folder download/upload/move etc. How to get: 1. Install testflight on your iPhone/iPad: https://apps.apple.com/us/app/testflight/id899247664 2. Enable SSH -- terminal access -- on your unraid server (if it isn't already enabled) https://docs.unraid.net/legacy/FAQ/terminal-access/ 3. Download app "Server Remote" https://testflight.apple.com/join/z1eDZ0SA 4. Connect to your server! Feedback Please report bugs/request features here or in app! The world is our oyster, I developed app In a very extensible way, anything you can control via command line on unraid can be added as a GUI Interface.
-
Cool thanks @JorgeB
-
I built a new iOS app for controlling unraid servers (will be in Android soon). I am going to open a free beta to the unraid community, I am wondering where I should post a thread about this with images/links?
-
Is there plans for unraid to support an open API for server information/control? I want to build an app on top of Unraid, but I need a specification to work against. I have seen others ask and mention this, but haven’t seen any traction. I am happy to help with this initiative if we can create an open source project.
-
TY @ghost82 that solved it for me! For anyone else reading this, I added the xml linked above to my vm config, it then booted fine <qemu:commandline> <qemu:arg value='-usb'/> <qemu:arg value='-device'/> <qemu:arg value='usb-kbd,bus=usb-bus.0'/> <qemu:arg value='-device'/> <qemu:arg value='************************'/> <qemu:arg value='-smbios'/> <qemu:arg value='type=2'/> <qemu:arg value='-cpu'/> <qemu:arg value='Penryn,kvm=on,vendor=GenuineIntel,+kvm_pv_unhalt,+kvm_pv_eoi,+hypervisor,+invtsc,+pcid,+ssse3,+sse4.2,+popcnt,+avx,+avx2,+aes,+fma,+fma4,+bmi1,+bmi2,+xsave,+xsaveopt,+rdrand,check'/> </qemu:commandline>
-
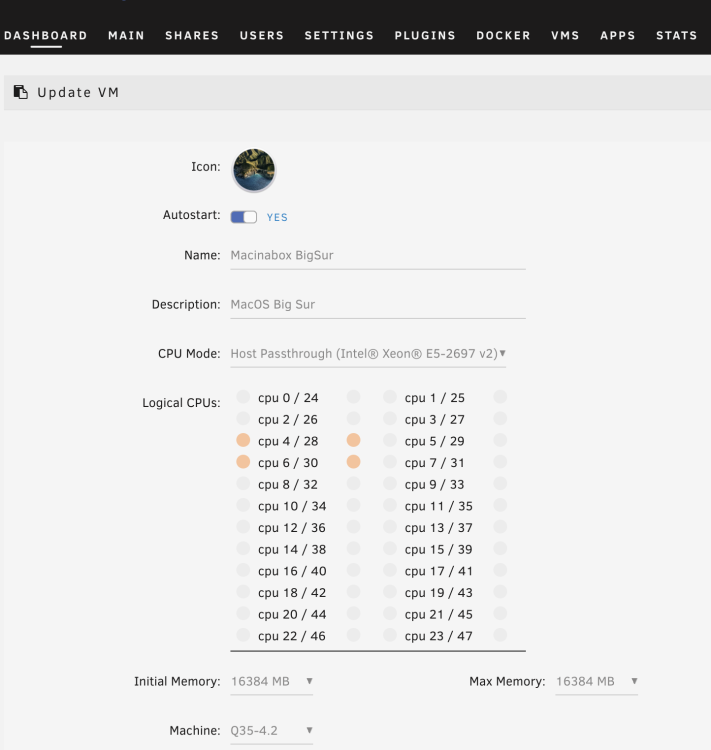
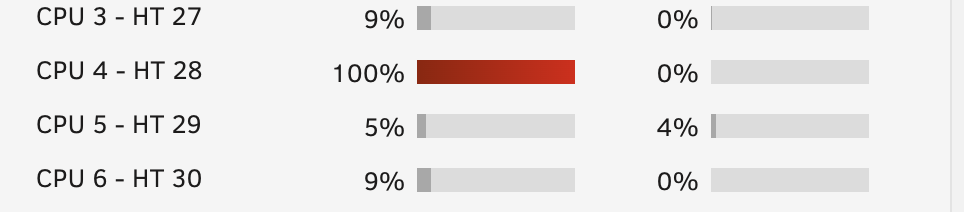
I was able to get Macinabox working from @SpaceInvaderOne s videos, but I am running into an issue now whenever I boot up the VM, the first CPU linked to the VM goes to 100% usage while the others I have allocated do nothing. The VM then hangs almost indefinitely. Included my XML configuration and a few screenshots: <?xml version='1.0' encoding='UTF-8'?> <domain type='kvm' id='16'> <name>Macinabox BigSur</name> <uuid>b86ac31a-0361-4854-bc36-6f25f52108d2</uuid> <description>MacOS Big Sur</description> <metadata> <vmtemplate xmlns="unraid" name="Windows 10" icon="BigSur.png" os="osx"/> </metadata> <memory unit='KiB'>16777216</memory> <currentMemory unit='KiB'>16777216</currentMemory> <memoryBacking> <nosharepages/> </memoryBacking> <vcpu placement='static'>4</vcpu> <cputune> <vcpupin vcpu='0' cpuset='4'/> <vcpupin vcpu='1' cpuset='28'/> <vcpupin vcpu='2' cpuset='6'/> <vcpupin vcpu='3' cpuset='30'/> </cputune> <resource> <partition>/machine</partition> </resource> <os> <type arch='x86_64' machine='pc-q35-4.2'>hvm</type> <loader readonly='yes' type='pflash'>/usr/share/qemu/ovmf-x64/OVMF_CODE-pure-efi.fd</loader> <nvram>/etc/libvirt/qemu/nvram/b86ac31a-0361-4854-bc36-6f25f52108d2_VARS-pure-efi.fd</nvram> </os> <features> <acpi/> <apic/> </features> <cpu mode='host-passthrough' check='none' migratable='on'> <topology sockets='1' dies='1' cores='2' threads='2'/> <cache mode='passthrough'/> </cpu> <clock offset='utc'> <timer name='rtc' tickpolicy='catchup'/> <timer name='pit' tickpolicy='delay'/> <timer name='hpet' present='no'/> </clock> <on_poweroff>destroy</on_poweroff> <on_reboot>restart</on_reboot> <on_crash>restart</on_crash> <devices> <emulator>/usr/local/sbin/qemu</emulator> <disk type='file' device='disk'> <driver name='qemu' type='raw' cache='writeback'/> <source file='/mnt/user/domains/Macinabox BigSur/macos_disk.img' index='1'/> <backingStore/> <target dev='hdc' bus='sata'/> <boot order='1'/> <alias name='sata0-0-2'/> <address type='drive' controller='0' bus='0' target='0' unit='2'/> </disk> <controller type='pci' index='0' model='pcie-root'> <alias name='pcie.0'/> </controller> <controller type='pci' index='1' model='pcie-root-port'> <model name='pcie-root-port'/> <target chassis='1' port='0x10'/> <alias name='pci.1'/> <address type='pci' domain='0x0000' bus='0x00' slot='0x02' function='0x0' multifunction='on'/> </controller> <controller type='pci' index='2' model='pcie-root-port'> <model name='pcie-root-port'/> <target chassis='2' port='0x11'/> <alias name='pci.2'/> <address type='pci' domain='0x0000' bus='0x00' slot='0x02' function='0x1'/> </controller> <controller type='pci' index='3' model='pcie-root-port'> <model name='pcie-root-port'/> <target chassis='3' port='0x12'/> <alias name='pci.3'/> <address type='pci' domain='0x0000' bus='0x00' slot='0x02' function='0x2'/> </controller> <controller type='pci' index='4' model='pcie-root-port'> <model name='pcie-root-port'/> <target chassis='4' port='0x13'/> <alias name='pci.4'/> <address type='pci' domain='0x0000' bus='0x00' slot='0x02' function='0x3'/> </controller> <controller type='virtio-serial' index='0'> <alias name='virtio-serial0'/> <address type='pci' domain='0x0000' bus='0x02' slot='0x00' function='0x0'/> </controller> <controller type='sata' index='0'> <alias name='ide'/> <address type='pci' domain='0x0000' bus='0x00' slot='0x1f' function='0x2'/> </controller> <controller type='usb' index='0' model='ich9-ehci1'> <alias name='usb'/> <address type='pci' domain='0x0000' bus='0x00' slot='0x07' function='0x7'/> </controller> <controller type='usb' index='0' model='ich9-uhci1'> <alias name='usb'/> <master startport='0'/> <address type='pci' domain='0x0000' bus='0x00' slot='0x07' function='0x0' multifunction='on'/> </controller> <controller type='usb' index='0' model='ich9-uhci2'> <alias name='usb'/> <master startport='2'/> <address type='pci' domain='0x0000' bus='0x00' slot='0x07' function='0x1'/> </controller> <controller type='usb' index='0' model='ich9-uhci3'> <alias name='usb'/> <master startport='4'/> <address type='pci' domain='0x0000' bus='0x00' slot='0x07' function='0x2'/> </controller> <interface type='bridge'> <mac address='52:54:00:77:f4:a3'/> <source bridge='br0'/> <target dev='vnet2'/> <model type='virtio-net'/> <alias name='net0'/> <address type='pci' domain='0x0000' bus='0x01' slot='0x00' function='0x0'/> </interface> <serial type='pty'> <source path='/dev/pts/2'/> <target type='isa-serial' port='0'> <model name='isa-serial'/> </target> <alias name='serial0'/> </serial> <console type='pty' tty='/dev/pts/2'> <source path='/dev/pts/2'/> <target type='serial' port='0'/> <alias name='serial0'/> </console> <channel type='unix'> <source mode='bind' path='/var/lib/libvirt/qemu/channel/target/domain-16-Macinabox BigSur/org.qemu.guest_agent.0'/> <target type='virtio' name='org.qemu.guest_agent.0' state='disconnected'/> <alias name='channel0'/> <address type='virtio-serial' controller='0' bus='0' port='1'/> </channel> <input type='tablet' bus='usb'> <alias name='input0'/> <address type='usb' bus='0' port='1'/> </input> <input type='mouse' bus='ps2'> <alias name='input1'/> </input> <input type='keyboard' bus='ps2'> <alias name='input2'/> </input> <graphics type='vnc' port='5902' autoport='yes' websocket='5702' listen='0.0.0.0' keymap='en-us'> <listen type='address' address='0.0.0.0'/> </graphics> <video> <model type='qxl' ram='65536' vram='65536' vgamem='16384' heads='1' primary='yes'/> <alias name='video0'/> <address type='pci' domain='0x0000' bus='0x00' slot='0x01' function='0x0'/> </video> <memballoon model='virtio'> <alias name='balloon0'/> <address type='pci' domain='0x0000' bus='0x03' slot='0x00' function='0x0'/> </memballoon> </devices> <seclabel type='dynamic' model='dac' relabel='yes'> <label>+0:+100</label> <imagelabel>+0:+100</imagelabel> </seclabel> </domain>
-
I have a fresh Unraid install going, first thing I want to do is setup the WireGuard vpn, I went to `Settings -> VPN Manager` Setup defaults Add Peer And then try to click the `Inactive` toggle to activate, and it turns off automatically. After reading online a bit I saw `wg-quick up wg0` as a test command from terminal. My output reads so: root@Tower:~# wg-quick up wg0 [#] ip link add wg0 type wireguard [#] wg setconf wg0 /dev/fd/63 [#] ip -4 address add 10.253.0.1 dev wg0 [#] ip link set mtu 1420 up dev wg0 [#] ip -4 route add 10.253.0.2/32 dev wg0 [#] logger -t wireguard 'Tunnel WireGuard-wg0 started' [#] iptables -t nat -A POSTROUTING -s 10.253.0.0/24 -o br0 -j MASQUERADE [#] ip -4 route flush table 200 [#] ip -4 route add default via 10.253.0.1 dev wg0 table 200 [#] ip -4 route add 192.168.50.0/24 via 192.168.50.1 dev table 200 Error: either "to" is duplicate, or "200" is a garbage. [#] ip link delete dev wg0 The `/etc/wireguard/wg0.conf` file contains: [Interface] #homewg PrivateKey=... Address=10.253.0.1 ListenPort=51820 PostUp=logger -t wireguard 'Tunnel WireGuard-wg0 started' PostUp=iptables -t nat -A POSTROUTING -s 10.253.0.0/24 -o br0 -j MASQUERADE PostDown=logger -t wireguard 'Tunnel WireGuard-wg0 stopped' PostDown=iptables -t nat -D POSTROUTING -s 10.253.0.0/24 -o br0 -j MASQUERADE PostUp=ip -4 route flush table 200 PostUp=ip -4 route add default via 10.253.0.1 dev wg0 table 200 PostUp=ip -4 route add 192.168.50.0/24 via 192.168.50.1 dev table 200 PostDown=ip -4 route flush table 200 PostDown=ip -4 route add unreachable default table 200 PostDown=ip -4 route add 192.168.50.0/24 via 192.168.50.1 dev table 200 [Peer] #phone PublicKey=OCcPej80Tkt1lT0UvAgCVEG3oIa4EaFkOseI4BDO3QQ= AllowedIPs=10.253.0.2 The problem seems to be with line: `PostUp=ip -4 route add 192.168.50.0/24 via 192.168.50.1 dev table 200` I just removed the config line causing the error, initialized the VPN, and repaired phone and it is working. Is this a considered a bug then? The config that was there was default, when I removed the line it worked.




