kinaley

Members
  • Posts

    33
  • Joined

  • Last visited

kinaley's Achievements

Noob

Noob (1/14)

1

Reputation

  1. Thank you johnnie.black, trurl and Constructor. I'm enlightened.
  2. Well Technically for me it's not problem if sdb changes to sdc and vice versa as long as all has Write Cache or what ever that is enabled. Ok one quesiton although i have never seen it happening in windows environment. If it were to in windows server then is that change of sdb,sdc,sde like change in drive letter D,E,F,G ?
  3. Hello friends, I the write speed has increased to 100+MB/s after running the command mentioned some where in this forum The below command will change the value from 0 to 1 and the write speed is great. sdparm --set=WCE /dev/sdb sdparm --set=WCE /dev/sdc sdparm --set=WCE /dev/sdd sdparm --set=WCE /dev/sde sdparm --set=WCE /dev/sdf sdparm --set=WCE /dev/sdg but after reboot the write speed is back to slow i type the below command to check the status sdparm -g WCE /dev/sdb sdparm -g WCE /dev/sdc sdparm -g WCE /dev/sdd sdparm -g WCE /dev/sde sdparm -g WCE /dev/sdf sdparm -g WCE /dev/sdg and the output displays 0 for all . I again have to re-run the command to enable is there a permanent way to fix so that it will work even after reboot ? is the settings available in BIOS ? I'm on very old server Dell R710, with H200 RAID controller. Thanks
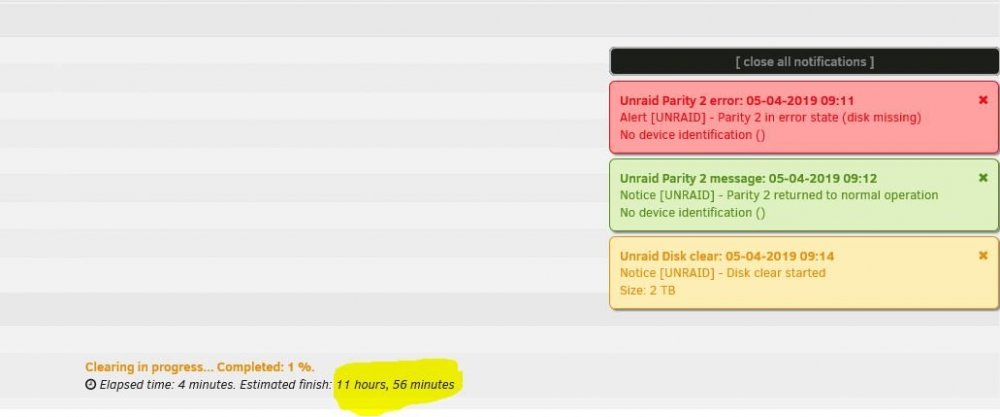
  4. johnnie.black redirected me to this post As the writing speed of Parity Clearing time was showing 12 hrs. sdparm command not found was the message at first but as per AnnabellaRenee87 post, installed nerdpack GUI plugin. after that everything was magic. 12 hrs parity work reduced to 3 hrs. This is very helpful post. Thanks
  5. Thankyou so much that really did the trick. Installed the nerdpack gui plugin as it was saying sdparm command not found. invoked the commands To set the write speed sdparm --set=WCE /dev/sdb sdparm --set=WCE /dev/sdc sdparm --set=WCE /dev/sdd sdparm --set=WCE /dev/sde sdparm --set=WCE /dev/sdf sdparm --set=WCE /dev/sdg and Verified with sdparm -g WCE /dev/sdb sdparm -g WCE /dev/sdc sdparm -g WCE /dev/sdd sdparm -g WCE /dev/sde sdparm -g WCE /dev/sdf sdparm -g WCE /dev/sdg NOTE: didn't had to reboot. and the result is attached from 12 Hrs to 3hrs. That was awesome. Thankyou for saving 9Hrs of my time. Many Many Thanks
  6. 12 Hrs 😞 , There is option like Quick Format or Full Format while formatting drives. I know it sounds silly and might not exist is there such option as Quick Parity Start and Full Parity Start. Anyways Thankyou johnnie.black
  7. I thought I found the information on wiki pages https://wiki.unraid.net/UnRAID_6/Storage_Management#Assigning_storage_devices but no it doesn't mention about the reducing parity disk from 2 to 1. waiting for some wise people to guide me.
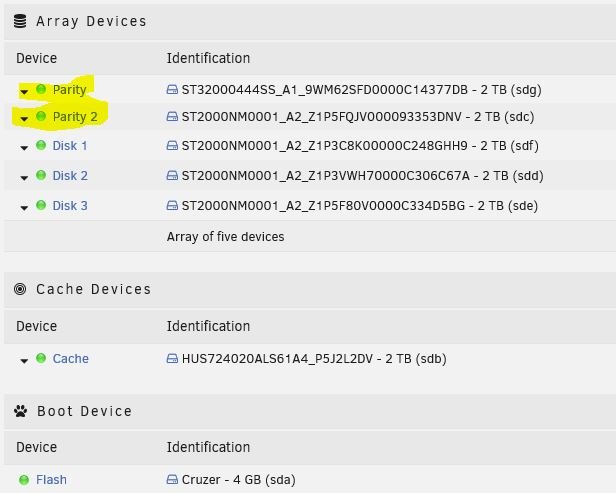
  8. Hello friends, Still fiddling around with the magical unRAID O.S. I have 6 disks and have configured the disk as below 2-parity disk 3-data disk 1-Cache disk Everything is running good without any issue. I just want to reduce my number of parity disk from -2 to 1 and add the 1 disk from parity to data disk and make 4 - data disk in total. (without losing data , is that possible ?) attached is the snapshot of my current disk configurations. Thanks
  9. That was awesome. Yes on this window-7 machine. I re-activated with the same licence. on next one I will try with the UUID stuff. Many Thanks itimpi
  10. opps sorry i think you're referring to different file libvert.. my bad
  11. Hi There, I'm also new to unRAID I had to download the virtio.img attached is the snapshot I had download option once I downloaded now the option is Remove please correct me if i'm in wrong direction
  12. Last Question. How do I preserve the License ? Now Windows says it's not activated.
  13. Thanks tjb_altf4, As you suggested just renamed the .raw to .img and specified in the VM Manager. It's working now.
  14. Thankyou itimpi yes, selectied SATA had BSOD again selected IDE, It's working great.
  15. Just got some more instructions at https://www.utappia.org/2016/04/how-to-migrate-your-virtual-box.html will try to follow the instructions hope it will help