

toolmanz
-
Posts
103 -
Joined
-
Last visited
Content Type
Profiles
Forums
Downloads
Store
Gallery
Bug Reports
Documentation
Landing
Posts posted by toolmanz
-
-
Thanks for the suggestion.
Yup, with and without the ACS Override.
ACS Override splits the 4 port NIC into 4 individual IOMMU's.
It made no difference that I can detect.
Hmmmm I am wondering if it is the card itself?? The card is an intel from a Dell server. Shouldn't be a problem......
I have changed around what riser the card is plugged into and seems to make no difference.
The built in NIC is a broadcom...... I wonder if that is a problem.
Well upwards and onwards.....🤪
Cheers
-
Well I tried your suggestion and I got the same result..... this is a really frustrating problem .... but I absolutely will not give up ...grrrrr😈
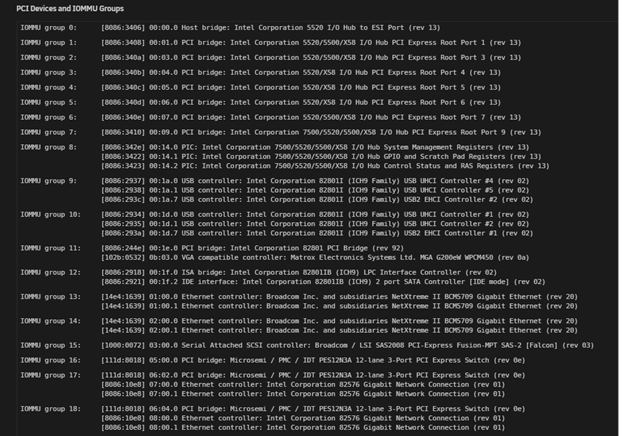
Looks like the same issue. IOMMU group 17 and 18 are where the newly installed NIC appears.
When I look at settings/network the installed card does not show up (it did) before I executed the vfio-pci.ids= command in the flash drive.
So it appears the card is properly excluded but the VM is not picking it up..... apparently you have to have an available NIC in order to start and install the VM.
Back to testing I guess ......
Thanks in advance for any information you can provide.....
Cheers
-
Ok thanks for the suggestion.
I did actually try installing OPNSense but without the seabios and I440fx.
I will try that and report back.
-
Spoke too soon - the iso does install BUT it doesn't find any valid NIC's.....
So removed PCIe ACS Override in the VM Manager as well and no joy! 😔
Ill keep at it......
Cheers
-
Well it pays to be persistent! 😃
I played around with the settings and found a combo that works.
I used
Spaceinvader One video ...I guess the difference is the box I am running Unraid on .... only thing I can think was a difference from the video.
Anyway ....
I went with SEABIOS in the VM set up and turned on PCIe ACS Override in the VM Manager which separated all of the ethernet ports into their own IOMMU's.
Not sure if it was one or both ?? Going with it for now.
Cheers
-
Trying to Install PF Sense on latest Unraid as a VM.
I am running on a Dell R710 server. 24 HT and 40 G memory.
I have 4 NICS as part of the server and have added another Intel 4 port NIC for PF Sense.
I entered the vfio command in Syslinux Configuration to remove the new card from Unraid.
It was successfully removed and it turns up on the PF Sense config to include.
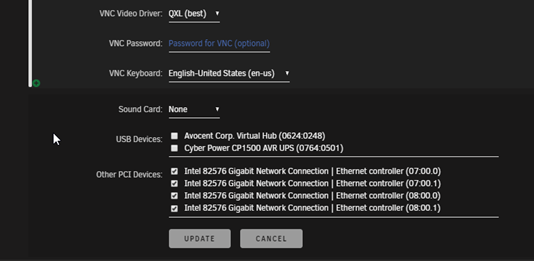
IOMMU screen
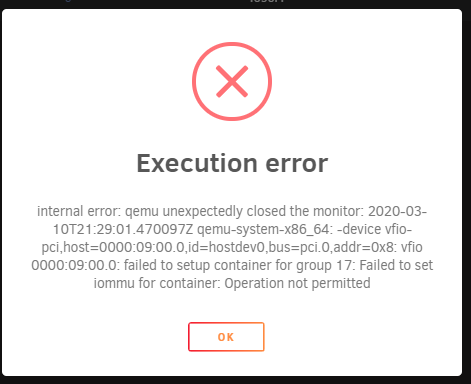
When I try to start it up, after removing virtual disk in XML, it gives this error message:

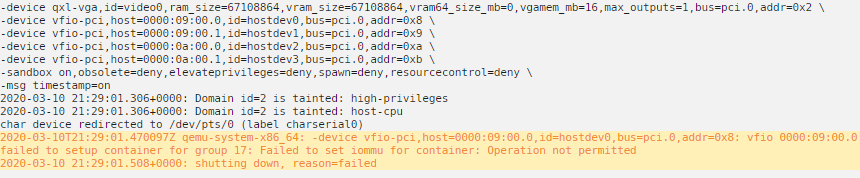
Error Log:
I have also tried the PCIe ACS Override in the VM Manager. It did split up the ports into their own IOMMU groups but get same error.
I'm out of ideas. Anyone else get something similiar?
I tried a few of the other suggestions in the forum but no joy!
Could someone have a look at the particulars and suggest a direction to head in?
Thanks in advance!
Cheers
***Solution***
Sitrep
1. Dell R710 2U rackmount server
2. Onboard 4 port NIC
3. 23 HT’s and 46G memory
4. Unraid server with various dockers such as Nextcloud, NZBGet, Sonarr and Bitwarden
5. Server is stable and functioning as expected.
6. Unraid has claimed all 4 NIC’s for itself.
Objective:
To install PF Sense in a VM to handle network traffic from the server, various IOT devices, tablets and phones.
Use existing 4 port NIC. 2 ethernet ports are required.
Process:
1. Follow the process for downloading and preparing the iso for installation
https://docs.netgate.com/pfsense/en/latest/install/installing-pfsense.html
2. Copy the iso you plan to use to your iso’s directory on the unraid server
3. Go to Tools/System Devices. It will provide a list of devices in your machine. Look for your ethernet adapters. I have 4 – but only need 2 so I used device 02:00:00 and 02:00:01 leaving the first to for Unraid to use. Jot down these numbers.

4. Go to Main/Flash and scroll to the bottom. Add the text shown

Note where I used 02:00:0 and 02:00:1
Reboot the machine as these commands affect the entire machine and need to be in play for the next steps.
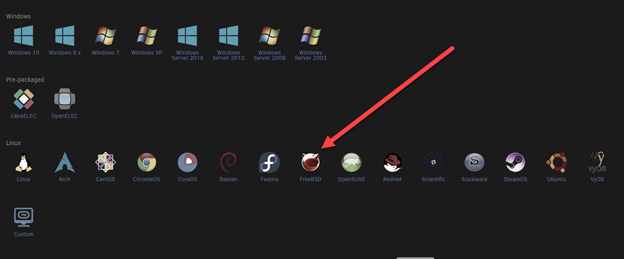
5. After reboot, go to VM tab in Unraid and click “add a VM”.
6. Choose FreeBSD
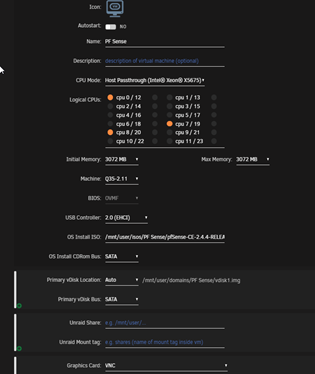
7. Fill in the template as shown in the attached “Tutorial PF Sense property sheet.PDF. Click on the yellow bubbles for additional info.
Double check to make sure the “start vm after creation” is unticked.
8. Click on the VM and select edit.
9. In the top right there is a button that says “form view”. Click it and you should see something like this. (XML)
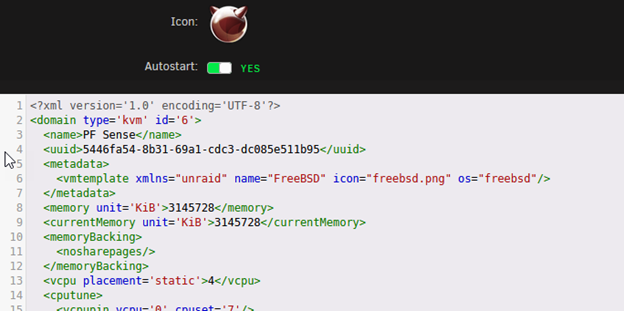
10. Scroll down to </video> near the bottom.
11. Add in the following text after </video>:
<hostdev mode='subsystem' type='pci' managed='yes'>
<driver name='vfio'/>
<source>
<address domain='0x0000' bus='0x02' slot='0x00' function='0x0'/>
</source>
<alias name='hostdev0'/>
<address type='pci' domain='0x0000' bus='0x03' slot='0x00' function='0x0'/>
</hostdev>
<hostdev mode='subsystem' type='pci' managed='yes'>
<driver name='vfio'/>
<source>
<address domain='0x0000' bus='0x02' slot='0x00' function='0x1'/>
</source>
<alias name='hostdev1'/>
<address type='pci' domain='0x0000' bus='0x04' slot='0x00' function='0x0'/>
</hostdev>
Edit lines 4 and 12 – insert the device id’s from your machine that you wish to use. The supplied example is from my XML and note the usage of the 02:00:0 and 02:00:1 identifiers. Also, if you have more than 2 just add more.
12. Click save which should take you back to the VM page.
13. Start the VM and you now operational with PF Sense. I recommend you check out Spaceinvader One videos on setting up PF Sense.
Next, since I have got this going, I am going to install a 4 port NIC into the server and try to get that working as it provides 4 instead of 2 NIC’s which was my original plan.
Let me know if this is overkill - started my IT career as a technical writer. 🤔
Cheers
-
Good to know.
Thanks for the info.
Cheers
-
All,
I have set up cpu pinning in the property sheets for dockers and my windows 10 vm.
Question:
If a docker or vm with cpu pinning is stopped - is the cpu pinning associated with the stopped docker or vm ignored or does it still "exist" and thereby not available for use by other items such as the unraid os etc.?
Just wondering if anyone knows.
Cheers
-
Solved
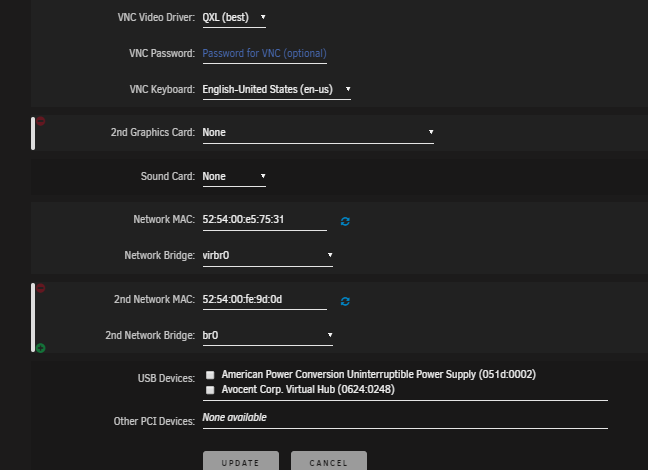
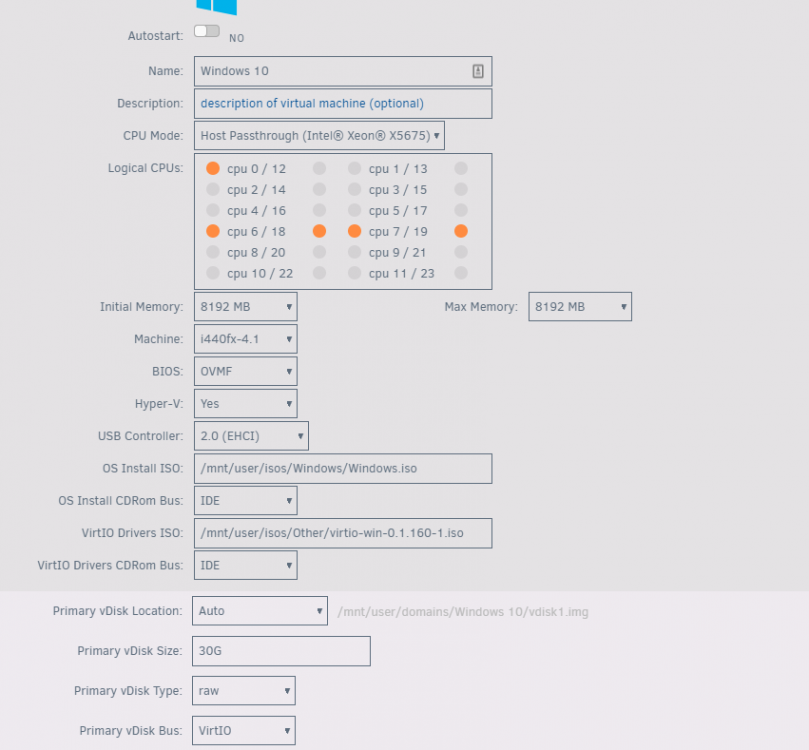
Well I am not sure what did it but I have a Windows 10 VM up and running. I changed a few things in my property sheet and that seems to have done it.
First is my hardware setup:
Dell R710 server, 12 Xeon 5600 Series processors (24 with HT), 48G memory, 6 Sata HD
This is what I did to the best of my recollection:
1. Grabbed a new copy of windows 10 from Microsoft using the Media Creation Tool - https://www.microsoft.com/en-ca/software-download/windows10
2. Updated driver files to virtio-win-0.1.171.iso at https://docs.fedoraproject.org/en-US/quick-docs/creating-windows-virtual-machines-using-virtio-drivers/
3. Changed the OS Install CDROM bus to Sata
4. VM Property sheet:
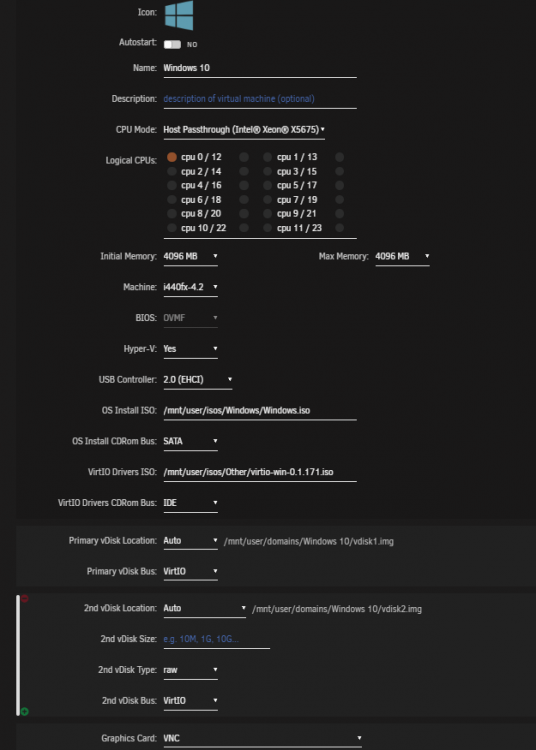
It then booted into Windows install.
5. To get the disk to work I had to use the Fedora Red Hat AMD dirvers (?!?!? not sure why this worked since this is a Xeon system).
6. Install completed .... but I had no internet so .....
7. Installed the network driver ....
8. Up and running
I also installed a graphics driver to get a more reasonable screen size:
and a virtual sound device....
Thats it and it works wonderfully.
Cheers
PS: Thanks Johnnie Black for the redirection. 😁
-
Ohhhhhh.....didn't think of that.
I'll give it a try and report back.....
Thanks!
-
Bump....
-
Folks,
I return with glad tidings - it works!
Because I had messed around with the configuration files so much trying to follow the instructions from a couple of different sources, I just blew away my nextcloud and mariadb dockers and started from scratch.
It was very painful but I am glad to say it was much easier starting from scratch.
As was said earlier there is just one line to add to the appdata/nextcloud/www/nginx/config/config.php file:
This is what mine looks like under the trusted proxies section (about line 8 of the file):
'trusted_domains' =>
array (
0 => 'your local address 192....',
1 => 'your subdomain on duckdns.org',
),An example of second line could be:
1 => 'mydomain.duckdns.org',
Thats it and it worked!!! Don't forget to restart your dockers after the change is made.
All good and thanks for the assist.
Now on to bitwarden - but not until I have a beer or 2 - code lube!
Cheers
-
Newbie(s)
I went through the same thing and I finally got it to work. Been there done that (this is one of the most difficult aspects of unraid 😵)
There is another option though - much easier, intuitive and up and running in 10 - 15 minutes.
I use duckdns and this is a great docker. No writing code (except for nextcloud configuration which is straight forward and there are lots of assists on the forum). I use it for nextcloud, sonarr, radarr and netdata. All work flawlessly.
Haven't figured out Bitwarden yet - that is a little more complicated and a number of folks are working on it.
For somebody starting out this is an good way to just get up and running. You can always come back to this if you wish.
Check this out ....https://nginxproxymanager.jc21.com/
The instructions are virtually non-existent but the set up is intuitive.
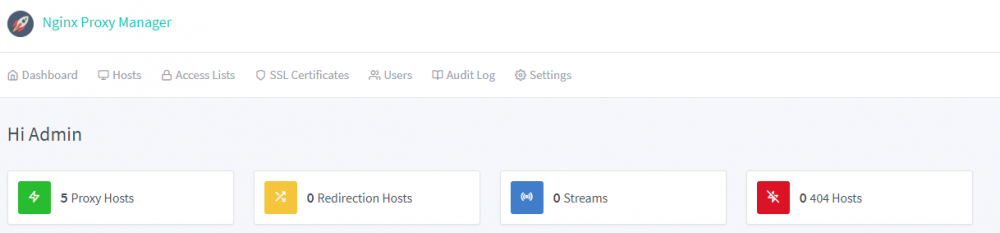
Cheers
PS: I just posted up the coding to get nextcloud working on the NGINX Proxy Manager help thread.
-
All,
I have to admit that it didn't take long to get this set up and working for http: sites. Excellent docker that suits me right down to the ground.
Djoss you da man....👍
I struggled with this nginx reverse proxy thing for weeks and weeks....tried about 4 different methods and none of them worked.
This worked on first try and is working for sonarr, radarr and nzbget and netdata. I am using duckdns and subdomains.
I have a problem with Nextcloud though. No matter what I try it doesn't work.
I have received

 and an interesting message around internal server error:
Internal Server Error
The server encountered an internal error and was unable to complete your request.
Please contact the server administrator if this error reappears multiple times, please include the technical details below in your report.
More details can be found in the webserver log.Anyway I suspect it is something I did with the various config files while trying the other methods to get this working....default, config.php etc.
I can't even access it locally!!! Not to mention it is the only https:// site.
Would it be better if I "blew away" my nextcloud docker and re-installed? I'm thinking yes. But do I risk my nextcloud data? Or anything else?
Thoughts?
Has anyone had any luck getting the https:// nextcloud reverse proxy to work? Did you have to change any config files?
I would appreciate it if someone could help out or give me a nudge in the right direction.
Thanks in Advance 😊
-
First thanks for the responses....
The part I am struggling with is the final instructions in the guide called Services (Proxy_Pass). Why are those pages included at all?
I think I understand what it is trying to do. But, what do I do with them? Do I add them to the default file under the folder called letsencrypt then nginx then site-conf?
Or is this just confirming what it should look like in the default file? There is no context on that final page.
Not sure if that is any clearer....I think the question is "why is the services (proxy_pass) pages of the guide even included ?"
Just can't get it through my thick skull....it is apparent I have a lot more to learn.
Oh, forgot to include that the set up is not currently working for me at all. Just get "page not working".
I'll read the blog previously suggested just to see if there is a clue. I will post up my default file later on.
Thanks again
-
All,
I have gone over this thread many times - still can't get this to work. 😫
Tested with sonarr, radarr etc. just get the NGINX 404 page.
I think the problem is the section on PROXY_PASS.
I don't understand what this is and what file I should be adding those lines to.....☹️
Can somebody tell me what file(s) I need to add these lines to?? I can't find anything on what this stuff is....
I am using the duckdns site and have a typical unraid installation.
Thought I knew a lot about unraid - apparently that isn't the case....😖
If anyone is around I would appreciate a "nudge" in the right direction.
Thanks in advance
-
Hello all,
I have been messing with unraid for a while and just migrated to a Dell R710 rack server.
Now I would like to try installing a Win10 VM.
Set up is done and we get to the install stage but can't find a driver in the "virtio-win-0.1.160-1.iso" file that works.
Tried everything and no disk shows up....
I have tried all of the possible options and the only one that shows a driver that is compatible and it doesn't work.
I have also search the $#^& out of this forum with no joy.
This is the sheet but can't find a driver that works.
If anyone has one of these servers and/or has a suggestion please let me know.
Is it the vdisk type? vDisk bus? CPU mode?
Just too many options and combinations to do trial and error.
Thanks in Advance
Toolman
-
I am setting up a reverse proxy on my Unraid server. I followed all the steps in the OP video and currently have Sonarr working. 😀
I used the duckdns method as I dont have my own domain.
The video is excellent as always but for the Sonarr implementation it does instruct if you are using duckdns.
The nextcloud portion just speaks to instruction if you have your own domain name - not if you used duckdns.
What are the edit changes to the config.php (this is where I think the problem is) file to get this working with duckdns?
Do you include the full duckdns domain name xxxxxx.duckdns.org or just the xxxxxx without the suffix?
Or something different?
Current config.php:
$CONFIG = array (
'memcache.local' => '\\OC\\Memcache\\APCu',
'datadirectory' => '/data',
'instanceid' => 'xxxxxxxxxx',
'passwordsalt' => '/xxxxxxxxxxxxxxx',
'secret' => 'xx+xxxxxxxx+xxxxxxxxx',
'trusted_domains' =>
array (
0 => 'xxx.xxx.xxx.xxx:444',
1 => 'xxxxxx.duckdns.org',
),
'dbtype' => 'mysql',
'version' => '16.0.1.1',
'overwrite.cli.url' => 'https://xxxxxx.duckdns.org',
'overwritehost' => 'xxxxxx.duckdns.org'
'overwriteprotocol' => 'https',
'dbname' => 'nextcloud',
'dbhost' => 'xxx.xxx.xxx.xxx:3306',
'dbport' => '',
'dbtableprefix' => 'oc_',
'mysql.utf8mb4' => true,
'dbuser' => 'nextcloud',
'dbpassword' => 'xxxxxx',
'installed' => true,
);* I have xx'd out the private bits.
Any help with this would be most appreciated.... ☺️
Thanks in advance
-
Ok thanks for this. 😀
Will do.
-
Problem:
Need to add 2 more SATA ports to motherboard.
Sorry for all the detail but wanted to make sure everyone has all the facts.
Motherboard:
ASUSTeK COMPUTER INC. A88X-PLUS/USB 3.1, Version Rev X.0x
American Megatrends Inc., Version 0211
BIOS dated: Mon 07 Mar 2016 12:00:00 AM ESTAvailable slots: (All available no cards installed)
1 x PCI Express 3.0/2.0 x16 slot (at x16 mode)
1 x PCI Express 2.0 x16 slot (max at x4 mode)
2 x PCI Express 2.0x1 slots
3 x PCI slots
CPU:
AMD-A10-7870K, 12 compute cores 4C+8G @ 4200Mhz
Drives:
(1) Parity Drive: 8GB Iron Wolf
(2) Array: 6 disks – (5) 3TB and (1) 5Tb
(3) Cache: (2) SSD’s 240 Gb ea.
OS: Unraid latest
Docker Containers:
(1) binhex – Krusader
(2) binhex-nzbget
(3) binhex-radarr
(4) bibhex-sonarr
(5) pihole
(6) PlexMediaServer
VM:
(1) Windows 10
Requirements:
I want to add an 8TB drive to the array. I want to add 2 SATA ports to the rig.
What type of PciE SATA port card should I add to the machine?
Not too worried on speed – just need something simple and easy to install.
What I have gleaned from reading this and other posts is that:
1) Most folks here are recommending an LSI based card???
2) Some Marvell firmware does perform as expected
3) Not sure if I need a RAID capable SATA expansion card???
4) There are lots of SATA expansion cards on places like Amazon(.ca)
5) There are lots of choices – just not sure which one would work best with UnRaid.
Examples of what I have looked at:
IO Crest 4 Port SATA III Controller Card: http://amzn.to/2b1MfdP
Vantec 4-Channel 6-Port SATA PCIe Raid Controller Card: http://amzn.to/2aZfhj5
StarTech.com 4 Port PCIe RAID Controller Card: http://amzn.to/2b1LyBh
All of these have a 2 port option so ignore the # of ports – I only want 2.
Thanks in advance for any guidance you can provide.....or if there is a thread I have missed that speaks to this.....
Cheers
-
Thread closed please.
-
Thanks for your response. This led me to look for another email and I found it. 😋
Because of the crappy way outlook works online😖, this email was not showing up in the in box. Not sure why but did a search and bam!
All registered and setup proceeding.
Thank-you to all!
-
Thanks for your quick response. Nice to know somebody is listening 😀
I have emailed lime. Not really impressed so far.
And whats up with that crappy Firefox browser....keeps crashing. Oh well....chalk it up to noobidity...😏
Now I wait for Lime.
-
Well I got the email acknowledging registration but no file attached.


 and an interesting message around internal server error:

PF Sense VM - internal error: qemu unexpectedly closed the monitor - ***Solved***
in VM Engine (KVM)
Posted
I did but double checked to make sure.
No joy.
On to investigating the IOMMU subject and investigate why the NIC's are not available to Unraid yet not available to anything else either....
¯\\\_(ツ)_/¯
I am hoping that will yield some positive results.
Cheers