

Jakosaur
-
Posts
20 -
Joined
-
Last visited
Content Type
Profiles
Forums
Downloads
Store
Gallery
Bug Reports
Documentation
Landing
Posts posted by Jakosaur
-
-
Drives arrived yesterday. Putting the 1st one through a pre-clear now. Hopefully the steps above look alright! 🙂
-
Anyone know if Plex Media Server 1.18.2.2041 is available through the Plex Pass docker yet? Forcing an Update to the docker through unRAID doesn't seem to do anything. Thanks 🙂
-
On 11/17/2019 at 10:36 PM, jonathanm said:
Pretty much identical. Just substitute Data Drive for Parity Drive in every applicable step. Also step 12 should be a non-correcting parity check when replacing a data drive.
If you are absolutely confident in the health of all your current drives and you already have the serial numbers recorded, you could skip steps 2,3,4,5, but it doesn't hurt to be sure everything is still healthy.
IF you currently have 2 parity drives you could theoretically do both upgrades simultaneously, but that adds another level of risk, and I suspect from the tone of this thread that you are more than happy to do the extra legwork and take the time to be as safe as you possibly can.
Thanks for that information!
- Pre-Clear / Stress Test New Data Drive (Optional)
- Screenshot Current Config
- Parity Check with `Write corrections to parity` enabled
- Check Smart Reports
- Backup Flash Drive
- Turn Server Off
- Disconnect Old Data Drive
- Connect New Data Drive (if not already connected for pre-clear)
- Turn Server On
- Select New Data Drive in Data Slot that Shows the Missing Drive
- Start the Array with Parity-Sync and / or Data-Rebuild
- Parity Check without `Write corrections to parity` enabled
- Check Smart Reports
^ Hopefully that looks alright!
Currently only have 1 parity drive, but as you say I'm happy to do the extra work/time to be safe. 🙂
-
Got 2 more 4TB drives on the way. Will be upgrading 2x 1TB data drives and upgrading them both to 4TB.
Anyone able to help with the steps required for that? Are they similar to the steps above for a Parity Drive upgrade? Maybe not? Any help will be appreciated 🙂
-
15 hours ago, John_M said:
Since split level takes precedence over allocation method, what happens when Disk 1 is (almost) full? Since you have Minimum free space set to zero, will the allocation ever move on to Disk 2 or will all subsequent writes fail due to lack of space?
I don't actually know, and would like to know!
-
31 minutes ago, johnnie.black said:
Configuration is correct, only way I think of that happening is that episode being written to the disk share.
Thanks for checking the config!
Plex has /media mapped to /mnt/user. Going to have to do some investigating 🤔
-
6 minutes ago, johnnie.black said:
Split level is pretty much bulletproof if correctly configured, you can post the complete paths you're using together with a screenshot for that share, but either share is not correctly configured or that episode was written directly to the disk share.
TV Shows/The 100/Season 06/EpisodesAreHere
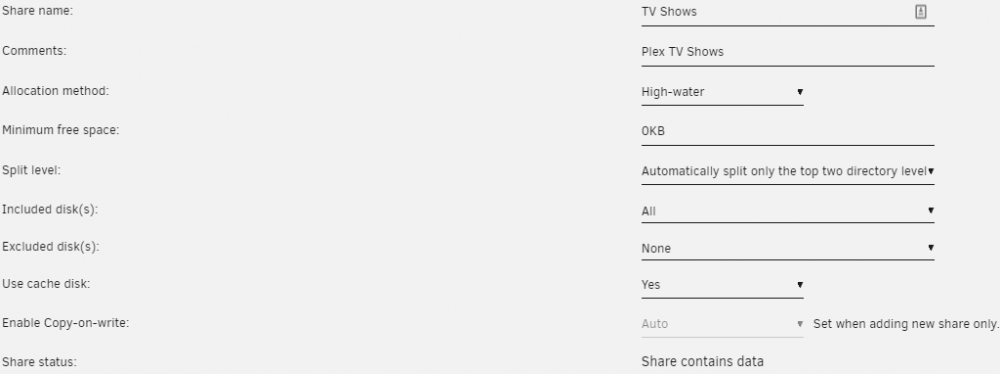
Just taken a look at another similar share (but used for Plex DVR) and same thing is happening. Same share settings and directory layout
Thanks
-
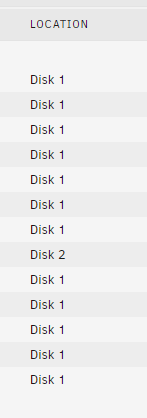
I have a TV share with the exact same directory layout as the bottom example (in the image) I found on the forum. I set the Split Level to Top Two Directory Levels. I did this before adding any data into the share, right when I was first setting up UNRAID.

Just taken a look in the share, and can see that one episode is on a different disk.
Just wondering whether I did something wrong as I'm not sure what happened.
Thanks in advance 🙂
-
30 minutes ago, jonathanm said:
Also, check the smart reports on all drives before and after.
I found this online whilst looking up how to replace the parity drive. Are these the only things to look at on the Smart Report?
QuoteYou are basically looking for Attributes #5, 196, 197, 198, and 199 to be all zeros.
-
1 minute ago, buxton said:
Yes, just a screen shot of the main tab in the web UI before you make any changes. I used "working config" to mean a known good state of everything, sorry for the confusion. Also, the parity check before and after as mentioned by @jonathanm is critical.
Thanks! Added the suggestions from you two into the steps, in my previous comment. Appreciate the help from both of you! 🙂
-
@buxton & @jonathanm thanks for replying!
On 10/7/2019 at 2:09 PM, buxton said:I would also recommend saving a screen shot of your working config before you make any changes
Would you mind expanding on what is the "working config"? Web UI main tab? Thanks
On 10/7/2019 at 2:09 PM, buxton said:Have you precleared the new drive?
Currently in the process of that! 🙂
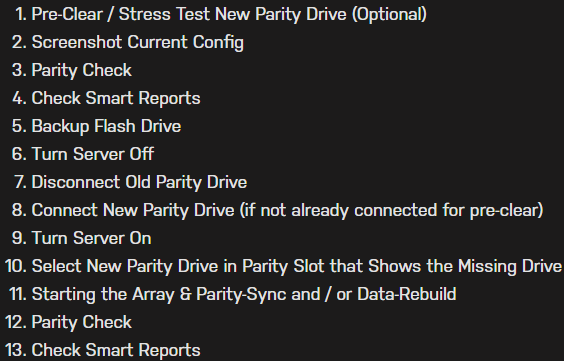
- Pre-Clear / Stress Test New Parity Drive (Optional)
- Screenshot Current Config
- Parity Check
- Check Smart Reports
- Backup Flash Drive
- Turn Server Off
- Disconnect Old Parity Drive
- Connect New Parity Drive (if not already connected for pre-clear)
- Turn Server On
- Select New Parity Drive in Parity Slot that Shows the Missing Drive
- Start the Array & Parity-Sync and / or Data-Rebuild
- Parity Check
- Check Smart Reports
Thanks again for the help!
-
Hello,
Just asking for some confirmation to whether I've understood this correctly before proceeding. Currently got a 2TB drive as my Parity, looking to upgrade it to 4TB so I can later down the line increase the size of my data disks.
- Turn server off
- Disconnect old parity drive
- Connect new parity drive
- Turn server on
- Select new parity drive in parity slot that shows the missing drive
- Guessing when starting the array it'll say / do a rebuild?
Hope I haven't missed anything, but just asking for confirmation to whether I've understood correctly + any tips or steps other people recommend before & after.
Thanks in advance 🙂

-
1 hour ago, dlandon said:
The '@' character is a reserved php character and trying to work around this is a major task.
Ok, thanks for explaining! 🙂 Would be great if it's possible to get working at some point!
-
On 8/18/2019 at 8:50 AM, Jakosaur said:
+1 - implementation via the GUI would be perfect. Going to follow those instructions, but 100% agree it should be in the GUI for convenience! 🙂
Did in the end use those instructions and worked perfectly. Would be nice to know why UNRAID won't let us have usernames with "@" in them through the GUI. Normal UNRAID share access work fine, but Unassigned Devices follows the GUI rules and denies access to shares if the username has an "@".
-
5 hours ago, dlandon said:
The '@' symbol is not allowed.
Guess I'll scrap my plans then, normal shares work fine after using the tutorial.
Thanks for replying.
-
On 3/17/2018 at 6:04 AM, geekazoid said:
Zombie thread but it wasn't answered and I haven't found a current one that does yet. Anyway its first page on google results so here goes. braaaaaains!
This is unfortunately incorrect, at least in 2018 it is. A Microsoft Account is not an email account. It is a Microsoft Account that is registered to your device and software licenses (for MS products), your Store account, your Skype acct and it links your user profile experience across Windows machines. That is why every time you log in with your MS account on a new PC, you have to authorize that by multi-factor auth and lo and behold you have the same desktop image and other stuff. You can and should use your MS account with your unRAID shares because it's The Right Way and it's easy. But there is no integration to MS directly; you will have to update your password on unRAID when you change it with MS. This is actually how it's done on every NAS on the market that I've seen, because its been supported by Samba for years.
Unfortunately the GUI on unRAID has not caught up with the times. You can use your Microsoft Account with unRAID; you just need to know how to edit a few config files, and you need to restart samba (i.e. stop/start the array).
- In the GUI, create a user with the short name for your account. e.g. in my case I called the account 'dude'. Set a password for dude that matches your MS account. This will create a unix account and a matching samba account- edit /etc/passwd (and /boot/config/passwd probably - I did) and change "dude" to "[email protected]" to match your MS acct
- edit /etc/shadow (and /boot/config/shadow) likewise
- edit /boot/config/smbpasswd as well, to change the unix username to your MS account
Now when you restart the array its going to restart samba. You can probably bounce samba manually; I've not tried to see if unRAID handles that gracefully yet. Someone else might chime in the confirm. Once samba is restarted, the new account is enabled.
Okay now on the client machine you are connecting from, I'm assuming that you are logging in with a standard Microsoft Account. You should have no drives mapped (especially with credentials saved) and you can always restart the Workstation service to clear any open sessions to the server. Once you've done this, if you navigate to the unRAID server in your Windows Explorer network browser, it should not prompt you for credentials ASSUMING that you configured basic permissions for the user account to access your shares.
This works fine because its TOTALLY SUPPORTED BY SAMBA and standard on almost every NAS product I've seen but unRAID. I'm just going to push a feature request to add the ability for the GUI and the supporting scripts to eat a proper email address for a MS account.
BTW the form of a MS account in SMB protocol is MicrosoftAccount\[email protected]
If the target was a windows box, it would need to have that MS account created locally and have been logged in once before. Samba is not so picky because it has SAVED the password that you gave it. The difference is that real Windows 8 or 10 host knows how to ask Microsoft if the credentials are valid (and it caches it for a time, which you could look up - I've forgotten).
I find it hilarious when people say oh this is not standard or supported when it's a Microsoft protocol so what they say and do is the standard.
Cheers from your friendly neighborhood MCSE.Thanks for these instructions, works perfectly! Only issue I'm having is shares from Unassigned Drives prevents access as the user name has an "@" in it 🙁
-
Hello,
I used this tutorial to make an UNRAID user with an email address as the username, as it's not supported through the GUI at the moment. Mainly for easy access to the server through Windows Explorer whilst using a Microsoft Account user on Windows.
When I try to add "Read/Write" access to that user in Settings -> Unassigned Devices -> SMB Security then press "Apply", the newly added permissions don't save and stays at "No Access".
Any help would be appreciated.
Thanks
-
On 4/11/2018 at 3:53 AM, Caldorian said:
it would be really helpful if there was a way to create new users/SMB users who's username is an email address
+1 - implementation via the GUI would be perfect. Going to follow those instructions, but 100% agree it should be in the GUI for convenience! 🙂


Unraid Forum 100K Giveaway
in Unraid Blog and Uncast Show Discussion
Posted