Joe Avelar
Members
-
Joined
-
Last visited
Everything posted by Joe Avelar
-
Same issue here as well.
-
I'm not entirely sure what's happening, but pihole stopped working for me after my last update. I'd be grateful for any help. I'm using ssl and am self-signed. I have the following container paths: Container Path: /etc/lighttpd - where I updated the external.conf and haven't changed it since Aug of 2022 when I initially set things up. Container Path: /config/ Container Path: /etc/dnsmasq.d/ Container Path: /etc/pihole/ I'm not clear why this line is existing with 1. 2022-12-29 13:32:42: configfile.c.2113) command "find /etc/lighttpd/conf-enabled -name '*.conf' -a ! -name 'letsencrypt.conf' -printf 'include "%p"\n' 2>/dev/null" exited non-zero: 1 I can see the line in lighttpd.conf which was updated today when I stopped and restarted the container. [18:32:38.154071] STUBBY: Read config from file /config/stubby.yml 2022-12-29 13:32:38: configfile.c.2113) command "find /etc/lighttpd/conf-enabled -name '*.conf' -a ! -name 'letsencrypt.conf' -printf 'include "%p"\n' 2>/dev/null" exited non-zero: 1 2022-12-29 13:32:38: configfile.c.1970) source: /etc/lighttpd/lighttpd.conf line: 82 pos: 1 parser failed somehow near here: (EOL) lighttpd: no process found [18:32:39.153634] STUBBY: Stubby version: Stubby 0.3.0 [18:32:39.156214] STUBBY: Read config from file /config/stubby.yml 2022-12-29 13:32:39: configfile.c.2113) command "find /etc/lighttpd/conf-enabled -name '*.conf' -a ! -name 'letsencrypt.conf' -printf 'include "%p"\n' 2>/dev/null" exited non-zero: 1 2022-12-29 13:32:39: configfile.c.1970) source: /etc/lighttpd/lighttpd.conf line: 82 pos: 1 parser failed somehow near here: (EOL) lighttpd: no process found [18:32:40.153184] STUBBY: Stubby version: Stubby 0.3.0 [18:32:40.156068] STUBBY: Read config from file /config/stubby.yml 2022-12-29 13:32:40: configfile.c.2113) command "find /etc/lighttpd/conf-enabled -name '*.conf' -a ! -name 'letsencrypt.conf' -printf 'include "%p"\n' 2>/dev/null" exited non-zero: 1 2022-12-29 13:32:40: configfile.c.1970) source: /etc/lighttpd/lighttpd.conf line: 82 pos: 1 parser failed somehow near here: (EOL) lighttpd: no process found [18:32:41.154673] STUBBY: Stubby version: Stubby 0.3.0 [18:32:41.157475] STUBBY: Read config from file /config/stubby.yml 2022-12-29 13:32:41: configfile.c.2113) command "find /etc/lighttpd/conf-enabled -name '*.conf' -a ! -name 'letsencrypt.conf' -printf 'include "%p"\n' 2>/dev/null" exited non-zero: 1 2022-12-29 13:32:41: configfile.c.1970) source: /etc/lighttpd/lighttpd.conf line: 82 pos: 1 parser failed somehow near here: (EOL) lighttpd: no process found [18:32:42.155364] STUBBY: Stubby version: Stubby 0.3.0 [18:32:42.158502] STUBBY: Read config from file /config/stubby.yml 2022-12-29 13:32:42: configfile.c.2113) command "find /etc/lighttpd/conf-enabled -name '*.conf' -a ! -name 'letsencrypt.conf' -printf 'include "%p"\n' 2>/dev/null" exited non-zero: 1 2022-12-29 13:32:42: configfile.c.1970) source: /etc/lighttpd/lighttpd.conf line: 82 pos: 1 parser failed somehow near here: (EOL) lighttpd: no process found I've included my external.conf file and I found the this from 2017 - https://discourse.pi-hole.net/t/enabling-https-for-your-pi-hole-web-interface/5771 - but not much luck. Thanks in advance. EDIT 2022-12-30 Removing the container path to /etc/lighttpd fix the issue, but I lose the ssl certificate for the sight. Appears that something has become deprecated with lighttpd. EDIT 2023-01-01 Solved. Before creating the docker volume mapping to /etc/lighttpd, I needed to copy all subfolders from the container first into /mnt/user/appdata/pihole-dot-doh/lighttpd.conf. Otherwise, the mapping wasn't working as expected. docker cp pihole:/etc/lighttpd/conf-enabled/ . docker cp pihole:/etc/lighttpd/conf-available/ . Redirection to HTTPS is working as expected once again. external.conf
-
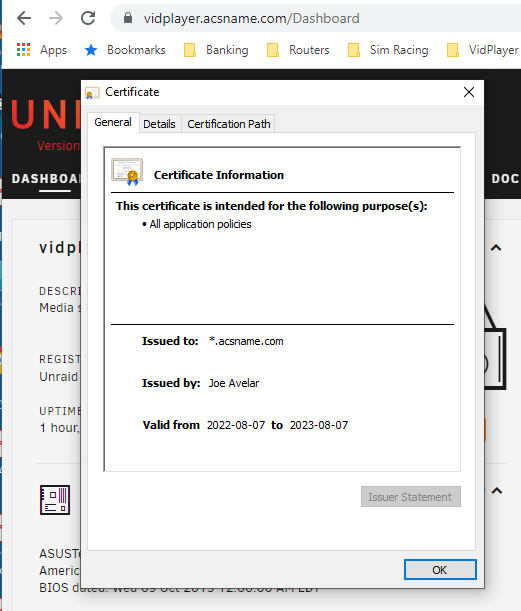
Hi, this was my solution to setting a valid SSL (self-signed in my case, but should be the same for any other cert). Hopefully this helps out anyone looking for assistance. I've set myself as the CA and am using a wildcard for all my internal web services. None of these are available outside of my private network, so not on the internet. First, I connected to the flash drive \\hostname\flash I then drilled into the following sub-folders - config\ssl\certs I created a backup of my host's PEM file "vidplayer_unraid_bundle.pem" I cleared the data from the host's PEM file "vidplayer_unraid_bundle.pem" and inserted my own data as follows Pasted the contents of the Server.CRT file - the one that will show the host information Pasted the contents of the CA.CRT file Pasted the contents of the Server.Key file Save and restart for the new cert to take affect. Make sure Unraid has the local TDL set to your domain name (menu option "Settings > Manage Access". Mine is set to "acsname.com". I like this site for decoding and reviewing the CSR/PEM data - https://report-uri.com/home/pem_decoder. Below are the commands I use to create the CA and Server SSL data. Credit goes to Oren Oichman (https://two-oes.medium.com/working-with-openssl-and-dns-alternative-names-367f06a23841) for his tutorial. Once the "*_answer.txt" files are created, I would recommend reviewing and updating as required. ### Run under Linux ### https://two-oes.medium.com/working-with-openssl-and-dns-alternative-names-367f06a23841 export DOMAIN="acsname.com" export SHORT_NAME="wildcard" export rsabits=2048 # This defines how long the cert is valid for. This can be redefined, but I personally keep it at 365 days. # Since this requires renewing, and not regenerating, this script is only useful for the initial generation, or re-creating the # entire thing, if you feel like it. export certValidityDays=3650 ## for the server cat > ${SHORT_NAME}_answer.txt << EOF [req] default_bits = ${rsabits} prompt = no default_md = sha256 x509_extensions = req_ext req_extensions = req_ext distinguished_name = dn [ dn ] C=CA ST=Ontario L=Kanata O=Joe Avelar OU=Server [email protected] CN = ${SHORT_NAME}.${DOMAIN} [ req_ext ] subjectAltName = @alt_names [ alt_names ] DNS.1 = *.${SHORT_NAME} #DNS.2 = ${SHORT_NAME}.${DOMAIN} #DSN.3 = ??? EOF ## For the Root CA. cat > csr_ca.txt << EOF [req] default_bits = ${rsabits} prompt = no default_md = sha256 distinguished_name = dn x509_extensions = usr_cert [ dn ] C=CA ST=Ontario L=Kanata O=Joe Avelar OU=Root [email protected] CN = Joe Avelar [ usr_cert ] basicConstraints=CA:TRUE subjectKeyIdentifier=hash authorityKeyIdentifier=keyid,issuer EOF #CA certificate and Key #Generate the Key: openssl genrsa -out ca.key ${rsabits} # Generate the CA openssl req -new -x509 -key ca.key -days ${certValidityDays} -out ca.crt -config csr_ca.txt #Generate Server Key #Same as we done for the CA , we are generating an RSA key with the length of 2048 chars. openssl genrsa -out ${SHORT_NAME}.key ${rsabits} #Generate Server CSR #Now we will generate the certificate request using the domain Key and the domain answer file which we created in the beginning of the this tutorial. openssl req -new -key ${SHORT_NAME}.key -out ${SHORT_NAME}.csr -config ${SHORT_NAME}_answer.txt #It is a very good practice at this point to Test the CSR for DNS alternative names : openssl req -in ${SHORT_NAME}.csr -noout -text | grep DNS #Sign the Certificate Signing Request (CSR) for the servere: #now comes the tricky part , we need to tell the CA to use the “altrnames” we setup in the answer file but we need to tell it which section to look at for the values we need so we are going to add 2 more arguments for this purpose. # use new CA openssl x509 -req -in ${SHORT_NAME}.csr -CA ca.crt -CAkey ca.key -CAcreateserial -out ${SHORT_NAME}.crt -days ${certValidityDays} -extensions 'req_ext' -extfile ${SHORT_NAME}_answer.txt # use the existing CA # openssl x509 -req -in ${SHORT_NAME}.csr -CA CA/ca.crt -CAkey CA/ca.key -CAcreateserial -out ${SHORT_NAME}.crt -days ${certValidityDays} -extensions 'req_ext' -extfile ${SHORT_NAME}_answer.txt #Certificate bundle #In some cases it is a good practice to join the certificate and the CA into a single file (not all servers has a CA configuration options). mv ${SHORT_NAME}.crt ${SHORT_NAME}-certonly.crt cat ${SHORT_NAME}-certonly.crt ca.crt > ${SHORT_NAME}.crt ## This is for Pi-Hole cat ${SHORT_NAME}.key ${SHORT_NAME}-certonly.crt | tee combined.pem cat ${SHORT_NAME}.crt > ${SHORT_NAME}.pem cat ${SHORT_NAME}.key > ${SHORT_NAME}_key.pem