





milouz
Members
-
Joined
-
Last visited
-
Hi everyone, Unraid VSOCK Sensors v3.0.0 is now available! This is the first stable release of v3, bringing several improvements to the Proxmox integration: New per-sensor hwmon architecture using configfs, with automatic topology reconciliation and failsafe handling. Separate IOC and Board temperature sensors for supported HBA controllers. More reliable Debian/DKMS upgrades, including recovery from failed module updates. Improved systemd security and sensor topology change notifications. Important for existing users upgrading from v2.x: The virt-temp kernel interface has changed, so both the Unraid plugin and the Proxmox package need to be updated. The UNRAID_VSOCK_RESTART_UNITS setting has also been replaced by explicit [email protected] systemd units. In-place downgrades from v3 to v2 are not supported. Release and full changelog: https://github.com/milouz1985/unraid-vsock-sensors/releases/tag/v3.0.0 Feedback and bug reports are welcome!
-
Hi everyone, I’m releasing Unraid VSOCK Sensors 2.0.0 (UVSS). First, an apology regarding the previous 1.4.3 announcement. The .plg I published accidentally referenced package files hosted on my private development Gitea instance (git.lan.home) instead of the public GitHub repository. The .plg itself was publicly accessible, but a normal Unraid installation could not actually download the package from outside my own network. Sorry about that — this was a release packaging mistake on my side. The issue is fixed in 2.0.0 and all public plugin/package URLs now point to GitHub. So in practice, UVSS 2.0.0 is the first publicly installable release of the plugin. Plugin URL https://raw.githubusercontent.com/milouz1985/unraid-vsock-sensors/refs/heads/main/unraid-plugin/unraid-vsock-sensors.plg GitHub https://github.com/milouz1985/unraid-vsock-sensors Release https://github.com/milouz1985/unraid-vsock-sensors/releases/tag/v2.0.0 What changed since the original 1.4.3 announcement? The overall goal of UVSS has not changed: Export disk and HBA temperatures from an Unraid VM to its Proxmox host through AF_VSOCK, so that the Proxmox host can use those temperatures for fan control. However, several parts of the implementation described in my original post have changed significantly. hwmon topology: no more aggregated unraid_storage / unraid_hba In the original version, Proxmox exposed aggregated hwmon devices: unraid_storage unraid_hba with multiple temperature channels inside each device. In 2.0.0, UVSS now creates one stable hwmon device per disk or HBA controller. Examples: unraid_disk1 unraid_cache unraid_hdd_maximum unraid_sata_ssd_maximum unraid_nvme_ssd_maximum unraid_sas3008 Each device exposes its temperature as temp1. Disk sensors use the stable Unraid disk ID, while HBA sensors use stable hardware identities such as SAS address, PCI address or serial number. Sensor identity is therefore no longer tied to: /dev/sdX hwmonX array position controller index This makes the topology much more stable when disks or controllers appear, disappear or move around. If anyone manually managed to install the old 1.4.3 package, any CoolerControl, fancontrol or fan2go configuration using unraid_storage or unraid_hba will need to be updated. VSOCK is now a persistent push connection The original design was described as a small server inside the Unraid VM that the Proxmox side queried through VSOCK, this has been reworked. The Unraid side now maintains a persistent guest-to-host VSOCK connection and continuously pushes its latest snapshot to Proxmox. A snapshot is sent every second and also acts as a heartbeat, if the connection is lost UVSS automatically reconnects. This makes failure detection simpler and is better suited to continuously published sensor data. Disk collection now uses more of Unraid’s native runtime state The original description mainly focused on disk temperatures coming from /var/local/emhttp/disks.ini, In 2.0.0 UVSS now uses: disks.ini for assigned disks devs.ini for unassigned disks Unraid’s existing SMART cache to validate temperature freshness The Unassigned Devices plugin is not required. Assigned disks take precedence if the same stable ID appears in both sources. UVSS also validates the inventory more strictly. Duplicate IDs within the same source now invalidate the inventory instead of silently hiding one of the disks. The agent still never runs smartctl to collect disk temperatures, so UVSS itself does not wake sleeping disks. SMART freshness and spin-down handling were redesigned The original version already avoided waking sleeping disks, but freshness handling is now more precise. UVSS reads Unraid’s poll_attributes value and uses it to determine how long a cached SMART temperature can be considered fresh. After Unraid completes its SMART polling cycle, the native poll_attributes event sends a lightweight refresh request to UVSS. There is also a five-second watchdog for: missed events inventory changes spin-down / wake-up transitions SMART cache expiration Physical USB detection and per-disk policies This did not exist in the original release. UVSS can now automatically exclude disks that are physically connected through USB, Detection uses the Linux sysfs hardware topology instead of trusting only the transport field reported by emhttpd. This matters because some USB-SATA bridges can make a disk physically connected through USB appear as transport=ata. The plugin UI now provides three policies for every stable disk ID: Auto Include Exclude In Auto mode: physically USB-connected disks are excluded non-USB disks are included if the physical bus cannot be determined, the disk is included as the thermally safer fallback The Unraid boot flash device is always excluded. Overrides are stored using the stable Unraid disk ID, so a change from /dev/sdX to another device name does not change the policy. HBA monitoring is still available through both backends, but is more robust The two backends mentioned in the original post are still available: native /dev/mpt3ctl StorCLI The long-term direction has not changed: the native backend uses the public Linux mpt3sas ABI directly and does not require a proprietary userspace utility. Several details have improved in 2.0.0: backend-specific refresh defaults better controller identity handling stricter MPT3 parsing better handling of native ioctls that remain blocked past their deadline stale results are rejected instead of overwriting newer state additional fuzz testing around the MPT3 parser Default refresh intervals are now: native mpt3ctl: 15 seconds StorCLI: 30 seconds StorCLI intentionally uses a longer interval because launching and parsing StorCLI is significantly more expensive than the native ioctl path. Persistent topology and stronger failsafe behaviour The Proxmox side now persists the hwmon topology. After the service or host restarts, the previous sensors can be recreated immediately before the Unraid VM has sent its first new snapshot. They start in the failsafe state rather than disappearing. The virt-temp module applies a per-sensor timeout, if a sensor is not refreshed for ten seconds, it becomes 100 °C This protects against situations such as: unavailable readings guest collection failure lost VSOCK connection stopped receiver stale topology state A new valid value automatically restores the actual temperature. The receiver can also recover automatically after a virt-temp module reload and from stale kernel sessions (ESTALE). The plugin UI has been expanded The Unraid settings page now includes: service status and version VSOCK port read-only Unraid SMART polling interval HBA enable / disable HBA backend backend-specific HBA refresh interval per-disk Auto / Include / Exclude policies detected physical bus effective inclusion state The normal descriptions now use Unraid’s native contextual help system instead of being permanently displayed on the page. Current status UVSS 2.0.0 is the first version that is actually installable from the public URLs I intended to provide in the original announcement. I use it on my own virtualized Unraid setup for host-side fan control. The native mpt3ctl backend is still considered experimental outside the hardware I can test myself, currently a LSI SAS3008. And again, apologies for the broken private git.lan.home URL in the previously announced 1.4.3 package descriptor.
-
Hi everyone, I’m releasing the first public version of Unraid VSOCK Sensors, a plugin that exports disk and HBA temperatures from an Unraid VM to its Proxmox host using AF_VSOCK. GitHub: GitHubGitHub - milouz1985/unraid-vsock-sensorsContribute to milouz1985/unraid-vsock-sensors development by creating an account on GitHub.What does it do? The plugin runs a small server inside the Unraid VM. A companion service installed on the Proxmox host retrieves the sensor data through VSOCK and exposes it as standard Linux hwmon devices. The temperatures can then be used by tools such as: lm-sensors CoolerControl fancontrol fan2go custom monitoring scripts On the Proxmox host, the sensors appear as: unraid_storage: individual disk temperatures and maximum temperatures by category unraid_hba: HBA controller temperatures, when HBA monitoring is enabled The storage device includes one channel per internal disk. It can also expose maximum temperature channels for HDDs, SATA SSDs and NVMe SSDs. Why VSOCK? My previous solution used the Unraid web API. It worked, but I wanted something more direct and better suited to communication between a VM and its host. AF_VSOCK provides a dedicated communication channel between the Unraid guest and the Proxmox host: no IP address or virtual network configuration is required; it does not depend on the Unraid web interface or its authentication API; the sensor service is not exposed on the LAN; communication still works independently of the VM’s network configuration; the protocol is small and dedicated to this specific use case. VSOCK also makes the architecture clearer: Unraid remains responsible for collecting its hardware information, while Proxmox only consumes the resulting sensor data. Disk spin-down support The plugin reads disk temperatures directly from Unraid’s existing /var/local/emhttp/disks.ini temperature cache. It does not run smartctl to collect disk temperatures. Therefore, querying the plugin does not wake up sleeping disks. A spun-down disk remains in the inventory, but its temperature is reported according to Unraid’s cached state. The Proxmox hwmon integration also includes failsafe handling when readings are unavailable or communication is interrupted. HBA monitoring Two HBA backends are currently available: native /dev/mpt3ctl access for controllers using the mpt3sas driver; StorCLI, when installed separately. The native mpt3ctl backend communicates directly with the Linux mpt3sas driver. Its implementation is based on the upstream Linux kernel ABI, structures and reference code, including the mpt3sas control interface and its hwmon support. The long-term goal is for HBA monitoring to rely exclusively on interfaces and code provided by the Linux kernel, without requiring any proprietary user-space utility. Requirements Unraid running as a QEMU/KVM VM on Proxmox; a vhost-vsock-pci device added to the VM; the Unraid plugin installed inside the VM; the companion Debian package installed on the Proxmox host; Proxmox kernel headers for the virt-temp DKMS module. Basic installation Add a VSOCK device to the Unraid VM configuration: args: -device vhost-vsock-pci,guest-cid=3 If the VM already has an args line, append the device to the existing line. The VM must be fully stopped and started after this change. add plg url in unraid: https://raw.githubusercontent.com/milouz1985/unraid-vsock-sensors/refs/heads/main/unraid-plugin/unraid-vsock-sensors.plg Install the companion .deb package on the Proxmox host. The complete installation and configuration instructions are available in the GitHub README. Current status The project is functional on my own setup, but this is its first public release. I hope this will be useful to others running Unraid as a VM and wanting to control host-side cooling using the actual storage temperatures.
-
Thanks for your insights. The goal is to prevent oom with swapiness really low, i'll try just to see!
-
hi @primeval_god, my cache pool is in zfs, so i start looking for an alternative solution and ended up reading this blog post : https://blog.nerdcruft.net/2017/02/06/linux-swap-over-loopback-devices/ so, I have written a small bash script to implement this using user script plugin: #!/bin/bash # Chemin du fichier de swap SWAP_FILE="/mnt/cache_nvme/system/swapfile" # Taille du swap en Mo SWAP_SIZE=4096 # 4 Go # Vérifier si le fichier de swap existe, sinon le créer if [ ! -f "$SWAP_FILE" ]; then echo "Création du fichier de swap..." dd if=/dev/zero of="$SWAP_FILE" bs=1M count=$SWAP_SIZE chmod 600 "$SWAP_FILE" fi # Trouver un loopback disponible LOOP_DEVICE=$(losetup -f) # Associer le fichier de swap au loopback losetup "$LOOP_DEVICE" "$SWAP_FILE" # Formater en swap mkswap "$LOOP_DEVICE" # Activer le swap swapon "$LOOP_DEVICE" # Régler le swappiness SWAPINESS=42 echo $SWAPINESS > /proc/sys/vm/swappiness echo "Swap activé sur $LOOP_DEVICE avec une taille de $SWAP_SIZE Mo et un swappiness de $SWAPINESS." if it can help you to implement a workaround for your plugin with zfs...
-
Ok, I think I understood what happend. I had a traefik instance on my swarm, when I first join the swarm with unraid it wasn't running. I started it later on, but didn't notice the webui wasn't accesible at this time. Traefik messed up Ports 80 and 443 port on unraid host. rookie mistake... thanks for your help @JorgeB.
-
ok, so stock install works, then adding docker config doesn't. I had join my swarm with unraid, which seemed working fine for several days until now. Removing it from my swarm seems to solve my problem. Not sure what is the link between joining a swarm and not having access webui though. we'll see if the problem come back...
-
so, i copied back files from flash backup using this: https://docs.unraid.net/unraid-os/getting-started/manual-install-method/ no luck, still no webui. in safe mode, i got ERR_CONNECTION_REFUSED in chrome and i suspect the array is not starting
-
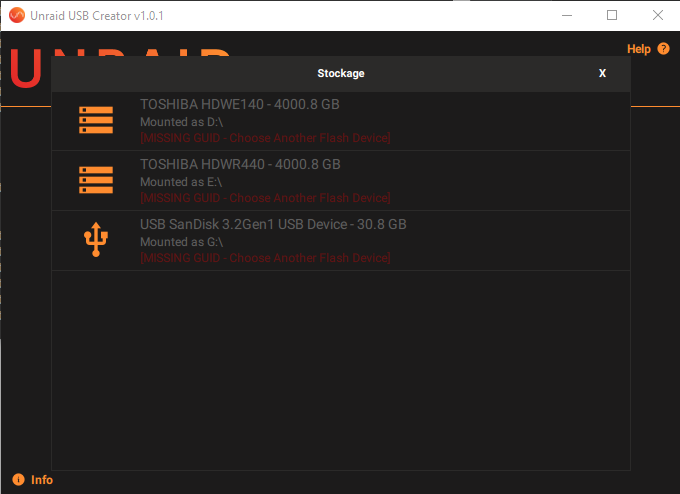
I tried to use unraid usb creator to recreate my flash drive but i got "MISSING GUID" on the key i'm already using... does it mean it is dying?
-
Thanks for the link. I was unaware of the diagnostics command to use with cli! nas-diagnostics-20240911-1021.zip
-
Hi, when navigating to http://localip i get redirected to https://localip and get a "404 page not found" error message. by searching in forum i ended up deleting certs in /boot/config/ssl/certs, but a new one appear after reboot. I can't access the webui which is quite annoying. everything else seems to work fine. any idea?
-
May I ask you what is the prupose of using mergerfs on unraid?
-
is there any news on that? What can I do to make the plugin automatically calculate hash for new files that where moved by the mover from cache to array? is it possible to make the plugin calculate hash for file even if it is on cache and not on the array? I discovered that I have a lot of files without blake3 hashes despite '"Automatically protect new and modified files" option is enabled.
-
Thanks for your help. I'll try to ask tailscale also. nas-diagnostics-20230609-2323.zip
-
My logs are full of this kind of line: Jun 9 15:47:12 NAS tailscaled: 2023/06/09 15:47:07 wg: [rNaiD] - Failed to send handshake initiation: peer's node key has expired all my devices on my tailscale network have valid key and my unRAID server has Expiry disabled what does these errors mean?


