

Mik3
-
Posts
27 -
Joined
Content Type
Profiles
Forums
Downloads
Store
Gallery
Bug Reports
Documentation
Landing
Posts posted by Mik3
-
-
On 5/8/2023 at 12:23 AM, diederich89 said:
hi there,
i have the same problem with "No matching files for pattern".
I can manually block my IP and unblock it, so I guess crowdsec is working correct.
But it seems like my nextcloud logs won't be read!
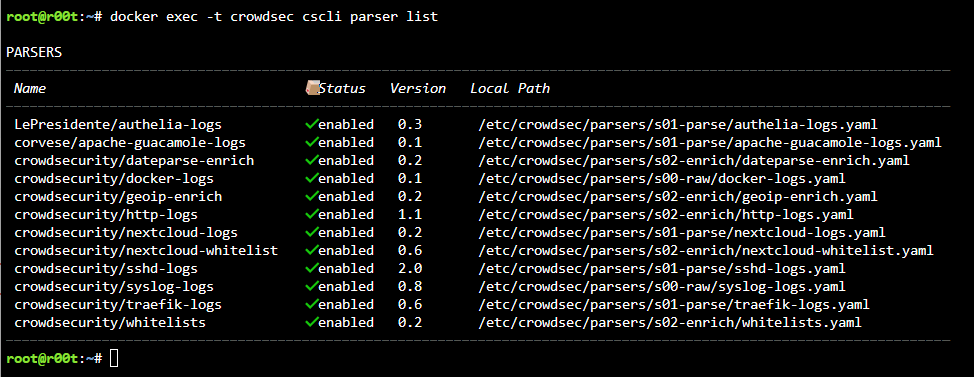
Nextcloud-Parser seems to be active:
But nextcloud logs aren't displayer here:

And in cli it says:
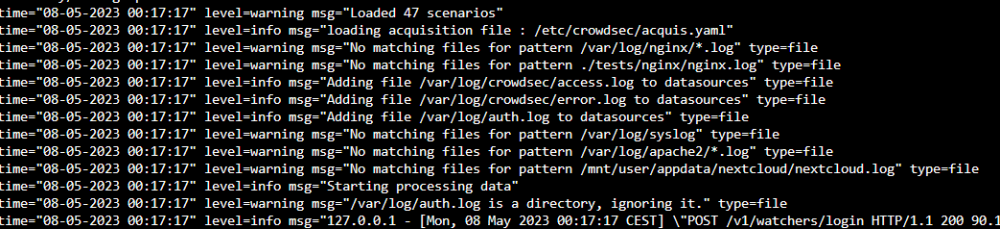
So I guess nextcloud logfile won't be read?
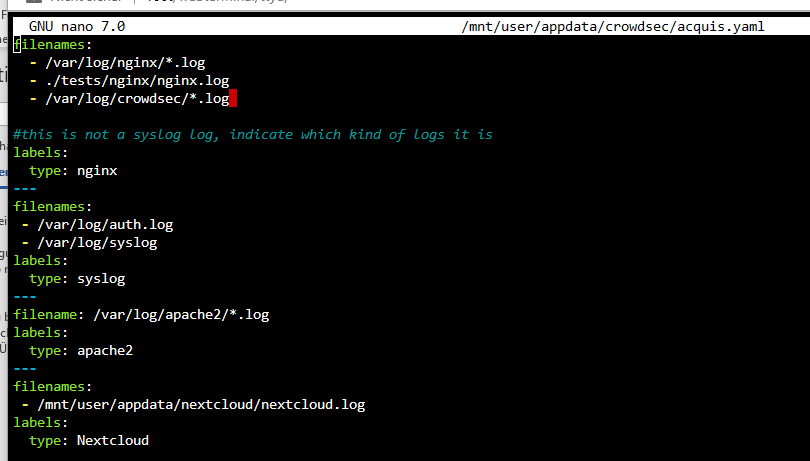
this is my acquis.yaml:
My questsions are:
1. how can I check nextcloud.log with crowdsec?
2. how can I verify for sure, that crowdsec is working on nextcloud?
3. how can I test a malicious string or something on my nextcloud to see if my IP-Adress is getting banned through crowdsec?
Thanks for help
")
:::
EDIT:
OK, I've found it out myself
You have to create a path variable on nextcloud docker and crowdsec docker:
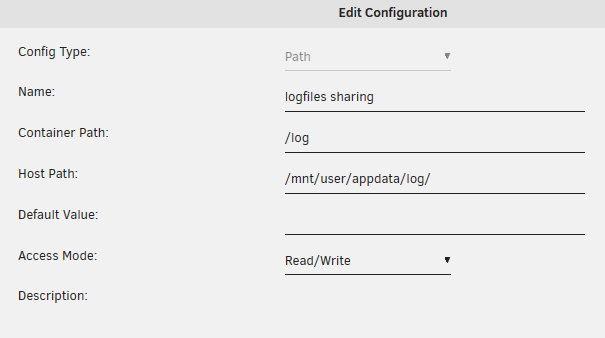
Then you have to tell nextcloud to change the logfile path:
sudo -u abc touch /log/nextcloud.log
chmod 777 /log/nextcloud.log
Then Edit the config.php and insert the path:
nano /mnt/user/appdata/nextcloud/www/nextcloud/config/config.php
'loglevel' => 1,
'logfile' => '/log/nextcloud.log',
:::
Now I have another question
How can we test if crowdsec is doing something at all?As far as I know, crowdsec can only prevent bruteforce for nextcloud (which is too bad, I was hoping, that crowdsec is a real intrusion prevention system and blocks more attack szenarios like "trying SQL Injections"....
nethertheless I now have the problem, that I can't test crowdsec for bruteforce attacks since nextcloud anti-bruteforce tool is blocking my tests BEFORE crowdsec is blocking anything.
Does anybody have an idea on how to test if crowdsec is doing its job?
How can I trigger a pattern to verify?
What you did with nextcloud is partially correct. Everytime you want a service protected by crowdsec, you need the correct parser and the logs. However this is only half of the equation as once crowdsec analyze the log and finds something bad it will report back through the local API that this IP should be banned. However no automatic action are taken as nextcloud doesn't know that.
Depending on how you are hosting nextcloud: If it's through a reverse proxy like swag than additional configuration might be required. If you are using the incorporated web server then you need to do some additional configuration in the nextcloud docker itself. I can't help further as I don't use nextcloud and I don't know how you host your instance.
Try to post your question/scenario and I'll try my best to help.
Crowdsec protection depends on the parser. For example, nextcloud collection protects against bruteforce and enumeration.
For how to test:
Temporary disable the nextcloud anti-bruteforce tool so to let crowdsec parser do it's job. If it works it should block your attack if it's properly configured.
You can ban your ip and try to access your nextcloud instance, if the configuration is correct you shouldn't be able to reach it.
For a pattern to verify your best bet is to look at the nextcloud crowdsec parser documentation and see which pattern is looking for and replicate that yourself.
Hopefully this helps.
-
On 2/10/2023 at 1:34 AM, notuxnobux said:
Having the same issue here. Same setup as the other user, just without the docker real ip mod.
Thanks
I updated the guide. Try to set your API key without using the ${}. Let me know if you have further issues
-
On 2/16/2023 at 6:41 PM, Thee_Dewd said:
just checking to see if you had time to sort out the issue on this? i'd love to use it but haven't found a good source for setting it up.
Ok Solved the issue. I tested and it's working. There was an error in the guide about setting the api key. You just have to set the api key without the ${}. I updated the guide. Let me know if you have further issues.
-
On 2/16/2023 at 6:41 PM, Thee_Dewd said:
just checking to see if you had time to sort out the issue on this? i'd love to use it but haven't found a good source for setting it up.
I am still working on it. I need to try and setup swag from scratch to see if there is a problem with the custom configurations. Having a busy work schedule which is not helping at all. If you could have a little bit more patience I'll try to solve the issue as soon as I can.
-
1 hour ago, Thee_Dewd said:
i grabbed my public IP from my office and then blocked it. i was then still able to connect from my office. my set up is pretty simple. cloudflare front end, swag proxy and apps behind that. i have the real ip docker mod added to swag for traffice coming from cloudflare.
I tested that myself again and I got the same behaviour. Looks like swag is not communicating or blocking the connection. I will investigate the issue and post the solution. I'll keep you updated. Thanks for the report.
-
37 minutes ago, Thee_Dewd said:
Thank you for adding this. I followed this step by step and I don't see any errors but I'm also still able to connect from an IP after I manually blocked said IP.
Hmm, that's strange. Is the IP a local IP or a public one? Local IP aren't blocked.
-
Dear community,
I have been looking for a quick reference guide on how to setup crowdsec with swag but I wasn't able to find one, hence this post. Hopefully this will be useful to someone else. Please let me know in the comment if there is a mistake, if you would add something else to make it easier to follow or if the setup can be improved in anyway. Comments, suggestion are always welcome and a way for me to learn more.
Let's begin...
PREREQUISITES:
--------------------------
- Unraid 6.11.5 or greater (might work on previous version but I didn't test)
- Unraid community app plugin
- Swag (linuxserver.io docker) already set up
SETUP:
------------
STEP 1 - Installing CrowdSec
---------------------------------------------
Go into the community app and search for crowdsec (IBRACORP docker maintainer), then hit install.
Before applying you need to set the following variables:
Network type => Custom: <swag> Replace with the custom docker network type you created when you first created swag
Auth logs to analyze => /mnt/user/appdata/swag/log/nginx Replace the path with the swag log folder (the one listed is the default)
Crowdsec logs to analyze => /mnt/user/appdata/swag/log/nginx
Collections => crowdsecurity/nginx crowdsecurity/http-cve If you need more check https://hub.crowdsec.net/browse/
Then check that the ports 8080 and 6060 are NOT in use by another container and click apply otherwise you need to change those ports variable as well.
STEP 2 - Crowdsec Configuration
----------------------------------------------------
Let the docker pull finish then open the docker logs and wait for it to finishing the initial setup, then look for the following message:
msg="Starting processing data"
Once you see the message shut down the container.
Go to the crowdsec appdata folder (default is /mnt/user/appdata/crowdsec) and edit the acquis.yaml file.
Under the first "filenames:" add the following line: /var/log/crowdsec/*.log
Your file should look similar to this:
filenames:
   - /var/log/nginx/*.log
   - ./tests/nginx/nginx.log
   - /var/log/crowdsec/*.log    <------------------------------------ this is the line we added
#this is not a syslog log indicate which kind of log it is
labels:
   type: nginx
---
[...]
By default crowdsec bans for 4h to modify that value we need the profiles.yaml file in the crowdsec appdata folder.
Edit profiles.yaml search for the line decisions and replace 4h with whatever vaule you want/need.
An example below:
[...]

decisions:
 - type: ban
   duration: 20h   <--------Default is 4h, replace this vaule according to your needs.

[...]
Now we can start the crowdsec docker, again check docker logs to make sure no errors are show and search for the line
msg="Starting processing data"
time="01-02-2023 00:03:00" level=info msg="Adding file /var/log/swag/access.log to datasources" type=file
time="01-02-2023 00:03:00" level=info msg="Adding file /var/log/swag/error.log to datasources" type=file
time="01-02-2023 00:03:00" level=info msg="Adding file /var/log/swag/unauthorized.log to datasources" type=file
If you see this, it means that everything is OK and crowdsec is now parsing the logs.
STEP 3 - SWAG <-> Crowdsec configuration
--------------------------------------------------------------------
Crowdsec is parsing the logs and making decisions but no further action is taken and the connection is not effectively blocked as swag doesn't know anything about crowdsec decisions. To make crowdsec communicate with swag we need to configure the swag container and the crowdsec bouncer.
First of all we need to install the swag bouncer inside crowdsec, to do so run in the shell the following command:
docker exec -t crowdsec cscli bouncers add swag
The command will return an API key. Copy that api key as we need it for the next step
Now we need to edit the swag docker container and add the following variables:
DOCKER_MODS: linuxserver/mods:swag-crowdsec

CROWDSEC_API_KEY: ${API}        <-------------Replace API with the API key you obtained from the cscli command in crowdsec

CROWDSEC_LAPI_URL: http://[IP]:8080   <-----Replace IP with the Ip address of the crowdsec docker. 8080 is the default                                                 port, if you changed that you need to change it here as well.
NOTE: Replace "${API}" with the api key you obtained. DO NOT USE THE '$' or the brackets '{' '}'. Example: ${API} becomes hj43gg061...
To create the above variable you can use the UnRAID webGui. Remember variables and values are case sensitive.
Once you have done that click apply and start the container. Open swag docker logs and check that the mod installation is successful and that the following line appears.
nginx: [alert] [lua] init_by_lua:8: [Crowdsec] Initialisation done
This means that the crowdsec mod is successfully installed and swag is now communicating with crowdsec docker.
If you want to double check that the communication between the two docker is successful you can run the following command
docker exec -t crowdsec cscli bouncers list
The output is a table with the name,latest time and auth method with the bouncer.
CONCLUSION
---------------------
Now everytime a connection attempt is made, swag will communicate with crowdsec docker, check if the ip is banned and allow/reject the connection.
You can check the crowdsec decisions by running the following command:
docker exec -t crowdsec cscli decisions listIf you want to test the ban you can use the cscli command to ban the ip. Example:
docker exec -t crowdsec cscli decisions add --ip [IP] --type ban --duration 15m <--- Replace IP with your IP
Then if you try to connect to your swag instance from that IP you should receive a 403 error.
To unban the ip just run the following:
docker exec -t crowdsec cscli decisions delete --ip [IP]
That's all. Hopefully you find it useful. Please let me know if something is not clear and I'll do my best to improve it.
Have fun and stay safe!
REFERENCES
----------------------
Blocking malicious connections with crowdsec and swag
-
 1
1
-
 1
1
-
Sorry for the late reply I was busy at work. I tried to setup again using the host mode and changing the port to something else. Maybe he doesn't like 808 XD. Anyway now looks like it's working. I'll do more tests and if anything strange comes up I'll report back.
On 9/17/2022 at 9:22 PM, thecode said:I have tested again HOST mode for the docker and it does work, the only problem is that if you try to open the WebUI from unRAID it will try to open it on port 80 since it is hardcoded in the template, I will check if it is possible to fix it.
To solve this just change the view from basic to advanced and modify the value "WebUI: http://[IP]:[PORT:80]/". Change 80 to the port you use..in your example 9080.
Thanks again for your time and help. Have a nice day!
-
1
-
-
Hi, thanks for your work much appreciated.
Probably it's me but the docker is not working. Please find below all the details.
OS: Unraid 6.11-rc5
Fresh install of docker, no previous appdata.
I change the net to host, change the HTTP and WS port to something not used but when the container is pulled, it still shows port 80 and port 443 in the docker details in unraid.
192.168.1.2:443/TCP192.168.1.2:443
192.168.1.2:5900/TCP192.168.1.2:5900
192.168.1.2:6080/TCP192.168.1.2:6080
192.168.1.2:80/TCP192.168.1.2:80/opt/deCONZ/mnt/user/appdata/deconz
Docker logs shows in RED
[deconzcommunity/deconz] Using options .......... --http-port=808 --ws-port=4434
Same happens if using the custom network to br0. Even if I leave the standard configurations the red line is still showed in the docker logs.
What am I doing wrong?
-
@Grant123 You can always add extra parameter in the docker by using the appropriate menù. It's at the end of the page. Also consider that some stuff have changed with the latest release since I wrote this guide. I am quite busy at moment, whenever I'll find the time I'll try to update this guide with the latest infos.
-
To be honest the RC4 is quite stable and I prefer to have the security fixes in place.
-
1
-
-
19 hours ago, JonathanM said:
How would this specific exploit work in Unraid? Unlike typical linux installs, ONLY root is allowed console login, so no privilege escalation attack from that vector, right?
Since Unraid operates so differently from normal setups, I'm having a hard time picturing how this effects us.
Correct me if I am wrong but:
1) You can have different user for your SMB share.
2) You can have different user for SSH
3) You have "Docker user". Some containers are set up to allow you to specify a UID/GID to be used by passing it in as an environment variable.
Probably not easy and the need for multiple vulnerability/misconfiguration but docker can be "escaped". Ex.: Consider a RCE that gives you access to a docker and from there you could possibly escape the container or if the container allows you to have "user" access to a folder, with the above vulnerability you can make it to root.
Now my opinion is that regardless the vulnerability the system needs to be fixed. Security is like an onion, if too many layers are missing, the chances of something bad happening is increased.
What we need is the possibility to avail of the latest security patches without waiting for a major/RC release. This topic has been brought up already before and I hope limetech will implement the changes quite fast.
-
34 minutes ago, ich777 said:
You know if you install the plugin Intel-GPU-TOP you don't have to edit the go file because it enables it on boot and the plugin also enables you to install the GPU Statistics plugin so that you can see the status from your iGPU on your unRAID Dashboard.
Thanks for your reply. The plugin came out after I wrote this guide. When I have the time I'll edit/write a new one with the updated steps.
With the phrase "Just follow the instructions" I was referring to follow the topic you wrote for the NVIDIA driver as the guy is using AMD+NVIDIA so Intel-GPU-TOP is NOT applicable.
-
2
-
-
@dkerlee Thank you for the nice comments.
Regarding your hardware may I suggest to have a look at the NVIDIA driver plugin (coomunity apps) from the amazing @ich777. This is a link to the forum post https://forums.unraid.net/topic/98978-plugin-nvidia-driver/
This allows you to use the nvidia driver into the docker container. Just follow the instructions, then use emby settings to use the gpu for transcoding and you shouldn't have any issue. Let me/us know how it goes and if you had to take any particular steps to make it working so other can benefit as well.
-
1
-
-
Heeyy all,
just wanted to wish a merry christmas to the whole unraid community and devs. Keep up the great work and stay safe!
All the best 🎅
-
I wasn't sure if unraid was using Apache or not that's why the question. Thanks a lot for your reply.
-
Dear devs and member,
I would like to know if unraid is vulnerable to the new APACHE vulnerability (not talking about log4j). The CVEs are the one in the subject, links to nist below. If vulnerable will an update be available soon to fix those CVE and improve the product security?
https://nvd.nist.gov/vuln/detail/CVE-2021-44790
https://nvd.nist.gov/vuln/detail/CVE-2021-44224
Thank you. Merry christmas
-
Happy birthday!🍰🥂
-
1
-
-
Dear members,
I tryed searching the forum about this specific question but couldn't really find an answer that satisfies me.
I own an unraid plus licence and since I am very happy with the product I want to buy an upgrade to support the project more and to allow for future expansion. The questions are:
- When I buy the upgrade from plus to pro do I receive a new licence file by email?
- What happens to the old one?
- Do I need to reinstall the key in my current unraid server or it automatically sees the upgrade?
- If the usb drive fail and I need to migrate my licence to the new usb, will Unraid recognize it as PRO licence?
Thanks for your time
Regards.
-
Hi guys,
I wanted to move from plex to emby since a while for multiple reasons.
I decided to make this guide first because I want to give back something to the amazing community behind UNRAID/REDDIT/EMBY and second because I couldn't find a step by step guide so I thought it would be nice to have a lot of useful informations in a single place.
If you just want to setup the hardware transcoding using intel quick sync video in emby on unraid go directly to STEP 8.I take also the opportunity to thank spaceinvaderone for the amazing videos he made about UNRAID, I learned a lot, and the linuxserver.io guys/gals for the amazing job they do supporting and maintaining the community images.
Note: I am not affiliated with anybody nor I get paid to do this, this shows the steps I used to setup emby on unraid so to make it easier for you to do the same. Also english is not my native language so excuse me for any syntax/grammar error.
Last premise before we start, if you want to add something or you think some steps needs additional informations to be clearer let me know in the comments. @Mods: if you think this guide is useful and you want to stick this post for ease of reference for the community please do so, thanks.
Let the fun begin...
PREREQUISITES:
------------------------------- UNRAID 6.9-RC1 or newer
- UNRAID COMMUNITY APPLICATIONS (Refer to this post on how to install: https://forums.unraid.net/topic/38582-plug-in-community-applications/)
- EMBY v4.5 or newer
- EMBY PREMIERE
SETUP:
------------
STEP 1 - Setting up a dynamic DNS
---------------------------------------------------------
Use your preferred dynamic dns provider to setup a custom dns tracking service.
For example:"emby.hopto.org" where "emby" is the name you want and the rest is fixed depending on the dynamic dns provider.
Ex.: "myembysrv.hopto.org"
STEP 2 - CREATE A CUSTOM DOCKER NETWORK
-----------------------------------------------------------------------------
Inside the unraid web interface, open a terminal by clicking the terminal icon on the top right corner and typedocker network create cdocknetwhere "cdocknet" is the name of our custom docker network. You can name it whatever you want.
Press ENTER and then a long string of random characters (network id) should appear meaning the custom network was successfully created. If there is an error message make sure you correctly typed in the command otherwise search google for the error message and fix it before moving onto the next step.
If everything is successful you can close the terminal window and proceed to the next step.
STEP 3 - Install SWAG (Secure Web Application Gateway)
------------------------------------------------------------------------------------------
Inside the unraid web interface, go to apps then in the top right corner inside the search bar search for "swag" (without quotes)
Click install and you will be redirected to the container settings.
Change the following settings:Network type: -> Select Custom: cdocknet (or watherver name you assigned in step 2)
HTTP: -> Change it to 8080 or another port that is not in use either in unraid or any docker you have
HTTPS: -> Change it to 8443 or another port that is not in use either in unraid or any docker you have
EMAIL: -> Your email address
DOMAIN NAME: -> The Dynamic DNS domain name, so if we use the one I setup in the first step it is going to be hopto.org Yours can
be different. Ex.: ddns.net, duckdns.org
SUBDOMAINS: -> Delete the "www" and replance it with the custom name you chose in step 1, in our case emby.
ONLY SUBDOMAINS: -> Set it to true (we tell swag to issue the cert. only for our subdomain as we don't own the top level domain
be it hopto.org or whatever else you chose)You can leave the rest as default. Now before clicking "APPLY" open a new tab and go to your router setting and setup a port forward to unraid for the port 80 and 443. I cannot give a specific guidance here as every router setting is different. Try to search for port forwarding [your router model] in google and read how to do it.
You should have a table/items like this. You need to setup 2 port forwarding, one for port 80 and one for port 443.NAME/APPLICATION NAME/SERVICE NAME: Swag80
IP ADDRESS: enter unraid ip address
PUBLIC PORT: enter the default HTTP port, in this case 80
PRIVATE PORT: enter the custom port you setup for the docker, in our case 8080
PROTOCOL: TCPNAME/APPLICATION NAME/SERVICE NAME: Swag443
IP ADDRESS: enter unraid ip address
PUBLIC PORT: enter the default HTTPS port, in this case 443
PRIVATE PORT: enter the custom port you setup for the docker, in our case 8443
PROTOCOL: TCPAfter you did so go back to unraid and click apply.
Once swag is installed check the log setting to make sure everything is done without error thus a certificate is created and valid. Basically you shouldn't have any red/amber warning in the log and at the end you should see a "Server ready." message. If any red/amber shows then check the port are correctly forwarded (make sure the numbers are correct, the unraid server's ip address is correct) otherwise read what the error says and do a search to fix it.STEP 4 - Install Emby
-----------------------------------
As before go under the apps tab in unraid to open the community applications and search for emby. You should see 3 or more emby containers, you can use the one you prefer. For our guide we use the official emby container. Click install and again you'll be redirected to the docker settings.
Change the following settings:Network type: -> Select Custom: cdocknet (or watherver name you assigned in step 2; if you have multiple custom network make sure you use the same you setup in swag otherwise the reverse proxy won't work)
Host path 2:* -> Path to your media folder share. Ex.: /mnt/user0/MediaThen click apply and wait for the docker to be pulled.
Once it's complete you can open emby web interface by clicking on the EmbyServer icon and select "WebUI". Emby asks you to setup a username and a password. Note this one will be the admin of the server so use a strong password. Don't worry about Emby connect, this is not required at this moment so you can leave it blank. If you have one feel free to enter it.
Click next.You can already setup the library in this part or skip and do it later. For the purpose of this guide we skip it as it's not difficult and there is plenty of documentation on emby website on how to do that.
So now you can click finish and you will have emby UI with all the libraries (if you setup any) and the possibility to access the server settings.STEP 5 - Configure SWAG proxy-conf
------------------------------------------------------------
If you didn't change the default appdata config path in swag you will have all the config file under /mnt/user/appdata/swag.
So from unraid webui set the appdata share to export with public access type.
To do so just click on the appdatashare, then under SMB Security Settings set the following:
Export: -> yes
Security: -> Public
Click apply then done.
From your PC/MAC navigate to the appdata share and open the swag folder.
In windows would be "This PC-> Network -> unraid_server_name -> appdata -> swag"
Inside swag navigate to nginx and then open proxy-conf folder.
Search and open a file named emby.subdomain.conf.sample with your preferred text editor be it notepad, notepad++, gedit or whatever.
Inside this file you have to change:
"server_name emby.*" to whatever name you setup in step 1 for the dynamic dns.Example if your dynamic dns is myembysrv.ddns.net in this line you would setup "server_name myembysrv.*" (without quotes).
The other line we have to change is the
"set $upstream_app emby" by replacing emby with the container name. If you used the official emby container and you didn't change it then you would set this up to "set $upstream_app EmbyServer". You can find the container name in unraid.Now click save and rename the file by removing the ".sample" at the end. So the new file name will be "emby.subdomain.conf".
Go back to unraid webui, click on the swag container icon and restart the container. (This reloads the configuration files in swag like the one we just modified)
STEP 6 - Configure remote access on Emby
---------------------------------------------------------------------
Open emby webui by clicking on the emby docker icon in unraid, go to settings -> network.
Tick the "Allow remote connections to this emby server" now some extra settings will appear.
Scroll down till you find "Public HTTPS port number" and change it to "443"
Right below you find the "External domain:" and set this to the dynamic dns we setup in step 1. In our case is "emby.hopto.org"
Then scroll down a bit more till you find "Secure connection mode:" and change it to "Handled by reverse proxy"
Then just below it untick the "Enable automatic port mapping" and then scroll at the end of the page and click save.
Go back to unraid webui and restart emby docker.
STEP 7 - Test the remote connection
-----------------------------------------------------------
Open a new tab and go to "https://emby.hopto.org", of course replace this with your custom dynamic dns entry.Ex.: "https://myembysrv.ddns.net"
You should see a "Please sign in" page with emby logo asking you for a login and password. If you see a connection timeout then you did something wrong. Go back and re-read all the steps and make sure you did everything correctly. If you see an SSL cert error/browser warning that the connection is not secure then you messed up with the ports or skipped some steps. Again re-read and make sure you did everything properly.
STEP 8 - Setting the HW (hardware) transcoding in Emby with intel QSV (Quick Sync Video)
--------------------------------------------------------------------------------------------------------------------------------------------------
Requirements:- Emby premiere
- Intel CPU that has Quick Sync Video (search your cpu at https://ark.intel.com/content/www/us/en/ark.html#@Processors)
- Compatible motherboards (sometimes iGPU has to be enabled in BIOS/UEFI, in some other cases you need a VGA/HDMI plugged-in to have it functional either by plugging in a monitor or by using a dummy VGA/HDMI adapter)
If you meet the above requirements please read on...
Open a terminal window in unraid (top right corner, click on the terminal icon inside the unraid webui) and type the following:
ls /dev/dri
and press ENTER
If you see something likeby-path/ card0 renderD128
this means that the QSV is already enabled in your unraid server and you can skip to the docker setting step otherwise read on.
In the terminal window type:modprobe i915
then press ENTER (if there is any error stop and solve this before moving on. Make sure you meet all the requirements)
Then type:ls /dev/dri
and press ENTER.
Now you should see something like this:by-path/ card0 renderD128
Now typechmod -R 777 /dev/dri
to set the permission on the folder so we can access to it from the emby docker container.
Once that's done close the terminal window, go over Emby docker container icon and click "Edit".
This will bring the container settings up like the first time we installed it.
Scroll down at the bottom and click on "+ Add another path, port, variable, label or device". A new window/popup will open.
Change the following settings:Config Type -> Device
Name -> /dev/dri
Value -> /dev/dri
Description -> Intel Quick Sync VideoThen click "ADD" and the "APPLY" and after the container is pulled down again click on "DONE".
Now open emby webui, go to "Settings -> Transcoding" and make sure you have "Enable hardware acceleration when available:" set to "Yes" or "Advanced". With advanced you can see the various preferred hardware encoders/decoders emby will use and tick/untick the ones you want. Scroll to the bottom and click on "Save".STEP 9 - Testing the hardware transcoding and make Intel QSV persistent across unraid server reboots
--------------------------------------------------------------------------------------------------------------------------------------------------------------------
To test if the hardware trascoding is working as intended just go to your library, open a movie and select a different quality. For example you can set it to 480p - 1Mbps and click play.If you go in your server dashboard inside emby webui settings you will see under "Active devices" the client name that is reproducing the movie and just below informations about wether it is being transcoded or not and which encoder/decoder is being used. For example if you see VAAPI (Video Acceleration Api) means the hardware transcoding is working using the intel QSV by accessing /dev/dri (Direct rendering infrastructure).
Finally last step is to go back into unraid webui, open a terminal window and edit the go file to make sure Intel QSV is always on even if we reboot the server. To do so type:
nano /boot/config/go
and press ENTER
Nano editor will open and you will see the content of the file. If you never modified it before it should be similar to:#!/bin/bash # Start the Management Utility /usr/local/sbin/emhttp &
Just add the following lines to the bottom of the file
modprobe i915 chmod -R 777 /dev/dri
Your go file should look like this:
#!/bin/bash # Start the Management Utility /usr/local/sbin/emhttp & modprobe i915 chmod -R 777 /dev/driSave using the CTRL + O and then CTRL + X to exit
Done!
If you read it this far I thank you for the attention and I hope you found this guide useful.
Finally you can enjoy your media on the sofa.-
4


How many attached storage devices do you have?
in Unraid Polls
Posted
Before expanding my array further I am waiting the next major unraid release where multiple pool/array will finally be a reality. Not really a fan using only 2 parity drive for 28 data drive, particularly if you consider the rebuild time when you use 18+TB hard drive. I experienced a drive failure twice and unraid was great into rebuilding that but guys, lost some sleep for 2/3 days. If multiple arrays becomes a reality I would like to build 2/3 "unraid array" in a single server each containing 12 disk (2 parity).