Teejoo
Members
-
Joined
-
Last visited
Everything posted by Teejoo
-
I looked into it but it's too complicated for me. I think I will format both discs and set up a new cache pool and start over. That probably is faster.
-
I will test that. Thanks.
-
Here you go
 Here it is:
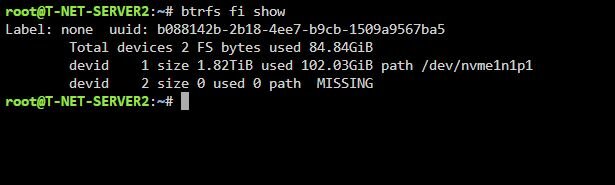 Can you help me where I can edit the VM when I can't see it? I'm a bit clueless..
 I disbled autostart in the VM settings tab and rebooted. See screenshot and attachment for diagnostics. I hope this helps. t-net-server2-diagnostics-20250208-1555.zip
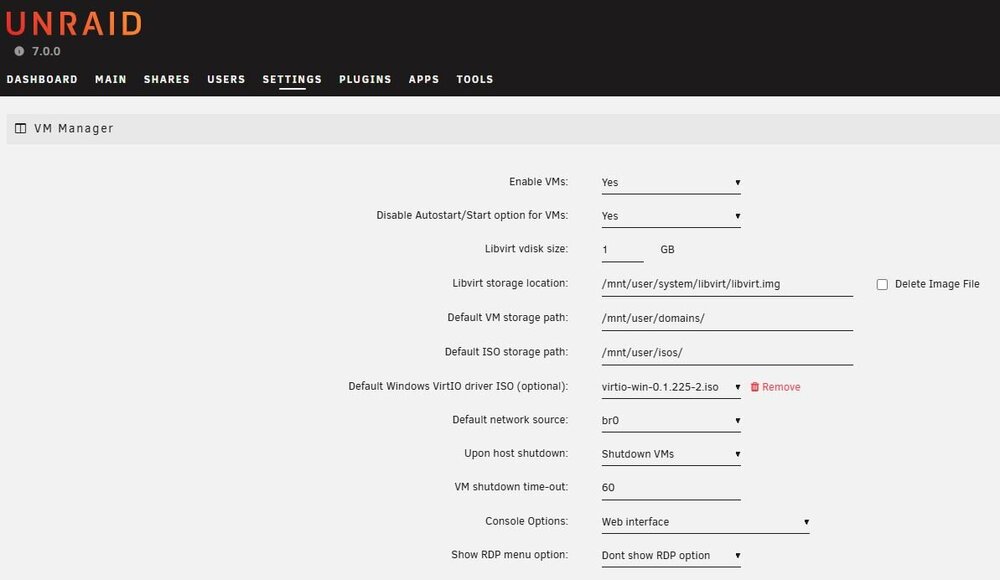 That makes sense.. But I can't edit the VM because of this Libvirt Servic failed to start error because it's on those cache pool drives.
 Thanks for your response. I already checked that, but in the settings 'passed' is not turned on as you can see. Also it doesn't say 'passed' but 'array'. I can't get in the VM settings because Libvirt Servic failed to start.., so I can't check things there.
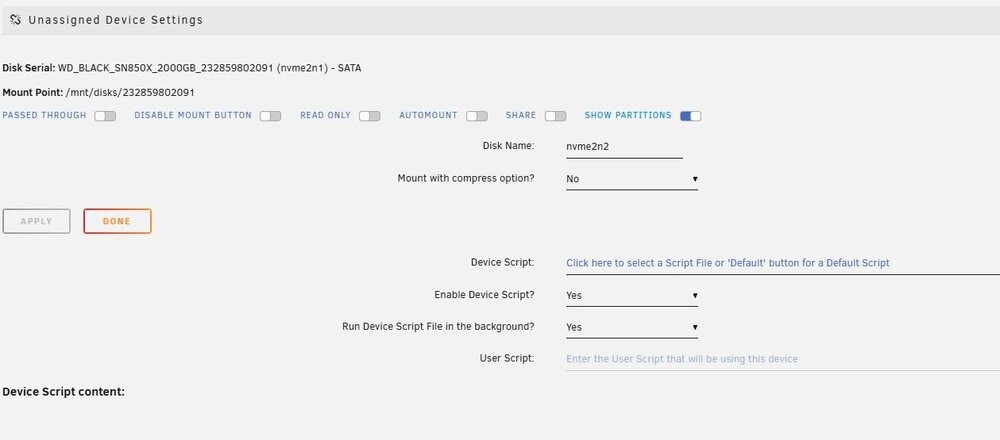 Hi all, I upgraded 2 servers to Uraid 7. Both servers had an error with the wrong pool state error. Dockers and VM didn’t run because of this. On the first server removing the pool and adding it again as described in several topics solved it. Dockers and VM are running again on that server. On the second server I did the same, but I get an error that it’s “unmountable: unsupported or no file system” message. Also I see one of the drives in the unassigned disc section. See screenshot. Dockers and VM’s don’t run because of this. Any ideas how to solve this? I attached the diagnostics file t-net-server2-diagnostics-20250207-1931.zip
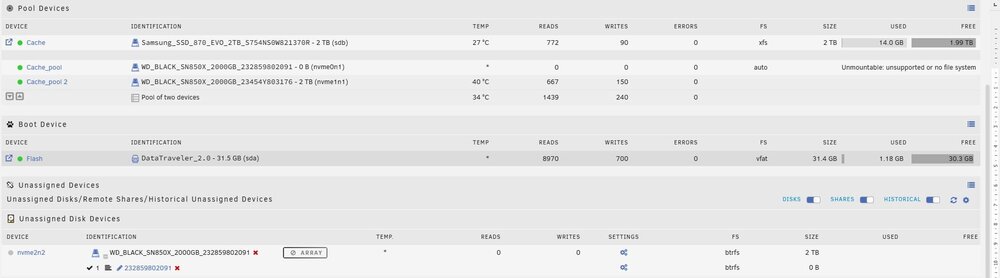 So I guess that has been solved 😎:A follow up: I managed to use a script to activate the 2.5g mode using the script plugin. This worked, Unraid now detects the correct speed. However, although a speedtest shows it has indeed almost 2.5G speed, actual copy speed was much lower compared to my other asus 2.5G nic. Very strange. So in the end I returned the Intel card and put back the Asus nic.Here they are t-net-server2-diagnostics-20241103-1430.zipI’m encountering an issue with my 10G Dual Port RJ45 NICs that use the Intel X550 chipset on both of my Unraid servers. Unraid is only detecting these NICs at a 1G speed, even though they’re connected to a 2.5G switch and should be running at 2.5G. Interestingly, when I used my previous ASUS XG-C100C NIC, Unraid correctly recognized the 2.5G speed. Same with the motherboard’s 2.5G NIC. Also, when I passthrough the Intel NIC for testing purposes to a Windows VM, the speed shows up correctly as 2.5G in the Windows VM!.. What steps can I take to ensure that Unraid correctly detects the NIC at 2.5G speed?Thanks, I will do that as soon as I got the switch and report back when everything is running.So I need to configure the VLAN in Windows 11? I'm going to look into that. I thought / expected I needed to configure this in the VM settings so the whole VM was only connected to the intel NIC. Do I need to disable/change something in the Unraid VM network settings to disable that connection?What I want to achieve: A separate VLAN for my IP security camera's and Blue Iris security software that I installed on a Windows VM with a dedicated NIC installed in the Unraid server for the VM. I will setup the VLAN in my managed switch. I passed through the Intel Ethernet Controller X550 to the VM, but now I don't know what I need to do to make the VM make exclusively use of this NIC.. Because I passed it to the VM it's not visible anymore in the Unraid VM settings, so that's why I'm wondering if passing through is the correct way. Hence my shoutout to the forum that already helped me a lot! Can anybody give me some pointers how to achieve this?Thanks for the update. I'll wait with 7 then..Thank YOU!! that was the solution. I didn't know you don't have to do that using the plugin. Besides that, I hope at a certain time this plugin wil be integrated in Unraid. That would help a lot of people using the integrated GPU's in their VM's.I installed the Intel Graphics SR-IOV plugin and created one virtual GPU. The virtual GPU is visible in the system devices, I could bind it to vfio and select it in the VM's settings. No Code 43 in the Windows VM and as you can see the GPU is now present in the taskmanager. So far so good. However, I discovered I get an error when I restart the server that the VM autostart failed because of a vfio binding error. When I manually start the VM everything is fine. I'm wondering if it takes a longer time to bind the virtual GPU so it's not ready when the VM starts? When I check the log all devices are bound succesfully.
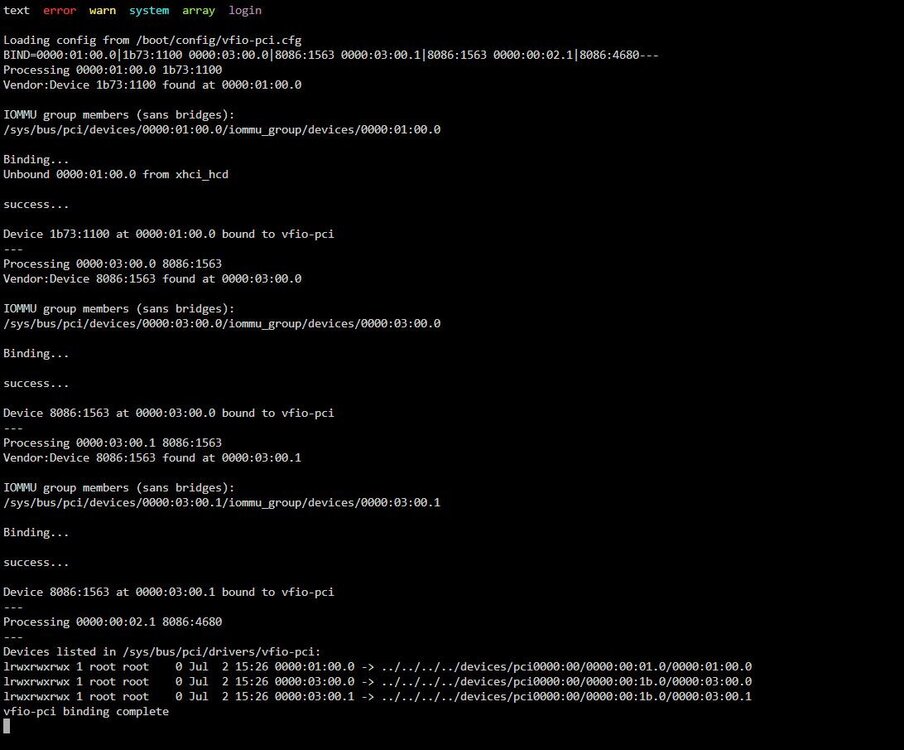

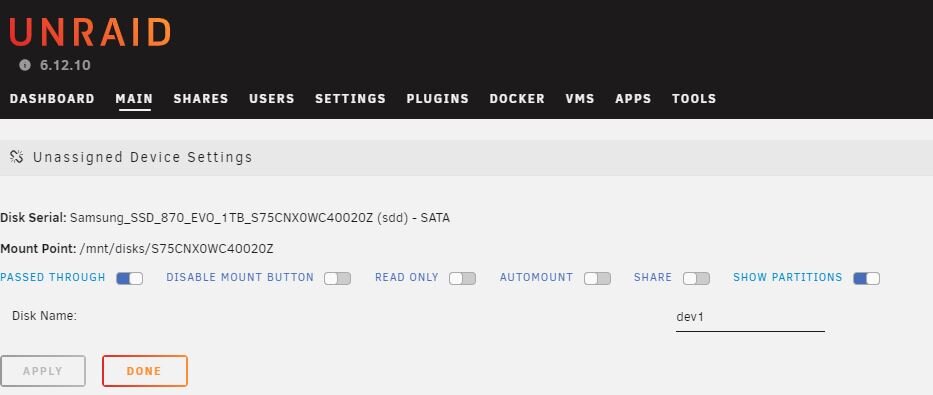
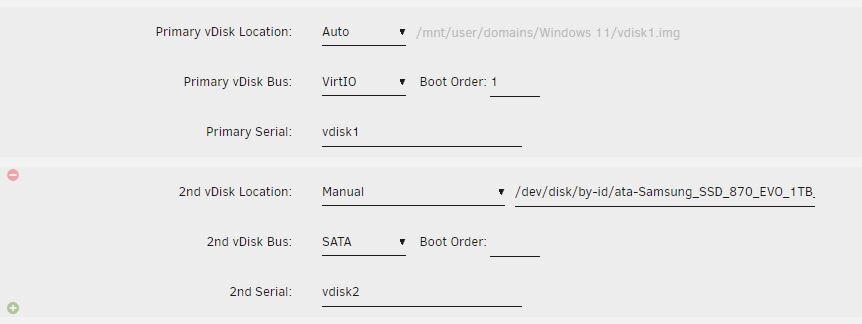
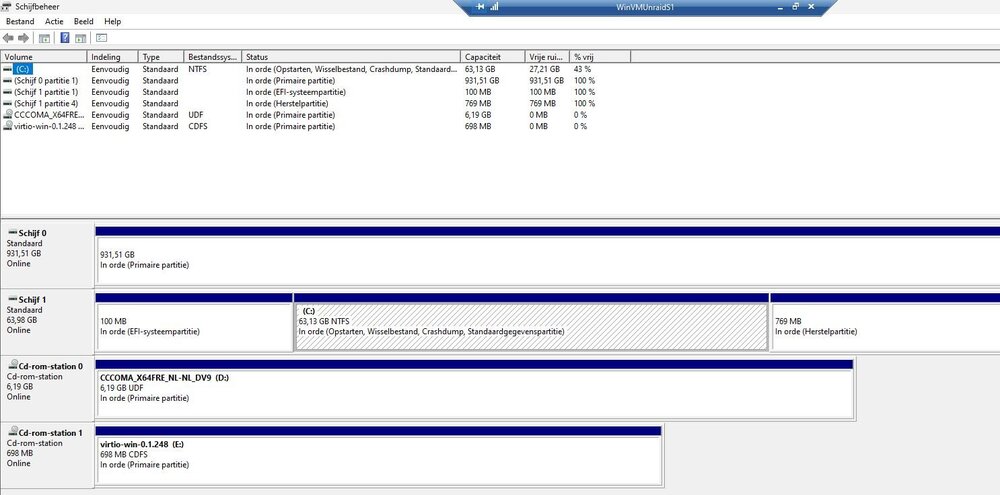
 I just installed it, but I have to check how it works. I will let you guys know how it goes!I want to passthrough the gpu so I can use it with Blu-Iris. I use an ASRock Z790 Pro RS/D4. After reading, trying and testing a lot of options i found in this forum and reddit I stil didn't manage to succesfully get it working. What did I do so far: BIOS has Intel Graphics Virtualization Technology enabled BIOS has IOMMU enabled The GPU is recognized in the Unraid device manager: IOMMU group 0:[8086:4680] 00:02.0 VGA compatible controller: Intel Corporation AlderLake-S GT1 (rev 0c). Binded the GPU to VFIO. In the Windows 11 VM the GPU is recognized al Intel(R) UHD Graphics 770. However, I get an "error Code 43 device can't start that I can't get rid off. I already installed the latest Intel driver, but no change. So, anybody has ideas how to fix this?That was the issue! Duh.. Thanks! Hopefully the screenshots can help other people adding a drive.I have read I think most topics concerning adding a passthru drive to my windows VM. A lot of them however are older and not using the latest 6.12.10 version where some or all elements are included in the software. However after adding the drive I still can't see it in Windows. My goal is to add an extra drive dedicated to the VM because I want to use it as storage for the Blue-Iris camerasoftware. My Windows VM is installed on a 2TB nvmeOn drive. What did I do: I added a small 1TB SSD drive for testing purposes to see how it all works before I will get a big regulair HDD. In the Unassigned Devices settings for that drive I've selected the Passed through option. See screenshot. In this screenshot You see the disc serial that I used in the VM settings to add the drive. See the second screenshot. You can't see it in the screenshot, but the location is /dev/disk/by-id/ata-Samsung_SSD_870_EVO_1TB_S75CNX0WC40020Z. The VM updates without an issue and windows 11 runs. However, I can't see the disc in the VM Windows Exporer.. I attached a disc manager screenshot and I assume the schijf 0 (=disc0) is the drive. I can't however give it a drive letter as suggested in one of the other topics to make it visible. That option is not available. So, my question is if my settings and steps are correct and what should I do to make the drive visible?