


Zerax
Members
-
Joined
-
Last visited
-
A new version of the script has been uploaded to GitHub. This should fix the login issue.
-
Thanks for the great feedback! I really appreciate you taking the time to point out those confusing spots. I have updated the Wiki based on your suggestions: Variable Confusion (Steps 3 & 4): You were absolutely right—the distinction between "editing existing template variables" and "adding new custom variables" wasn't clear. I’ve renamed the sections to "Configure Standard Gluetun Variables" and "Add Custom Script Variables" with specific notes on when to Edit vs. Add. Missing Log File: I suspect the log file wasn't showing up for you on the host because the /tmp/gluetun path mapping (Step 3.3) might have been missed or configured differently. I’ve updated the Troubleshooting section to explicitly state that the script runs inside Gluetun (not qBittorrent) and added two methods to find the logs: one via docker exec (guaranteed to work) and one via the Host path. Volatile Speeds / No Upload: This is usually a binding issue rather than the script itself. I’ve added a troubleshooting tip to ensure qBittorrent's Network Interface is bound specifically to tun0 rather than "Any interface," which fixes the zero-upload issue for most users. Thanks again for helping improve the guide! Let me know if the updated version is clearer.
-
Hi @bigsteve , the script is now updated! Please let me know how it behaves on your end. Also, could you let me know which VPN provider you’re using?
-
Thanks for pointing this out! I’ve got a newly fixed script ready, but I need to rewrite the whole install process to match the changes. Give me about an hour and I’ll have the updated guide posted.
-
Yes. I’m using PIA with Gluetun + qBittorrent, and it works fine. The script was originally written with PIA in mind, since PIA rotates the forwarded port every 14 days. That’s why the script automatically fetches the new port from Gluetun and updates qBittorrent — otherwise, you’ll hit “stale” ports when PIA rotates them. If you’re getting issues, I’d suggest: - Make sure you’re using a **PIA location that supports port forwarding** (e.g., CA Montreal, CA Toronto, etc.). - Restart Gluetun and check the logs — you should see the port-forwarding process happening. - Confirm in qBittorrent’s **Connection tab** that the “Listening Port” matches the one Gluetun reports. > Note: PIA rotates forwarded ports every 14 days. The script handles this automatically, but you may need to restart the stack.
-
Have you tried restarting the stack and watching the logs step by step? Here’s what I’d suggest for debugging: 1. Restart Gluetun and immediately check its logs. 2. Once Gluetun is fully up, restart qBittorrent. 3. Look in the Gluetun logs for the port-forward script activity. If it’s working, you should see something like this: 2025-09-29T06:12:05+02:00 INFO [port forwarding] qBittorrent is not available yet. Retrying in 5 seconds... 2025-09-29T06:12:10+02:00 INFO [port forwarding] qBittorrent is available. Proceeding with the script... 2025-09-29T06:12:10+02:00 INFO [port forwarding] Fetching listening port from Gluetun URL: http://127.0.0.1:8000/v1/openvpn/portforwarded 2025-09-29T06:12:10+02:00 INFO [http server] 200 GET /portforwarded wrote 15B to 127.0.0.1:50874 in 47.831µs 2025-09-29T06:12:10+02:00 INFO [port forwarding] Curl exit code: 0 2025-09-29T06:12:10+02:00 INFO [port forwarding] Raw Gluetun Response: [{"port":24219}] 2025-09-29T06:12:11+02:00 INFO [port forwarding] Fetched listening port: 24219 2025-09-29T06:12:11+02:00 INFO [port forwarding] Logging in to qBittorrent... 2025-09-29T06:12:11+02:00 INFO [port forwarding] Login successful. SID: 4lbXv5gN3XvB7VpngEg6LqQPt1T+Pdxt 2025-09-29T06:12:11+02:00 INFO [port forwarding] Updating listening port in qBittorrent to 24219... 2025-09-29T06:12:11+02:00 INFO [port forwarding] qBittorrent listening port updated successfully to 24219. 2025-09-29T06:12:11+02:00 INFO [port forwarding] Logging out from qBittorrent... 2025-09-29T06:12:11+02:00 INFO [port forwarding] Logout successful. 2025-09-29T06:12:11+02:00 INFO [port forwarding] Script finished.If the script fails to update after 10 retries, it will time out and qBittorrent’s port will not be updated. That usually means qBittorrent wasn’t ready, credentials were wrong, or the WebUI wasn’t reachable. Once the logs confirm the port was updated, open qBittorrent → Options → Connection and check that the “Listening Port” matches what Gluetun reported. If qBittorrent shows the correct port but still reports “firewalled,” try an external port test (from another device or a port-checking site) to confirm whether it’s actually open. Further troubleshooting with Gluetun firewall: - The Gluetun container has a built-in firewall which can sometimes block port forwarding. - You can temporarily disable it for debugging: FIREWALL=off - Enable detailed firewall logging to see all related commands: FIREWALL_DEBUG=on - These settings help verify whether Gluetun’s firewall is blocking the port. > ⚠️ Remember: disable the firewall for debugging **only** — re-enable it afterwards for security. Tracker-side delay: Some private trackers take several minutes to re-test your port after a reconnect. The status may show “firewalled” even though the port is already open. Check with a Torrent Tracker IP Checker
-
I updated the script. Please replace the update_qbittorrent_listening_port.sh file with the new version attached. Make sure to update your username and password in the script. Make sure it's executable (chmod +x /tmp/gluetun/update_qbittorrent_listening_port.sh). Run it again: /bin/sh -c /tmp/gluetun/update_qbittorrent_listening_port.sh Let me know if that helps or if you’re still running into issues!
-
I completely agree, the solutions in that PR are quite elegant, and it's great that the Gluetun project is evolving to make things more dynamic. That said, I ran into some hiccups with VPN_PORT_FORWARDING_UP_COMMAND=wget --retry-connrefused --tries=6 -qO- --post-data=json={\"listen_port\":{{PORTS}}} http://127.0.0.1:8080/api/v2/app/setPreferences. While it’s a clever approach, it didn't work out of the box for me either. So, I took the liberty of updating my script to fully embrace the new VPN_PORT_FORWARDING_UP_COMMAND environment variable. I’ve tested it to ensure it's not only functional but also ready for the upcoming Gluetun v3.40.0 release, where authentication is a must for /v1/openvpn/portforwarded. The flexibility of this variable is a game-changer, and I’m really looking forward to leveraging it more. If you’re trying out anything similar or need help tweaking the script, let me know—I’d love to collaborate further on this!
-
Thanks for bringing this up, @hallowatcher I wasn’t aware of the VPN_PORT_FORWARDING_UP_COMMAND variable before, but it looks like a great improvement for handling port updates directly. I’ll definitely look into this and see how I can incorporate it into my setup. Really appreciate you pointing this out! 🙌
-
My backplane is a single-port expander model, specifically the Supermicro BPN-SAS3-846EL1 with 24 drive slots. I’ve connected it using a single cable to my HBA, ensuring there’s no dual-path setup or multiple expanders involved. This configuration has worked flawlessly with Unraid 6.12.14 and earlier versions, so I’m confident the issue isn’t with the hardware setup. Could there be another reason for the detection issue?
-
I recently attempted to upgrade my Unraid server from version 6.12.14 to 7.0.0 and encountered several critical issues that forced me to revert back to 6.12.14. I’d like to share my findings in case others experience similar problems or can offer insights. System Configuration: Motherboard: ASUS Pro WS W680-ACE IPMI (includes an onboard IPMI card) HBA: Broadcom HBA 9500i MB NIC: Intel(R) Ethernet Controller I226-LM After the upgrade, all 16 drives connected to the Broadcom HBA 9500i were no longer detected. I suspect this may be due to missing or incompatible drivers for the HBA in Unraid 7.0.0. Network Misconfiguration: On the second reboot after upgrading, the primary network interface (eth0) was incorrectly assigned to a virtual USB NIC (CDC Ethernet Device) or possibly to the IPMI card instead of the Intel Ethernet Controller I226-LM. As a result, the server was unreachable over the network, and I could not access it remotely. I found a similar issue discussed in a forum thread titled "No Network After Updating: eth0 Assigned to Virtual USB NIC", where the solution involves deleting the network.cfg and network-rules.cfg files and letting Unraid regenerate them upon reboot. However, the issue persisted. IPMI Card Impact: The presence of an onboard IPMI card may have contributed to the network misassignment, as Unraid seemed to misinterpret the available interfaces during boot. Power-Related Quirk: A particularly puzzling issue I encountered was that after issuing the poweroff or reboot commands, the server wouldn't complete the shutdown or restart process properly. Instead of gracefully powering down or rebooting, I had to manually press the power or reset button to get the system to actually turn off or restart. This unusual behavior was something I hadn't experienced before, and it was particularly frustrating given that the system appeared to be responding to other commands, but the shutdown sequence seemed to stall. After Reverting to 6.12.14: Drives connected to the Broadcom HBA are detected. Network interfaces are assigned correctly, with the Intel NIC functioning as expected. Power-related quirk is gone Additional Note: Ironically, I upgraded a second server, which is my test server, to Unraid 7.0.0, and it went flawlessly without any issues. This suggests the problem might be specific to the configuration of the Pro WS W680-ACE IPMI or its hardware components. Conclusion: It seems that the new Unraid 7.0.0 release may have compatibility issues with: Broadcom HBA 9500i drivers. Implementing interface binding during upgrades could help ensure proper network interface prioritization, especially in systems with multiple NICs, virtual USB NICs, or IPMI cards. I hope this issue will be addressed in a future patch to allow seamless upgrades for systems with similar configurations. angel-diagnostics-20250110-0209.zip
-
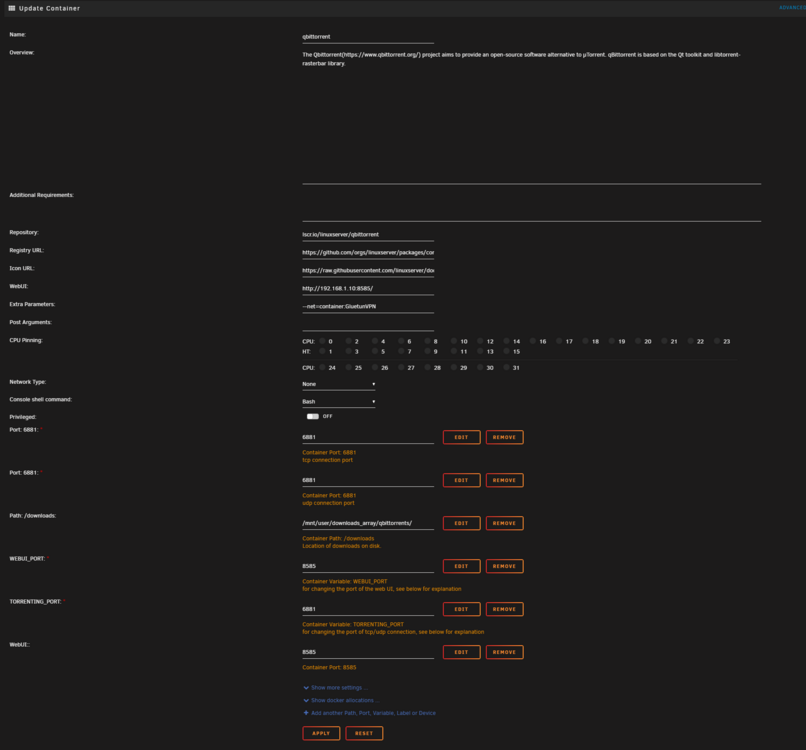
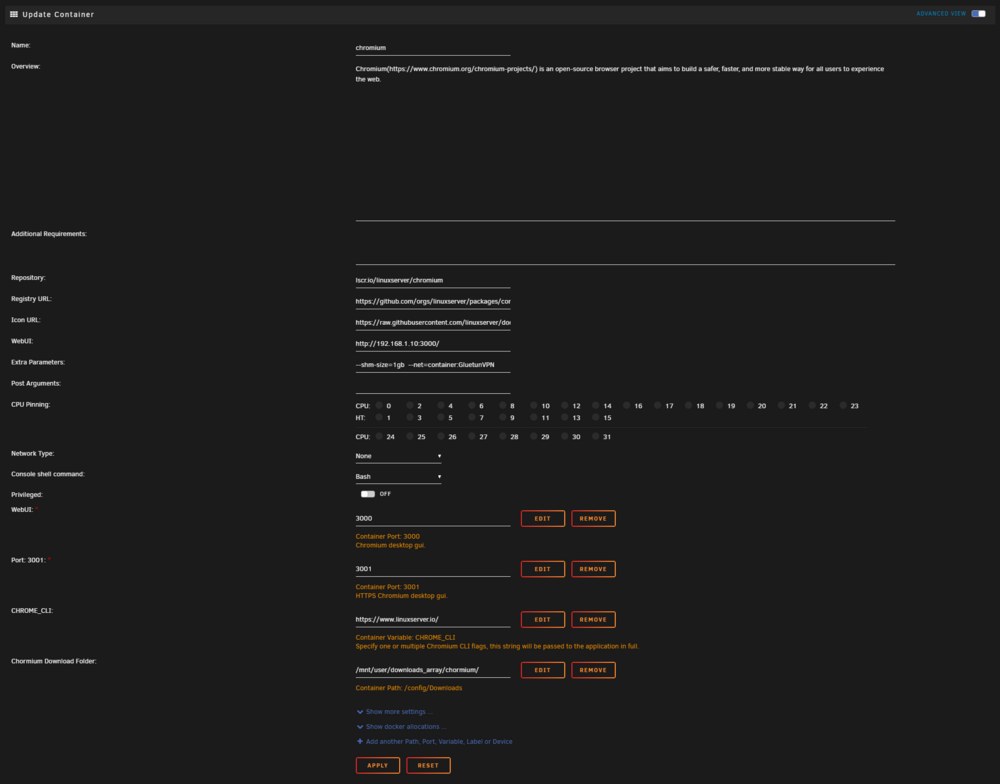
Hey fellow Unraid users! Hey fellow Unraid users! I wanted to share a handy User Script for UnRaid that I created to automate updating qBittorrent's listening port to match the forwarded port provided by the Gluetun VPN client. This eliminates the need for manual configuration and ensures your torrents are always optimized for connectivity. It is designed specifically for UnRaid users who utilize both qBittorrent and Gluetun VPN client in a Docker environment. 🔗 Source Code You can find the complete script and additional resources on GitHub: https://github.com/RzrZrx/Gluetun-qBittorrent-Port-Updater-Script-For-unRAID What is Gluetun VPN client? Gluetun is a lightweight and versatile VPN client that works with multiple VPN service providers. It runs in a compact Docker container, written in Go, and supports both OpenVPN and WireGuard protocols. Additionally, it features DNS over TLS for secure DNS queries and built-in proxy servers for added functionality. Supported VPN Providers: AirVPN, Cyberghost, ExpressVPN, FastestVPN, Giganews, HideMyAss, IPVanish, IVPN, Mullvad, NordVPN, Perfect Privacy, Privado, Private Internet Access (PIA), PrivateVPN, ProtonVPN, PureVPN, SlickVPN, Surfshark, TorGuard, VPNSecure.me, VPNUnlimited, VyprVPN, WeVPN, Windscribe. Updated for Gluetun v3.40.0 The script has been updated to support the v3.40.0 changes, which introduced authentication for accessing the /v1/openvpn/portforwarded endpoint. This ensures compatibility with the new authentication mechanism, providing seamless port-forwarding functionality. Installation GuidePrerequisites A Gluetun container (VPN Client). A qBittorrent container. Port Forwarding enabled in your VPN provider settings. Step 1: Save the ScriptDownload the latest script (update_qbittorrent_listening_port.sh). Save it to a persistent location on your server (e.g., /mnt/user/appdata/gluetun/scripts/). Step 2: File PermissionsBefore running the script, ensure it is executable. Use one of the following methods: Option 1: From Unraid Host Terminal Run the following command in your Unraid terminal: chmod +x /mnt/user/appdata/gluetun/scripts/update_qbittorrent_listening_port.shOption 2: From Gluetun Console Use the following command inside the Gluetun VPN Client Console: chmod +x /tmp/gluetun/update_qbittorrent_listening_port.sh Step 3: Gluetun Docker ConfigurationFor the script to work, it must be able to communicate with the Gluetun Control Server (port 8000). 1. Set Gluetun Credentials (Required)This is the step where you CREATE the Username and Password (or API Key) for Gluetun. You are defining these credentials now so the script can log in to the VPN container later. Choose ONLY ONE of the following methods (Method 1 or Method 2). Tip: If you prefer API Key authentication, run this command in the Unraid terminal to generate a random key: docker run --rm qmcgaw/gluetun genkey # Output example: 5HuQ3QpsZ7o6XKbawtvgvEYMethod 1: Environment Variable (For the lazies not willing to setup a configuration file)Use the HTTP_CONTROL_SERVER_AUTH_DEFAULT_ROLE variable to set your credentials globally. Add this Variable to your Gluetun container: Config Type: Variable Name: HTTP_CONTROL_SERVER_AUTH_DEFAULT_ROLE Key: HTTP_CONTROL_SERVER_AUTH_DEFAULT_ROLE Value: (Copy one of the JSON strings below) Description: Defines the Gluetun Control Credentials. Option A: Basic Authentication (User/Pass) Replace my_gt_username and my_gt_password with the actual credentials you want to use. {"auth":"basic","username":"my_gt_username","password":"my_gt_password"} Option B: API Key Authentication Replace the apikey value with your generated key. {"auth":"apikey","apikey":"5HuQ3QpsZ7o6XKbawtvgvEY"} Note: Remember the credentials you set here. You will need to enter these exact values into the script variables in the next step. Method 2: Configuration File Advanced (Recommended)Use HTTP_CONTROL_SERVER_AUTH_CONFIG_FILEPATH to point to a TOML file. This allows for multiple roles and fine-grained control. 1. Create the Config File Create a file named config.toml on your host (e.g., /mnt/user/appdata/gluetun/auth/config.toml). Example TOML (Basic Auth): [[roles]] name = "qbittorrent" routes = [ # Port Forwarding "GET /v1/portforward", # Public IP "GET /v1/publicip/ip" ] auth = "basic" username = "my_gt_username" password = "my_gt_password" Example TOML (API Key): [[roles]] name = "qbittorrent" routes = [ # Port Forwarding "GET /v1/portforward", # Public IP "GET /v1/publicip/ip" ] auth = "apikey" apikey = "5HuQ3QpsZ7o6XKbawtvgvEY"2. Mount the Config File1. Mount the Config File In your Gluetun Docker settings, add a new Path: Config Type: Path Name: HTTP_CONTROL_SERVER_AUTH_CONFIG_FILEPATH Container Path: /gluetun/auth/ Host Path: /mnt/user/appdata/gluetun/auth/ Access: Read Only Description: Defines the path where Gluetun finds the config.toml file 3. Add Script & Status Mappings (Required for Host Logs)Add the Status File Path: Config Type: Path Name: PORT_FORWARDING_STATUS_FILE Container Path: /tmp/gluetun Host Path: /mnt/user/appdata/gluetun/scripts/ Access: Read/Write Description: Defines the path where Gluetun writes status files (and where our script resides). 4. Configure Standard Gluetun VariablesNote: These variables may already exist in your Gluetun template. If they do, *Edit** the existing values. If they do not exist, Add them as new Variables.* Enable Port Forwarding Only: Config Type: Variable Name: PORT_FORWARD_ONLY Key: PORT_FORWARD_ONLY Value: true Description: Forces Gluetun to only connect to servers that support port forwarding. Activate VPN Port Forwarding: Config Type: Variable Name: VPN_PORT_FORWARDING Key: VPN_PORT_FORWARDING Value: on Description: Enables port forwarding on the VPN server. Automation Command: Config Type: Variable Name: VPN_PORT_FORWARDING_UP_COMMAND Key: VPN_PORT_FORWARDING_UP_COMMAND Value: /bin/sh -c /tmp/gluetun/update_qbittorrent_listening_port.sh Description: Specifies the command to execute whenever the port forwarding status is updated. 5. Port Mappings (Add these to GLUETUN)Since qBittorrent is attached to Gluetun's network, you must define the WebUI ports inside the Gluetun container settings, not qBittorrent. qBittorrent WebUI Port: Config Type: Port Name: bittorrent WebUI Port Container Port: 8080 Host Port: 8080 Connection Type: TCP Description: Configures the port used by qBittorrent’s web user interface, default port 8080. Firefox/Chromium WebUI Port (Optional): Config Type: Port Name: Firefox WebUI Port Container Port: 3000 Host Port: 3000 Connection Type: TCP Description: Configures the port used by the web user interface, default port 3000. Step 4: Add Custom Script VariablesImportant: The variables below are specific to this automation script and are NOT part of the standard Gluetun image. You must click "Add another Path, Port, Variable..." and Add these as NEW Variables. Internal IP Address: Config Type: Variable Name: PORTSYNC Internal IP Key: PORTSYNC_INTERNAL_ADDRESS Default Value: 127.0.0.1 Description: The IP address used to communicate between containers. Leave as default if containers share the same network stack (Sidecar/Bundle). Gluetun API Port: Config Type: Variable Name: PORTSYNC Gluetun API Port Key: PORTSYNC_GT_PORT Default Value: 8000 Description: The port Gluetun's API listens on (Control Server), default port 8000. qBittorrent WebUI Port: Config Type: Variable Name: PORTSYNC qBittorrent Port Key: PORTSYNC_QB_PORT Default Value: 8080 Description: The WebUI port of qBittorrent, default port 8080). Note: If your qBittorrent uses different port you must change this variable. qBittorrent CredentialsqBittorrent Username: Config Type: Variable Name: PORTSYNC qBittorrent Username Key: PORTSYNC_QB_USERNAME Default Value: my_qb_username (Replace with your qBittorrent Username) Description: Your qBittorrent WebUI username. qBittorrent Password: Config Type: Variable Name: PORTSYNC qBittorrent Password Key: PORTSYNC_QB_PASSWORD Default Value: my_qb_password (Replace with your qBittorrent Password) Description: Your qBittorrent WebUI password. Gluetun CredentialsChoose ONE of the following methods to match your Gluetun Control Server configuration. Method 1: Basic Authentication (User/Password) Use this if you configured Gluetun with a username and password. Gluetun Username: Config Type: Variable Name: PORTSYNC Gluetun Username Key: PORTSYNC_GT_USERNAME Default Value: my_gt_username (Replace with your Gluetun Username) Description: Gluetun Control Server username. Gluetun Password: Config Type: Variable Name: PORTSYNC Gluetun Password Key: PORTSYNC_GT_PASSWORD Default Value: my_gt_password (Replace with your Gluetun Password) Description: Gluetun Control Server password. Method 2: API Key Authentication Use this if you configured Gluetun with an API Key. Gluetun API Key: Config Type: Variable Name: PORTSYNC Gluetun API Key Key: PORTSYNC_GT_API_KEY Default Value: 5HuQ3QpsZ7o6XKbawtvgvEY (Replace with your Gluetun API Key) Description: The 22-character API key generated by Gluetun. Script BehaviorWait Timeout: Config Type: Variable Name: PORTSYNC Wait Timeout Key: PORTSYNC_TIMEOUT Default Value: 300 Description: Time (in seconds) to wait for qBittorrent to start before giving up. Debug Mode: Config Type: Variable Name: PORTSYNC Debug Mode Key: PORTSYNC_DEBUG Default Value: false Description: Set to true to enable verbose logging to file (/tmp/gluetun/portsync_debug.log). Step 5: qBittorrent Docker ConfigurationFor this setup to work, qBittorrent must route its traffic through the Gluetun container. 1. Network Setup When routing traffic through the Gluetun container, you must ensure the WebUI URL in the Unraid Docker template does not use Unraid’s default placeholder syntax. Instead of using the template defaults, replace the entry with your server’s actual static IP address and the mapped port. Change from: http://[IP]:[PORT:8080] Change to: http://192.168.1.50:8080 (Replace with your Unraid Server IP) Important: This rule applies to all containers that route their traffic through Gluetun (e.g., sabnzbd, hexchat, firefox). Hardcoding the IP ensures the WebUI icon in the Unraid dashboard functions correctly. qBittorrent - Environment variables (Unraid 6.12.14) Turn on Advanced view in template WebUI: http://192.168.1.50:8080/ (Replace with your actual Server IP) Extra Parameters: --net=container:GluetunVPN Network Type: None qBittorrent - Environment variables (Unraid 7) Turn on Advanced view in template WebUI: http://192.168.1.50:8080/ (Replace with your actual Server IP) Network Type: Container Container Network: GluetunVPN TroubleshootingDebug Mode (Finding the Logs) If the script isn't working, enable Debug Mode to see exactly what is happening. Add the variable PORTSYNC_DEBUG with value true to your **Gluetun** container. Restart the Gluetun container. To view the logs, you must verify where they are. Method A: Check inside the container (Guaranteed to work) Run this command in the Unraid terminal: docker exec -it gluetun cat /tmp/gluetun/portsync_debug.log Method B: Check on the Host If you want to read the file via your host file share (e.g., /mnt/user/appdata/gluetun/scripts/portsync_debug.log), you MUST have completed Step 3.3 (Status File Path) correctly. Ensure the Container Path for that mapping is exactly /tmp/gluetun. If that mapping is missing, the log file exists inside the Gluetun container (Method A) but won't show up in your appdata folder. Common Issues1. "qBittorrent not ready" Timeout Cause: qBittorrent takes longer than 5 minutes (300s) to start, or the script cannot reach the IP/Port. Fix: Check if PORTSYNC_QB_PORT matches your qBittorrent WebUI port. If your server is slow, increase PORTSYNC_TIMEOUT to 600. 2. "Script finished with errors/warnings"** Cause: Usually incorrect credentials or a changed IP address. Fix: Check the container logs. If you see authentication errors, verify PORTSYNC_QB_USERNAME and PORTSYNC_QB_PASSWORD. 3. Volatile Speeds / No Uploads** Symptoms: Downloads work (erratically), but upload speed is 0 B/s. Cause: This is rarely the script's fault. It is usually because qBittorrent is not bound to the correct VPN interface. Fix: 1. Open qBittorrent WebUI. 2. Go to Options (Preferences) -> Advanced. 3. Look for Network Interface. 4. Change it to tun0 (Do not leave it on "Any interface"). 5. Save and Restart qBittorrent. 4. Console Color Bleeding * Issue: The "Running Version" line in the logs is colored Blue/Cyan when it shouldn't be. * Cause: A cosmetic issue with how the Gluetun logger wraps ANSI color codes. * Impact: Harmless. The script logic is unaffected. Screenshot of configuration COMING SOON qBittorrent - Environment variables Unraid 6.12.14 # Turn on Advanced view in template WebUI: http://192.168.100.66:8080/ Extra Parameters: --net=container:GluetunVPN Network Type: None qBittorrent - Environment variables Unraid 7 # Turn on Advanced view in template WebUI: http://192.168.100.66:8080/ Network Type: Container Container Network: GluetunVPN Chromium Environment variables Unraid 6.12.14 WebUI: http://192.168.1.10:3000/ Extra Parameters: --shm-size=1gb --net=container:GluetunVPN Network Type: None # Optional Config Type: Path Name: Chormium Download Folder: Container /config/Downloads Host Path: /mnt/user/downloads_array/chormium/ Default Value: Access Mode: Read/Write Description: Specifies the directory for storing downloads made through the Chromium browser. By default, downloads are saved in /mnt/user/downloads_array/chromium/ on the host system. update_qbittorrent_listening_port.sh Setup Gluetun qBittorrent Port Synchronization Script.pdf

-
@SofcsoHow did you update the Intel ME version, last time i had to boot into bare-metal windows. Do you have another update method.
-
@OmidDoes your HBA show up under the Advanced tab in the bios. Try the following (use the remote window of the IPMI software) for easy monitoring at reboot. Before "Save configuration and reboot" remove any connection to all the graphics cards, Let Unraid boot and plug in VGA to IMPI card after Unraid is started, this solved the iGPU issue for me.
.jpeg.4b69cddbf35b9d8f94a52debf12f666d.jpeg)
.jpeg.38109da97aa9aaf9d4c20ae139a12a6f.jpeg)
.jpeg.170ca7c84afbfedcdc0c6b749fe59628.jpeg)
.jpeg.ee22d4e3c5419054d168e6bcdf9a2e51.jpeg)
-
I use the Noctua NH-U12A with Thermalright Contact Frame on i9-13900T. And the IPMI card fits in the first slot. In many cases the NH-U12A perform beter then NH-D15.


.jpeg.4b69cddbf35b9d8f94a52debf12f666d.jpeg)
.jpeg.38109da97aa9aaf9d4c20ae139a12a6f.jpeg)
.jpeg.170ca7c84afbfedcdc0c6b749fe59628.jpeg)
.jpeg.ee22d4e3c5419054d168e6bcdf9a2e51.jpeg)