bmnkrkc
Members
-
Joined
-
Last visited
-
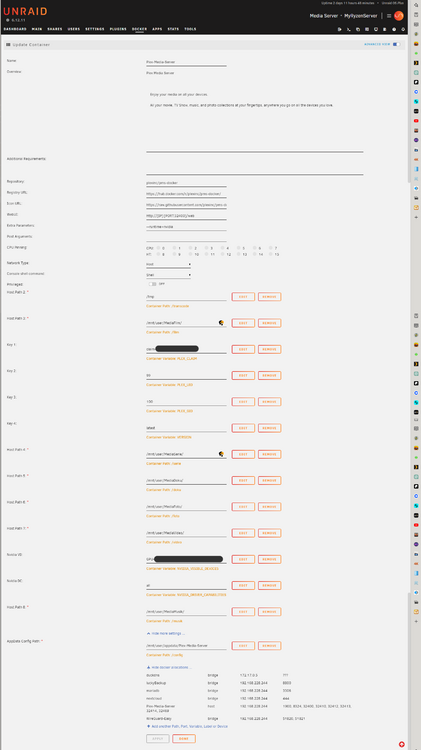
Danke für den Hinweis! Habe root auf nobody geändert. Jetzt läuft es wieder.
-
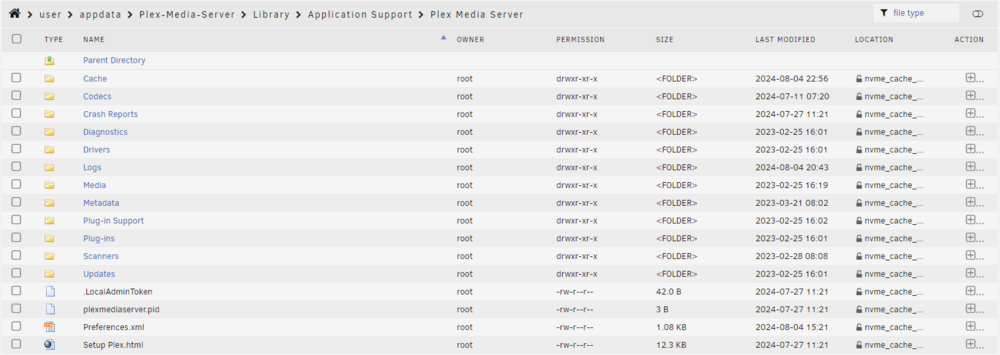
Nachdem ich Unraid auf 6.12.11 geupdatet habe, lief Plex einwandfrei. Aus heiterem Himmel lässt sich die WebUI nicht startet. Ich habe keine Änderungen vorgenommen, außer hin und wieder die Updates von Unraid und den Apps installiert. Das Plex-Log zeigt folgende Fehlermeldung an. Da ich in dem Thema nicht drin bin, tue ich mich gerade sehr schwer, zu verstehen, was das Problem ist. Starting Plex Media Server. PMS: failure detected. Read/write access is required for path: /config/Library/Application Support/Plex Media Server Stopping Plex Media Server. Vielleicht hat jemand, der mit dem Thema vertraut ist, einen Tipp oder die Lösung für mein Problem. Vielen Dank im Voraus für Eure Unterstützung!
-
Ich hatte bereits 4x 8TB WD RED PRO Festplatten und wollte bei WD RED PRO bleiben, um es einheitlich zu halten. Ansonsten hätte ich pro Platte 100,- Euro sparen können. Hinterher ist man immer schlauer. Das war jetzt Lehrgeld. Was mich jetzt interessiert. Was macht den Unterschied, dass Toshiba und Seagate im Vergleich zu WD RED PRO so günstig sind? Als Laie erkenne ich keinen Unterschied. Oder ist es letzten Endes nur der Name bzw. die Marke, für die man zahlt?
-
Die Platten waren im Angebot. Es gab 15% auf die Platte - das waren 346,- Euro inkl. Versand. Der Preis war unschlagbar. Vielen Dank für die Info! Hatte mir hierzu noch einige Videos von Spaceinvader One angesehen. Ich bin sicher gegangen und habe auf beiden Platten einen PreClear durchgeführt. Beide Platten waren einwandfrei und sind mittlerweile schon eingebunden. Die New Config hat auch einwandfrei funktioniert. Nochmals vielen Dank für Deine Unterstützung!
-
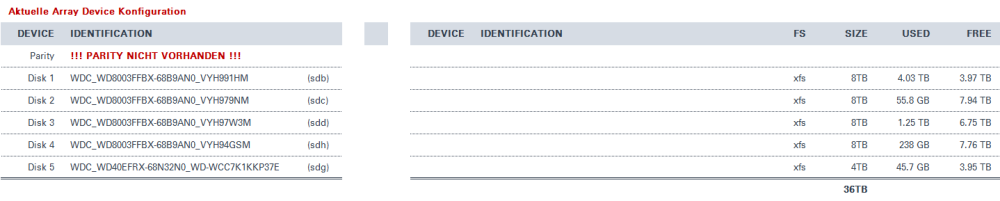
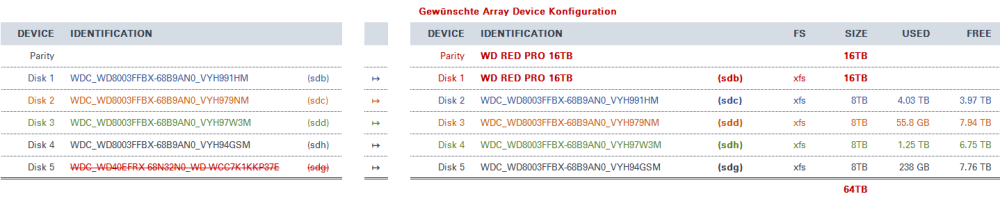
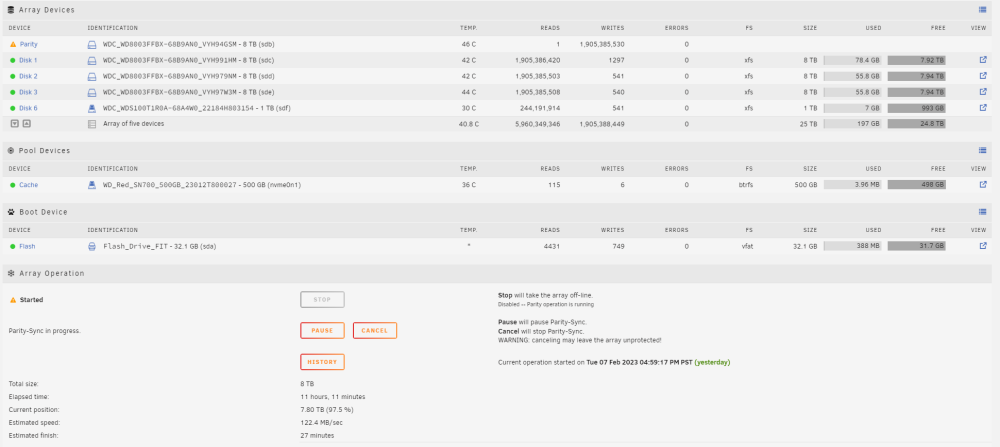
Hallo liebe Community! WD hat aktuell ein gutes Angebot, daher war ich so frei und habe mir gleich 2x WD RED NAS 16TB Festplatten bestellt. Jetzt möchte ich meinen Unraid-Server gerne erweitern bzw. neu konfigurieren. Für die aktuelle IST-Konfiguration siehe Abbild 01. Abbild 01 Das Array soll mit den neuen zwei 16TB Festplatten erweitert und neu konfiguriert werden, ohne dabei die Daten zu verlieren. Die meisten Daten liegen aktuell auf Disk 1 (sdb) und Disk 3 (sdd). Die neue Ausrichtung bzw. Konfiguration ist wie folgt gewünscht: Abbild 02 Selbstverständlich würde ich vorerst einmal ein PreClear auf beiden Festplatten durchführen lassen. FRAGE: Kann man 2 PreClear parallel laufen lassen? Ich habe hierzu etwas recherchiert und etwas gefunden, dass die neue Konfiguration ermöglicht. Leider bin ich Anfänger im Thema Unraid und daher unsicher, ob die unten angegebenen Lösungen die Richtigen für mich sind. FRAGE: Hat jemand ähnliche Erfahrung gemacht bzw. kennt eine Methode, die mein Vorhaben umsetzen lässt? Freue mich auf Eure Unterstützung. Lösungsansätze: 1. https://wiki.unraid.net/Replacing_Multiple_Data_Drives_with_a_Single_Larger_Drive Faster Method This method disables the parity drive while transferring data from the smaller drives to the larger drive, and then rebuilds parity at the end. Not having parity allows faster writing to the larger drive. Stop array and power down. Add new larger drive and power up. Stop array and use Tools - New Config. Assign new larger drive to new slot, unassign parity drive, and start array. Copy all files from the smaller drives to the larger drive. For example, if the smaller drives are Disk 1 and Disk 2, and the larger drive is Disk 3, then you could use these commands in console or telnet: rsync -avX /mnt/disk1/ /mnt/disk3 rsync -avX /mnt/disk2/ /mnt/disk3 Stop array and power down. Remove smaller drives and power up. Use New Config to unassign removed drives and assign parity. You can also change the slot assignment of the new drive or any other drives at this point. Start array and let parity rebuild. Safer Method This method rebuilds one of the smaller drives onto the new larger drive then copies the data from the other smaller drives. This will maintain parity during the data transfer then rebuild parity after the last of the smaller drives have been removed. Stop array and power down. Replace one of the smaller drives with the new larger drive and power up. Assign new larger drive to replace missing smaller drive, and start the array, to let unRAID rebuild onto it. Copy all files from the other smaller drive(s) to the larger drive. For example, if a smaller drive is Disk 2 and the larger drive is Disk 3, then you could use this command in console or telnet: rsync -avX /mnt/disk2/ /mnt/disk3 Stop array and power down. Remove the remaining smaller drive(s) and power up. Use New Config to unassign removed drive(s). You can also change the slot assignments of the new drive or any other drives at this point. Start array and let parity rebuild. 2. https://wiki.unraid.net/Manual/Storage_Management#Reset_the_array_configuration Reset the array configuration If you wish to remove a disk from the array or you simply wish to start from scratch to build your array configuration, there is a tool in Unraid that will do this for you. To reset the array configuration, perform the following steps: Navigate to the Tools page and click New Config You can (optionally) select to have the system preserve some of the current assignments while resetting the array. This can be very useful if you only intend to make a small change as it avoids you having to re-enter the details of the disks you want to leave unchanged. Click the checkbox confirming that you want to do this and then click apply to perform the operation Return to the Main tab and your configuration will have been reset Make any adjustments to the configuration that you want. Start the array to commit the configuration. You can start in Normal or Maintenance mode. Notes: Unraid will recognize if any drives have been previously used by Unraid, and when you start the array as part of this procedure the contents of such disks will be left intact. There is a checkbox next to the Start button that you can use to say 'Parity is Valid'. Do not check this unless you are sure it is the correct thing to do, or unless advised to do so by an experienced Unraid user as part of a data recovery procedure. Removing a data drive from the array will always invalidate parity unless special action has been taken to ensure the disk being removed only contains zeroes Reordering disks after doing the New Config without removing drives does not invalidate parity1, but it DOES invalidate parity2. Undoing a reset If for any reason after performing a reset, you wish to undo it, perform the following steps: Browse to your flash device over the network (SMB) Open the Config folder Rename the file super.old to super.dat Refresh the browser on the Main page and your array configuration will be restored
-
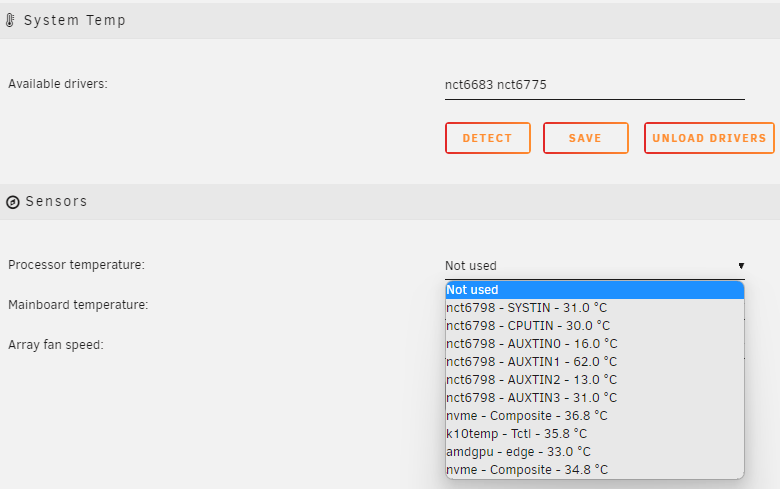
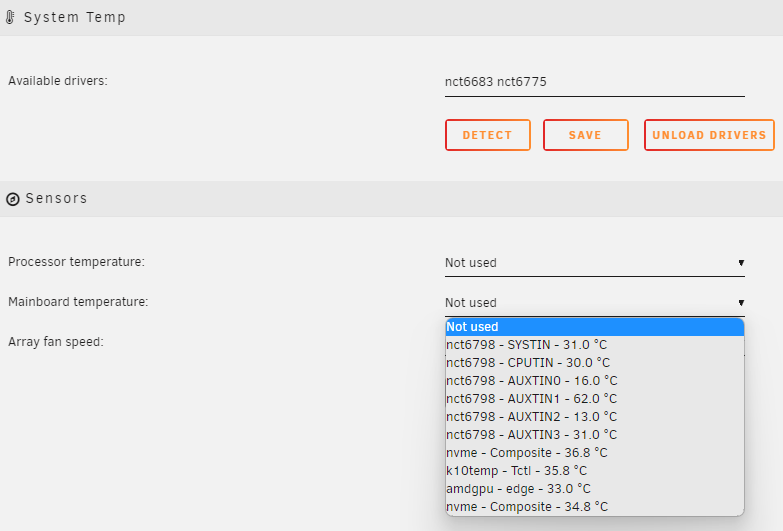
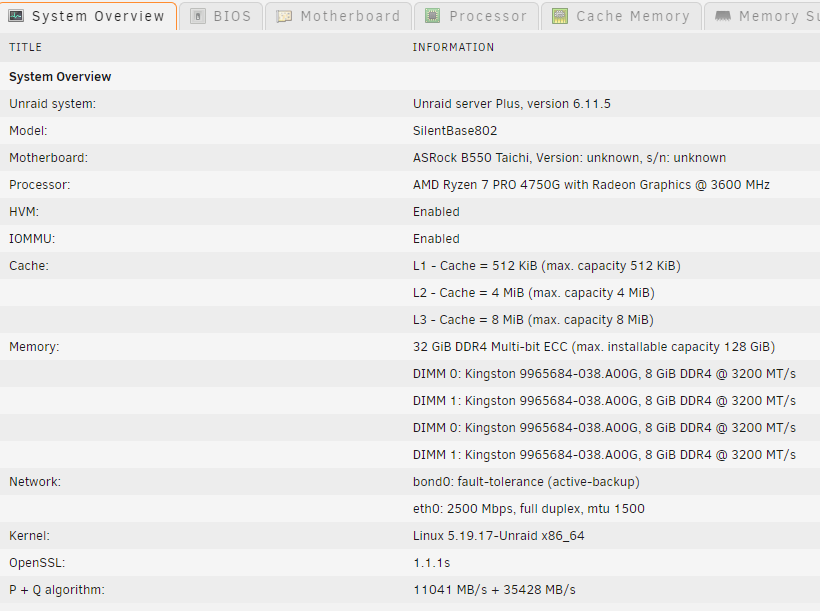
Hallo liebe Community, ich bin gerade etwas überfordert. Habe auf Google und YouTube nach den Treibern nct6683 nct6775 gesucht, um mehr darüber zu verstehen. Ich bin weiterhin ratlos und irritiert. Als vorhandene Treiber werden die zuvor zwei genannten Treiber definiert und in den Dropdowns für Prozessor und Mainboard wiederum andere Treiber angezeigt. Siehe Bilder anbei. Könnte mich jemand kurz aufklären. Ich komme hier irgendwie nicht weiter. Vielen Dank! Systemüberblick Prozeesor Tempratur Mainboard Tempertaur
-
Ich danke Euch allen für Eure Unterstützung. Der Ordner ist gelöscht und die Fehlermeldung ist weg. Somit ist das Problem gelöst.
-
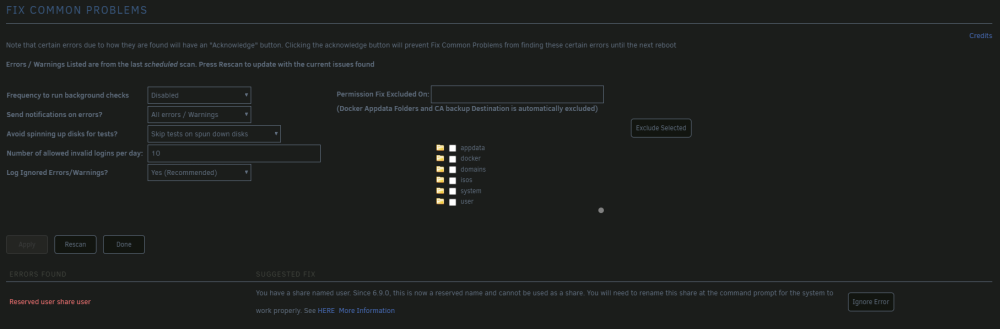
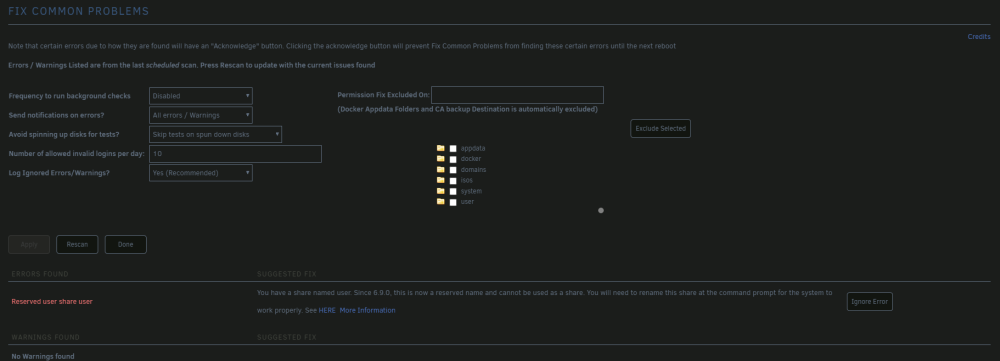
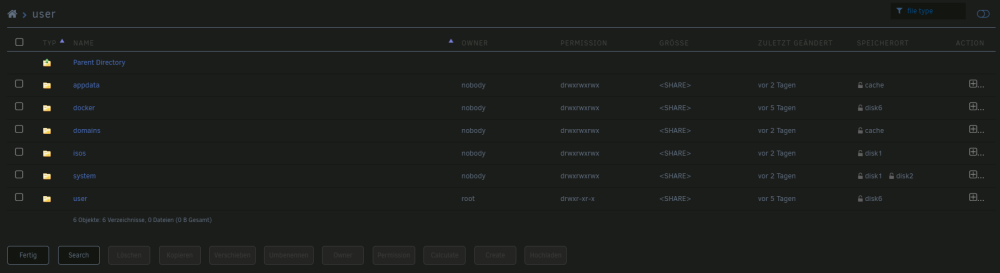
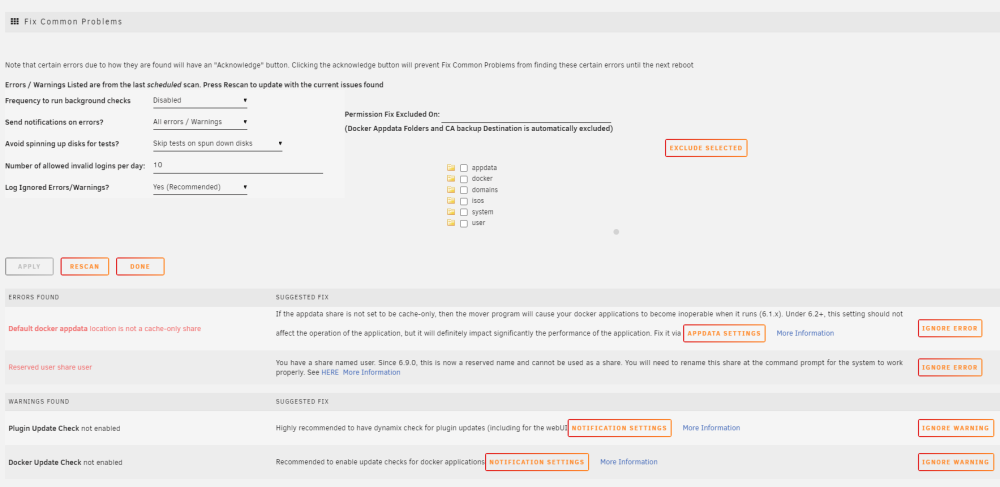
Ich habe das Problem, dass Fix Common Problems mit folgende Meldung ausgibt... Ich wusste nicht weiter. Jetzt habe ich über Dynamix File Manager den Zugriff auf den Ordner erlangt. Ich möchte den deklarierten Fehler beheben. Das Umbenennen, wie von Fix Common Problems empfohlen, ist nicht möglich. Ich kann den user-Ordner entweder löschen, verschieben oder den Owner von root auf nobody ändern. Ich bin nicht gewillt den Ordner zu behalten.
-
Der Dynamix File Manager hat mir den gewünschten Zugriff zum /mnt/user/ Ordner gewährt. Was soll ich jetzt tun? Soll ich den user-Ordner gemäß Abb.01 löschen? Abb.01 Abb.02 Abb.03


-
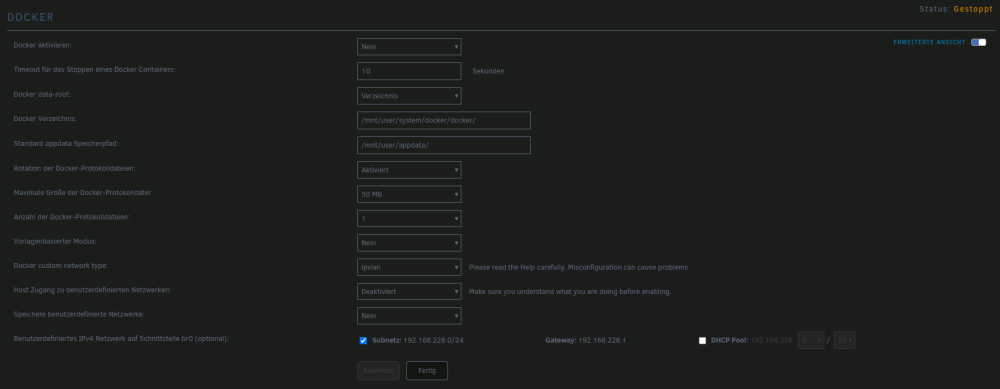
Docker war aktiviert habe es jetzt deaktiviert und den Docker Data-Root auf Verzeichnis gestellt. Es sieht, wie folgt aus. Ist der Docker-Verzeichnis eventuell von /mnt/user/system/docker/docker/ in /mnt/disk6/system/docker/docker/ zu ändern? Ebenso mit dem Standard appdata Speicherpfad. Ich bin Euch allen sehr dankbar, dass Ihr Euch bereit erklärt mir zu helfen. Bevor ich dieses Problem nicht gelöst habe, möchte ich vorerst keine weitere Konfigurationen und Installationen vornehmen. Würde mich freuen, wenn sich das Problem löst. Außerdem habe ich jetzt eine Meldung in den Shares für isos und system. Bedeutet das, dass der Cache, wie bei appdata auf Nur: Cache stehen sollte?

-
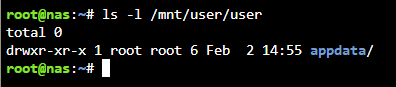
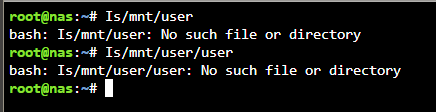
Unter dem Befehl scheint der Ordner, wenn ich es richtig deute, leer zu sein.
-
Das System ist komplett neu konfiguriert. Die HDDs, NVMe und SSD sind auch alle neu und diese wurden durch Unraid formatiert und Parity läuft aktuell noch. Quasi Jungfern-Installation.

-
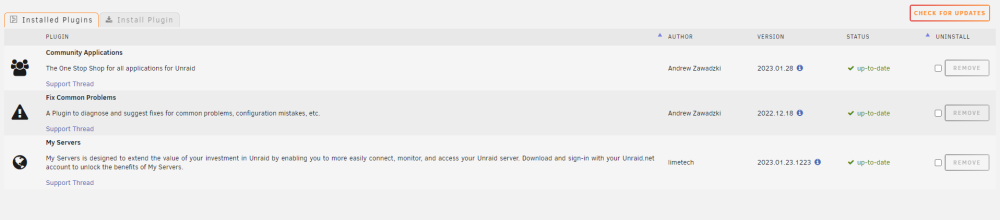
...so war es dann auch, dass Copy & Paste sein Wunder bewirkt hat. Jedoch lässt sich der Ordner nicht löschen, da er anscheinend nicht leer ist. Ich danke Dir für Deine Unterstützung. Als Neuling gleich mit so einem Problem konfrontiert zu werden, überfordert einen. Zumal das System ist komplett neu aufgesetzt. Es sind nur MyServers und FixCommonProblems installiert. Siehe Bild anbei.

-
Erst einmal vielen Dank für Deine schnelle Unterstützung. Ich habe mich Deiner Anweisung angenommen. Konnte das Problem aber nicht lösen. Die Anfrage 'Is/mnt/user' ist negativ. Habe das System komplett neu aufgesetzt. Es ist also ganz sauber außer My Servers wegen dem Key und FixCommonProblems als einzige Apps installiert. Und ich bekomme wieder diese Meldung. Ich frage mich, ob es vielleicht ein Bug in der App FixCommonProblems sein könnte?

-
Hallo liebe Community, als Neuling habe ich diese Woche den Einstieg in das Thema Unraid geschafft. Jetzt installiere ich gemäß der Videoanleitung von The Greek Freaks "Unraid RICHTIG installieren und einrichten! Walkthrough mit Plugins - Unraid Tutorial #002" die notwendigen Apps. Jetzt gibt mir die App Fix Common Problems die Meldung, dass ich eine Freigabe namens Benutzer habe. Seit 6.9.0 ist dies nun ein reservierter Name und kann nicht als Freigabe verwendet werden. Ich muss diese Freigabe an der Eingabeaufforderung umbenennen, damit das System ordnungsgemäß funktioniert. Ich habe gesucht und bin nicht fündig geworden. Und leider verstehe ich auch nicht so recht, was ich da genau machen soll. Ich finde die entsprechende Stelle für die Umbenennung der Eingabeaufforderung nicht. Hat jemand damit Erfahrung und wäre bereit mir kurz Hilfestellung zu geben? Viele Grüße und vielen Dank im Voraus!