Skarm0ry
Members
-
Joined
-
I think this is very heavily dependent on your VPS and your connection to it. I haven't had any speed issues with my RackNerd VPS personally and have had multiple clients streaming through it, but there are a lot of factors that could cause this. I don't think this is a Pangolin specific thing though.
-
The apps rely on the Custom Server URL in the Plex settings, so you'll want to double-check that. One thing that I've seen others have to do is add :443 to the end of their custom URL in Plex, so: https://plex.example.com:443 For whatever reason, that seems to be necessary for some. I also personally had to clear out the Plex Data from a couple Android TV devices and re-login from scratch to connect again. Not sure if that will be necessary for all, but it's worth a shot too.
-
And now we wait. Drives look now. No idea why the initial Clear on the drives didn't remove those partitions, but I'll keep an eye out for that from now on. Thanks for the help!

-
Hi @JorgeB Thanks for the reply. I'd probably prefer not to do the rebuild one at a time since that will take a week or so. I'd probably prefer to manually wipe and rebuild parity after. So knowing that I'd just like to confirm my steps. Remove 3 new Disks from Array Use Unassigned Devices + to do a destructive format on each of the drives Add drives back to the Array Rebuild Parity after Since the original disks from the array are the only ones with data, there really should be no risk of data loss here right? When removing and re-adding the drives, do I just do that from the Main tab in the Dashboard, or do I need to do anything in Tools -> New Config?
-
Hi @JorgeB Here is my Diagnostics file. Let me know if there is anything else I can provide. A little more context on these drives. They were previously used in a Synology NAS, so they were not being used at full capacity. I didn't think that would matter after a clear and format, but figured I'd mention that as well. One other thing to note is, there is no data on any of these 3 disks, so I'm fine with completely clearing them some other way if that is an option. I assumed the clear/format did that, but I guess not.
-
***Update for anybody reading this later on*** So, as it turns out, Clearing the disks in Unraid, doesn't remove all of the partitions. In my case, these were drives that were previously in my Synology NAS, so they had multiple partitions. If you are planning to add drives that have been used in another device, always check them with Unassigned Devices first to see what partitions they have. You will want to remove those before adding them to your Array so you can actually use the whole disk. If you're in the position I was, check out JorgeB's steps toward the end of this post. I did this and was back up and running no problem. Hey all, I had an Array with 1 Parity and 4 Data Disks. My previous config was: 20tb - Parity 20tb - Data 8tb - Data 8tb - Data 8tb - Data I added 3 disks to the Array, but for some reason all of the new disks are appearing as 8tb. It seems like they're defaulting to the smallest sized disk in my current Array for some reason. The used space reported looks pretty crazy too. These are tested and working drives. Since these are showing as 8tb and are below the 8tbs above them, I wondered if the order of my disks mattered for whatever reason? Other than that I'm not really sure why these would be reporting incorrectly like this. Steps I've taken: Checked Filesystem Status on all drives. All show good. Any help would be appreciated. Thanks!

-
Yeah I've been happy with it so far! That would be because I also don't understand them yet and missed that they were only used for VPN Client connectivity haha. So these would only be used if you weren't using Newt to connect it seems. I went ahead and removed that step to avoid any confusion. Thanks!
-
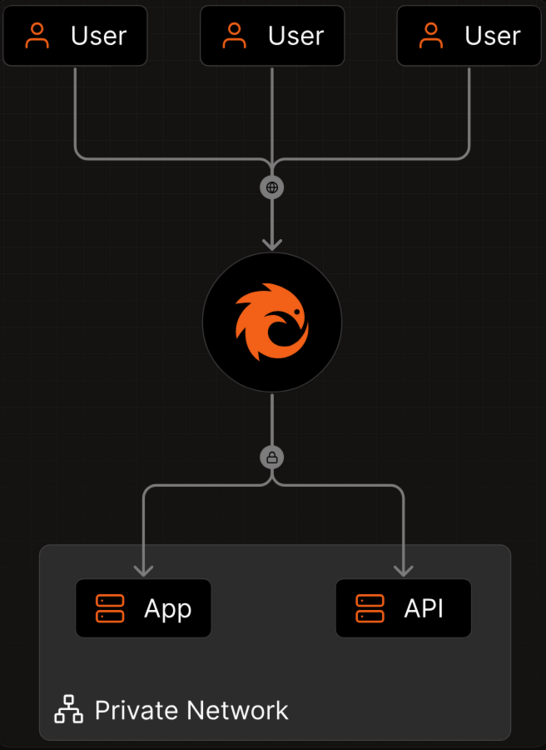
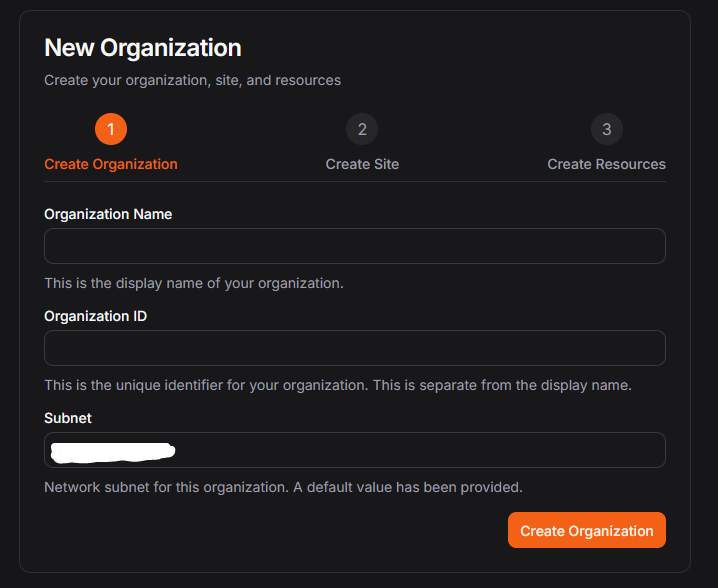
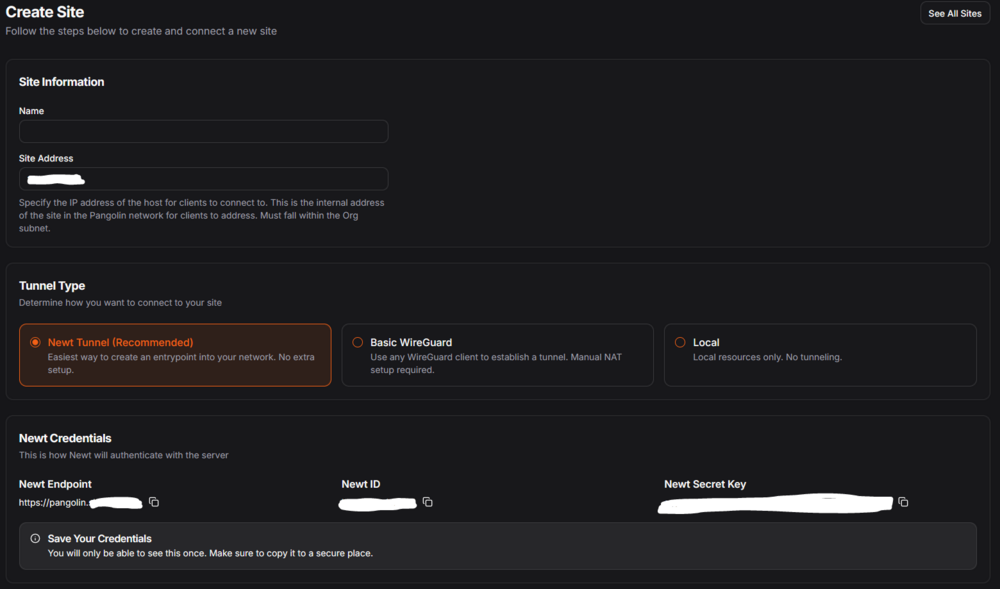
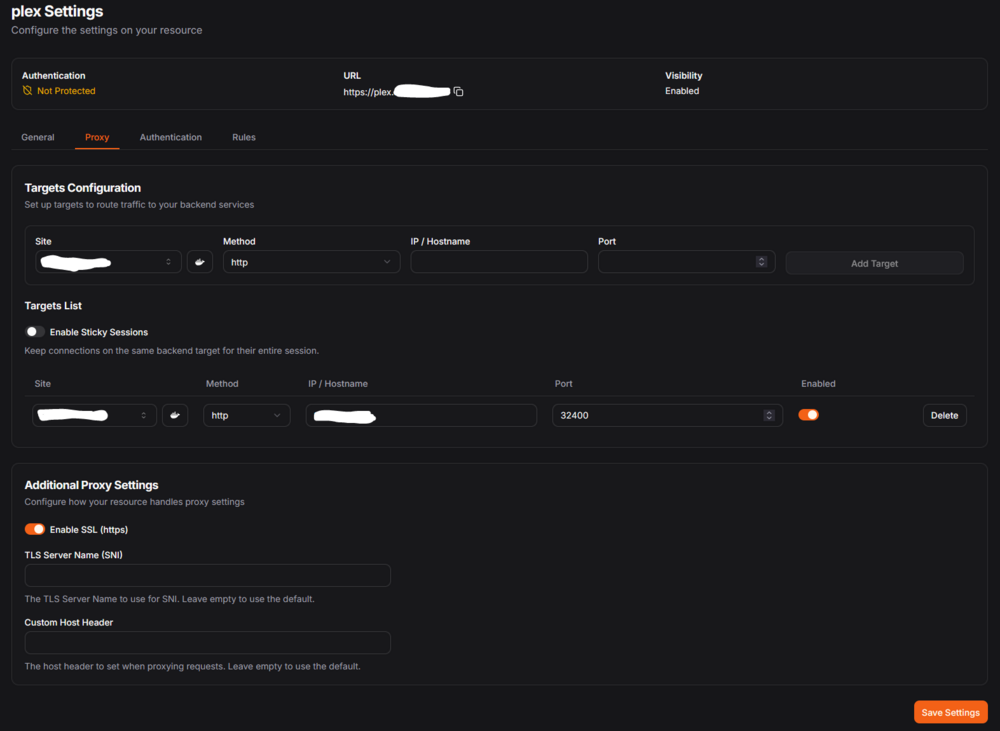
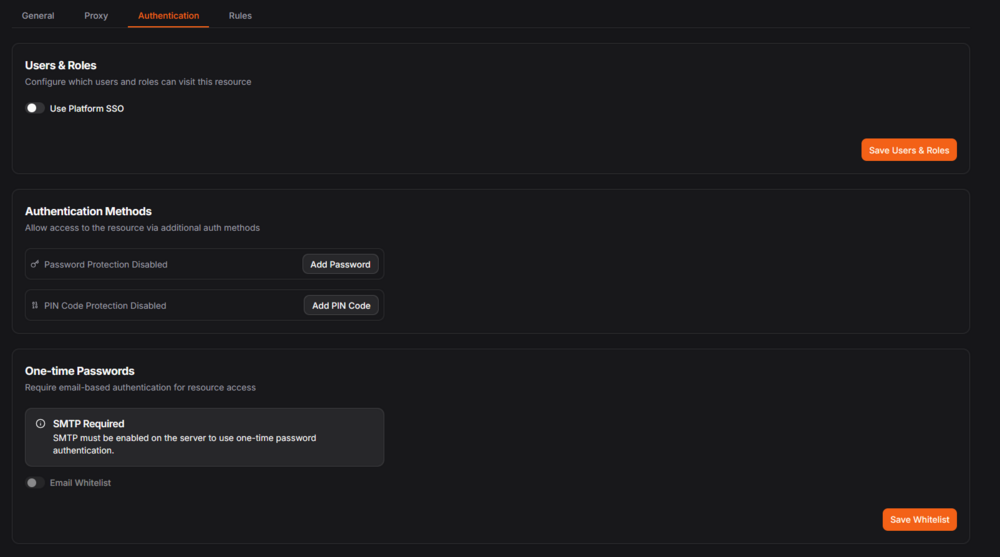
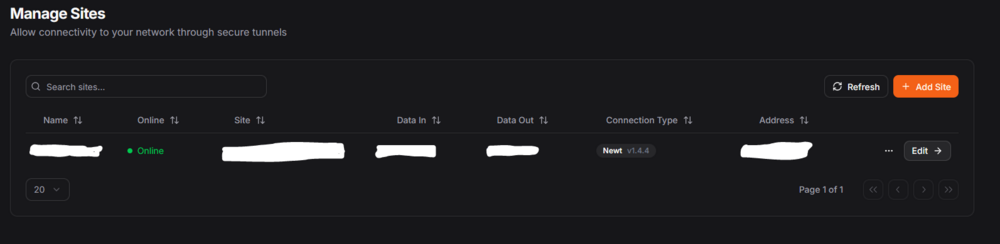
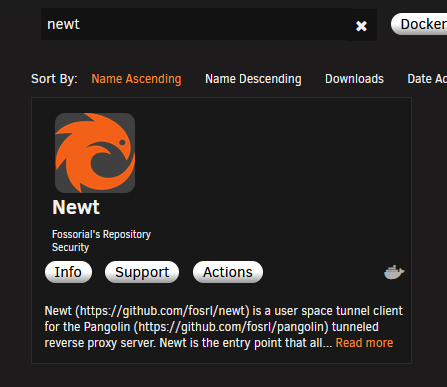
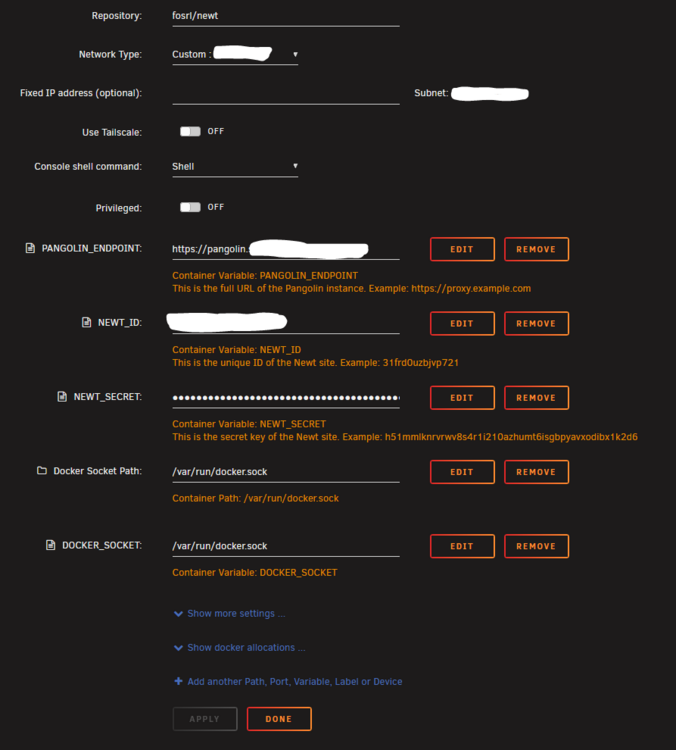
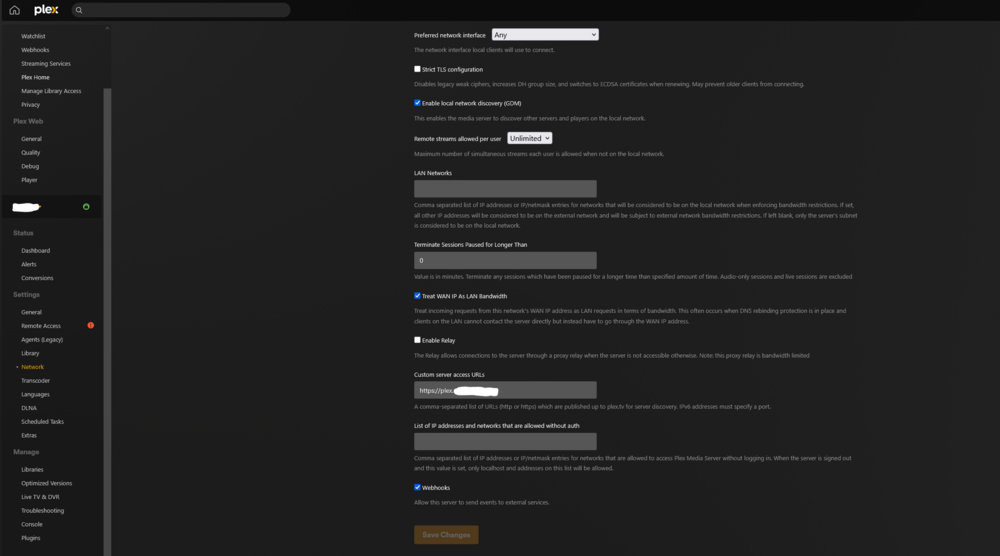
Hey all, today we’re going to be setting up a Pangolin Tunnel / Reverse Proxy for use with Plex Media Server. Since CloudFlare doesn’t want folks streaming across their tunnels, this is a nice alternative that has a lot of great features! What is Pangolin? Pangolin is an open-source and identity-aware tunneled reverse proxy server. Pangolin’s distributed architecture with nodes provide highly available ingress to ensure applications always remain accessible. Pangolin establishes secure connections from edge networks to nodes, bypassing the need for public inbound ports and complex firewall configurations. Pangolin is incredibly useful for exposing local services, IoT devices, or internal applications to the internet without direct exposure, enhancing security by reducing attack surface and simplifying network management. Additionally, Pangolin acts as an identity-aware proxy by authenticating every request against admin-defined access controls and rules. What is needed? A VPS ~$2-7 depending on requirements (Pangolin has a nice affiliate Racknerd deal for these here https://docs.digpangolin.com/self-host/choosing-a-vps ) A domain name A Plex Server (I will not be covering Plex server configuration in this guide) Decent upload speed (don’t forget about this!) DNS To start out, I’d just get the DNS entries set up first, as they can take a little bit to propagate sometimes. Check out their Docs here: https://docs.digpangolin.com/self-host/dns-and-networking Essentially all you really need is a Wildcard A Record pointing to your VPS. If you’re using this domain for other things you might need to set these A Records up manually for each subdomain you’re using, but in my case, this domain is exclusively for use with Pangolin, so a wildcard works perfect. I didn’t bother with the Root Domain Record, as it wasn’t necessary for my case. You might consider it if you want to run something through your Root Domain as well. Getting Started With Pangolin Check out the Pangolin Quick Install Guide first and foremost. This gives you an idea of what all you will need to do and has all of the commands necessary to get this going: https://docs.digpangolin.com/self-host/quick-install-managed First off, just create a Pangolin account now: https://pangolin.fossorial.io/auth/signup (You will need this later) Get SSH’d into your VPS and run the commands to get the installer going. During the installer you will have to make a few choices. You might want to set these differently from me, but this is what I ended up running with to start: Basic Configuration Do you want to install Pangolin as a cloud-managed (beta) node? (yes/no): no Enter your base domain (no subdomain e.g. example.com): your base domain goes here Enter the domain for the Pangolin dashboard (default: pangolin.example.com): pangolin.yourdomain.com Enter email for Let's Encrypt certificates: Your email Do you want to use Gerbil to allow tunneled connections (yes/no) (default: yes): yes (This is what will link up with Newt on our Unraid server for the tunnel. Email Configuration Enable email functionality (SMTP) (yes/no) (default: no): no Advanced Configuration Is your server IPv6 capable? (yes/no) (default: yes): yes It will also ask you if you want to install and use Docker. I said yes, you can use Podman if you want, but Docker makes the most sense for most folks probably. You will then be prompted about installing CrowdSec. By default this is set to No. I also opted for No to begin with. Later on if you want to add this you can just re-run the installer and select yes, but this does add another degree of management overhead that might not be worth the hassle for some. I will not be covering this in this guide, but it might be worth considering in the future, so keep it in mind for now. Pangolin Dashboard Initial Setup After all this, you will get a Setup Token and an Initial Setup URL. Browse to the Initial Setup URL which should work since you created the A Record for the site in an earlier step. If this is not working, it’s likely because you messed up the DNS record or it hasn’t propagated yet. (This usually is pretty quick though) At the Initial setup screen make 100% sure that you’re connected to your VPS (pangolin.example.com) and not the Pangolin cloud (https://pangolin.fossorial.io/). Step through the initial setup, enter your Token from the previous steps and log in. Once you log in you will be prompted to set up an Organization. The name doesn’t matter much, this is just so you can group your resources/sites. The default Subnet should be fine for you, as you likely won’t overlap with it, but you can change it if needed. Next you will be prompted to set up a Site. This is the Server end of our tunnel. Name it whatever you want, the IP it’s bound to by default is fine. You will want to configure this as a Newt Tunnel and copy the Newt Endpoint, Newt ID, and Newt Secret. These will be used on the Newt config on the Unraid side later. Lastly, you will be asked to set up a Resource. This is your service behind the tunnel. Name it Plex or whatever you want. This will be your subdomain for this service. Add an HTTP Method with the Internal IP Address of your Plex instance as the IP/Hostname. Port will be your Plex listening port which is 32400 by default. Enable SSL (https). On the Authentication Tab you might want to Enable/Disable extra layers of security. These will prompt for Pangolin Authentication, Pins, etc. before your request is sent to your Services behind Pangolin. This is nice for security, but can break things like the Plex Mobile Apps that expect to just use the Plex Auth. YMMV, try this out and set it to whatever works for you and your users. Once you’re done there, you should be all good to go on the Pangolin Dashboard. You can check your Tunnel health by going to the Sites section and looking at the Online Status. For now it will be Unhealthy, so let’s get Newt set up on our Unraid server to get this connected! Configuring Newt Go to the App store on your Unraid server and install Newt After that is done, edit the Newt Container. This is where you will enter the Endpoint, ID, and Secret we generated during the Site setup. Enter those in and Apply them. The Container should reboot and afterwards you should show Online on the Pangolin Dashboard under Sites. Plex Settings In Plex Settings → Network set Custom Server Access URLs to the same thing that was configured in Resources. This will likely be https://plex.example.com This might also be a good time to verify you have Hardware Transcoding, Bitrate Limits, etc. since more people might be utilizing your server after this. Note: You do NOT need the Relay or even Remote Access enabled from the Plex Dashboard for this to work. Testing We should be fully configured now! Test access from your browser to https://plex.example.com and see if it works. If you get a 401 / 502 you likely messed something up in the Resource config or didn’t add the correct URL to Plex, so doublecheck those and try again. Extras After you get all this tested and working, you can start working on locking this down even further. Pangolin uses Traefik on the back end, so you can add plugins in for even more customization. One I’d recommend to start with is the Geoblock plugin. Adding this is as easy as editing your YAML files for Traefik on your VPS. Pangolin has a nice guide for that here: https://docs.digpangolin.com/self-host/community-guides/geoblock And that’s it! If you have any questions feel free to post them up here.

-
Skarm0ry changed their profile photo
-
Hi all, I've been migrating away from a Synology NAS over to my newly built Unraid server and things have been going well. I currently have 1 Parity Drive and 4 Data Drives in the array. I have 3x 20tb and 1x 12tb Ironwolf Pros in the Synology currently and now that I have fully migrated over to the Unraid server for all of my day to day use, the Synology is finally being decommissioned. Currently I have 1 20tb drive set up as Parity 1, but since I'll have 4 new disks added to the array, I figured now was the time to just get a 2nd Parity drive set up. My question is, what is the most efficient way to do this? Should I add my 3 new data drives to the array first and then add the 2nd Parity drive and kick off the rebuild, or should I get the 2nd parity drive added in and then add the other 3 disks to the array letting it do the parity calculations from there? I'll need to preclear all 4 of the drives I'm assuming, so I have a chunk of time to plan this out. The 20tb drives take a couple days to parity check, so I'm sure the preclears will take a while too. Any advice would be appreciated!
-
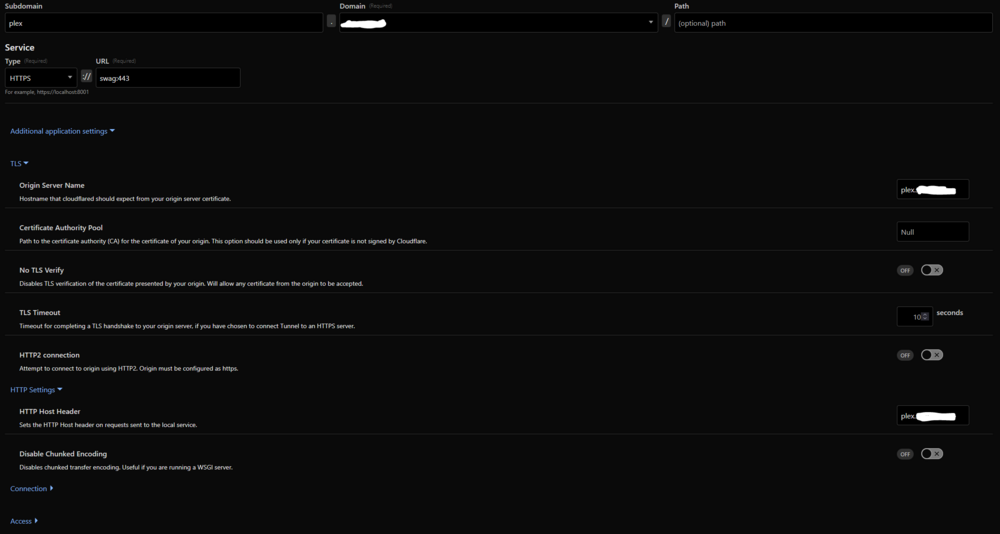
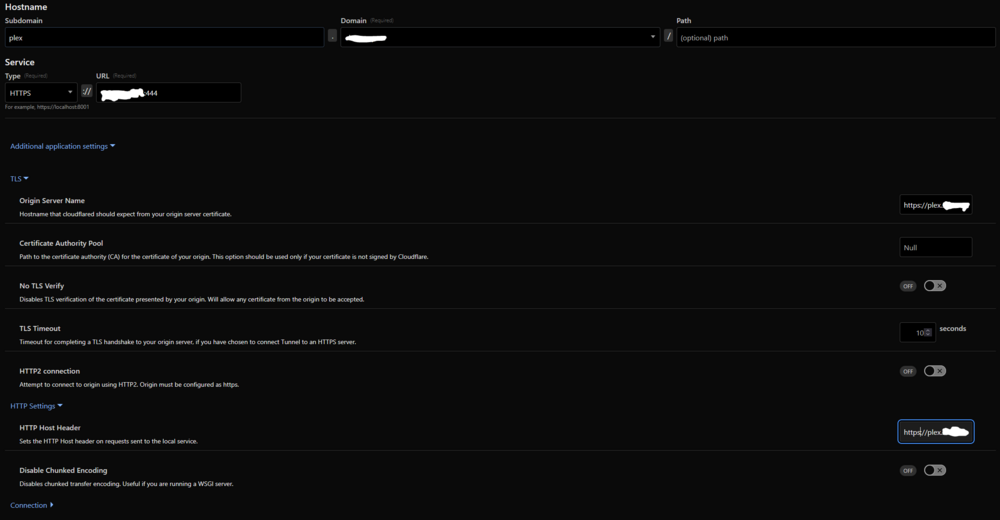
A small update to my above post. I found that adjusting the HTTPS Service URL from myIP:444 to myIP:443 changed the error and got me to a point where it was complaining about TLS validation, which there was an option for in the services. If I enable that I no longer get any errors on the Cloudflare Tunnel logs, but I get a 400 Bad Request when attempting to connect. You hadn't mentioned anything about needing to make adjustments to the "No TLS Verify" option, so I think I might just be going down the wrong path here, but wanted to throw that out there if it helped understand where this might be breaking. Thanks again! Final update to this for anybody who might be having the same troubles. The issues were specifically with this part of the guide: The Cloudflare Tunnel service needs to be pointed to the SWAG IP (or container name if they're on the same custom network) with 443 as the port. The Origin Server and HTTP Post Header don't need to be the full URL as stated in the guide, that causes TLS to freak out, so changing those to just subdomain.domain resolved these Bad Gateway errors that I was seeing. Here is how my config looks in Cloudflare after all is said and done. One last key thing that was left out of this guide that was necessary for this to work for me was: In Plex you will need to add the Custom Server URL as: https://plex.yourDomain.com:443 if this is not added with the port at the end, it will not work. Finally got this working, so I'm excited to do some testing now! @Sgine let me know if there is anything I'm not considering here as I am pretty new to all of this, but this was the only combo of configs that I could get to work for me.
-
Hey there, Thanks for the writeup on this! I'm having some trouble with my configuration and had a couple questions. During 4. Configure Cloudflare Tunnel you say: I'm a little confused as to what to use here. Should I actually be setting up http in the headers/service in CloudFlare or is that just a typo? I have the Cloudflare tunnel configured and was able to hit my Plex server using just that previously using it's default 32400 port, so I know that is working, but after adding Swag into the mix and adjusting the service on Cloudflare I'm getting this in the Cloudflared Tunnel container's logs: Any idea where the issue might be? Swag shows good and has pulled down the cert per it's logs, so I think that's good to go, but I think I missed something during this config. Here is a screenshot of my Cloudflare config as well to make this a little easier: Thanks again!
-
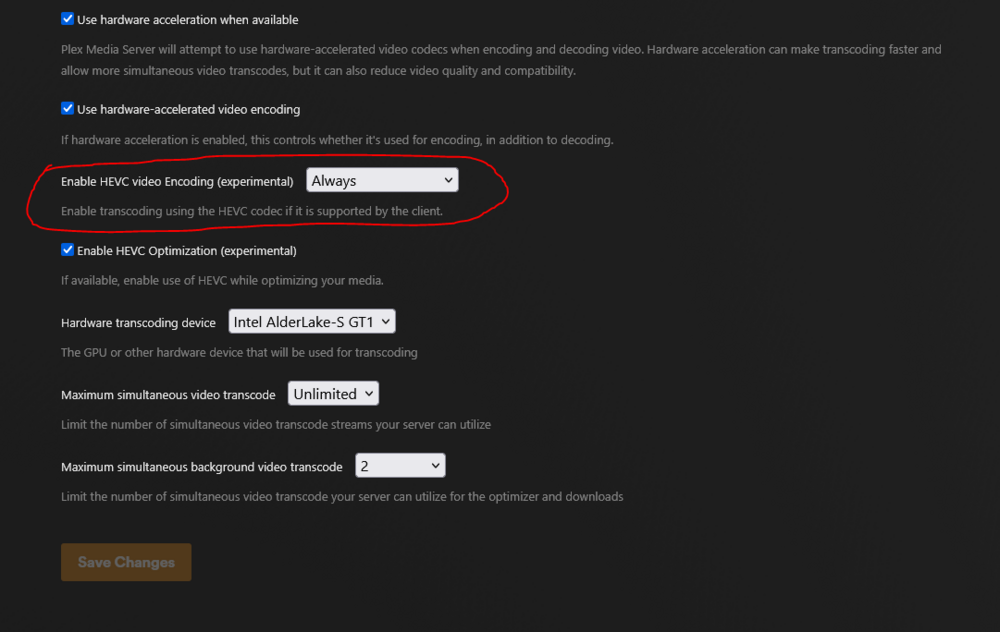
Just throwing this out there for anybody who might be pulling their hair out like I was for the past couple days. Unraid 7.1.4 12th Gen Intel® Core™ i9-12900KS (QuickSync compatible with UHD 770 iGPU) Lastest linuxsever Plex (1.42.1.10060-4e8b05daf) Followed this guide and many others, but couldn't seem to get HW transcoding to work. After a lot of testing I found that it was only HDR content that was not utilizing HW Acceleration and was absolutely slamming my CPU. Transcoding of non-HDR video worked fine. Disabling HDR Tonemapping in Plex Transcoder settings fixed this, but I don't really consider this a real solution. After doing some digging on the Plex forums, it looks like this is an issue more on the Plex side and rolling back to an older version could potentially work, but the Plex Team recommended the new HEVC transcoding option which has been in Beta for a while now is basically going to replace HDR Tonemapping anyways from what it sounds like. Enabling HEVC Video Encoding lets HDR content utilize HW Acceleration and eliminates the need to use HDR Tonemapping. The downsides of this are that HEVC Video Encoding will not support DoVi and some clients might not support HEVC. I think a lot of folks can probably deal with that though, especially since these transcodes might just be for relatives who could care less about quality anyways. Hopefully this saves someone from having to go down the Github / Forum rabbithole that I had to go down!