Jump to content

Ti133700N

Members
  • Posts

    24
  • Joined

  • Last visited

Everything posted by Ti133700N

  1. I double checked my mount point settings and it turns out everything is actually working fine (I was not writing the files to the right location). So manually creating a raid0 for storing images does work, but as you mentionned @1812 that feature might not be implemented at the UI level. I moved existing os / games images that I had on the cache to that new raid, changed the img location in the VM template, fired up the VM and holy crap, now it's extremely smooth ! Before that I had performance issues when the game updates were downloading, the computer was not super responsive. Now it downloads super quickly and the rest of the system is unaffected !
  2. Hey guys, I would like to use 2 SSDs in btrfs RAID0 for the VM images. Ideally I would have used the GUI, but I'm not sure you can create raid from the Unassigned devices tab. I enabled the Format button, but I think it will only let me format each individual drive. I tried creating the raid from the terminal using something like this: mkfs.btrfs -d raid0 /dev/sdb /dev/sdc and then I mounted on /mnt/users/disks/ It kinda worked, as I could put a few files on it but now I'm getting the "No space left on device" error message whenever I try to move or copy files on it, even though df -h usage is 1% on that mount point. Although if I btrfs filesystem usage /mnt/user/disks/, the "Unallocated" devices are showing as 929.50GiB x2, which leads me to believe I may not have assigned things properly. So basically I would like to know what would be the best way to correctly create that btrfs raid0 so that I could easily put the images on it ? Ideally I would have liked to see the partition on the "Unassigned devices" GUI with the % used. Note: I know I could use the cache instead, but I'm already using another SSD as cache, and I would like the extra performance of the unassigned devices in raid0, strickly reserved for the VMs content (games, etc.). Thanks !
  3. Scan user shares is disabled, here is what happens when I re-enable the plugin with the option set to "No". Maybe I absolutely need to select at least one "Included folder" ?
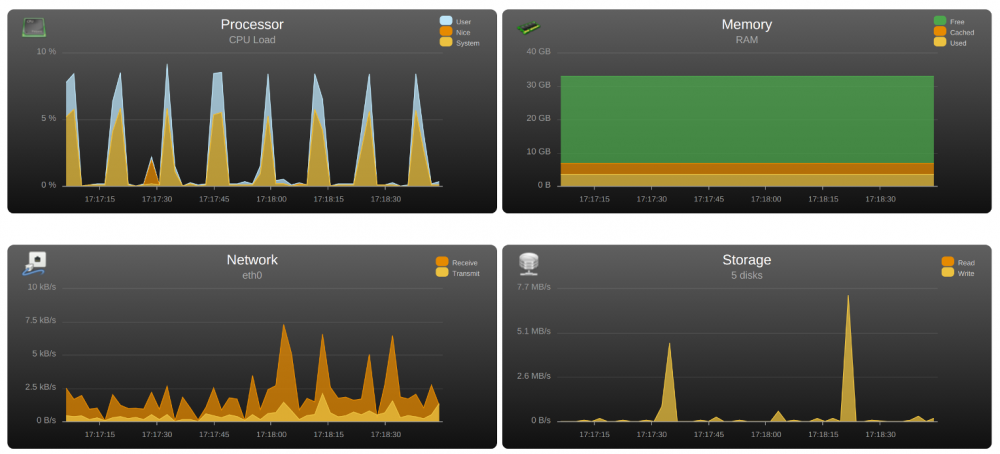
  4. Thank you for the reply. I just found the source of the problem. Since I first noticed the issue yesterday, I thought it might have been a recent change in my UnRaid settings. So I remembered watching Gridrunner's latest video and installed a few plugins as a result in order to try to optimize my setup. After disabling Dynamix Cache Directories, CPU usage went back to normal. Not sure if it's supposed to behave that way, but in my case I don't want my fans ramping up and down every 8 seconds because of CPU usage spikes, so I'll leave it off for now and maybe I'll check with Dynamix later on to see why this is happening. Thanks !
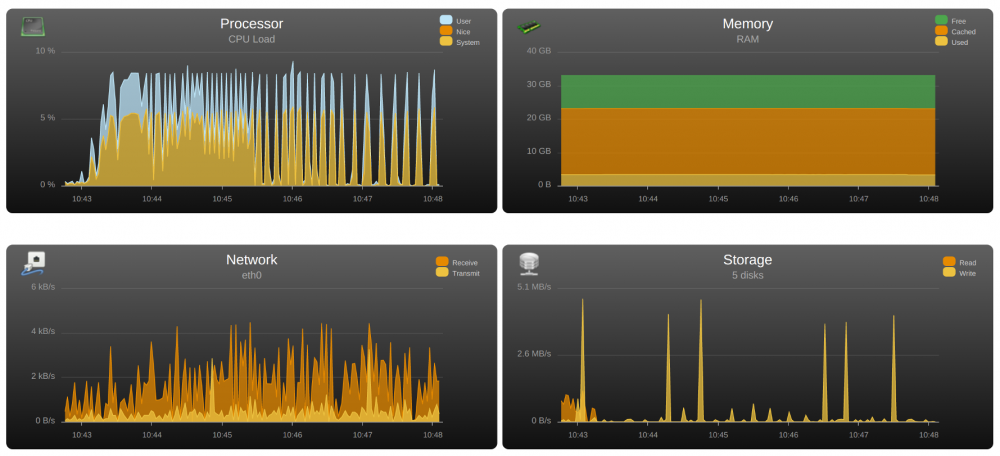
  5. Hey guys, yesterday I noticed the fans in the server started spinning up and down at regular intervals, so I looked at UnRaid's System Stats and saw that the CPU was spiking up every 8 seconds. From the dashboard, in the System Status, I can see that every 8 seconds, a random thread spikes to 100% usage and then goes down to 0%. All the VMs are shutdown, and I also tried disabling Dockers completely but I am still getting the same result. I also tried SSHing to the server and looking at "top", but I didn't see anything super suspicious, although I might need help on that front. What steps should I take to debug this issue and determine what is the cause of those spikes (I assume that's not "normal") ? Thanks !
  6. Wow ! So I ran this command to list the snapshots for a particular domain: qemu-img snapshot -l /mnt/user/domains/Creative/vdisk1.img and to my surprise, all the previous snapshots I took using `virsh snapshot-create-as` were listed ! So even if I couldn't list them using `virsh snapshot-list --domain Creative` after the server is rebooted, they were still listed using qemu-img. So as you might have guessed, my next experiment was to try to revert to one of those. So I used: qemu-img snapshot -a "AdobeInstalled" /mnt/user/domains/Creative/vdisk1.img and it worked ! Yes, somehow the actual snapshots were still saved within the .img and I could revert back to a past snapshot. But this doesn't stop there, you can even go back and forth to any snapshots (not just back) ! I did some testing (not extensive testing mind you), and so far the best method I came up with is this: [*]Stop the VM [*]Create a snapshot using the command `virsh snapshot-create-as --domain Creative --name "AdobeInstalled" --description "Installed Adobe Creative Suite"` [*]List snapshots using `qemu-img snapshot -l /mnt/user/domains/Creative/vdisk1.img` [*]Go to any snapshot using `qemu-img snapshot -a "AdobeInstalled" /mnt/user/domains/Creative/vdisk1.img` Not sure why this is not integrated in the UnRaid UI yet, as this would bring the value up by 500%. I'll continue experimenting with this, but so far this is perfect as the images are retained between reboots and it adds a lot of flexibility to the system. Thanks !
  7. I know (I think ?) snapshots aren't actually supported in the current UnRaid version however I'm thinking you guys might still be able to help. Basically I was using the virsh snapshot feature using the commandline, on qcow disks: virsh snapshot-create-as --domain MyVM --name "FirstSnapshot" --description "My first snapshot" And everything seemed to work fine. I could virsh snapshot-list --domain MyVM to get the snapshot list, and I could virsh snapshot-revert to get back to a point. However, when I reboot the UnRaid server all my snapshots are gone ! Is there a way to keep my snapshots ? Is there a way to get them back ? Where are they supposed to be saved ? What method do you use to take snapshots ? I was thinking I could rdiff-backup to only save a diff of the VMs, but that's just a bit more involved than using virsh snaphots. Thanks !
  8. I finally got it working using only the UI ! I tried putting my main video card in another PCI-E slot and use the 210 in the primary slot. I set the VM to use i440fx / OVMF and pass through the main video card and corresponding sound and that worked without the need for a rom. Out of curiosity, I tried the method to dump the rom and to my surprise, the file size is different than any other BIOS I had tried / dumped before. Even when the main video card was in another slot and discoverable, the dumped BIOS was different than the current working one (wierd huh ?). I haven't tried actually using it yet since I haven't moved back the main video card to the primary slot and it's working without any custom edits, but I'm hoping it will also work using that new BIOS. Also note that when I start the VM, I immediately see the BIOS and Windows loading, contrary to when I boot Ubuntu where I only see the VGA output once the login screen appears. I hope this will also help someone else, basically I would say you have to try one video card in the primary slot and then try the other video card in all the other slots one by one until it works... Thanks !
  9. I spent the day again trying to figure out what's wrong. Instead of trying to make the main video card to work, I tried with the 210. I get the exact same Code 43 error no matter what I do. I was wondering, before dumping the BIOS, when the video card is installed in the secondary PCI-E slot, should it be already working when you assign it to a VM and boot the VM (so no Code 43) or is it only supposed to work once you have dumped the BIOS for that secondary graphics card too ? I find it odd that people got their GPU pass through to work one way or another by simply swapping the video cards in different slots and use the UI (and most also got it to work using the rom dump method), while I can't get any of my 2 video cards to work at all (for Windows VMs). Is there something I am blatantly missing, any command I could run that would tell me I can't pass through GPU at all ? Could it be a mobo BIOS config ? Thanks.
  10. Thanks for the suggestion. Based on that I guess there might be something I don't understand though. As I mentioned, I'm using RDP to quickly be able to confirm that Windows boots and then I can go in Devices Manager and see the Code 43. I'm now doing this because when I was checking directly for the video input while trying to make the Ubuntu VM work, I was mislead since it was taking more than a minute to get the video signal (I messed with that for a week, recreating VMs, trying different settings because I thought it was not working even though it was), so I thought when diagnosing Windows, it would be more reliable to check the presence of Code 43. So do you think that even if there is a Code 43, the driver could still be working fine and I could get a video signal ? So I should try all the display output anyway to confirm ? My understanding was that if there is a Code 43, that meant the NVIDIA driver can't be used at all.
  11. I went back to the BIOS and saw that with my latest GPU testing positions, the main video card was is the "wrong" slot, where it was only 1X effective, so that probably didn't help. I went ahead and simply removed the 210, and put the main video card back in the first x16 slot. I booted and visually confirmed that UnRaid is booting from that video card. I also disabled ACS Override. Since I'm still not seeing any mention of the rom in the logs, is there a command I can directly run on the server so that I could test various custom settings and possibly make it work that way ? Would it be easier to diagnose ? Thanks.
  12. I'm not editing the VM using the UI after I make modifications in the XML as I know it will erase the custom edits. That being said I just tried doing exactly that (using the UI to re-set the values) and then custom edited the XML to add the rom line afterwards. Still, I'm not seeing the rom option in the logs. Do you think it's an issue I should look into, as in, it's not taking into account the rom option at all ? Yea I tried dumping the rom anyway with the switch in the other possition. The rom files are identical in size as far as I can tell. I did flash one of my GPU BIOS a while ago, it was working back then but it stopped working a few months ago and it looks like the video card is not working at all if I set it to that position (2) as I'm not even getting a video signal when booting / POST. So that's why I'm mainly testing with position 1 as I'm thinking this should be stock BIOS and easier to work with ?
  13. I tried adding bar='on' and use <rom bar='on' file='/mnt/user/roms/GK110Stock.rom'/> It doesn't seem to change anything. I still get the Code 43. Here is the VM log: 2016-11-26 23:24:35.848+0000: starting up libvirt version: 1.3.1, qemu version: 2.5.1, hostname: LimeHive LC_ALL=C PATH=/bin:/sbin:/usr/bin:/usr/sbin HOME=/ QEMU_AUDIO_DRV=none /usr/local/sbin/qemu -name Gaming5 -S -machine pc-i440fx-2.5,accel=kvm,usb=off,mem-merge=off -cpu host,kvm=off -drive file=/usr/share/qemu/ovmf-x64/OVMF_CODE-pure-efi.fd,if=pflash,format=raw,unit=0,readonly=on -drive file=/etc/libvirt/qemu/nvram/1569af02-c0a5-05fd-206c-59ba443c1fda_VARS-pure-efi.fd,if=pflash,format=raw,unit=1 -m 10240 -realtime mlock=on -smp 12,sockets=1,cores=6,threads=2 -uuid 1569af02-c0a5-05fd-206c-59ba443c1fda -nographic -no-user-config -nodefaults -chardev socket,id=charmonitor,path=/var/lib/libvirt/qemu/domain-Gaming5/monitor.sock,server,nowait -mon chardev=charmonitor,id=monitor,mode=control -rtc base=localtime,driftfix=slew -global kvm-pit.lost_tick_policy=discard -no-hpet -no-shutdown -boot strict=on -device ich9-usb-ehci1,id=usb,bus=pci.0,addr=0x7.0x7 -device ich9-usb-uhci1,masterbus=usb.0,firstport=0,bus=pci.0,multifunction=on,addr=0x7 -device ich9-usb-uhci2,masterbus=usb.0,firbus=pci.0,addr=0x8 -device usb-host,hostbus=3,hostaddr=5,id=hostdev3 -device usb-host,hostbus=3,hostaddr=4,id=hostdev4 -device virtio-balloon-pci,id=balloon0,bus=pci.0,addr=0x9 -msg timestamp=on Domain id=13 is tainted: high-privileges Domain id=13 is tainted: host-cpu char device redirected to /dev/pts/0 (label charserial0) That's wierd though, I remember seeing prior logs with the rom argument, now I don't see it anymore, is it normal ? Quick question: When you boot a Windows 10 VM, do you immediately get a signal from your monitor and see the BIOS or do you only get the signal once you get to the Windows loading screen ? I ask because with the Ubuntu VM, I only get video signal at the login screen, and since the bootloader takes like 60 seconds, the screen is black for at least 60 seconds which made things difficult to diagnose at first. Both cards (Geforce) are not working, but currently UnRaid is booting from the 210 (top 16x PCI slot), and I'm trying to pass through the 780. But I also tried swapping the cards before, and try to pass though either the 210 or the 780, it doesn't matter I still get Code 43. I'll check out hupster's method but I think it's the same as Mr. Spaceinvader AKA gridrunner. Thanks a lot for your help !
  14. I guess I could also include one of the XML I'm testing with: <domain type='kvm' id='12' xmlns:qemu='http://libvirt.org/schemas/domain/qemu/1.0'> <name>Gaming5</name> <uuid>1569af02-c0a5-05fd-206c-59ba443c1fda</uuid> <metadata> <vmtemplate xmlns="unraid" name="Windows 10" icon="windows.png" os="windows10"/> </metadata> <memory unit='KiB'>10485760</memory> <currentMemory unit='KiB'>10485760</currentMemory> <memoryBacking> <nosharepages/> <locked/> </memoryBacking> <vcpu placement='static'>12</vcpu> <cputune> <vcpupin vcpu='0' cpuset='0'/> <vcpupin vcpu='1' cpuset='1'/> <vcpupin vcpu='2' cpuset='2'/> <vcpupin vcpu='3' cpuset='3'/> <vcpupin vcpu='4' cpuset='4'/> <vcpupin vcpu='5' cpuset='5'/> <vcpupin vcpu='6' cpuset='6'/> <vcpupin vcpu='7' cpuset='7'/> <vcpupin vcpu='8' cpuset='8'/> <vcpupin vcpu='9' cpuset='9'/> <vcpupin vcpu='10' cpuset='10'/> <vcpupin vcpu='11' cpuset='11'/> </cputune> <resource> <partition>/machine</partition> </resource> <os> <type arch='x86_64' machine='pc-i440fx-2.5'>hvm</type> <loader readonly='yes' type='pflash'>/usr/share/qemu/ovmf-x64/OVMF_CODE-pure-efi.fd</loader> <nvram>/etc/libvirt/qemu/nvram/1569af02-c0a5-05fd-206c-59ba443c1fda_VARS-pure-efi.fd</nvram> </os> <features> <acpi/> <apic/> <kvm> <hidden state='on'/> </kvm> </features> <cpu mode='host-passthrough'> <topology sockets='1' cores='6' threads='2'/> </cpu> <clock offset='localtime'> <timer name='rtc' tickpolicy='catchup'/> <timer name='pit' tickpolicy='delay'/> <timer name='hpet' present='no'/> </clock> <on_poweroff>destroy</on_poweroff> <on_reboot>restart</on_reboot> <on_crash>restart</on_crash> <devices> <emulator>/usr/local/sbin/qemu</emulator> <disk type='file' device='disk'> <driver name='qemu' type='qcow2' cache='writeback'/> <source file='/mnt/user/domains/Gaming5/vdisk1.img'/> <backingStore/> <target dev='hdc' bus='virtio'/> <boot order='1'/> <alias name='virtio-disk2'/> <address type='pci' domain='0x0000' bus='0x00' slot='0x04' function='0x0'/> </disk> <controller type='usb' index='0' model='ich9-ehci1'> <alias name='usb'/> <address type='pci' domain='0x0000' bus='0x00' slot='0x07' function='0x7'/> </controller> <controller type='usb' index='0' model='ich9-uhci1'> <alias name='usb'/> <master startport='0'/> <address type='pci' domain='0x0000' bus='0x00' slot='0x07' function='0x0' multifunction='on'/> </controller> <controller type='usb' index='0' model='ich9-uhci2'> <alias name='usb'/> <master startport='2'/> <address type='pci' domain='0x0000' bus='0x00' slot='0x07' function='0x1'/> </controller> <controller type='usb' index='0' model='ich9-uhci3'> <alias name='usb'/> <master startport='4'/> <address type='pci' domain='0x0000' bus='0x00' slot='0x07' function='0x2'/> </controller> <controller type='pci' index='0' model='pci-root'> <alias name='pci.0'/> </controller> <controller type='virtio-serial' index='0'> <alias name='virtio-serial0'/> <address type='pci' domain='0x0000' bus='0x00' slot='0x03' function='0x0'/> </controller> <interface type='bridge'> <mac address='52:54:00:b0:77:dd'/> <source bridge='br0'/> <target dev='vnet0'/> <model type='virtio'/> <alias name='net0'/> <address type='pci' domain='0x0000' bus='0x00' slot='0x02' function='0x0'/> </interface> <serial type='pty'> <source path='/dev/pts/0'/> <target port='0'/> <alias name='serial0'/> </serial> <console type='pty' tty='/dev/pts/0'> <source path='/dev/pts/0'/> <target type='serial' port='0'/> <alias name='serial0'/> </console> <channel type='unix'> <source mode='bind' path='/var/lib/libvirt/qemu/channel/target/domain-Gaming5/org.qemu.guest_agent.0'/> <target type='virtio' name='org.qemu.guest_agent.0' state='disconnected'/> <alias name='channel0'/> <address type='virtio-serial' controller='0' bus='0' port='1'/> </channel> <hostdev mode='subsystem' type='pci' managed='yes'> <driver name='vfio'/> <source> <address domain='0x0000' bus='0x06' slot='0x00' function='0x0'/> </source> <alias name='hostdev0'/> <rom file='/mnt/user/roms/GK110Stock.rom'/> <address type='pci' domain='0x0000' bus='0x00' slot='0x05' function='0x0'/> </hostdev> <hostdev mode='subsystem' type='pci' managed='yes'> <driver name='vfio'/> <source> <address domain='0x0000' bus='0x06' slot='0x00' function='0x1'/> </source> <alias name='hostdev1'/> <address type='pci' domain='0x0000' bus='0x00' slot='0x06' function='0x0'/> </hostdev> <hostdev mode='subsystem' type='pci' managed='yes'> <driver name='vfio'/> <source> <address domain='0x0000' bus='0x00' slot='0x1b' function='0x0'/> </source> <alias name='hostdev2'/> <address type='pci' domain='0x0000' bus='0x00' slot='0x08' function='0x0'/> </hostdev> <hostdev mode='subsystem' type='usb' managed='no'> <source> <vendor id='0x046d'/> <product id='0xc07d'/> <address bus='3' device='5'/> </source> <alias name='hostdev3'/> </hostdev> <hostdev mode='subsystem' type='usb' managed='no'> <source> <vendor id='0x1532'/> <product id='0x011a'/> <address bus='3' device='4'/> </source> <alias name='hostdev4'/> </hostdev> <memballoon model='virtio'> <alias name='balloon0'/> <address type='pci' domain='0x0000' bus='0x00' slot='0x09' function='0x0'/> </memballoon> </devices> </domain>
  15. I've been trying to get this to work for more than a month now by reading all the related threads on this forum and on the internet in general. Hopefully you guys will be able to help me out if I provide all the necessary information. - I'm on UnRaid 6.2.4. - I have been able to create an Ubuntu Mate VM, using the default template and passthough my video card without any issues (OVMF / Q35-2.5). See my next post for full hardware list. EDIT: Looks like the full hardware list is too big to post here directly. Let me know if you need more info about my hardware. I originally had my main video card in the first slot but I tried swapping it with the GeForce 210 and boot from the 210 instead since I know it was easier to make it work in the past if you would assign a GPU that is not already used. I have to say it doesn't matter if I try to assign the main video card or the 210, I always get the Code 43 anyway for both these cards, It seems like Nvidia is detecting this is in a VM and preventing me from using the video card. I tried ACS Override ON or OFF (it's currently ON at the moment). I tried adding this in the domain section: <qemu:commandline> <qemu:arg value='-cpu'/> <qemu:arg value='host,kvm=off'/> </qemu:commandline> I tried adding this in the features section: <kvm> <hidden state='on'/> </kvm> to hide the VM from NVIDIA, but it doesn't seem to work. I'm using Guacamole (RDP) in order to test if the GPU pass-through is working, so I don't have to set VNC to the Domain (I know it won't work if I set VNC for the VM). I can successfully install the latest NVidia drivers (I'm only installing drivers and PhysX, no Geforce Experience or 3D). At the end it says the installer has finished and it needs to restart the computer to complete the installation. But then once I reboot and check the device manager, under Display Adapters, my video card is listed with the full name with an exclamation mark next to it. If I right click on it and look at the device status, it says "Windows has stopped this device because it has reported problems. (Code 43)". I tried 3 different BIOS, the one I dumped using Mr. Spaceinvader's method. One dumped from GPU-Z, one from Overclockers forums. I put the line like this in the XML: <hostdev mode='subsystem' type='pci' managed='yes'> <driver name='vfio'/> <source> <address domain='0x0000' bus='0x06' slot='0x00' function='0x0'/> </source> <alias name='hostdev0'/> <rom file='/mnt/user/roms/GK110Stock.rom'/> <address type='pci' domain='0x0000' bus='0x00' slot='0x05' function='0x0'/> </hostdev> My video card has 2 physical BIOS, but the second one isn't working at all anyway (I can't get a video signal when booting normally), so I'm only using the stock one using the dip switch on the video card itself. I'm currently running in a Windows 10 Pro VM without it being registered yet (since I'm testing first to see if it works). Are you guys aware of an issue with GPU pass-through if the Windows license is not registered ? I tried any combination of Seabios / OVMF / i440 / Q35 (I have a few different VMs for testing this now, that I created from scratch). I tried deleting the libvirt.img and let UnRaid recreate it. Please let me know what else I can try as I am running out of options here. Thanks !
  16. @Siwat2545 Could you be a little more specific about the steps you did to solve the issue ? I've been trying to make this work for the past month and I can't figure it out. I feel like I tried every combination of BIOS / Hyper-V / Machine / rom possible. My situation is very similar to yours. I have 2 nvidia graphics cards installed. In the primary slot, I have an NVIDIA video card, this is the one UnRaid is booting from. The other is a GeForce 210. I have a working Ubuntu VM with the main video card passthrough working perfectly fine, simply by using the VM setttings from the GUI (Machine Q35, BIOS OVMF). For the W10 machine however, I am getting the code 43 in the device manager. I have been able to confirm this by using RDP / Guacamole. I have managed to install the latest NVIDIA drivers (375.95). I'm not sure I understand all the steps you did, but if I understand correctly, once you installed the NVIDIA drivers, you simply had to select your NVIDIA video card as passthrough from the GUI and then it worked ? If that's the case I would think it would be close to working for me too, so I'm not sure what I'm missing. Thanks for your help.
  17. That sounds amazing, except for retro-gaming I would probably prefer playing it on my TV rather than in my computer room and since I can't directly pass-through GPU (TV is way too far from the server), I don't think this is a viable option for me. I currently use an HTPC running Steam OS to play games on my TV. Can you think of a workaround to use Lakka remotely or do you know something similar I could use on my Steam OS (Debian) ? What I like about Lakka (from what I understand) is that you can simply execute the rom and it will automatically play it. Currently with my setup I have to configure various emulators and manually launch them and start the rom, which is a bit of a pain. Thanks !
  18. Alright guys here is the conclusion to this epic quest to assign a static IP to a docker container. There are a few things that need to be configured properly in order for this to work, so a combination of previous steps and the following solved my issue. Note that at this point, even my newly created Promox LXC containers weren't working with addresses from 192.168.1.119 and new MAC Addresses, even if I was following the exact same procedure I was doing before (which was working): I checked my switch configuration (using a Windows VM and installing their ProSafe Management Software) and nothing seemed out of place, actually that switch doesn't have that many settings. Next, I checked my other switch, and decided to reset it because there were lots of configuration options, and I think I remembered tweaking it at some point to make this work for LAN parties. After that, I retried my LXC container created with Proxmox, and it worked ! When I had problems starting my container before resetting my switch, Proxmox was a lot more verbose when it came to tell me it wasn't able to assign the IP address to the container, so that's how I knew something was wrong on my network. On the other hand, the container's logs, the system logs and the docker logs within UnRaid were silent on the issue, and it was just "not working", I hope this can be improved in the future. Before trying the container, I tried with a VM, because with those you can directly assign a MAC address so I thought it would be more straightforward. That's when I faced another issue. Upon saving the VM config, UnRaid complained about the MAC address being invalid (something about being a multicast address). I knew about unicast / multicast addresses but my knowledge on that subject was too limited to understand exactly what role that played in relation to VMs and Containers. So I found out that instead of trying to manually generate a random MAC address, it's much more reliable to generate a MAC address using the "refresh" icon next to the MAC address field of the Edit VM Config page. So I replaced my old MAC Address in PfSense with the newly generated address by UnRaid and used it for that VM, and of course, it worked ! Next step was to test with the container. I first tried using dhcp, but it was still not working, so I then tried using the direct IP/dhcp server + MAC address like so: -e 'pipework_cmd=br0 @CONTAINER_NAME@ 192.168.1.119/[email protected] 36:08:87:2E:73:03' That last setting made it work and I was able to access sickrage's Web UI. Note that the WebUI shortcut still point to the host address so you have to manually change the URL in the address bar to access the IP you manually assigned (again, something I hope can be fixed in the future for our convenience). Now I was not going to just assume it was working, I wanted to confirm the container had actually the right IP assigned. So here is how you can confirm this. You can SSH into your UnRaid box and then run the docker exe command to execute commands inside your docker containers. docker exec sickrage ip -4 address show 22: eth1@if23: <BROADCAST,MULTICAST,UP,LOWER_UP,M-DOWN> mtu 1500 qdisc noqueue state UP qlen 1000 inet 192.168.1.119/24 scope global eth1 valid_lft forever preferred_lft forever Last step was to confirm I can setup rules from my PfSense and they would work as expected for that particular IP. So I setup a rule to pass through my VPN and validated with this command: docker exec sickrage curl -s checkip.dyndns.org | sed -e 's/.*Current IP Address: //' -e 's/<.*$//' The VPN address showed up. Fantesticles ! Thanks a bunch to all of you for your help, and I hope the information in this thread will also come in handy to other people in case they have similar issues. Have a good day !
  19. @tinglis1 I tried without the MAC address option and it gave me the same result. The container's logs are the same as what I posted before. I also tried with another container (PLEX) and it's doing the same thing. Oh wait, I just tried creating a new LXC container in Proxmox and it's not working either, but the previous containers I made with Proxmox are working... So I'm starting to suspect there is something wrong with my network somewhere, starting with IP 192.168.1.119 and up. I have a 10Gbe Netgear switch, maybe there is a setting in there I need to tweak. Unfortunately it requires a Windows machine to install their "ProSAFE Plus Configuration Utility" and I don't have Windows installed on any of my 4 PCs so I'm not able to test right away. I'll try to find a Windows machine and see if I notice anything weird on that switch. I'll keep you posted.
  20. The sickrage container logs [s6-init] making user provided files available at /var/run/s6/etc...exited 0. [s6-init] ensuring user provided files have correct perms...exited 0. [fix-attrs.d] applying ownership & permissions fixes... [fix-attrs.d] done. [cont-init.d] executing container initialization scripts... [cont-init.d] 10-adduser: executing... ------------------------------------- _ _ _ | |___| (_) ___ | / __| | |/ _ \ | \__ \ | | (_) | |_|___/ |_|\___/ |_| Brought to you by linuxserver.io We gratefully accept donations at: https://www.linuxserver.io/index.php/donations/ ------------------------------------- GID/UID ------------------------------------- User uid: 99 User gid: 100 ------------------------------------- [cont-init.d] 10-adduser: exited 0. [cont-init.d] 30-install: executing... Cloning into '/app/sickrage'... fatal: unable to access 'https://github.com/SickRage/SickRage.git/': Couldn't resolve host 'github.com' [cont-init.d] 30-install: exited 0. [cont-init.d] done. [services.d] starting services [services.d] done. and then this line repeats endlessly: python: can't open file '/app/sickrage/SickBeard.py': [Errno 2] No such file or directory In the system logs, I only get this: Nov 1 19:51:50 LimeHive kernel: device veth1pl13417 entered promiscuous mode Nov 1 19:51:50 LimeHive kernel: eth1: renamed from veth1pg13417
  21. First, I tried using the variable @CONTAINER_NAME@ instead of sickrage in the parameter. Then I tried deleting the Orphan image, deleting pipework, re-downloading pipework, and when it asked for the settings I immediately put dreamcat4/pipework:1.1.6 in the repository field. The containers seem to be nicely installed. I tried using a static IP + MAC address like in your example. I tried using dhcp and MAC Address. I'm indeed changing the value of Extra Parameters in the sickrage container. I tried restarting the whole server. I tried stopping docker + VMs and re-saving the Network settings, then restarted everything. Still not working. I will post my actual settings in case there is something wrong with my whole configuration and maybe you'll be able to spot it. Network Settings: MAC address:08:62:66:82:07:04 Enable bonding:Yes Bonding mode:active-backup Bonding members:eth0 Enable bridging:yes Interface description: IP address assignment:automatic IP address:192.168.1.100 Network mask:255.255.255.0 Default gateway:192.168.1.1 DNS server assignment:automatic DNS server:192.168.1.1 Desired MTU: Enable VLANs:Yes I have a pfSense on my network, where I assign static IP Addresses to MAC Addresses and create an ARP entry. I manually assign them in the 192.168.1.100 to 192.168.1.149 range. This works very well for 30+ devices / VMs on my network. In this case, I assigned 192.168.1.119 to MAC address 21:5f:3a:cf:60:96. Pipework container has Privileged ON and Network Type: Host. In the sickrage container, Privileged is OFF (I also tried ON), Network Type is set to None, and in advanced view, in Extra parameters, I use -e 'pipework_cmd=br0 @CONTAINER_NAME@ dhcpcd 21:5F:3A:CF:60:96' I also tried -e 'pipework_cmd=br0 @CONTAINER_NAME@ 192.168.1.119/[email protected] 21:5F:3A:CF:60:96' If I ping 192.168.1.119, I get this: PING 192.168.1.119 (192.168.1.119) 56(84) bytes of data. From 192.168.1.100 icmp_seq=1 Destination Host Unreachable From 192.168.1.100 icmp_seq=2 Destination Host Unreachable From 192.168.1.100 icmp_seq=3 Destination Host Unreachable From 192.168.1.100 icmp_seq=4 Destination Host Unreachable I don't see anything special in the UnRaid logs. If I simply set Network Type to Host and access http://192.168.1.100:8081/, the sickrage WebUI works perfectly. But using pipework and the extra parameter + network none, I can't access http://192.168.1.119:8081/ (This site can’t be reached). Not sure what is the next troubleshooting step ? Has anybody managed to make this work with sickrage, maybe I should try another container ? Thanks.
  22. I didn't update the repository. Now I did: Edited the pipework container and set Repository to dreamcat4/pipework:1.1.6. Confirmed that DOCKER_API_VERSION was set to 1.22. Now in the Docker containers list I have By: dreamcat4/pipework:1.1.6 and Version says not available. There is also another container entry at the bottom of the list, in grey that says (orphan image) dreamcat4/pipework:latest. Still not working though. Thanks for the help.
  23. Thanks guys, it steers me in the right direction but unfortunately I still can't get it to work. Here's what I did. [*]Went to the Apps page (Community Applications) [*]Searched for pipework [*]Added pipework-1.1.6 container by dreamcat4 (this is for Unraid 6.2) [*]Left default values [*]Went to the Docker tab [*]Made sure Pipework was set to autostart [*]Edited the container I wanted to assign the IP address to [*]Set Network Type to None [*]Switched to Advanced view [*]Added the Extra parameters like this: -e 'pipework_cmd=br0 sickrage dhcpcd 29:57:f5:b6:14:e9' It looks like unRaid is using dhcpcd so that's what I set there because in the doc it says you must use the dhcp program that is installed on the host. The last parameter is the MAC address I want to use. I assign a specific IP address to that MAC from my pfSense (that's what I'm doing for all my machines and it also works fine with my lxc containers on my Proxmox server). As you can see, I'm trying to make this work with the sickrage container. I don't know if the IP address is actually assigned correctly but the problem is accessing the Web UI for sickrage... ? Do you guys have any suggestions on what to try next ? Thanks.
  24. Please let me know if you ever find a solution to this. I usually assign custom MAC Addresses (for example I have a Proxmox server with LXC containers) and I manage the NAT rules using my PFSense's DHCP server, so having the ability to assign custom MAC addresses for Docker containers would be fantastic !
×
×
  • Create New...