

cholzer
-
Posts
164 -
Joined
-
Last visited
Content Type
Profiles
Forums
Downloads
Store
Gallery
Bug Reports
Documentation
Landing
Posts posted by cholzer
-
-
1 hour ago, JorgeB said:
No need to take it offline:
https://forums.unraid.net/topic/46802-faq-for-unraid-v6/?do=findComment&comment=480421
okay, I eventually found the option. 😅
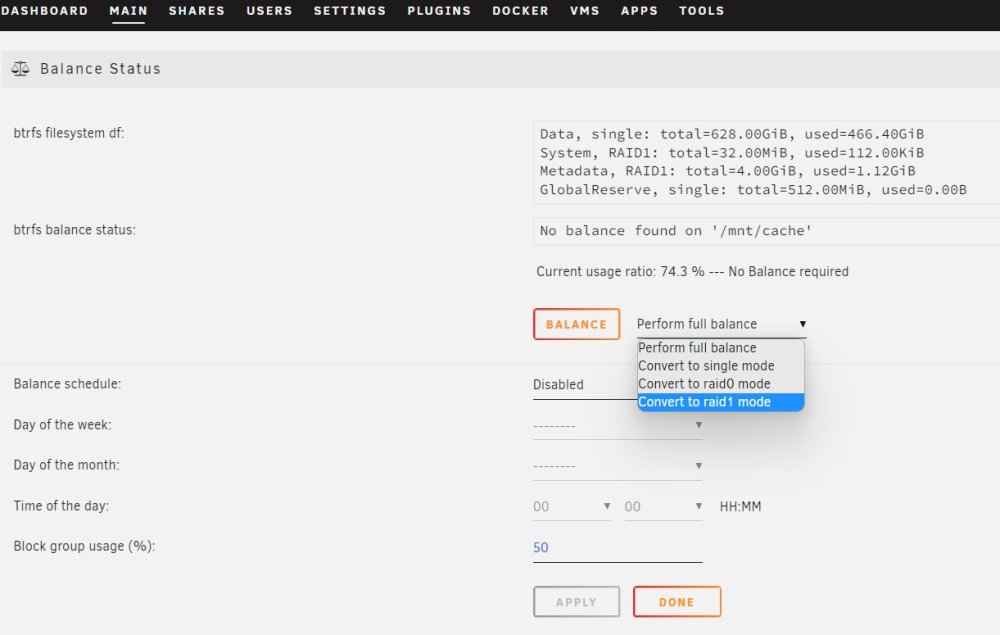
So I:
1.convert the cache pool to RAID1
2.shut down unraid
3.replace ONE of the 1TB cache pool drives with a new 4TB drive4.start unraid and add the newly installed 4TB to the pool replacing the now missing 1TB drive
5.let it resync the RAID1 cache pool
6.shut down unraid
7.replace the SECOND 1TB cache pool drive with the 2nd new 4TB drive
8.start unraid and add the newly installed 4TB to the pool replacing the now missing 2nd 1TB drive
9.let it resync the RAID1 cache pool
Question:
will I then end up with a 1TB cache pool?
or does it scale the size to the full 4TB automatically? -
1 minute ago, JorgeB said:
First you'd need to convert the pool to raid1, assuming the current data would still fit, then you can upgrade one device at a time.
Well, I can make it fit by moving some files away.
So I can just take the array offline and switch the CachePool from Raid0 to Raid1 without losing data? 😮 -
Hi!
Currently I run 6.11.5 with a cachepool that consists out of 2x Samsung_SSD_970_EVO_1TB - so I have a total of 2TB for the cache pool.
I am running docker, vm's and one smb share on the cachepool.
Now I want to replace these 2x 1TB ssd's with 2x 4TB ssd's (and this time configure the pool to be redundant) - but I could not find a step by step guide that explains the process.
(Note: I can physically add the 2 new 4TB drives to the system so I could spin up a 2nd pool if that is required for the process.)
Ideally I want this to be a hardware swap only where I just copy the data from the old to the new CachePool and docker, vm's as well as shares just work after. 😅
Any help would be highly apprechiated! -
On 4/7/2018 at 11:43 AM, feraay said:
the script is only needed if you don't want the server to wake up every day.
I do want the server to wake up every day, sadly the wake up timer in my bios does not seem to work as the system stays in sleep.
gonna try this script now. thanks!
-
6 hours ago, ljm42 said:
Please read the first two posts in this thread very carefully, particularly the part titled "Complex networks"
Thank you for your reply, my error was that I misread this section.
QuoteWith "Use NAT" = Yes and "Host access to custom networks" = enabled (static route optional)
server and dockers on bridge/host - accessible!
VMs and other systems on LAN - NOT accessible
dockers with custom IP - NOT accessible
(avoid this config)
After I added a static route on my router it worked.
I guess the aspect which confused me was that wg-easy on the rpi did not require this, but the networking on Unraid is certainly different.
QUESTION:
Why cant this route be added directly inside Unraid?")
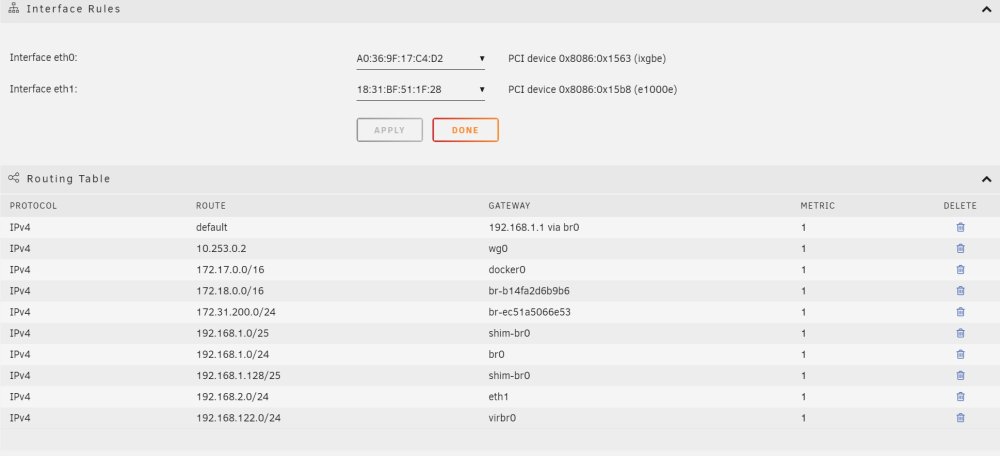
Like in the "Routing Table" section. -
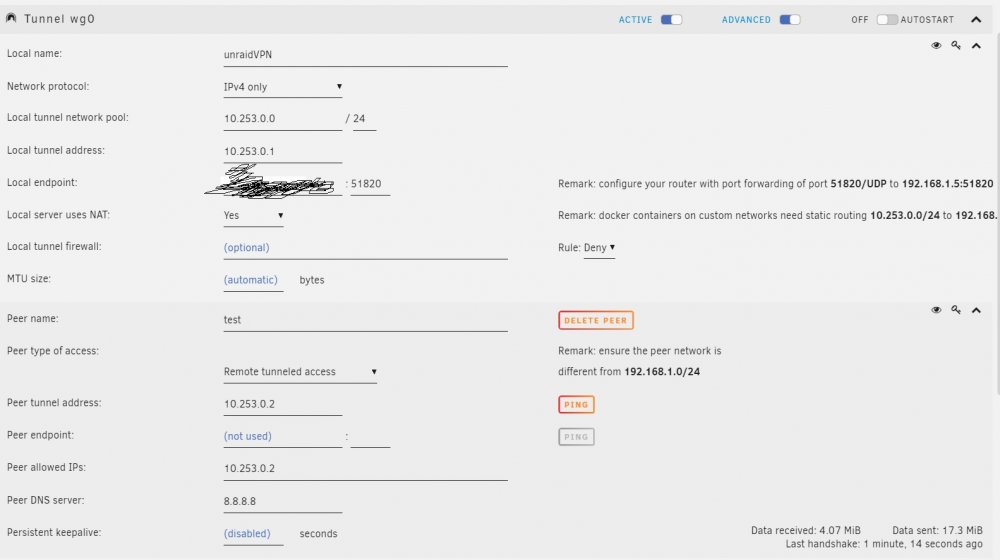
I followed this guide to achive "Remote access to LAN" on 6.11.5.
My problem is that:- I can access the Unraid GUI on 192.168.1.5
- I can access Plex on 192.168.1.5:32400
- I can NOT access my windows VM 192.168.1.10 running on Unraid using RDP
- I can NOT access any other device on my LAN (i.e. 192.168.1.1)
It looks like my WG connection terminates at 192.168.1.5 (Unraid) and can't access any other IP on the network - feels like a routing issue.
Ideas?
-
I gave this another whirl - same outcome. I can only partially access devices/services on my network.
No one else has this problem?
https://forums.unraid.net/topic/126490-wireguard-unable-to-ssh-into-vm-running-on-unraid/?do=findComment&comment=1153218 -
thx for your reply!
Unraid:- 192.168.1.5 (my main network - gateway 192.168.1.1)
- 192.168.2.5 (this interface is used so that my brother also has access to the SMB shares from his network, that is the only thing this interface is used for)
Ubuntu VM running on Unraid: (br0 - static IP) 192.168.1.26
Windows VM running on Unraid: (br0 - static IP) 192.168.1.10
docker image plex: (host) 192.168.1.5
docker image n8n: (br0 - static IP) 192.168.1.21
docker image code-server: (br-0 static IP) 192.168.1.9
on my Router: port 51820 (UDP) forwarded to 192.168.1.5
Network I am connecting from: 192.168.123.0/24
-------------------
The following happens with "remote tunneled access" as well as "remote access to LAN"
-------------------
Through the Unraid Wireguard tunnel I can:- access the WebGUI of Unraid 192.168.1.5
- access the WebGUI of Plex on 192.168.1.5:32400
- access the WebGUI of docker image code-server on 192.168.1.9:8443
- access the SMB shares on unraid 192.168.1.5
Through the Wireguard tunnel I can not:
- ping nor access the WebGUI of any other device on my network (i.e. 192.168.1.1 - router)
- access the WebGUI of docker image n8n on IP 192.168.1.21:5678
- ping nor ssh (putty) into the Ubuntu VM
- ping nor remote desktop into the Windows VM
I have the exact same issues when I use the "wireguard-easy" docker on unraid - however using wireguard-easy on my RPI works just great.
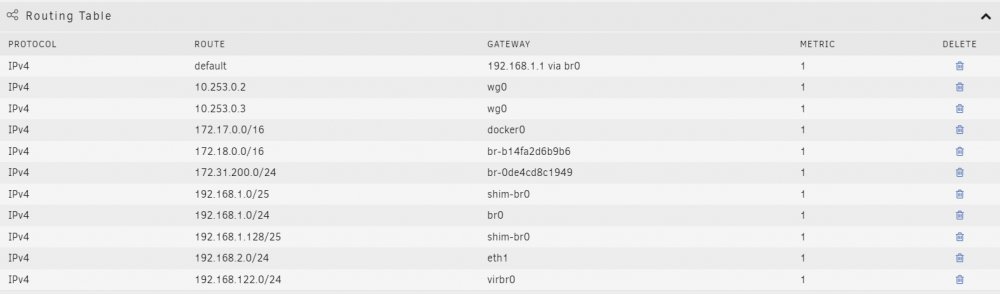
blow are my routing tables.
I have no idea where these came from or what they are used for:- br-b14fa2d6b9b6
- br-b14fa2d6b9b6
- shim-br0
- virbr0
-
Tried a couple more things, but I always run into the same issue that SSH does not work through the wireguard tunnel.
-
Goals:
- connect to my home network via wireguard
- have access to all shares / webgui's of devices on my home network
- do NOT use the internet connection of my home network (my remote device uses its own local internet connection)
- be able to ssh into my VMs
Currently I run wireguard-easy on a RPI, and it achieves all the above goals. But I thought I could use the wireguard implementation in Unraid instead and replace the RPI that way.
So to achieve the above goals I selected "Peer type of access: remote access to LAN" in the Unraid Wireguard config.
That way I achieved goals 1 ,2, and 3.HOWEVER I cannot ssh into my VMs through that tunnel, the connection cant be established.
I also run into the same issue when I use the "Wireguard-easy" docker in unraid. So I guess there is some networking issue inside unraid preventing me from using ssh through the tunnel? -
I have wireguard-easy on my rPI and have been very happy with it. So I though I should try the docker version because I could then get rid of my rPI.
Using this docker I can connect to network shares and web gui's on my home network.
I have set it to bridge mode and assigned a static IP.
However using this docker I cannot SSH into a virtual machine through that wireguard tunnel - putty only throws a "network error: Software caused connection abort".
Using wireguard-easy on my rPI I do not have that problem, I can ssh into my VMs just fine. -
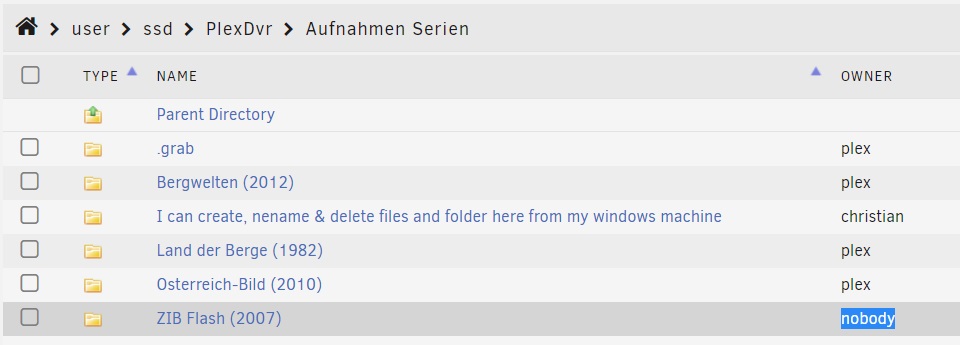
I just ran into this issue as well.
I recently switched from running Plex in a VM to the Plex Official Docker on Unraid.I use Plex DVR which records into a share on unraid.
From my windows PC I can add/rename/delete files in that share just fine (drwxrwxrwx).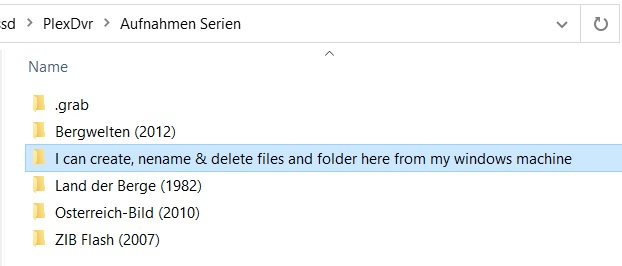
The problem is that I can not delete files/folders created by Plex DVR (drwxr-xr-x).
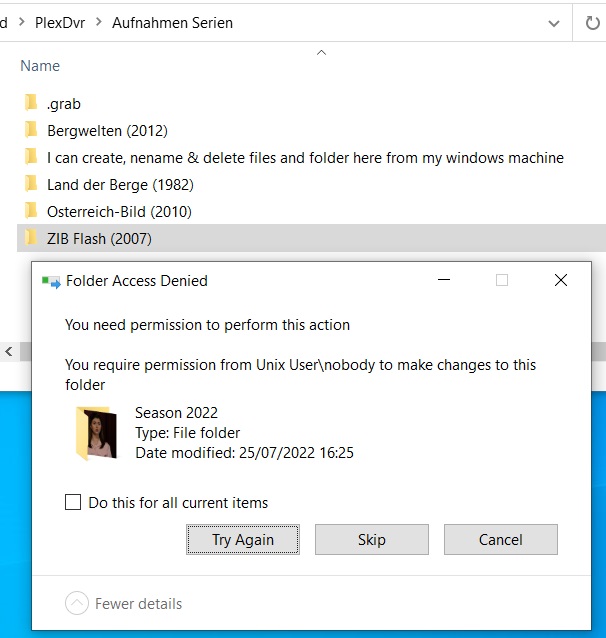
The folders/files newly created by the Plex Docker are owner by "nobody" drwxr-xr-x (the older folders were created by my old VM running Plex drwxrwxrwx).
-
This might be an alpine specific issue because it works just fine with Ubuntu
-
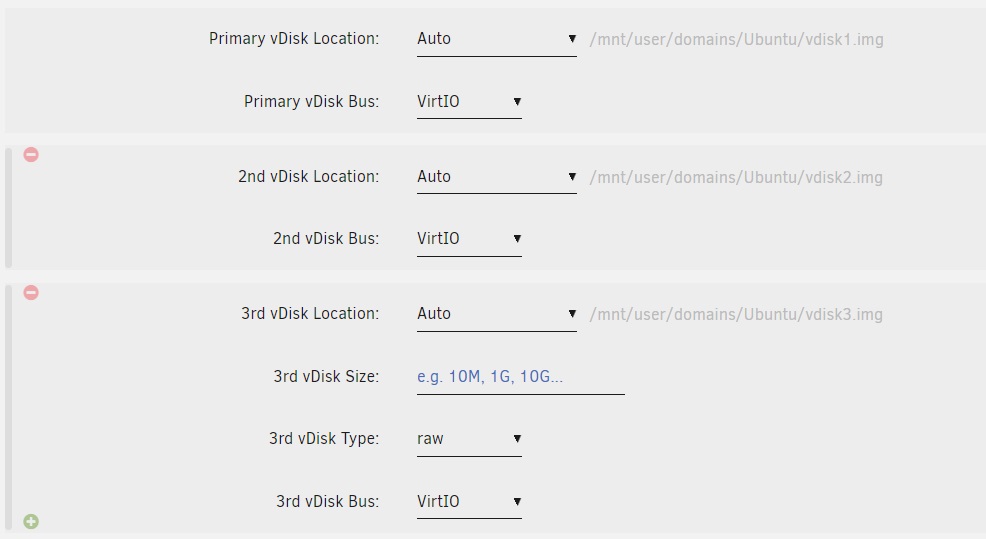
4 minutes ago, Kilrah said:
You might already have a folder called Ubuntu with an existing vdisk in it. If that belongs to another VM you might want to change the name of this new one.
You are right!
Deleted the folder now the vDisk size setting shows up again.
There should be a notification inside the Vm creation page to explain what is going on. -
I selected the Ubuntu template, shouldnt there be a "size" option for the primary vDisk?
Unraid 6.10.3
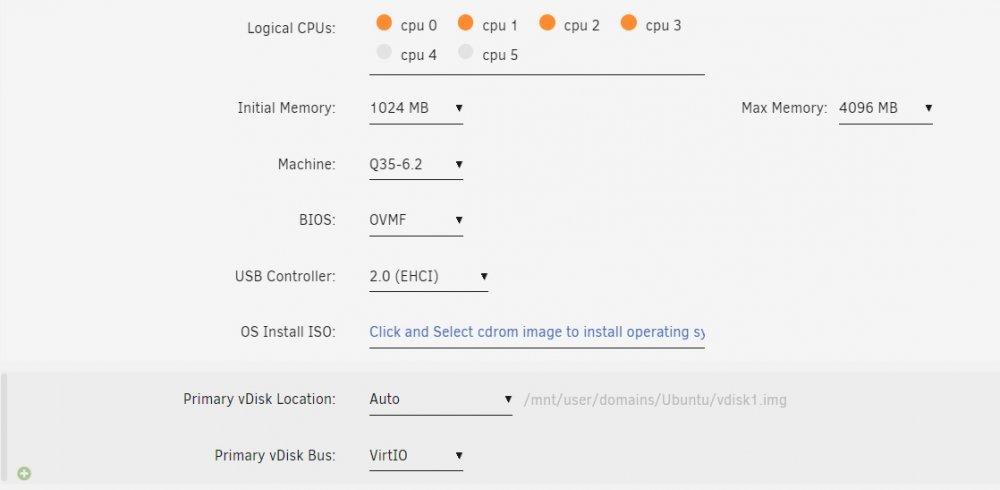
I have to add 2 more vDisks to eventually get the size option for the 3rd.

-
Hey guys!
I am tearing my hair out over this.
I have created an Unraid Mount Tag for a share in an Alpine Linux VM.This WORKS when I mount it via the terminal using
mount -t 9p -o trans=virtio,version=9p2000.L,posixacl,cache=loose onedrive /mnt/unraid/onedrivehowever this in /etc/fstab does not mount it
onedrive /mnt/unraid/onedrive 9p trans=virtio,version=9p2000.L,_netdev,rw 0 0Anyone an idea what I am doing wrong?
-
Hey!
Currently I can get the Exos X16 12TB for 60€ less than an IronWolf 12TB.
Anyone got experience with the Exos X16 in UnRaid?
On paper it seems like a no brainer to use the Exos X16... right?
-
8 minutes ago, Kilrah said:
That's basically what the example for device scripts on UD is about:
it's a nice starting point but lacks much of what I wanted (compare the scripts). 😉
-
I have stitched together this script because I could not find any solution for my usecase.
Thx to @mgutt and his backup script I took some parts from
Goal:
- Connect hot-swap-able disk to unraid
- automatically mount the disk (can be disabled)
- automatically perform (multiple) mirror backup jobs which simply copy all changes from the SourceDir to the DestinationDir (including deletions)
- automatically unmount the disk once the backup(s) are done (can be disabled)
- safely remove the disk once everything is done thx to notifications that are sent for each step of the process
Required:
- some kind of hot-swap-able storage media
- Unassigned Devices Plugin
Setup:
- connect your backup storage media
- make sure it has a mount point
- click on the little "gear" icon
- paste the script below into the script window
- adjust the Backup Jobs configuration section
- save
- done
- click on mount to test if the script is working correctly
- if everything is working click on unmount
if you want to automate the entire process:
- click on the little "gear" icon again
- enable "automount"
- and set "unmount_after_backup to 1
Hope someone finds this helpful!
#!/bin/bash PATH=/usr/local/sbin:/usr/sbin:/sbin:/usr/local/bin:/usr/bin:/bin ######## # SIMPLE MIRROR BACKUP / V01 - 2022-07-14 / by cholzer # This script is meant to be used in the script area of a disk inside the Unassigned Devices plugin ######## # I stitched together this backup script as I could not find a solution for my Offline Backups which are done onto hot-swapable disks. # With this script you can define multiple backup jobs - you get a notification for each important action. # # The whole backup process gets super easy if you choose to enable "automount" for the disk in Unassigned Devices and enable "unmount" in the config section below then . # Just plug in the disk and the script starts the backup and unmounts the disk once it is done so that you can safely unplug the disk. # ######## # Do your modifications below ######## # Here you can setup all your backup jobs. # The mountpoint of the disk you add this script to inside Unassigned Devices is automatically used as destination target. # You can set a subfolder per backup if you'd like to use one. # Use Unraids new file manager to find the exact source path (available in Unraid 6.10 and later) backup_jobs=( # sourcePath # destinationPath-Subfolder (/ for none) #jobName "/mnt/user/documents" "/Backup" "Documents" "/mnt/user/photos" "/Backup" "Photos" ) # Unmount the backup disk - (Will only be done if the backup was successful) unmount_after_backup=0 # Notifications: # You can disable notifications if you really want to. notifications=1 # rsync options which are used while creating the full and incremental backup rsync_options=( --human-readable # output numbers in a human-readable format --delete # when a file was deleted in source directory it will be delete in the destination directory too --exclude="[Tt][Ee][Mm][Pp]/" # exclude dirs with the name "temp" or "Temp" or "TEMP" --exclude="[Tt][Mm][Pp]/" # exclude dirs with the name "tmp" or "Tmp" or "TMP" --exclude="Cache/" # exclude dirs with the name "Cache" --exclude=".Recycle.Bin/" # exclude dirs with the name ".Recycle.Bin" ) #### # WARNING! DRAGONS BELOW! Do not change anything that comes next unless you know what you are doing! #### ## Available variables: # ACTION : if mounting, ADD; if unmounting, UNMOUNT; if unmounted, REMOVE; if error, ERROR_MOUNT, ERROR_UNMOUNT # DEVICE : partition device, e.g. /dev/sda1 # SERIAL : disk serial number # LABEL : partition label # LUKS : if the device is encrypted, this is the partition device, e.g. /dev/sda1 # FSTYPE : partition filesystem # MOUNTPOINT : where the partition is mounted # OWNER : "udev" if executed by UDEV, otherwise "user" # PROG_NAME : program name of this script # LOGFILE : log file for this script case $ACTION in 'ADD' ) if [ "$OWNER" = "udev" ]; then # do your hotplug stuff here sleep 1 else # do your user initiated stuff here # sync the file system to commit all writes to disk sync -f "$MOUNTPOINT" # notification if [ "$notifications" == 1 ]; then /usr/local/emhttp/webGui/scripts/notify -e "Unraid Server Notice" -s "Unassigned Devices" -d "Device mounted" -i "normal" fi ######## Lets run the Backup Job(s) # remove the trailing slash from the source and destination path should there be one remove_trailing_slash() { [[ "${1%?}" ]] && [[ "${1: -1}" == "/" ]] && echo "${1%?}" || echo "$1"; } # now lets loop through each individual backup job for i in "${!backup_jobs[@]}"; do case $(($i % 3)) in 0) src_path="${backup_jobs[i]}"; continue ;; 1) dst_path="$MOUNTPOINT${backup_jobs[i]}"; continue ;; 2) job_name="${backup_jobs[i]}" ;; esac # check user settings src_path=$(remove_trailing_slash "$src_path") dst_path=$(remove_trailing_slash "$dst_path") echo "Source Path is $src_path" "Destination Path is $dst_path" # Notification Backup Started if [ "$notifications" == 1 ]; then /usr/local/emhttp/webGui/scripts/notify -s "`hostname` Backup Job: "$job_name" started" -d "Sync started. `date`" fi # first we need to make sure that the log directory does exists, if it doesn't, create it if [ ! -d "$MOUNTPOINT"/rsync-logs/"$job_name"/ ]; then mkdir -p "$MOUNTPOINT"/rsync-logs/"$job_name"/; fi # Now lets run the actual backup job. # It does a mirror, which means that all changes including deletions are pushed from the source directory to the destination directory. # Folders named '.Recycle.Bin' are excluded rsync -av --log-file="$MOUNTPOINT"/rsync-logs/"$job_name"/log.`date '+%Y_%m_%d__%H_%M_%S'`.log --progress "${rsync_options[@]}" "$src_path" "$dst_path" # Notifications sync complete or error if [ "$notifications" == 1 ]; then latestRsyncLog=$(ls -tr "$MOUNTPOINT"/rsync-logs/"$job_name"/ |tail -1) if [ $? -eq 0 ] then /usr/local/emhttp/webGui/scripts/notify -s "`hostname` Backup Job: "$job_name" completed" -d "Sync okay! `date`" else /usr/local/emhttp/webGui/scripts/notify -s "`hostname` Backup Job: "$job_name" FAILED" -i "alert" -d "Sync ERROR! `date`" -m "`tail -5 "$MOUNTPOINT"/rsync-logs/"$job_name"/"$latestRsyncLog"`" fi fi done sleep 1 fi # unmount the backup disk once the rsync backup finished if [ "$unmount_after_backup" == 1 ]; then /usr/local/sbin/rc.unassigned umount $DEVICE fi ;; 'UNMOUNT' ) # do your stuff here # since we also get notified once the disk was unmounted, I commented this notification out # /usr/local/emhttp/webGui/scripts/notify -e "Unraid Server Notice" -s "Unassigned Devices" -d "Device unmounting" -i "normal" ;; 'REMOVE' ) # do your stuff here # notification if [ "$notifications" == 1 ]; then /usr/local/emhttp/webGui/scripts/notify -e "Unraid Server Notice" -s "Unassigned Devices" -d "Device unmounted" -i "normal" fi ;; 'ERROR_MOUNT' ) # do your stuff here # notification if [ "$notifications" == 1 ]; then /usr/local/emhttp/webGui/scripts/notify -e "Unraid Server Notice" -s "Unassigned Devices" -d "Error mounting device" -i "alert" fi ;; 'ERROR_UNMOUNT' ) # do your stuff here # notification if [ "$notifications" == 1 ]; then /usr/local/emhttp/webGui/scripts/notify -e "Unraid Server Notice" -s "Unassigned Devices" -d "Error unmounting device" -i "alert" fi ;; esac-
 1
1
-
ein forced umount kann dazu führen dass unraid diese disk als aus einem "broken array" ansieht und man diese erst nach einem reboot von unraid wieder mounten kann (fragt mich woher ich das weis 😅 )
unmount sollte man daher nur unassigned devices machen lassen, nicht manuell via 'umount'.
aus meinem script/usr/local/sbin/rc.unassigned umount '/dev/disk/by-uuid/3C9751517A72CC80'uuid muss man natürlich die seiner disk eintragen
-
no update on github in over 1 year, guess this is dead?
any other app to backup vm's? -
BUMP - I just ran into this again on a new install. the Telegram notification section in the configuration is 100% useless without this option.
-
 2
2
-
-
I was looking for the same info, thank you! I just migrated a debian VM from proxmox to unraid and I am amazed how easy it was!
One thing I'd like to add is that proxmox itself is capable of extracting a vma file.
So if you still have access to your proxmox system you just have to open the shell and thencd /path/where/you/store/your/vma vma extract [name].vma -v /target/folder/to/extract/to
to extract the raw image.
-
 1
1
-
3
-
-
On 4/1/2022 at 8:52 AM, cholzer said:
Is it possible to ssh into unraid and then remotely call UD to unmount or mount a disk?
I did take a look at the scripts in the first post but these dont seem to hold the answer. 😅
Reason for my question is that as it truns out I run into several issues with the SMB share creation/destruction when I remotely SSH into unraid and then just mount/unmount the disk.
These problems do not exists when I use the "mount" button in the UD gui, so I guess the solution would be to call UD remotelly via SSH and let it do the mount/umount. But how?
Thanks in advance!
I think I figured it out.
Goal:
Short Version:
Use ssh to have UnassignedDevices mount/umount a specific disk and create an SMB/CIFS share for that disk.
Long Version - my usecase:- (pre-backup script) a Server on my network connects to UNRAID via SSH and instructs UD to mount a specific disk which also creates the share
- this server then runs a backup job which has this UD share as target
- (post-backup script) once the backup is done the server connects to UNRAID via SSH and instructs UD to unmount this specific disk which also removes the share
Step-by-step guide:
I assume that your disk already has a single partition
- Connect the disk to your Unraid system
- go to the settings of the disk, enable the 'share' setting
- mount the disk, make sure that the share is created and can be accessed
- note the disk id (sd* i.e. sdg) next to the drive serial in the UD GUI
- ssh into the UNRAID server or open the terminal in the webgui
- run "ls -ahlp /dev/disk/by-uuid" to list all drives by their UUID (look for the sd* to find your disk's UUID)
-
now you can use these 2 commands to mount/unmount this specific disk via SSH or a script on your UNRAID machine.
/usr/local/sbin/rc.unassigned mount '/dev/disk/by-uuid/THEUUIDOFYOURDISK'
/usr/local/sbin/rc.unassigned umount '/dev/disk/by-uuid/THEUUIDOFYOURDISK'
Hope this might help someone who finds himself in the same situation as I was in.


how do I replace existing CachePool SSDs with new (larger) SSDs?
in General Support
Posted
So the new cache pool will automatically use the entire capacity of the new 4TB ssds once both are replaced. nice!
Thank you very much!