





doron
Community Developer
-
Joined
-
Last visited
Everything posted by doron
-
Absolutely not. You must do it when the array is started. In fact when it's not started you will not be able to follow the instructions above, as the /dev/mdX devices will not be available.
-
@Derek_, limetech's post in the thread referenced above has it exactly right. In brief, you can either use "cryptsetup luksAddKey" followed by "cryptsetup luksRemoveKey", or just use "cryptsetup luksChangeKey" which, in most instances, just bundles these two actions together. The safest way would be to do a whole set of luksAddKey, test that everything works with the new key (array stop/start from GUI etc.), and then use luksRemoveKey to clean up. The /dev/ devices you must use as operands for cryptsetup are /dev/md1 for disk1, /dev/md2 for disk2 and so forth. Note that you have to do it unto all of your encrypted array disks(!), and make very sure you assign the exact same key to all of them. Another thing you want to be mindful of is your cache. If you have configured it to be encrypted XFS, you'll need to take care of it, too. To figure out the correct device name for the operation, you can check out your GUI main tab. Under "Cache Devices" you will find your cache drive. There, you will have the device name in parenthesis under "Identification". So if, for example, you find "(sdc)" in there, your parameter for the luksAddKey / luksRemoveKey would be /dev/sdc1 (note the "1" suffix, indicating the first partition). (Edited - corrected cache reference)
-
Hi folks, I've recently pre-cleared 3 drives using the plugin (run off of Unassigned Devices, successfully completed) and then added them to the array, one by one. Two drives were recognized by Unraid as clear and added immediately. The third was not recognized as being precleared and Unraid kicked off a clear - again. For a 12TB this is a bit frustrating... The two drives that went in smoothly are 4TB, 512e. The one drive that went into clearing again is 12TB, 4Kn. Btw the Unassigned Devices code recognized all three of them as "precleared" (under fs type). Any thoughts on what could be the reason for the larger (newer) drive to not be recognized as pre-cleared? Could it have something to do with the drive being 4Kn? (I posted about this here and received the good advice to ask on this thread).
-
Thanks for taking the time! (Just to avoid confusion, this particular issue was first reported by @electron286 , I was asking about progress since I bumped into same issue). At any rate, I found the problem, at least in my case. My setup includes a floppy drive, which is a platform-connected device. Seems like ScanControllers.cfm device tree parsing is slightly confused by this. What you get in ls -l /sys/block for this device looks like this: fd0 -> ../devices/platform/floppy.0/block/fd0 Once instructed to ignore such devices, the scanning process completes happily and everything starts to work flawlessly. Below is a proposed patch to ScanControllers.cfm. Again, thanks for building and maintaining this fantastic tool over the years! --- ScanControllers.cfm.orig 2019-08-07 06:57:04.000000000 +0300 +++ ScanControllers.cfm 2019-10-09 10:49:20.150512121 +0300 @@ -388,7 +388,7 @@ <CFFILE action="write" file="#PersistDir#/ls_sysblock.txt" output="#BlockDevices#" addnewline="NO" mode="666"> <CFLOOP index="i" from="2" to="#ListLen(BlockDevices,Chr(10))#"> <CFSET CurrLine=ListGetAt(BlockDevices,i,Chr(10))> - <CFIF FindNoCase("virtual",CurrLine) EQ 0> + <CFIF FindNoCase("virtual",CurrLine) EQ 0 AND FindNoCase("platform",CurrLine) EQ 0> <CFSET DrivePath="/sys/" & ListDeleteAt(ListLast(CurrLine,">"),1,"/")> <CFSET CurrDrive=Duplicate(Drive)> <CFSET CurrDrive.DevicePath=DrivePath>
-
Hi @jbartlett- has there been progress on this issue? I'm seeing the same issue ("usr/bin/lspci: option requires an argument -- 's') so I thought I'd ask. Thanks!
-
Yes, indeed. Thanks for this! - I will add this to the post. I didn't go that path since (a) I was concerned that, placed over a plug pin, the tiny piece of tape would not hold for many insert/removal cycles and would eventually peel off and cause trouble - I'm not sure how real that concern is, and (b) the adapters I applied the "destructive" way on are quite inexpensive (the first type can be sourced from Aliexpress for a little over a buck a piece).
-
This has been mentioned here and there on the forums, but I thought I'd offer a concise guide in hope to save some grief for at least one other person 🙂 The symptom is quite simple: You purchased one or more new drives, you connect them to your existing setup and they just don't spin up. Seem to be DOA. So good news - most likely they're not, and you're just having a case of the SATA Pin 3 syndrome. This will happen when your power supply is not of the newest crop, in one of two cases: The drive is SAS, newer crop, and you are trying to connect it to a SATA-style SAS controller ports, such as those on boards like SM X10SL7-F, using contraptions such as this SATA-to-SAS adapter or that SAS-to-SATA cable. The drive is SATA, newer crop. For example, some of WD (ahem HGST) new enterprise drives - in my case, HC520 - specifically HUH721212AL4200 (SAS) or HUH721212ALN600 (SATA) - will demonstrate this issue. Very briefly, the issue has to do with a newer spec of the SATA power connector. Revisions of SATA spec after Rev 3.2 (which does not have this), redefine the function of pin 3 on the SATA power connector to be Power Disable. This means that for drives supporting this feature, if the drive sees live voltage on this pin (typically 3.3V), it will power itself off (or not power on, as the case may be). (This is done in support of hot-swap enclosures and arrays, where the ability to hard-power-cycle a single drive without physical access or total system disruption is a boon.) WD has a nice writeup about this if you want to read more. So basically, if these drives see voltage on pin 3, they will not start. Now, many PSUs we use these days, unless they're extremely new, would show 3.3V on all three pins: 1/2/3. (In addition, some cheap SAS-SATA adapters short pins 1-2-3 together, so even if your PSU does not feed pin 3 with 3.3V, your drive may still see voltage there due to this "feature".) So how do we fix this? One way to solve this is using Molex-to-SATA power adapters, such as this. These do not carry 3.3V in (only 5V and 12V) so problem solved. Even if you have a SATA power chain cable, you can still feed its end off of one of these and you should be good. One type of SAS-to-SATA adapter - this one - also solves the problem due to its power being fed by a Molex power plug. Another way (the one I used) is to hack these adapters. So if you take a sharp cutter and gently pick up, fold and break pin 3 of the power section, counting from the L shape end, on your adapter (do not even consider doing this unto the drive itself!), you should get lucky (make very sure you get rid of the broken pin, so it doesn't find itself inside some electronics later). It will look like this: On some other adapters, however, it gets slightly trickier. Seems like some of them short pins 1-2-3 together, so removing only input pin 3 does not help cuz 3.3V that's fed to pin 1 flows to the drive's pin 3. In that case, what I did is remove all three pins 1-2-3. Note that pins 1-2 are marked "reserved" in the standard, so I didn't expect anything bad to happen. And sure enough, everything started to churn. This is how it looks: A similar and less destructive way to solve this issue, as mentioned below by @jonathanm, is to use a thin slice of Kapton tape and place it over pin 3. If choosing this solution I'd probably opt for applying it onto pin 3 of the drive itself, to make the solution compatible with adapters that short pins 1-2-3 together. There are several good online guides for this, e.g. this one. I didn't opt for this solution since I was unsure just how well the tiny piece of tape would withstand multiple insert/removal cycles of the plug. Now, your drives should spin up and live happily ever. Edit: Added the Kapton tape method, the SAS-SATA-Molex adapter and some text clarifications.
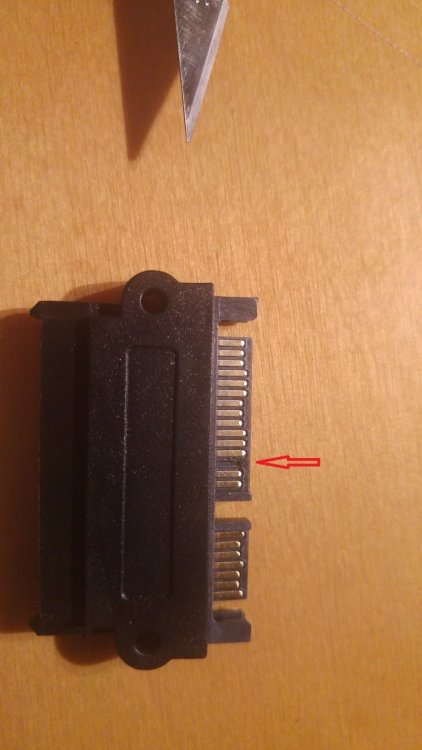
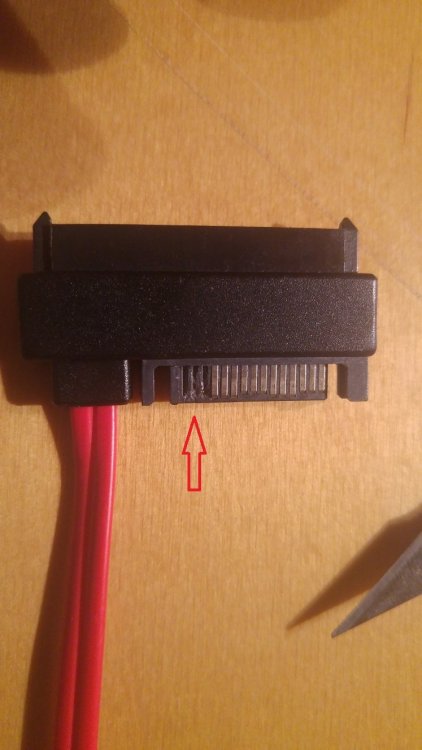
-
Two simple ways to boot your VM: Use PlopKexec, boot from its ISO image, and have your flash drive available to the VM. The boot code will detect the USB drive and continue boot from it. Adds a few extra seconds to be boot time but might be worth it in simplicity. This is the method I'm using now. Create a small boot drive on your Unraid VM, format it as FAT, copy the content of the USB drive to it and then run the "make bootable" bat script from it to make that drive bootable. You will still need to have the flash drive available to the VM. This method shaves a few seconds from boot time but needs a bit of fiddling, and, most importantly, each time Unraid is updated, you will need to manually copy the updated files to the boot virtual drive or your system won't boot the next time around. None of these methods involve a downloaded, pre-cooked VMDK. You just create a VM and provision it with these elements. You will also need to provision it with your array drives, but this is discussed extensively in other posts. Hope this helps.
-
I'm running Unraid 6.7.x. Is there a reason you are installing a backward version?
-
Happy Unraid day! I've been a camper for like 8 years or so, mostly a very happy one. Came here from the FreeNAS varieties, visited OMV, but stayed here. Cool product, great bunch of people on the forum.
-
@Socrateshappy to hear you are finally up and running! Hope you will have a smooth ride from now on, with unRAID Unraid - I've been using it for years and love it.
-
Umm, I'm not sure... the USB stick? Is it configured to be made available at boot? @uldise - thoughts?
-
You seem to still have a hard drive configured. Make sure only the ISO image and the USB drive are available to the VM.
-
First of all, if you want to get a running system quickly, the plopkexec method would lead you there the soonest. All you need to do is to boot off the plop ISO, after getting rid of the HDD (just disconnect it from the VM) and adding the USB drive. You should have a running Unraid in no time. If you want to solve for the VMDK you now have, then... Ah. To the boot drive. From what I gather from your posts (and the "find" above) it is not mounted after boot. Mount it: Find the device (/dev/sdX for some value of X, which is NOT currently mounted - the one mounted is the flash drive. You can check which one is currently mounted by "df"). Find what X is (either a or b), then - mkdir /mnt/tmp mount /dev/sdX1 /mnt/tmp ls /mnt/tmp This is where you copy the bz* files into (from the flash). After copying, reboot.
-
That's good advice too.
-
As we are a bit out of sync: This (quoted) is good. Unraid needs some more driver modules that it wants to read from a USB drive. What is left to do now is to copy the bz* files from the boot drive you created (where you installed the latest version) into the USB drive you prepared earlier (overwrite), and then attach the USB to the VM and reboot. At that point you should see the network, i.e. get a proper IP address and be able to connect to your server via HTTP.
-
Can you describe what you've done to get to this point, and how you see the ui page (if the browser still shows "refused")?
-
I need to go, so once you locate the bz* files, you can do this Build the USB with the bootable Unraid, latest version, make_bootable, as the doc instructs. Make it available to the VM. copy to it, under its root directory, the bz* files (overwriting similarly named files on the flash drive) Reboot, while the USB is available to the VM. By the way, once you ran the "emhttpd" command from a few messages ago (only once!...), you should have been able to connect to your unraid server from a web browser. Could you?
-
Can you find files by the names of bzroot, bzimage, bzmodules and bzfirmware in your vmdk? They usually live under the mounted /boot but seems like your vmdk is different.
-
The USB drive should be built with the same unraid version you have in the VMDK.
-
The command runs the unraid main management tasks, including the web server, in the background. So you should then be able to navigate your browser to the tower.
-
Bingo. Do you have an Unraid flash drive attached to the VM? You'd need to have it to run Unraid properly. As a temp band aid, just for testing, run this command: /usr/local/sbin/emhttp & and see if you have progress.
-
Okay you definitely do not have a web server running. To cut on the back and forth, please post output of: ps auxww | egrep "emhttp|nginx" plus, your "go" script (lives under /boot/config - you can just "cat /boot/config/go" )
-
Okay @Socrates, this implies that your server does get an IP address (etc.) from the DHCP server. You are connecting to it via SSH. What does not seem to run is the web server (nginx). "Connection Refused" means we got to the box, but the applicable port (80 by default for a web client) is not open (listened to). At any rate, can you do, on the shell you connect to via putty, run this and post the output: netstat -apn | grep LISTEN | grep 80
-
Check if unRAID (sorry, Unraid) sees the NIC and has a driver for it. Can you paste the output of: ifconfig -a and ethtool -i eth0



