sansoo22
Members
-
Joined
-
Last visited
Everything posted by sansoo22
-
Great set of dockers. I have my sender on an Intel NUC running pihole in a docker and my receiver on my unRAID server. I should probably flip them for data redundancy sake since I run a 3 disk SSD cache pool on unRAID but whatever I did it backwards. I followed @geekazoid's instructions with one caveat. For whatever reason I had to create my symlinks first and then map those as volumes. If I did it the other way around the sender kept syncing the actual symlink to the receiver which of course doesnt work because of mismatched directory structures between unRAID and Ubuntu Server 22.04. Other than that the setup was pretty straight forward and easy.
-
@MsDarkDiva - If you're on Win10 you might give Visual Studio Code a try for editing config files. Especially anything yaml. VS Code is free, easy to setup, and for yaml it does cool things like auto-indent 2 spaces whenever you hit the tab key. It would have even highlighted the word "password" in your example above as an error.
-
I don't need support. I just wanted to say thanks for this container and its continuous maintenance. I started with Aptalca's container then switched to the linuxserver.io container. Its been close to 3 yrs of rock solid performance. I often forget its even running. I thought about switching to the Nginx Proxy Manager for the nice GUI and the fact the nginx syntax makes me commit typo errors for whatever reason. However the lack of fail2ban in that container has kept me away. I'm so glad you guys decided to bake that in. You can watch what I assume are bots getting blocked daily and its a nice peace of mind. This container works great with my firewalled "docker" VLAN using Custom br0. Between the firewall and fail2ban I feel my little home setup is about as secure as I can get it. As a fellow dev I know we don't always hear a peep from users in regards to appreciation for our hours of hard work. So thanks again for keeping this container going. I really do appreciate it.
-
Its been a couple months so not sure if you still need help but you can get this error if mongo was restarted while rocket chat was still running. It happened to me a few times. The other thing I did since i was running a single node replica set was run rs.slaveOk() on my primary node. Making sure rocket is shutdown while fiddling with mongo and the above command have me going for almost a week without that error
-
My steps were a bit different to get this all working with authorization setup in MongoDb. I used the same mongo.conf file with one adjustment to get authorization working. First make sure to shutdown your RocketChat docker if its running. It will get angry when we do the rest of this if you don't. Next we need to create some users in MongoDB. Each command below needs to be run in the terminal of your MongoDB container separately. // switch to admin db use admin // first user db.createUser({ user: "root", pwd: "somePasswordThatIsReallyHard", roles: [{ role: "root", db: "admin" }] }) // second user db.createUser({ user: "rocketchat", pwd: "someOtherReallyHardPassword", roles: [{ role: "readWrite", db: "local" }] }) // switch to rocketchat db use rocketchat // create local db user db.createUser({ user: "rocketchat", pwd: "iCheatedAndUsedSamePwdAsAbove", roles: [{ role: "dbOwner", db: "rocketchat" }] }) Now we need to modify the mongo.conf file // this #security: // should be this security: authorization: "enabled" Next bounce the MongoDB docker and it should start up with authorization enabled. You can check by running the "mongo" command in terminal. If the warnings about authorization being off are gone then you have it set. You could also run "mongo -u root -p yourRootPwd" to verify. Finally we need to modify the connection strings in the RocketChat Docker // MONGO_URL: // this is the rocketchat user we created in the rocketchat database mongodb://rocketchat:[email protected]:27017/rocketchat?replicaSet=rs01 // MONGO_OPLOG_URL // this is the rocketchat user we created in the admin database mongodb://rocketchat:[email protected]:27017/local?authSource=admin&replicaSet=rs01 Fire up your RocketChat instance and hope for the best. If it works send a middle finger emoji to a random user and go relax. If not sorry I couldn't help out.
-
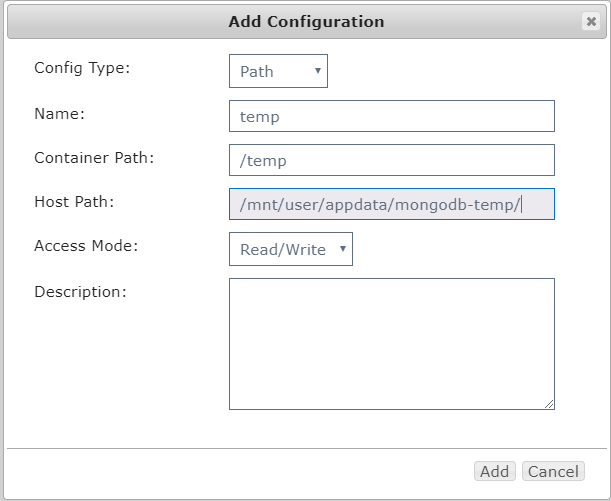
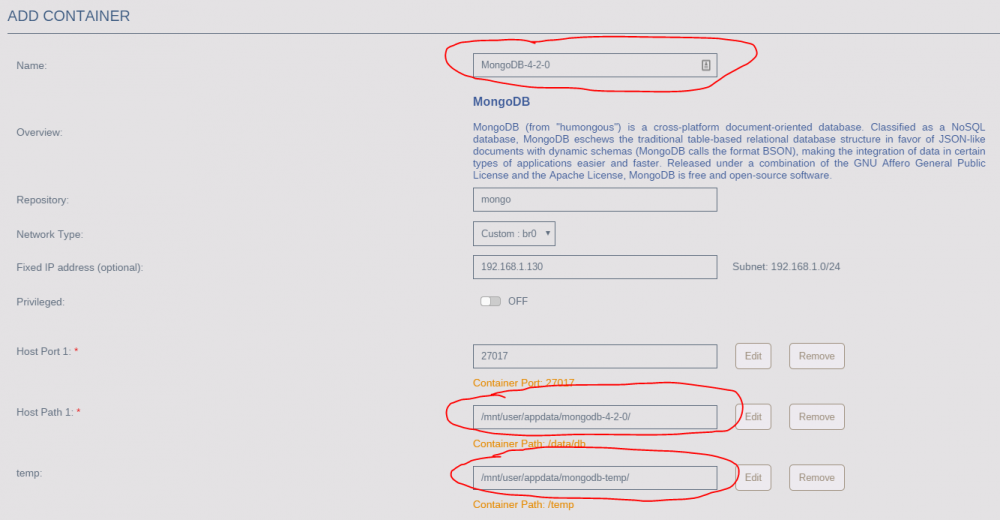
Posting my procedure steps to upgrade mongoDB image from 3.6 to 4.0/4.2 because it was a pain to figure out. Before you begin it is highly recommended to open a terminal window to your current mongodb instance and run... mongod --version Write that version number down somewhere. Mine was 3.6.14 and corresponds with a docker image tag if this whole process goes tits up and you need to revert. Backup your old mongodb volume Open a terminal into unRAID Run the following command assuming you have a cache drive. If not modify your path to wherever your appdata is stored cp -avr /usr/mnt/appdata/mongodb /usr/mnt/appdata/mongodb-bak Mount a new volume to your current MongoDB container: create a new directory in /usr/mnt/cache/appdata called mongodb-temp open your containers configuration click the + to add new path, variable, etc Fill out the form as follows and click add Save your docker configuration Dump current mongodb database to temp directory These next steps assume your mongodb instance is running on the default port and you mounted a volume named temp. Open a terminal window to your mongodb container Run the following command mongodump -v --host localhost:27017 --out=/temp The -v flag is for verbose so you should see a bunch of stuff scroll by and when its done it should report successful on the last line printed in the terminal. Upgrading MongoDB!!! This next step can be done one of two ways. The first method is nuke your current container and install brand new. The second method requires you have the "Enable Reinstall Default" setting set to "Yes" in your Community Application Settings. This write up will not cover turning that setting on. Upgrade Option 1: Open the mongodb container menu and choose remove Un-check "also remove image" Click Yes and watch it go bye-bye a. Delete the contents of your old /appdata/mongodb directory Go to Community Apps and re-install MongoDB Remember to add the /temp path to this new container just like in the screen shot above Skip down to Restoring Mongodb data Upgrade Option 2: This is the one I chose to use because it left my old mongodb instance completely intact Shutdown your current Mongodb container With "Enable Reinstall Default" turned on in Community Apps go to your "Installed" apps page Click the first icon on the MongoDb listing to reinstall from default Be sure to CHANGE the NAME and HOST PATH 1 values to create a new duplicate container. And don't forget to remap the /temp volume so we can do the restore later. If using custom br0 feel free to use the same IP address since your other container is now dormant Click Apply to create the container Move on to Restoring Mongodb data Restoring Mongodb data Open a terminal window into your current running mongodb instance. Enter the following command mongorestore -v --host localhost:27017 /temp Assuming you mounted the volume named /temp and everything went ok you should see a giant list of stuff scroll by the terminal window. At the bottom will be a report of successful and failed imports You can now leave the /temp volume mapped for later use or remove it if you like I created this process for myself last night after attempting to upgrade from 3.6 to 4.2 and running into a pesky "Invalid feature compatibility version" error. You can read about that here. I tried all the steps in the mongo documentation but being installed in a docker made things a bit trickier. I found it easier just to backup, dump, recreate image, and restore my data.
-
That's awesome! Working on setting it up now. My main goal for starting this was to add a more secure authentication layer and the ability to invite friends and family. I will pull the repo down and take a look at it. Thanks for sharing this!
-
I'm in the process of building a landing page that has built in authentication and Google Recaptcha support. I need to port my custom PHP framework to PHP7 and it relies on Composer for package management. My goal is to build something simple yet secure with bcrypt hashing and support for MySQL or MongoDB. If all goes well I will be hosting the code on Github for others to use. Planned features: - Authentication with username/password - MongoDB and MySQL support - Admin CMS for adding links and icons - Landing page that looks similar to the Chrome Apps view - User management - Activation email support (not sure how this will work just yet) Nice to haves: - Google account linking with 2 factor authentication Probably some lofty goals but being a developer by trade I already have most of the code ready to go. Just need help getting Composer set up. I'm not sure which install method would be best suited for a docker environment. Should I install directly to this container or stand up a composer docker and map its volumes to letsencrypt? Any help would be greatly appreciated
-
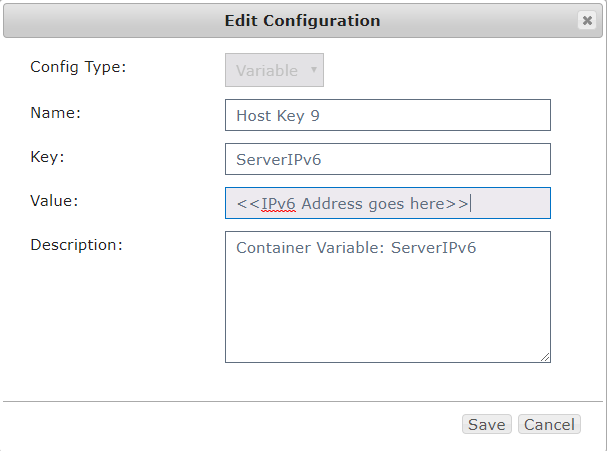
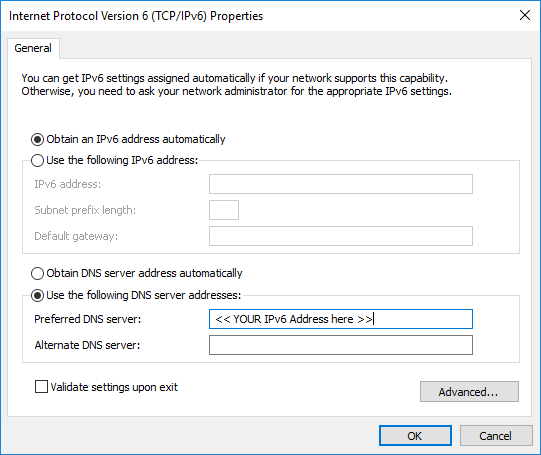
Using the documentation here https://github.com/diginc/docker-pi-hole I managed to 50% get Ipv6 to work. I say 50% because so far it is only been tested and working on a Windows 10 PC. I assume Linux will work as well since you can configure DNS entries for it. Steps: 1. Make sure your unRAID servers network settings have IPv4 + IPv6 set 2. Add a new variable to the piHole docker configuration I got the IPv6 from my router and just copy pasted it into the Value field. 3. Save the new field 4. Click apply and let the container rebuild 5. Edit your network connection in your PC as follows for "Internet Protocol Version 6" Unfortunately I can't get my router to use this new IPv6 address as its default IPv6 DNS and only clients with configurable DNS entries seem to work right now.