





dnoyeb
Members
-
Joined
-
Last visited
-
Huh, so i'm not the only one that happens to! interesting. For me, it's if I turn it off and pull the power plug; it'll typically lose all those settings.
-
Nice! Thanks for the information. I've been super happy with the power usage mine is already at... If I can get it cranking lower; heck yea! I'll give these a shot this weekend and report back.
-
Looks like you're on the newer bios at this point. Do non-ssd's work? Wondering if perhaps it's the wire you're using?
-
Big thanks to everyone that answered some questions and all the posts in this thread; with it I was able to really get this box humming along. I have been having a bit of fun with this build out! I still have a few things to do: 1/ swap out a few older 5400rpm 8TB drives for some 16TB SAS drives, 2/ redo my NVME setup (see concern below), 3/ rearrange some drives up into my 5in3 Supermicro SATA docks, 4/ add two more TR sensors for the 5in3 docks 5/ add in 92mm fans I can control from the IPMI for the docks. My only concern will be the combining of the Array cache, Download, VM, Dockers all onto the one large NVME pool. In the old days on my old dual Xeon setup; having all that on a single ssd would result in performance issues during downloads and playing Plex. I currently have the array cache/download on one NVME and the VM/Dockers on a second NVME. However, this leaves me with no parity; so, I am adding a 3rd NVME and turning all three into a ZFS rz1 pool. These new nvme’s are so fast that I am going to try it out and see if I can make it work. I do have a spare 500GB SSD I could have as the download drive and then extract to the array cache on the NVME if things don't go as planned. This way I can keep the latest movies on the cache a little longer too; resulting in less spin ups of the drives. Here’s where I’ll be by the end of the week if all goes to plan: Machine: Asus Pro WS W680 ACE IPMI motherboard Intel i7-12700 processor 96GB (2x48) ECC DDR5 memory LSI 9400-16i Mellonox Connect3x 10GB fiber card XFS Storage Array: Dual Parity - Seagate Exos X18 16TB SAS drives (with working spin down) Array – Mixture of 12-16TB drives for 110 TB of space ZFS Pools: 3xSamsung 990 Pro 2TB NVMEs in ZFS RZ1 for Array cache/Download/VM/Dockers 3xSamsung 870 Evo SSDs (1TB each) in ZFS RZ1 for important files / photos 2xSeagate 5400RPM spinners in ZFS mirror for ZFS backups Overall looking and running pretty well; been very happy. Thanks again for everyone's help!
-
any guidance you can offer on getting this working with current versions?
-
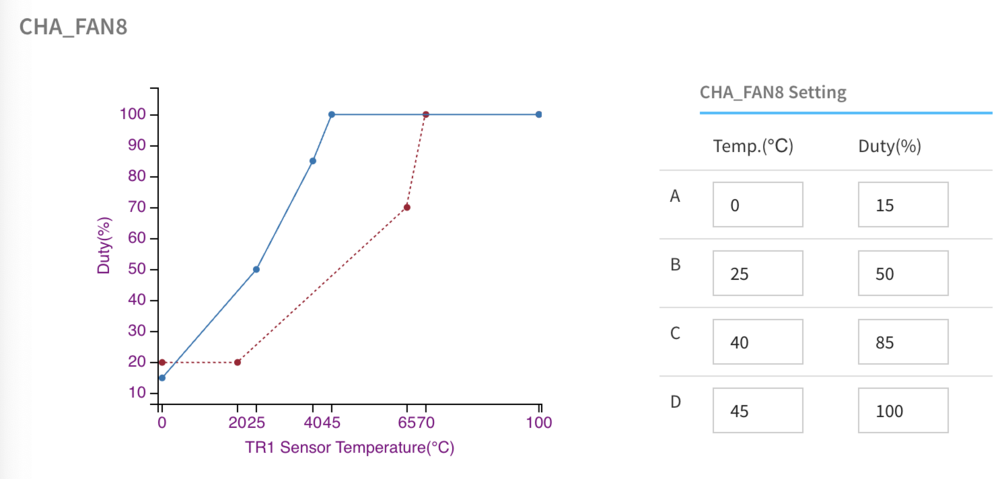
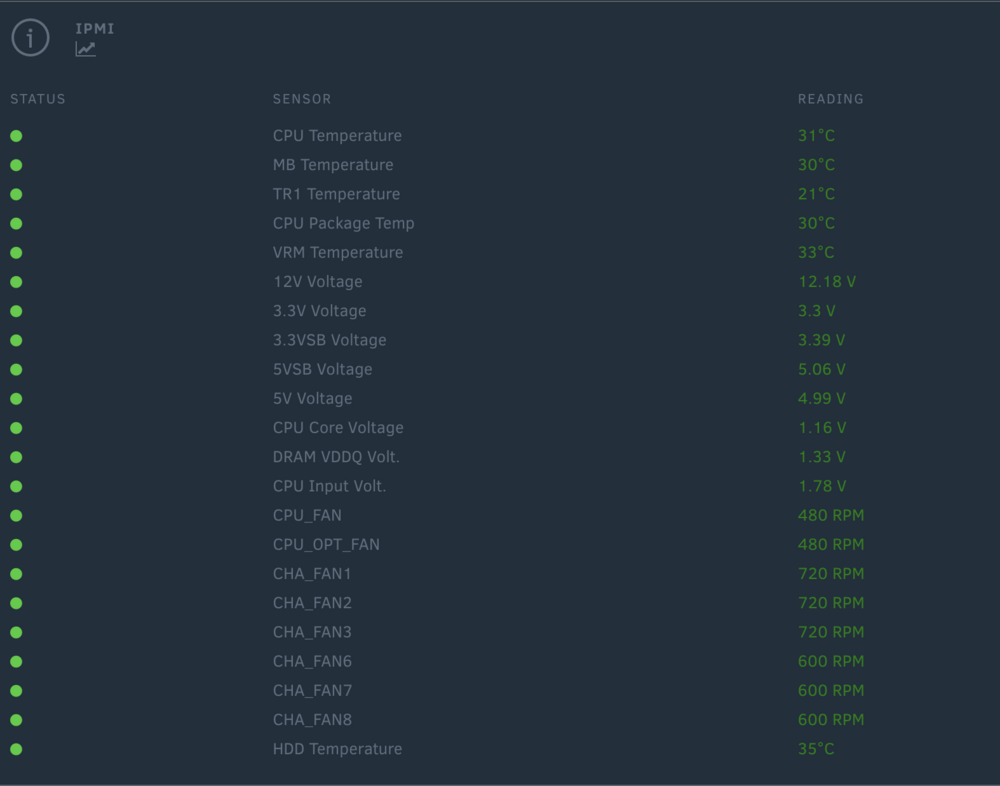
Really awesome work to the person before this post! Comically I was trying to address the exact same thing the day before; but instead I spent the 10$ and got myself a TR sensor that I have attached to one of my parity drives that routinely runs the hottest in the hdd bay. (Link to the one I bought) Solved it and allowed me to just use the native IPMI web portal with its pretty graphs and such. For example here is my chart for the front HDD bay on my system: Works great and here's a shot from the IPMI dashboard in unraid: It's gone so well that now i'm going to grab another TR to put in other locations of the case I have.
-
Super weird... I'm not having any issues like that from my older units. What happens when you put them in the other colored usb slots on the back? Just to verify, you do have fast boot disabled right? I wonder if I wouldn't factory reset it, boot without anything and turn off fast boot; reboot and go back into bios. While in there, plug in the usb stick with unraid and verify that it shows up in the usb menu area (I forget where exactly, but know mine showed up; I went in and changed mine to show up as a hard drive). One other weird thing with mine was I couldn't get the USB's fully seated in a couple of the slots unless I really pushed them.
-
one thing i'm noticing so far with the non ipmi board is that the default speeds it's doing my case fans is just too low... Need to adjust them all up as I have an ancient Lian Li tower server case that has compartments for things like the PSU, HDD's, motherboard, 5 1/4inch bays etc. I'm seeing the temps of the area with the motherboard are just fine; but the bays with things like the HDD's have their fans running way too slow which is resulting in hitting excess of 50c on the drives during big writes. Here's hoping swapping over to the other version of the board (hopefully later today) will give me that extra functionality to edit the speeds and get things cooler like they used to be. I did go ahead and get another heatsink for the nvme; noticed the one without it was running almost 10c hotter! Should be installing that today as well... One nice part about not needing to put that HBA card in those CPU direct slots is now I can save them for a dedicated GPU that I plan to get in the future so I can do some gaming in a VM with passthrough etc.
-
Has anyone done some testing on performance of doing some common tasks with different drives/shares on different locations on the motherboard? Here is my original setup that allowed me to maximize performance on my old system; no issues downloading at gigabit while unpacking files etc; all while using plex/vms etc. 4 SSDs: 1) Array-Cache 2) Docker-Cache 3) Download-Cache (downloads temporarily hit here and then unpack to the Array-Cache) 4) VM-Cache Question 1: Now with this new system having NVME support, I want to maximize my performance and I think I can potentially consolidate down some since NVME's perform so much faster. So, is option A or B better? A) Docker / VM cache on an NVME in m.2-1 (the slot attached to the CPU directly) to maximize performance on things like Plex's database / images etc and then put an NVME in one of the other m.2 slots to host downloads / array cache? B) Download / Array Cache on an NVME in m.2-1 (the slot attached to the CPU directly) to maximize performance of downloads/unpacking; and then put the Docker / VM Cache on a second NVME in the other m.2 slot. C) something else? Question 2: any thoughts on if there are any performance gains for an HBA card like the 9400-16i connected to the Gen5 slot that's directly connected to the CPU? I'm just not sure if spinning drives and that card would benefit at all from being directly attached to the CPU.
-
Those are rdimms though, pretty sure we can only use udimm's? Thanks! Got the system swapped out this weekend, ended up in replacing the PSU as well with a corsair rm850 as they seem to be much more efficient than the older evga one I had from 7 years ago. This thing is a beast! stress tested with downloading at full gig, unraring/repairing a file, while running 2 vm's, transcoding (don't ever transcode but wanted to try to make sure I had the intel setup right) with plex, and moving 100 of gigs via MC from one disk to another to balance stuff out after adding a new data drive. Didn't break a sweat! Now the bad... So, one thing I thought i'd skimp on was the IPMI version and go with a non as I found an open box on bhphoto for a great deal. Now after going back through this thread and seeing that I cannot actually get all that fun raw data off the normal non ipmi version; i'm jaded... I really like data! Thankfully amazon had an openbox ipmi version on a great price so I grabbed it. Here's hoping it doesn't have any issues. Will swap it out and return the non ipmi version back to bhphoto.
-
Thanks again for everyone's responses; went ahead and ordered the board, a pair of 48gig sticks, an i7-12700k, and a cpu cooler; should be up and running next week.
-
Yeah I found the press release from March 24 where they said this board and many others in the 700/600 range had been upgraded to 256gb max. I cannot find any 64gb sticks with ecc though, perhaps I’m just not searching right… If any of you have seen them, please let me know!
-
Thanks for the feedback to you both! Looks like I have finally found my motherboard; now to figure out the memory to get to max this thing out . Searching for ECC DDR5 is a bit tricky for sure... (so if there are any model number recommendations, please feel free to post them, i'd ideally max it out from the get go). thanks!
-
So, reading through this 14 pages; seems as if there were some kinks to work out in order to get this board fully working. With all that effort that you all had to do; would you do it again? Asking as my 13 year old dual xeon box is starting to get a little long in the tooth and the 170W idle is not the best way to spend my money. I like the idea of ECC ram and this seems to be the only "good" option for someone using an intel i7-12700. Anyways, hoping to get some feedback if it's worth it to go this route vs just getting a consumer 790 board... For reference my current box runs all the various Arr's, 3 vm's (windows server, windows 11 for light gaming, home assistant), plex, and another 15 or so dockers. I have 256gb of memory in my current workstation build on an older Supermicro X9DAI board and a pair of 12 core xeons. Currently I have 17 drives across 13 spinners (1 parity, 12 pool) and 4 SSD's in various cache roles and a Bluray drive for rips. I use some older perc310's flashed into IT mode but have already bought a 9400-16i for whatever new setup I get and I picked up a pair of 2tb NVME samsung 990 pro's to be my new VM/Docker cache pool. Thanks in advance for any Yay's or Nea's out there.
-
So after going through this, wanted to do much more of a step by step for a mac user wanting to flash the 430-16i over to the 9400-16i. Thanks to all the people who posted above and on the github site that's linked in prepare the files. Create the UEFI bootable disc On your Mac insert a USB you don't mind blowing away, - "Erase" using disk utility with Fat32 and guid bootloader options selected, I named my drive 9400-16i Open up the 9400-16i USB stick Add a folder called EFI\BOOT and add the shell file from https://github.com/KilianKegel/Howto-create-a-UEFI-Shell-Boot-Drive?tab=readme-ov-file I also added the 2 optional files into a EFI\TOOLS folder from the above link just for the fun of it, not really needed. Prepare the files To the root of the USB, copy the files that you downloaded per the instructions on this site: https://gist.github.com/buswedg/f94a7978b07c1976e81e6d456ec37853. You should have the following 4 files Pick one of these based on your needs (NVME vs just SAS/SATA) HBA_9400-16i_Mixed_Profile.bin - if you want NVME HBA_9400-16i_SAS_SATA_Profile.bin - If you only want SAS / SATA support mpt35sas_legacy.rom mpt35sas_x64.rom storcli.efi Prepare my older i7 motherboard for booting (this is a spare unraid box for testing) Swap mobo to boot from UEFI and select the USB for booting Boot Type in MAP and hit enter to see file system, for mine it was FS1 Type in “FS1:” without quotes to swap to FS1 drive LS to confirm you can see files that you copied above Make backup folder "mkdir backup" Backing up the current card and flashing new (this is from the https://gist.github.com/buswedg/f94a7978b07c1976e81e6d456ec37853 page, pasting here so people have it) Identify the relevant (cX) HBA: storcli.efi show all Confirm the relevant HBA: storcli.efi /c0 show Backup STORCLI output to the USB: storcli.efi /c0 show all > backup\output.txt Backup current controller bios, firmware etc. to the USB: storcli.efi /c0 get bios file=backup\bios storcli.efi /c0 get firmware file=backup\firmware storcli.efi /c0 get mpb file=backup\mpb storcli.efi /c0 get fwbackup file=backup\fwbackup storcli.efi /c0 get nvdata file=backup\nvdata storcli.efi /c0 get flash file=backup\flash Update the firmware: storcli.efi /c0 download file=HBA_9400-16i_Mixed_Profile.bin Update the EFI BIOS: storcli.efi /c0 download efibios file=mpt35sas_x64.rom Update the BIOS: storcli.efi /c0 download bios file=mpt35sas_legacy.rom Check HBA versions have updated: storcli.efi /c0 show Power cycle the machine. All done!


