blackfox
Members
-
Joined
-
Last visited
-
Ich habe jetzt eine neue, diesmal Windows 11 VM mit VNC aufgesetzt und eingerichtet. Im zweiten Schritt habe ich die GPU hinzugefügt, was auch funktioniert hat. Bei jedem Booten erhalte ich aber nach wie vor 2023-08-16T19:28:54.836604Z qemu-system-x86_64: vfio: Cannot reset device 0000:23:00.1, no available reset mechanism. 2023-08-16T19:28:54.840761Z qemu-system-x86_64: vfio: Cannot reset device 0000:23:00.1, no available reset mechanism. Die VM bootet trotzdem durch, jedoch ohne Sound. Da muss ich mal schauen, wie ich das gefixt bekomme. Sound ist für mich jedoch zweitrangig, gehe meist über Parsec drauf, da wird der Sound durchgeschleift. Also, keine finale Lösung aber zumindest ein Workaround...
-
Hallo liebe Community, meine GPU AMD Radeon RX 5700 XT (Navi) kostet mich den letzten Nerv. Dank spaceinvaderone habe ich sie monatelang in einer Windows 10 VM durchschleifen können. Lief auch soweit problemlos, hin und wieder reset bug aber das ließ sich durch ein entsprechendes Script oder notfalls Server Reboot beheben. Vor 1 Woche ca. hat Windows ein paar Updates gefahren und es lief eine Installation. Dabei hat sich die VM aufgehängt und lässt sich seitdem nicht mehr starten. Beim Boot erhalte ich: 2023-08-12T19:31:02.510597Z qemu-system-x86_64: vfio: Cannot reset device 0000:23:00.1, no available reset mechanism. 2023-08-12T19:31:02.514551Z qemu-system-x86_64: vfio: Cannot reset device 0000:23:00.1, no available reset mechanism. 2023-08-12T19:32:06.240512Z qemu-system-x86_64: terminating on signal 15 from pid 11953 (/usr/sbin/libvirtd) 2023-08-12 19:32:09.066+0000: shutting down, reason=shutdown Laut System Devices ist das HDMI Audio der GPU. Beide IOMMU groups sind and VFIO at boot gebunden. Wenn ich in den VM settings die Audio Karte ganz weglasse, erhalte ich folgenden Fehler beim Versuch, die VM zu booten: 2023-08-12T19:25:29.760116Z qemu-system-x86_64: terminating on signal 15 from pid 11953 (/usr/sbin/libvirtd) 2023-08-12 19:25:32.589+0000: shutting down, reason=shutdown Hier das XML meiner VM: <domain type='kvm'> <name>Windows 10 GPU</name> <uuid>30dbb865-313f-351e-980c-e9c6cd30f1bb</uuid> <description>Editing Win10 VM</description> <metadata> <vmtemplate xmlns="unraid" name="Windows 10" icon="windows7.png" os="windows10"/> </metadata> <memory unit='KiB'>50331648</memory> <currentMemory unit='KiB'>50331648</currentMemory> <memoryBacking> <nosharepages/> </memoryBacking> <vcpu placement='static'>16</vcpu> <cputune> <vcpupin vcpu='0' cpuset='10'/> <vcpupin vcpu='1' cpuset='34'/> <vcpupin vcpu='2' cpuset='11'/> <vcpupin vcpu='3' cpuset='35'/> <vcpupin vcpu='4' cpuset='12'/> <vcpupin vcpu='5' cpuset='36'/> <vcpupin vcpu='6' cpuset='13'/> <vcpupin vcpu='7' cpuset='37'/> <vcpupin vcpu='8' cpuset='14'/> <vcpupin vcpu='9' cpuset='38'/> <vcpupin vcpu='10' cpuset='15'/> <vcpupin vcpu='11' cpuset='39'/> <vcpupin vcpu='12' cpuset='16'/> <vcpupin vcpu='13' cpuset='40'/> <vcpupin vcpu='14' cpuset='17'/> <vcpupin vcpu='15' cpuset='41'/> </cputune> <resource> <partition>/machine</partition> </resource> <os> <type arch='x86_64' machine='pc-q35-7.1'>hvm</type> <loader readonly='yes' type='pflash'>/usr/share/qemu/ovmf-x64/OVMF_CODE-pure-efi.fd</loader> <nvram>/etc/libvirt/qemu/nvram/30dbb865-313f-351e-980c-e9c6cd30f1bb_VARS-pure-efi.fd</nvram> </os> <features> <acpi/> <apic/> <hyperv mode='custom'> <relaxed state='on'/> <vapic state='on'/> <spinlocks state='on' retries='8191'/> <vendor_id state='on' value='none'/> </hyperv> </features> <cpu mode='host-passthrough' check='none' migratable='on'> <topology sockets='1' dies='1' cores='8' threads='2'/> <cache mode='passthrough'/> <feature policy='require' name='topoext'/> </cpu> <clock offset='localtime'> <timer name='hypervclock' present='yes'/> <timer name='hpet' present='no'/> </clock> <on_poweroff>destroy</on_poweroff> <on_reboot>restart</on_reboot> <on_crash>restart</on_crash> <devices> <emulator>/usr/local/sbin/qemu</emulator> <disk type='file' device='disk'> <driver name='qemu' type='raw' cache='writeback'/> <source file='/mnt/disks/UD_SSD-4T/vdisk-win10-gpu.img'/> <target dev='hdc' bus='virtio'/> <boot order='1'/> <address type='pci' domain='0x0000' bus='0x04' slot='0x00' function='0x0'/> </disk> <disk type='file' device='cdrom'> <driver name='qemu' type='raw'/> <source file='/mnt/user/isos/Windows10.iso'/> <target dev='hda' bus='sata'/> <readonly/> <boot order='2'/> <address type='drive' controller='0' bus='0' target='0' unit='0'/> </disk> <disk type='file' device='cdrom'> <driver name='qemu' type='raw'/> <source file='/mnt/user/isos/virtio-win-0.1.229-1.iso'/> <target dev='hdb' bus='sata'/> <readonly/> <address type='drive' controller='0' bus='0' target='0' unit='1'/> </disk> <controller type='pci' index='0' model='pcie-root'/> <controller type='pci' index='1' model='pcie-root-port'> <model name='pcie-root-port'/> <target chassis='1' port='0x8'/> <address type='pci' domain='0x0000' bus='0x00' slot='0x01' function='0x0' multifunction='on'/> </controller> <controller type='pci' index='2' model='pcie-root-port'> <model name='pcie-root-port'/> <target chassis='2' port='0x9'/> <address type='pci' domain='0x0000' bus='0x00' slot='0x01' function='0x1'/> </controller> <controller type='pci' index='3' model='pcie-root-port'> <model name='pcie-root-port'/> <target chassis='3' port='0xa'/> <address type='pci' domain='0x0000' bus='0x00' slot='0x01' function='0x2'/> </controller> <controller type='pci' index='4' model='pcie-root-port'> <model name='pcie-root-port'/> <target chassis='4' port='0xb'/> <address type='pci' domain='0x0000' bus='0x00' slot='0x01' function='0x3'/> </controller> <controller type='pci' index='5' model='pcie-root-port'> <model name='pcie-root-port'/> <target chassis='5' port='0xc'/> <address type='pci' domain='0x0000' bus='0x00' slot='0x01' function='0x4'/> </controller> <controller type='pci' index='6' model='pcie-root-port'> <model name='pcie-root-port'/> <target chassis='6' port='0xd'/> <address type='pci' domain='0x0000' bus='0x00' slot='0x01' function='0x5'/> </controller> <controller type='pci' index='7' model='pcie-root-port'> <model name='pcie-root-port'/> <target chassis='7' port='0xe'/> <address type='pci' domain='0x0000' bus='0x00' slot='0x01' function='0x6'/> </controller> <controller type='pci' index='8' model='pcie-to-pci-bridge'> <model name='pcie-pci-bridge'/> <address type='pci' domain='0x0000' bus='0x01' slot='0x00' function='0x0'/> </controller> <controller type='virtio-serial' index='0'> <address type='pci' domain='0x0000' bus='0x02' slot='0x00' function='0x0'/> </controller> <controller type='sata' index='0'> <address type='pci' domain='0x0000' bus='0x00' slot='0x1f' function='0x2'/> </controller> <controller type='usb' index='0' model='qemu-xhci' ports='15'> <address type='pci' domain='0x0000' bus='0x00' slot='0x07' function='0x0'/> </controller> <interface type='bridge'> <mac address='52:54:00:f9:01:71'/> <source bridge='br0'/> <model type='virtio-net'/> <address type='pci' domain='0x0000' bus='0x03' slot='0x00' function='0x0'/> </interface> <serial type='pty'> <target type='isa-serial' port='0'> <model name='isa-serial'/> </target> </serial> <console type='pty'> <target type='serial' port='0'/> </console> <channel type='unix'> <target type='virtio' name='org.qemu.guest_agent.0'/> <address type='virtio-serial' controller='0' bus='0' port='1'/> </channel> <input type='tablet' bus='usb'> <address type='usb' bus='0' port='1'/> </input> <input type='mouse' bus='ps2'/> <input type='keyboard' bus='ps2'/> <audio id='1' type='none'/> <hostdev mode='subsystem' type='pci' managed='yes'> <driver name='vfio'/> <source> <address domain='0x0000' bus='0x23' slot='0x00' function='0x0'/> </source> <rom file='/mnt/user/isos/Sapphire.RX5700XT.8192.190905.rom'/> <address type='pci' domain='0x0000' bus='0x05' slot='0x00' function='0x0'/> </hostdev> <hostdev mode='subsystem' type='pci' managed='yes'> <driver name='vfio'/> <source> <address domain='0x0000' bus='0x23' slot='0x00' function='0x1'/> </source> <address type='pci' domain='0x0000' bus='0x06' slot='0x00' function='0x0'/> </hostdev> <hostdev mode='subsystem' type='usb' managed='no'> <source startupPolicy='optional'> <vendor id='0x26ce'/> <product id='0x0a01'/> </source> <address type='usb' bus='0' port='2'/> </hostdev> <hostdev mode='subsystem' type='usb' managed='no'> <source startupPolicy='optional'> <vendor id='0x046d'/> <product id='0xc051'/> </source> <address type='usb' bus='0' port='3'/> </hostdev> <hostdev mode='subsystem' type='usb' managed='no'> <source startupPolicy='optional'> <vendor id='0x046d'/> <product id='0xc22d'/> </source> <address type='usb' bus='0' port='4'/> </hostdev> <memballoon model='none'/> </devices> <seclabel type='dynamic' model='dac' relabel='yes'/> </domain> Server-Reboot und reset-script helfen auch nicht, es tritt der gleiche Fehler auf. Zum Test habe ich eine neue VM erstellt, die GPU durchgeschleift, jedoch auch ohne Erfolg. Selbes Problem. Hat wer eine Idee was hier der Fehler sein könnte? VG
-
Ok, ich sehe gerade wo mein Fehler lag... linuxserver/nextcloud25.0.1-ls212 statt linuxserver/nextcloud:25.0.1-ls212 -.-
-
Ok danke dir. Hier der Screenshot:
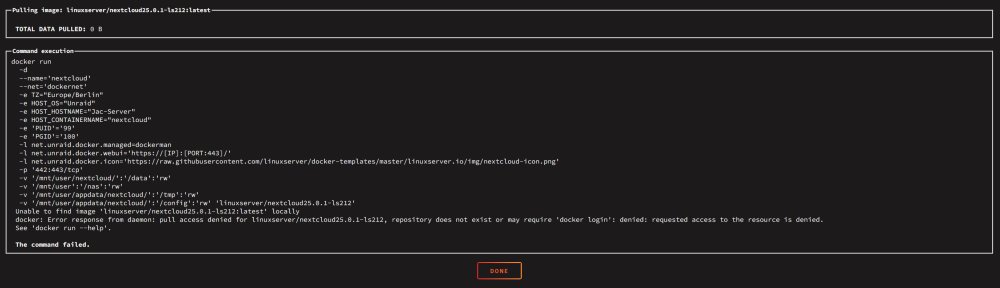
-
Gestern war es spät und ich habe nicht aufmerksam gelesen. Natürlich hab ich es so eingetragen: linuxserver/nextcloud:25.0.1-ls212 Danach habe ich auf "Apply" gedrückt, es kam der Fehler mit failed am Ende. Leider habe ich dazu keinen Screenshot und in den syslogs findet sich auch nichts. Den Tag hab ich von dockerhub, er existiert. Ich bin mir allerdings nicht 100% sicher auf welcher Version meine Nextcloud Instanz nun war, da das Update nicht korrekt durchlief. Nextcloud kann ich leider nicht starten, da der gesamte Docker Container weg ist. Es existiert nur noch das orphan image:

-
Hallo zusammen, ich benötige dringend eure Hilfe! Beim Versuch, Nextcloud (linuxserver) von v25.x auf v26 upzudaten, kam der Fehler mit PHP >= 8.2 wird nicht unterstützt. Der Schritt "occ upgrade" über docker exec -it nextcloud updater.phar schlug mit der PHP-Fehlermeldung fehl. Dann wollte ich es wie in folgender Anleitung machen: Als Repository habe ich "docker pull linuxserver/nextcloud:25.0.1-ls212" eingetragen. Das lief auf ein "failed" hinaus. Seitdem ist der ganze Nextcloud Container verschwunden. Ich sehe ihn noch als orphan image und alle Daten unter \appdata sind ebenso vorhanden. Ein Backup von CA_backup ist ebenfalls vorhanden. Welche Möglichkeit gibt es, nur den Nextcloud Container wiederherzustellen? VG & Danke im Voraus
-
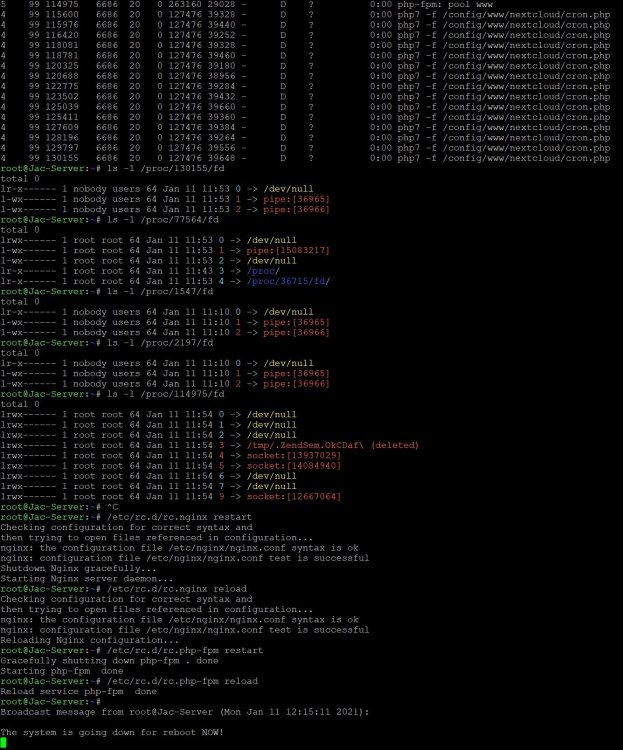
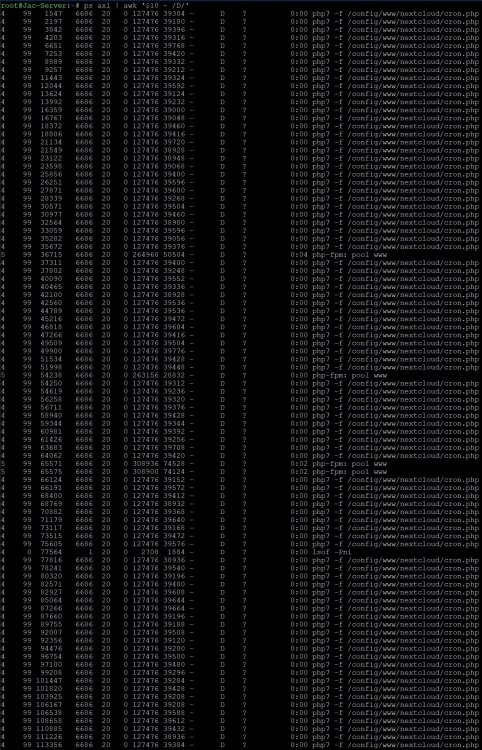
I got the same issue today while trying to stop the array. Nextcloud docker would not stop and pretend the system from stopping the array. I am running Unraid OS 6.9.0-rc1 and Nextcloud 20.0.3 with mariadb and swag as reverse proxy. There's no LSI Card installed. Nextcloud is running on a Samsung 970Evo Plus 2TB in a cache pool. @jcsnider I tried the command you mentioned: ps axl | awk '$10 ~ /D/' It gave me the following output: I picked a few pid's and listed the file handles with ls -l /proc/pid/fd as you see above. I then tried to restart / reload nginx and php-fpm to see if that helps, which didn't. /etc/rc.d/rc.nginx restart /etc/rc.d/rc.nginx reload /etc/rc.d/rc.php-fpm restart /etc/rc.d/rc.php-fpm reload Afterwards I restarted mariadb manually to see if nextcloud would stop while mariadb is still running which wasn't the case. Rebooting the system wouldn't work as well so I had to do an unclean restart with parity check now running. I attached the syslog as Unraid wasn't able to generate diagnostics. In the past I recognized nextcloud docker not stopping a couple of times, so there's an issue obviously. Anyway, while it's running there are no errors or failures for me. syslog.txt