BitAdept
Members
-
Joined
-
Last visited
Everything posted by BitAdept
-
this post fixed my problem. I forgot my wireless and wired networks are on 2 different subnets.
-
I also cannot access containers running on the wireguard interface from my LAN. It will timeout every time. I imported the config and selected the new network type when setting up firefox container. I've set up a static route on my router using the Local tunnel network pool and my unraid server's local IP address but that doesn't make any difference (1 distance or 2). I've also enabled "Host access to custom networks" and restarted unraid but it didn't help either. I was able to verify through container shell that it is using the commercial VPN IP and when it is running with a different network type that I use for other containers I'm able to access through LAN just fine. When I ssh to my unraid server and do a curl for the firefox container on wireguard using the unraid server IP I am able to get a response. Since I am getting a timeout I think it is able to get a connection otherwise I would get refused or some other error. I should also note that if I use the br0 network I am not able to access that over LAN either. Any help would be appreciated.
-
I've run some one-off containers from the command line that are auto-named by docker. Even after removing the container or using the --rm option they still show up in the notification of auto-updated containers. I've done a little looking but I'm unable to figure out how they're getting included in the notifications. Any idea how I can fix this?
-
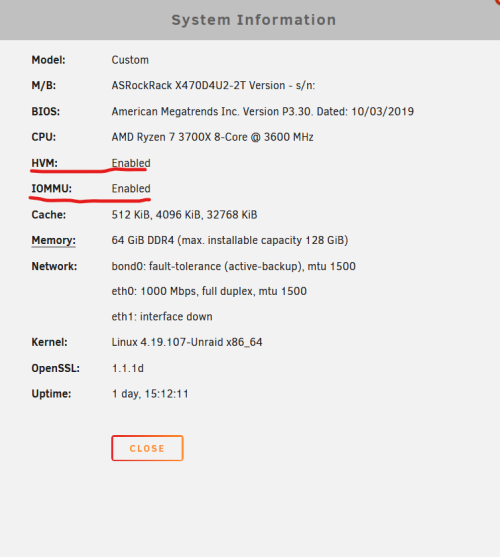
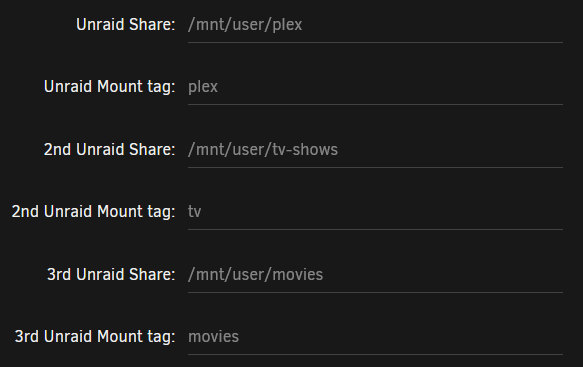
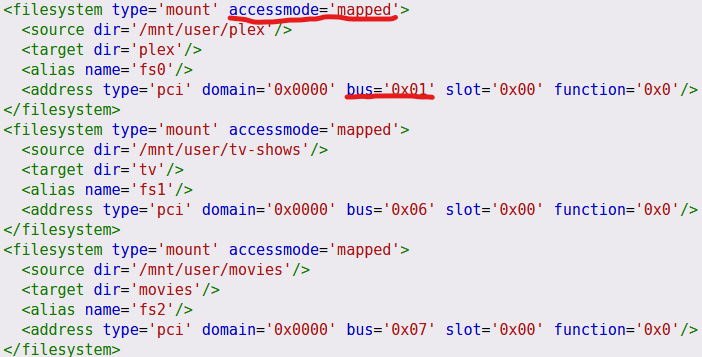
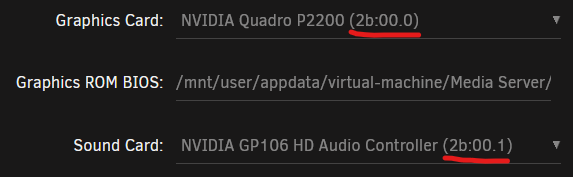
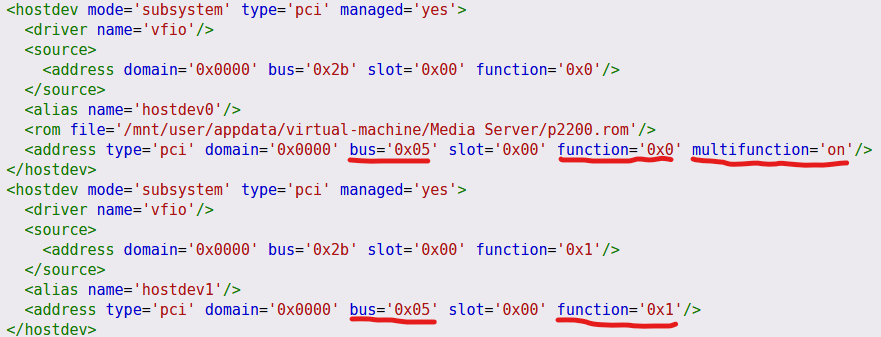
Consideration: I decided to set up a VM instead of using LinuxServer.io's Unraid Nvidia plugin for a few reasons. I was concerned that using a 3rd party Unraid distro could cause instability or interfere with Unraid's filesystem and parity. It is also recommended by LinuxServer.io that you should use a single GPU for transcoding as any interruption could cause system instability. Since I wouldn't be able to take advantage of using the GPU in multiple containers it was another reason for me to avoid Unraid Nvidia. Finally hardware transcoding is sensitive to Plex Media Server version and Nvidia driver version so with a VM any version of PMS or Nvidia driver can be installed as necessary. I'd also like to note that I didn't plan on making this tutorial before I started so I may miss some steps and some steps may not be strictly necessary but I included them anyway since that's what I did. Requirements: Make sure HVM and IOMMU are enabled in Unraid info. If yours doesn't show enabled and your hardware supports these settings you'll have to enable them in your BIOS and what those settings are called is dependent on your motherboard. Typically HVM and IOMMU are referred to as VT and VT-d by Intel and AMD-V and AMD-Vi by AMD. Make sure they're set to Enabled instead of Auto. I've only tested this on Unraid 6.8.3 with an Nvidia Quadro P2200. Enable Nvidia GPU passthrough: Follow SpaceInvaderOne's excellent guide to passthrough Nvidia GPUs. I chose to add my GPU and the attached sound card vfio ids to Unraid startup parameters to make sure Unraid doesn't bind to them. This may not be necessary but in order to do so go to Tools > System Devices and find your GPU and it's accompanying audio controller. You'll see something similar to [10de:13c2]. Copy the ID within the brackets for both your GPU and audio controller then go to Main > Flash > Syslinux configuration. Add your IDs to the Unraid OS and Unraid OS GUI Mode similar to this Unraid OS kernel /bzimage append initrd=/bzroot vfio-pci.ids=10de:13c2,10de:0fbb Unraid OS GUI Mode kernel /bzimage append initrd=/bzroot,/bzroot-gui vfio-pci.ids=10de:13c2,10de:0fbb Set up Ubuntu VM: Download Ubuntu 20.04 Server iso. Place that in your isos folder on your Unraid server. Add a VM through the Unraid UI. Provide resources as you see fit. I used 4 CPU and 8192 MB RAM. Select the Ubuntu Server iso in OS Install ISO. Make note of the Network MAC setting of your VM. As seen here: Finalize the VM settings and start it. Connect to the VM with Unraid VNC. Install the iso using all the Ubuntu default options but make sure to install the OpenSSH server. Once complete, reboot the VM and reconnect with VNC. As some users may be aware, when you make changes to the VM settings using the Unraid UI it can change the "hardware" location the VM sees the same components and cause problems with DHCP. So we want to fix that right away. Once at the command line execute: sudo nano /etc/netplan/00-installer-config.yaml Replace the file contents with the provided text, making sure to insert the MAC address from earlier: # This is the network config written by 'subiquity' network: ethernets: lan0: dhcp4: true match: macaddress: "<replace_mac_address>" set-name: lan0 version: 2 Now that we've fixed that we can create the mount folders and go back and edit the VM in the Unraid UI. To create the mount folders execute "sudo mkdir -p /plex /tv /movies". In the Unraid UI, edit the VM and find the "Unraid Share" option. Fill in your Unraid shares for your Plex configuration and any Plex libraries you'd like to include. If you're unable to add any more shares from the UI you may need to switch to the XML view and find the filesystem tag. If adding from the XML view, make sure the bus attribute is unique. Unraid 6.8.3 will show an error if they're not unique so you can keep incrementing until it saves successfully. Make sure to change accessmode to 'mapped' as we'll want to use that mode to manage permissions between Unraid host filesystem and the Ubuntu guest filesystem. I decided to use mapped access mode instead of passthrough because it separates the host user id and group id from the guest. After this point making changes to the VM configuration through the Unraid UI will change this back to 'passthrough'. I should note this is not strictly necessary but it is the accessmode I preferred. Save the VM configuration. Open a terminal in Unraid and run the following commands: cp /etc/libvirt/qemu.conf /etc/libvirt/qemu.conf.bak nano /etc/libvirt/qemu.conf Find the line '#user = "root"', around line 400, and change it so that the user matches the Unraid user that has access to your Plex shares. All of my shares are owned by the user nobody so I switched that line to 'user = "nobody"'. You should also make sure the group matches as well. This will align permission between Unraid and your VM. I believe this change will be persisted in the /mnt/user/system/libvirt/libvirt.img so it'll safely be re-applied when you restart Unraid. Start the VM. Once connected via VNC, run "sudo nano /etc/fstab" and add the following mounts: plex /plex 9p defaults,trans=virtio,cache=mmap,version=9p2000.L,msize=52430000 0 0 tv /tv 9p defaults,trans=virtio,cache=mmap,version=9p2000.L,msize=52430000 0 0 movies /movies 9p defaults,trans=virtio,cache=mmap,version=9p2000.L,msize=52430000 0 0 You can verify your mount is working correctly by running "sudo mount -a". You should then see all your files in the /plex, /tv, and /movies directories. This will mount your Plex configuration and data using the 9p filesystem which will provide fast direct access to all your data. Set up Plex Media Server: Now that our VM has access to all the data Plex requires we'll install Plex. Run the following command to download the latest Plex, at the time of writing: cd /tmp wget https://downloads.plex.tv/plex-media-server-new/1.20.3.3421-54b6523bd/debian/plexmediaserver_1.20.3.3421-54b6523bd_amd64.deb sudo apt-get install plexmediaserver_1.20.3.3421-54b6523bd_amd64.deb sudo usermod -u <user_id> plex This will install Plex and change the plex user id to match the user id of the Unraid shares mounted in your VM. You can find the user id by running "id <user>" on Unraid. Now we want to configure systemd so Plex runs smoothly. Run "sudo systemctl edit plexmediaserver" and replace the contents with: [Unit] After=network.target network-online.target plex.mount tv.mount movies.mount Requires=plex.mount tv.mount movies.mount [Service] Environment="PLEX_MEDIA_SERVER_APPLICATION_SUPPORT_DIR=/plex/Library/Application Support" Group=users This will make sure Plex doesn't start until it has network access and the Unraid shares are mounted in our VM, switch the Plex configuration directory to our mounted Unraid share, and runs using the group that matches the Unraid share. Install Nvidia Drivers: This will disable the default Linux Nvidia driver and download and install the latest Nvidia driver as of the time of writing. The driver may differ based on your card so you can substitute the wget command by looking up your driver here. This apt-get install command may be optional but I did it before installing the driver so I included it just in case. sudo apt-get install -y linux-headers-generic build-essential libncurses-dev bison flex libssl-dev libelf-dev bc kmod sudo bash -c "echo blacklist nouveau > /etc/modprobe.d/blacklist-nvidia-nouveau.conf" sudo bash -c "echo options nouveau modeset=0 >> /etc/modprobe.d/blacklist-nvidia-nouveau.conf" sudo update-initramfs -u sudo reboot cd /tmp wget https://us.download.nvidia.com/XFree86/Linux-x86_64/450.80.02/NVIDIA-Linux-x86_64-450.80.02.run sudo sh ./NVIDIA-Linux-x86_64-450.80.02.run Once the installer runs you will be prompted to allow the installer to configure your Xorg settings. I declined all changes other than the driver installation. Once the installer is complete we need to make note of our VM's IP address. Run the command "ip addr" and look for the lan0 section with the line "inet x.x.x.x/x". The first 4 numbers will be your IP, like 192.168.1.128 for example. You should configure your router to give this VM a static IP. You'll need to update any port forwarding in your router with this IP so your Plex is available remotely and you'll need the IP to SSH into your VM once you've switched to your GPU as you'll no longer be able to access your VM with Unraid VNC. Shutdown the VM. Edit the VM config in the Unraid UI (don't use the XML view for this). Select your graphics card from the dropdown and select the matching sound card. Be sure to include the ROM you created following SpaceInvaderOne's tutorial and save the config. Go back to the VM config in the Unraid UI and this time select the XML view. We need to make sure the GPU and Sound Card share the same PCI slot. Find the rom tag and add multifunction='on' to the accompanying address tag. Make sure the bus of the next address matches and the function of the next address is 0x1. You should also switch the filesystem tags back to 'mapped' accessmode. Save the config. Now you can start the VM you'll have a Plex Media Server capable of hardware transcoding!