


AlainF
Members
-
Joined
-
Last visited
-
Unraid 7, pihole, tailscale Hello all, I tried to activate the new Tailscale support for my pihole container. Upon applying and restarting the container, it seems to be running but I cannot display the logfile or the console of the container. A window briefly pops up but closes immediately. Upon deactivating the tailscale feature in the container configuration, all is well again. Has anyone had success with this so far? Many thanks.
-
Maybe a bit later @JustinRSharp but you should really pay super attention when you paste logfiles - the link above contains your actual hash that could allow anyone to link their device to YOUR dropbox account!!
-
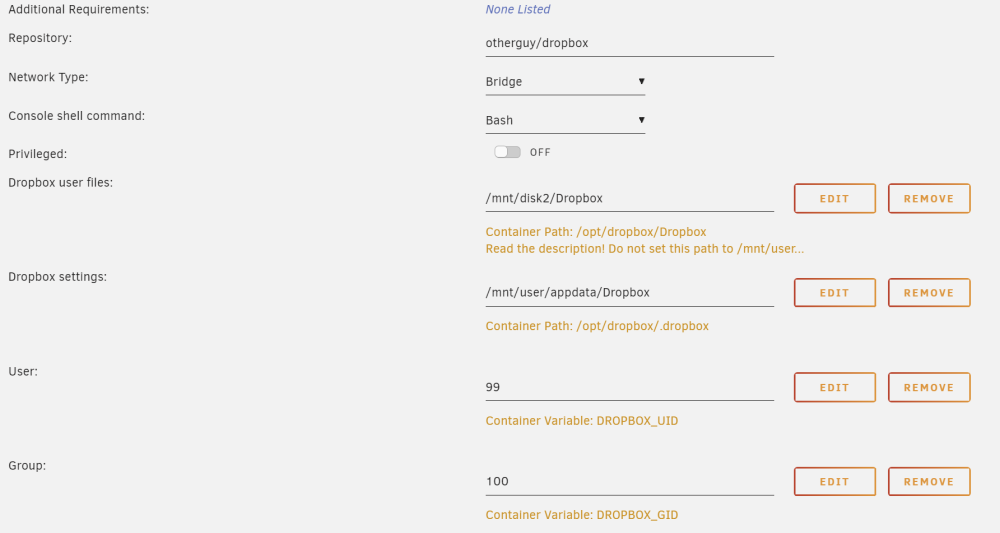
Hello, I followed the installation steps, but after successfully linking the new device by clicking the link, nothing happens after the "Welcome Alain." prompt. When I restart the container, it seems as if the device is no longer linked and I am prompted to link the device again: Checking for latest Dropbox version... Latest : 192.4.4605 Installed: 192.4.4605 Dropbox is up-to-date Using Europe/Paris timezone (09:43:33 local time) Starting dropboxd (192.4.4605)... dropbox: load fq extension '/opt/dropbox/bin/dropbox-lnx.x86_64-192.4.4605/cryptography.hazmat.bindings._openssl.abi3.so' dropbox: load fq extension '/opt/dropbox/bin/dropbox-lnx.x86_64-192.4.4605/cryptography.hazmat.bindings._padding.abi3.so' dropbox: load fq extension '/opt/dropbox/bin/dropbox-lnx.x86_64-192.4.4605/apex._apex.abi3.so' dropbox: load fq extension '/opt/dropbox/bin/dropbox-lnx.x86_64-192.4.4605/psutil._psutil_linux.cpython-38-x86_64-linux-gnu.so' dropbox: load fq extension '/opt/dropbox/bin/dropbox-lnx.x86_64-192.4.4605/psutil._psutil_posix.cpython-38-x86_64-linux-gnu.so' dropbox: load fq extension '/opt/dropbox/bin/dropbox-lnx.x86_64-192.4.4605/tornado.speedups.cpython-38-x86_64-linux-gnu.so' dropbox: load fq extension '/opt/dropbox/bin/dropbox-lnx.x86_64-192.4.4605/wrapt._wrappers.cpython-38-x86_64-linux-gnu.so' This computer isn't linked to any Dropbox account... Please visit https://www.dropbox.com/cli_link_nonce?nonce=XXXXXXXXXXXXXXXXXXXXXXXXXX to link this device. When I click the link and add the device, I get this: Please visit https://www.dropbox.com/cli_link_nonce?nonce=XXXXXXXXXXXXXXXXXXXXXXXXX to link this device. This computer is now linked to Dropbox. Welcome Alain And then it just sits there. My settings for the container are as follows:
-
This should be pulled from the apps "store" ; doesn't work, no logging, no support/help.
-
[Tailscale plugin and Pihole container] So I have only basic knowledge of networking, containers and Unraid, and I need some help achieving the following: Use my local Pihole as a DNS server for my iPhone wherever I am. I have the Tailscale Unraid plugin installed and it is working, i.e. I can access the Unraid WebUI via Tailscale. I also have the Pihole container running and I am using it as my DNS server for my local network. The challenge I seem to have is that my Pihole container is running on a "Custom: br0" interface which exposes an IP address of 192.168.178.250 to my LAN, whereas the main IP of my Unraid box is 192.168.178.222 and so the Pihole container is not part of my Tailscale network. One idea I had was to adapt the Pihole container so that it would also include Tailscale and so that my Pihole machine would expose itself as a separate node, but doing that is above my knowledge, and on paper seems like a lot of work - there must be other, simpler ways? Somehow forwarding port 53 request on the Unraid host to the Pihole's container port 53? Many thanks for your insights! Alain
-
Hello! Update - the build is done! See here : Migrated to new server - update and report on final build, and thanks! - Hardware - Unraid
-
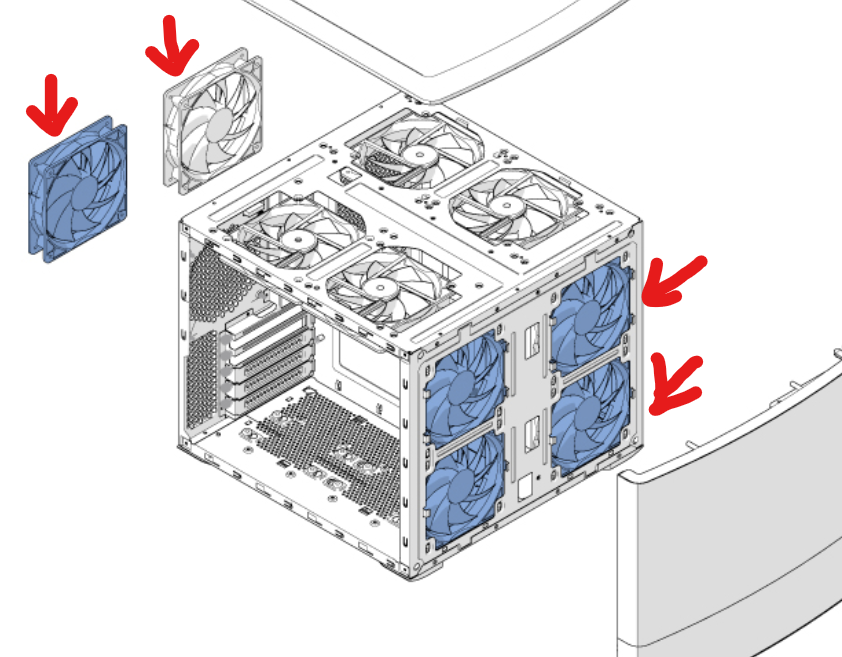
Dear community, Some weeks ago I posted for help and opinion on a new build to migrate my disks to, and I wanted to share the final build specs with you, also as a way of saying THANK YOU for all your constructive feedbacks! Eventually these are the parts I got and assembled: Case : Fractal Node 804 PSU : Corsair SF850L Mainboard : ASUS Rog Strix Z690-G Gaming Wifi CPU : Intel Core i5 13500 Memory : 2 x 16GB Corsair Vengeance DDR5 5600MHz CL36 CPU cooler : Noctua NH-U12S chromax.black Fans : 3 x Artic PWM PST RGB 120mm, 1 x Artic PWM PST RGB 140mm 3 sets of deleyCON SATA cables 2 x Kingston 2000 GB FURY Renegade PCIe 4.0 NVMe M.2 SSD (cache pool) 2 x Samsung SSD 860 EVO 2.5" SATA III 1TB (recovered from old rig) (docker containers, future VMs, other temp stuff) 2 x 8TB Seagate IronWolf HDDs (recovered from old rig) 2 x 8TB Toshiba MG06ACA HDDs (recovered from old rig) I replaced the fans that came with the Node 804 with the Artic ones, and got rid of the built-in "fan speed switch" of the case, planning to use "auto fan control" to do the job - and it works! The CPU fan, and the Artic 120mm sitting behind it on the right side of the case, are controlled directly by the BIOS based on CPU temperature. On the other side, I have 2 x 120mm fans in the front and 1 x 140mm in the back of the HDDs, and they are chained together using PST and plugged into one PWM header on the mainboard that allows auto fan control to ramp up and down the speed of the three fans according to HDD temp. This works really well, putting the drive fans to 0rpm when the drives are cooler than 30 °C, and ramping up to 50% of max RPM as temps rise but never go beyond 42 °C on any given drive. This is a perfect compromise of heat and noise for my use case. Note that the HDDs are set to spin down automatically after 30 minutes, and 90% of the time I have max 1 drive spun up so that the fans barely run at 20% of their max RPM. The only "noise" I can hear sitting 2 meters away is the one drive spinning... Getting auto fan control working was a bit of trial&error. I needed to install some additional drivers, and repeat the detection process a few times, but finally it just worked and Unraid detected the PWM controller. Sadly, I don't remember the sequence of my actions and would not be able to explain to someone exactly what I did 🤓. Anyway - it works. The machine is VERY powerful for my needs (mainly Plex, *arrs, and some home automation and network stuff). The CPU rarely breaks a sweat and comfortably sits at an average temperature of around 30°C. The Noctua CPU fan is inaudible. It's also a quite power efficient setup, with an average consumption of around 45 Watts, which translates in my country to around 11 euros of electricity cost per month. The only issue I had was that the mainboard needed a BIOS flash to support 13th gen CPUs, and I had to bring the computer to a very kind and efficient local computer shop who popped in a 12th gen CPU to flash the BIOS, for a very small fee. My next project is to find a way to change the RGB lighting of the 4 Artic fans based on the temperature of the disks (just for fun). Again, thanks to everyone who contributed to getting this (very nice to me) setup going! A. Update: here is a visual of my fan setup, the ones marked with a red arrow are the ones I replaced / installed. Blue = 120mm, white = 140mm. The disks are on the right side of the case, facing away from you.
-
Hallo! Spezifisch zum Node 804: ich habe vor ein paar Tagen ein relativ ähnliches Setup auf Basis des Node 804 gebaut, und bin sehr zufrieden mit meiner Wahl. Ich habe allerdings die mitgelieferten Lüfter durch Artic PWM PST 120mm und 140mm (respektive) ersetzt und ergänzt (siehe Bild unten). Ich habe auch das mitgelieferte Kontrollboard für Lüfterspeed (Min-Med-Max) rausgeschraubt da ich dies sowieso nicht nutzen wollte. Mein mainboard (ASUS Rog Strix Z690-G Gaming Wifi) unterstützt das "auto fan control" plugin und die 3 Lüfter auf Seite der Platten drehen unter Vollast der Platten (Parity check) mit maximal 50% der Drehzahl - fast nicht hörbar und die Platten werden nicht über 42°C heiss. Ich habe die RGB Versionen der Lüfter verbaut, so sieht es auch noch etwas "spannend" aus 🙂 Ansonsten ist dieses Case wirklich sehr einfach "bebaubar", sieht sehr schick aus, und ist qualitativ hochwertig. Kann ich nur empfehlen! Viel Spass und viel Glück bei deinem Projekt 💪

-
Hello, As a happy Unraid user, it regularly occurs that I want or need to publish the details of my rig. It would be great if there were a plugin (or app or tool...) that would automate the creation of a nice looking / nicely formatted "snapshot" of my rig, including the details of the hardware, drives, setup, installed apps, plugins, containers... and ideally the tool would allow me to select what sections, and what level of detail, I would like to share! This would be a big time saver, so as not to type this information over and over again. Yes, I could type it once and then copy&paste, but having a standardized / standardizing tool the output of which would always look the same would it also make easier for all fellow Unraiders to look at my, or others' systems. A.
-
So I do not need to worry about anything (re-assigning manually etc) but really just connect and power up and done (for that aspect) ?
-
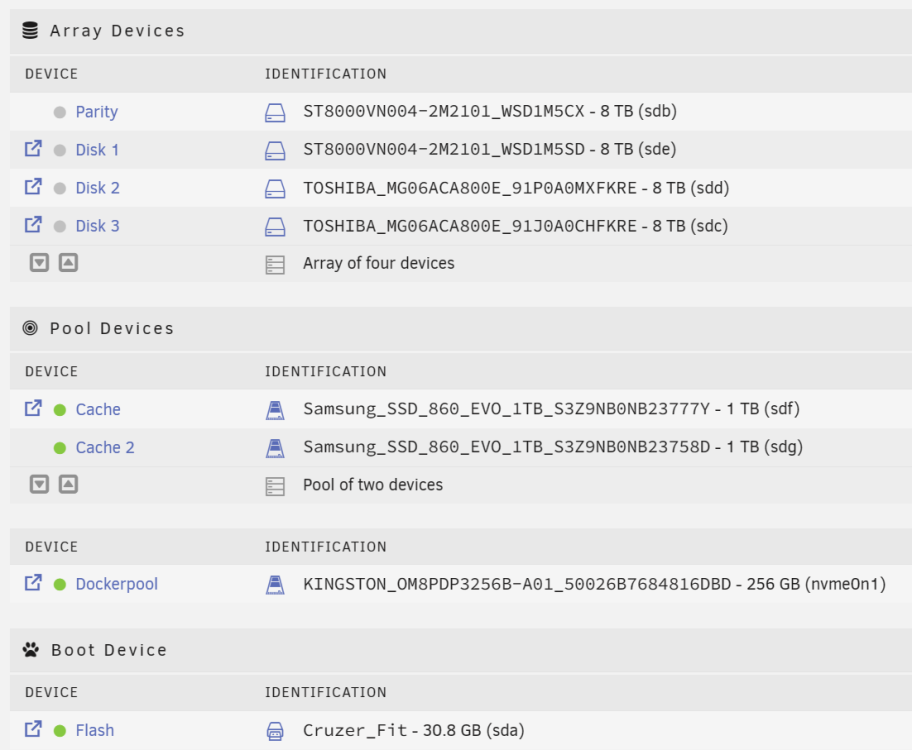
Hello, In the coming days I will finalize building my new rig for Unraid, and will need to move my disks over to that new machine and replicate my disk setup etc. I have read documentation and tutorials about how to proceed and just want to make sure I don't miss anything. Below is my current disk setup. The current shares The disks In my new rig, I will have an additional 2 x 2TB nvme drives that I plan to use as the new cache drives, replacing the above two Samsung SSDs. I plan to re-use those freed up 2 x 1TB SSDs to hold the data of what is currently "Dockerpool" above, to save the docker image and in the future possibly some VMs etc. So in the above, the Kingston nvme0n1 drive will effectively NOT be moved out of the old Unraid rig. My questions: To recreate the array without issues, I just have to make sure to re-assign the array disks by their ID to the correct slots once the disks have moved over to the new machine, right? To replace the cache drives, I will first have to change the cache preferences for all shares so that everything gets moved to the array disks with Mover, and once the disks are moved and the new 2 x 2TB nvme cache pool is ready in the new rig, change the cache preference settings again to what they were and run mover again in the new rig, correct? For the docker.img (residing on dockerpool above), the easiest seems to create the "dockerpool" pool in the new rig using the 2 Samsung SSDs that previously were the cache pool, re-create a fresh docker.img on there, and then use appdata backup and "reinstall previous apps" to recreate my docker containers and reapply all of the settings? This seems to be easier and quicker than trying to move/copy the original docker.img? Is there anything else I need to be aware of when moving my existing disks and setup over to the new rig? Many thanks!!
-
Am I wrong assuming that I wouldn't even need the sensors on the motherboard to control the fans based on the DISK temperatures? I could set a fan curve in the BIOS for some fans (CPU, some case fans) based on the board sensors, but then use autofan control to set other fans based on disk temps. So autofan control would need to know how to talk to the PWM controller on the board, but not read the temp sensors on the board....
-
Aaah, yes! Good catch, many thanks! It's also a bit cheaper, so double-win 🙂
-
Do you know where to find out about "compatible driver", knowing that my new mainboard will be an ASRock B660M Steel Legend?
-
Ah, well yes - for some reason when I used pcpartpicker on my phone I didn't get proper results. Tried again on the desktop now, and indeed found this mobo taht seems to tick all the boxes : ASRock B660M Steel Legend


