





Yousty
Members
-
Joined
-
Last visited
Everything posted by Yousty
-
Thank you!!! I updated my AMC input and output directories using storage as shown in the picture and move now works!

-
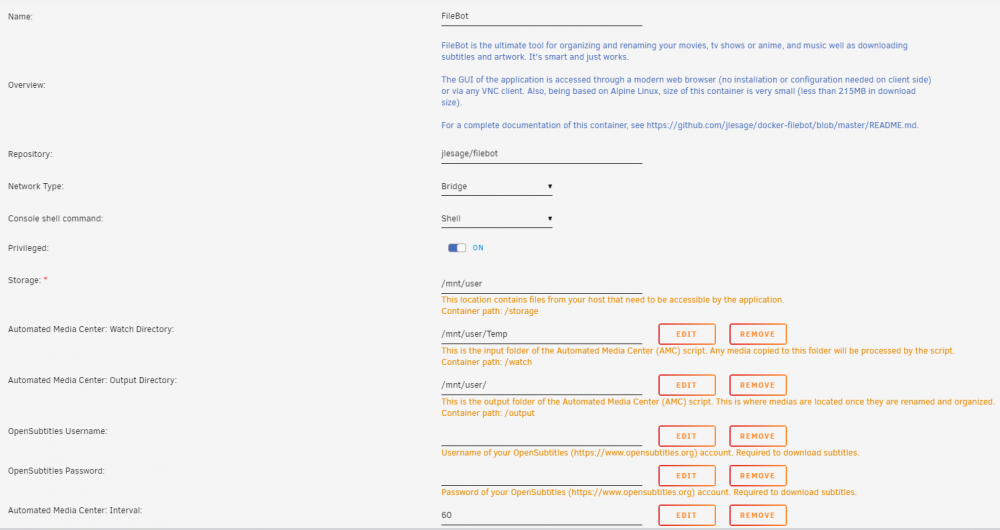
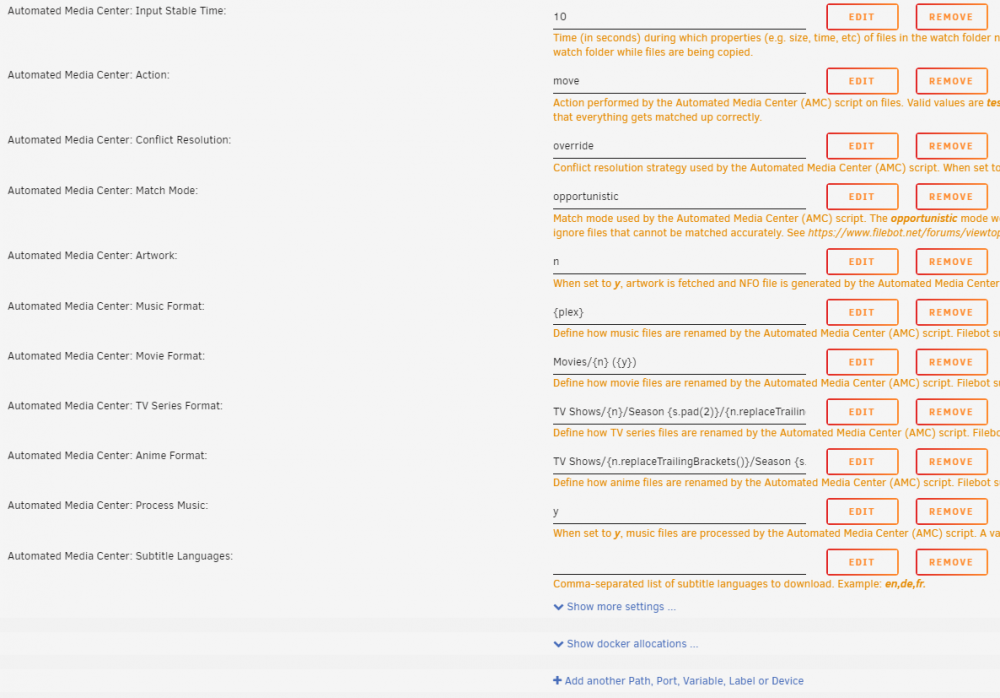
I'm hoping somebody can help. I have Filebot setup and working perfectly. I download files from my seedbox to a temp folder (mnt/user/temp) and then have AMC rename and move the files to where they belong (mnt/user/Movies or TV Shows) because I don't need the files in the temp directory after they're renamed/moved. However I've noticed using the move command requires reading and writing the entirety of the file, which seems odd to me since it's staying on the cache drive (until unraid's mover runs and moves the files to the array). Usually it's not that big of a deal but a lot of times I'm downloading 60GB files and that's a lot of unneeded wear and tear on the disk, not to mention time consuming. I've gone into Midnight Commander and manually moved a file from mnt/user/temp to mnt/user/Movies and it was instant so there must be something wrong in the Filebot docker permissions or setup that's causing it read/write the entirety of the file when it performs a move. I've attached pictures of my Filebot Docker setup

-
Actually the worst thing that can happen is frying the motherboard leads going to the CPU fan header due to high current draw, but the odds of that with only 3 fans total is pretty slim.
-
Yeah, I had thought of that but researching online several people warned not to use a splitter on the CPU fan header, but I think I'll go ahead and give it a try since I'm only going to be running 3 fans total off it (CPU, 120mm, and 140mm). Thanks!
-
Yes, the fan attached to my CPU will automatically adjust speed based on CPU temp, I was just hoping I could have my chassis fans adjust based on CPU temp as well.
-
I've got Dynamix Auto Fan Control working for my PWM chassis fans, but I was curious if it were possible to have it monitor and adjust based on CPU temp instead of HDD temps? The reason I ask is because my HDDs usually remain relatively cool but my CPU can get pretty hot when transcoding for Plex so it would be nice to have the chassis fans ramp up based on that instead of HDD temps. Thank you and sorry if this has been asked before!
-
I changed my syslinux.cfg file in the flash\syslinux folder to the following and rebooted but it didn't seem to help default menu.c32 menu title Lime Technology, Inc. prompt 0 timeout 50 label unRAID OS menu default kernel /bzimage append initrd=/bzroot label unRAID OS GUI Mode kernel /bzimage append initrd=/bzroot,/bzroot-gui cx23885.debug=5 label unRAID OS Safe Mode (no plugins, no GUI) kernel /bzimage append initrd=/bzroot unraidsafemode label unRAID OS GUI Safe Mode (no plugins) kernel /bzimage append initrd=/bzroot,/bzroot-gui unraidsafemode label Memtest86+ kernel /memtest label Xen/unRAID OS kernel /syslinux/mboot.c32 append /xen --- /bzimage --- /bzroot label Xen/unRAID OS Safe Mode (no plugins) kernel /syslinux/mboot.c32 append /xen --- /bzimage --- /bzroot unraidsafemode
-
What's the best way to erase all my EPG grabber settings and start fresh? I had Schedules Direct working but then I was messing around in Kodi and accidentally changed my Schedules Direct default lineup and then my EPG in TVH stopped working. I have tried re-running the Schedules Direct setup in TVH from the beginning but I'm still not getting any EPG data. I even tried deleting all the mapped channels in the EPG Grabber Channels tab but nothing shows up anymore when I force an internal grabber run.
-
Nevermind, I figured it out! I had to go to the Channels tab and map each channel to the correct sdjson value in the EPG Source column like so: Thanks for your help, saarg! Merry Christmas everyone!
-
Well I think I did everything correctly, but for some reason it's not pulling data from Schedules Direct. I ran the command instructed on github and used all the default responses: root@NAS:~# docker exec -it -u abc tvheadend /usr/bin/tv_grab_zz_sdjson --configure Name "Params::Validate::NO_VALIDATION" used only once: possible typo at /usr/bin/tv_grab_zz_sdjson line 238. Cache file for lineups, schedules and programs. Cache file: [/config/.xmltv/tv_grab_zz_sdjson.cache] If you are migrating from a different grabber selecting an alternate channel ID format can make the migration easier. Select channel ID format: 0: Default Format (eg: I12345.json.schedulesdirect.org) 1: tv_grab_na_dd Format (eg: I12345.labs.zap2it.com) 2: MythTV Internal DD Grabber Format (eg: 12345) Select one: [0,1,2 (default=0)] As the JSON data only includes the previously shown date normally the XML output should only have the date. However some programs such as older versions of MythTV also need a time. Select previously shown format: 0: Date Only 1: Date And Time Select one: [0,1 (default=0)] Schedules Direct username. Username: ******* Schedules Direct password. Password: ******* ** POST https://json.schedulesdirect.org/20141201/token ==> 200 OK (1s) ** GET https://json.schedulesdirect.org/20141201/status ==> 200 OK ** GET https://json.schedulesdirect.org/20141201/lineups ==> 200 OK This step configures the lineups enabled for your Schedules Direct account. It impacts all other configurations and programs using the JSON API with your account. A maximum of 4 lineups can by added to your account. In a later step you will choose which lineups or channels to actually use for this configuration. Current lineups enabled for your Schedules Direct account: #. Lineup ID | Name | Location | Transport 1. USA-OTA-46077 | Local Over the Air Broadcast | 46077 | Antenna Edit account lineups: [continue,add,delete (default=continue)] Choose whether you want to include complete lineups or individual channels for this configuration. Select mode: [lineups,channels (default=lineups)] ** GET https://json.schedulesdirect.org/20141201/lineups ==> 200 OK (1s) Choose lineups to use for this configuration. USA-OTA-46077 [yes,no,all,none (default=no)] Select the channels that you want to receive data for. root@NAS:~# Then I enabled that module and disabled OTA ATSC Grabber like so: And it appears to have automatically correctly mapped everything according to this tab: But then no data is showing in the EPG in tvheadend or in Kodi. Any suggestions on what I may be doing wrong or step I missed? Yeah, I used that for awhile but I always found the data to be lacking and not always correct. To me Schedules Direct is worth the $20 per year.
-
I think I finally figured it out. First off, I deleted the PVR setup in Plex but I forgot to remove the dvb passthrough parameter from the docker so thank you for that advice! Secondly when doing initial network scan I had to only use 1 ATSC-T tuner, for some reason if I used multiple tuners it would fail, so I now have all the channels listed! Now my next question, I am a complete novice when it comes to linux and tvheadend (I was using nextPVR with schedules direct on Windows before). Is there a good step by step guide anywhere for how to setup an EPG grabber for tvheadend in unraid?
-
I'm hoping somebody here can help me out because I've been trying all day with no luck. I live in Indianapolis and I'm trying to setup TVHeadEnd for the first time to get my OTA channels, but for some reason it won't scan my local ATSC-T channels. I think I've setup everything correctly with my Hauppauge quadHD but whenever I perform a scan it doesn't find any channels. I know it should be able to see all the channels because I setup the DVR in Plex and it found 35 channels and they streamed fine.
-
My server running 6.3.5 currently has an uptime of 112 days and I haven't changed anything recently and then out of the blue when I tried to access it tonight I'm getting the following popup in webui: It gives me the option to Install or Dismiss. If I choose Install, I get the following output: If I click Dismiss I just get the top bar with the Dashboard, Main, Shares, etc. tabs but nothing shows below them and if I click on any of the tabs I just get the Install Statistics Plugin popup again. I can still access all of my shares via Windows Explorer but I can't access anything over webui. Can somebody please help?
-
I'm having the same problem as tabish121. I was preclearing an 8TB Seagate and it went perfectly through the pre-read and zeroing and then at 95% of the post-read it just stopped and the timer is frozen at 15:09:01 and now unraid shows the disk as spun down. I also noticed that 1 core of my 8 on the cpu is maxing out at 100%. Here is the preclear log: Jul 12 18:03:09 preclear_disk_Z840ZW8W_1465: Command: /usr/local/emhttp/plugins/preclear.disk/script/preclear_disk.sh --notify 2 --frequency 3 --cycles 1 --no-prompt /dev/sdh Jul 12 18:03:09 preclear_disk_Z840ZW8W_1465: Preclear Disk Version: 0.8.9-beta Jul 12 18:03:09 preclear_disk_Z840ZW8W_1465: S.M.A.R.T. info type: default Jul 12 18:03:11 preclear_disk_Z840ZW8W_1465: Pre-Read: dd if=/dev/sdh of=/dev/null bs=2097152 conv=notrunc,noerror iflag=direct Jul 12 18:03:11 preclear_disk_Z840ZW8W_1465: Pre-Read: dd pid [2776] Jul 13 08:59:20 preclear_disk_Z840ZW8W_1465: Pre-Read: dd - read 8001565319168 of 8001563222016. Jul 13 08:59:20 preclear_disk_Z840ZW8W_1465: Pre-Read: 0 Jul 13 08:59:21 preclear_disk_Z840ZW8W_1465: Zeroing: ionice -c 3 dd if=/dev/zero of=/dev/sdh bs=2097152 seek=1 conv=noerror,notrunc oflag=direct Jul 13 08:59:21 preclear_disk_Z840ZW8W_1465: Zeroing: dd pid [4556] Jul 13 13:24:00 preclear_disk_Z840ZW8W_1465: hdparm exec_time: 1s Jul 13 13:27:45 preclear_disk_Z840ZW8W_1465: hdparm exec_time: 1s Jul 13 13:28:07 preclear_disk_Z840ZW8W_1465: hdparm exec_time: 1s Jul 13 13:30:17 preclear_disk_Z840ZW8W_1465: smartctl exec_time: 1s Jul 13 13:46:07 preclear_disk_Z840ZW8W_1465: hdparm exec_time: 1s Jul 13 16:00:50 preclear_disk_Z840ZW8W_1465: smartctl exec_time: 1s Jul 13 22:24:21 preclear_disk_Z840ZW8W_1465: hdparm exec_time: 1s Jul 13 23:50:11 preclear_disk_Z840ZW8W_1465: Zeroing: dd - wrote 8001563222016 of 8001563222016. Jul 13 23:50:12 preclear_disk_Z840ZW8W_1465: Zeroing: 1 Jul 13 23:50:17 preclear_disk_Z840ZW8W_1465: Post-Read: dd if=/dev/sdh bs=512 count=4096 skip=1 conv=notrunc,noerror iflag=direct Jul 13 23:50:17 preclear_disk_Z840ZW8W_1465: Post-Read: dd pid [8746] Jul 13 23:50:17 preclear_disk_Z840ZW8W_1465: Post-Read: dd if=/dev/sdh bs=2097152 skip=1 conv=notrunc,noerror iflag=direct 2>/tmp/.preclear/sdh/dd_output | cmp - /dev/zero &>/tmp/.preclear/sdh/cmp_out Jul 13 23:50:17 preclear_disk_Z840ZW8W_1465: Post-Read: dd pid [8811]
-
Sorry, I guess I wasn't entirely clear in my previous question. There are 3 big steps to a preclear: 1) Pre-read 2) Zero 3) Post-read. For the first cycle it went through all 3 steps and took ~19 hours per step. However on the 2nd cycle it completely skipped the pre-read step and went straight to the zeroing step. Is that normal behavior when running multiple cycles? (I don't know because I've never run more than 1 preclear cycle at a time)
-
I'm currently running a 3 cycle faster preclear on a Seagate 8TB drive using this plugin, and it's in the middle of the 2nd cycle but I noticed that it skipped the pre-read step and went straight to zeroing the disk as step 1, is this normal? I didn't tick the skip pre-read option box in the plugin and it ran pre-read for the 1st cycle. ================================================================== 1.15b = unRAID server Pre-Clear disk /dev/sdi = cycle 2 of 3, partition start on sector 1 = = Step 1 of 10 - Copying zeros to first 2048k bytes DONE = Step 2 of 10 - Copying zeros to remainder of disk to clear it = **** This will take a while... you can follow progress below: = = = = = = = = Disk Temperature: 32C, Elapsed Time: 63:39:26 1838795+7 records in 1838795+7 records out 3856240254976 bytes (3.9 TB) copied, 23631 s, 163 MB/s Wrote 3,856,240,254,976 bytes out of 8,001,563,222,016 bytes (48% Done)
-
I'm currently running this process but it doesn't seem to be removing the source files off of disk1 after they're transferred to disk6. Is that something it does as each file is copied or does it wait until all the files have transferred and then do a compare before deleting all the files in succession? Edit: Nevermind, it's deleting the files off disk1 now, it just seems to be on a ~10 minute delay after the file has been transferred.


