





Uncle09
Members
-
Joined
-
Last visited
-
Hi, thanks at least a good solution for now 🙂
-
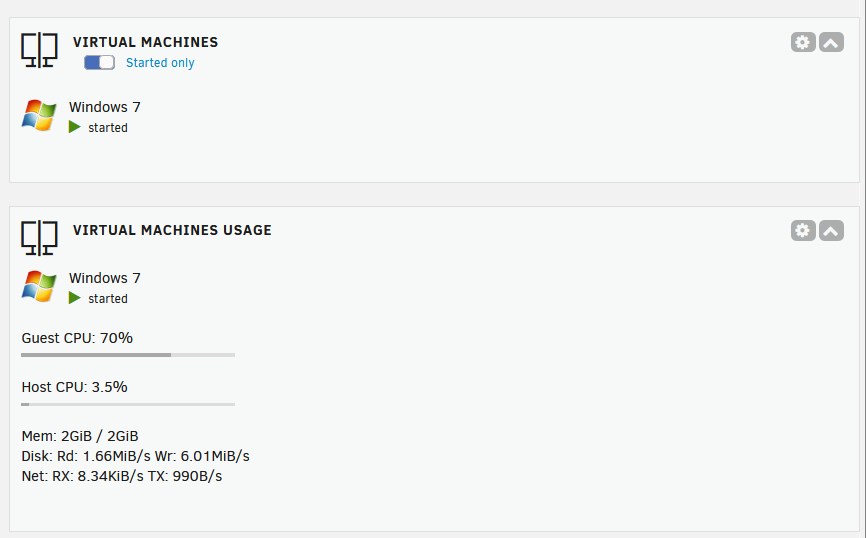
Yes, but I mean if you enable the Virtual Machines Usage Window it looks like:
-
Hi, I like to have in the dashboard view the same nice overview for started docker containers like we have for the VM with the virtual machine usage window.
-
Hi, I like to update my dockers except one or two. So I can not use the update all feature and must select every single docker to update. If there is a xhoice button behind each docker lets say like the autosart button, it ould be much easier.
-
yeah that should work at least. But I would love to see a sound passthrough also for dockers 🙂
-
Hi, my case do differ a little. My Mainboard has on onboard soundcard. So I would like to know if its possible to use it with lets say an firefox docker build, to stream videos with sound from youtube etc. Sorry for not making this clear in my first post.
-
Hi, any news on this ? I would like to have a Firefox Docker with sound available on guest system. (Youtube, etc.)
-
Some handlings: - Restart s world: the easiest and fastest way to restart/start with new world is deleting the world folder in Appdata. - update Version: I had problems with the update to A21, I guess it is because of different serverconfig.xml parameters. So I deleted everything and installed new. - add webui to Docker Icon: - activate docker advanced view (upper right corner), then add to Line WebUI: http://[IP]:[PORT:8080]/ - stay at fixed Version of 7dtd due to Mod: in the docker config under Game_ID: use fix Version like "294420 -beta stable_alpha19.4" m
-
Hi, what is the easiest and fastest way to restart/start with new world ? Deleting the world folder in Appdata ? Thanks for a hint
-
Part 2: Another Server-Docker now with Mod: Now I tried to bring up another Docker Server of7dtd - but this time with a Mod installed. My Choice was undead legacy. (https://ul.subquake.com/) This Mod is awesome ! Thanks to subquake for this !! Read: https://meadowrockalpacas-com.ngontinh24.com/article/7-days-to-die-undead-legacy-user-s-guide Due to same usage of the ports, you can run only one of those 2 dockers on the same IP at the same time. Lets get startet. Server: 1. Reinstall the Docker with the same template used before (Add Container/select Template), but adjust at least the name and the ServerFiles: path so it will not install over your origin installation and add 2 more variables (Add another Variable): 2. you have to add a Bepinex ( Name: BepInEx, Key: ENABLE_BEPINEX, Value: true) and doorstop (Name: Doorstop, Key: DOORSTOP_CORLIB_OVERRIDE_PATH, Value: /serverdata/serverfiles/BepInEx/core) 3. copy the content of the 7dtd folder made before intothe new created folder 4. make a Folder named Mods 5. copy the content of the downloaded Mod (in my case undead legacy) into the Mods folder of the new Docker. 6. I had to turn off EAC on the server side (serverconfig.xml) = <property name="EACEnabled" value="false"/> If you like Alloc`s Mod too, just do it the same way like mentioned for the original 7dtd docker. Same with CSMM - but keep in mind, you can not use the same ip for 2 csmm servers. I solved it with another duckdns adress. PC: U can chose to do the Mod install manually or using auto by using the ModLauncher from the download page of undead legacy. (https://community.7daystodie.com/topic/4085-subquakes-undead-legacy/page/116/) The idea is: - copy your installed folder of 7dtd (in my case the steam game folder of 7dtd), merge the Mod into Mods folder and to switch of EAC. then start 7dtd-UL via the 7dLauncher.exe and turn of ECA - search for your new server - join - play - thats it. otherwise Error "NullReferenceException: Object Reference Not Set To An Instance Of An Object" will pop up!!
-
Hi ich777, if I decide to run 2 server containers of the same game, I just give the new one another name and adjust the ports ? Will this work ?
-
Hi, yes I joined, but I did not realized that this question have to be asked not here, becaus ich777 did the container. But now I will 🙂
-
Hi ich777, last question 🙂 CSMM asks me to enter in the add a server window to fill in an authorization name and an authorization token, to set this with telnet command. I know telnet, but I am not able to do this. I gues it must be done at the 7DtD Server. But how ? Telnet, local XML, Docker console, Ingame Console ? Thanks for the hint.
-
Hi ich777, may I aske you one more thing ? I can open the console of your 7DtD Server and your CSMM-7DaystoDie. But I can not Login. You mentioned the Login is Docker and adminDocker ? But do not work for me. My Login looks like: 9223daxxxxxx login: Maybe I changed something ? Do you have any idea where to look, or what is wrong ? Thanks
-
Hi to all, after a lot of work and collecting all the information, it was even for me possible to get a 7DtD dedicated Server running, including Alloc`s Mod and CSMM managing. So according I like to share my experience to keep it simple for someone else and of course for myself, if I have to reinstall it one day, for some reason 🙂 So first of all, a lot of thanks for the people who showed a lot of patience with me and helped me out, like ich777 from this Forum Catalysm via the Discord chanel. I hope it is o.k. to collect here all the information from your work. Otherwise let me know. o.k. lets start: 1. Install in unraid via Apps "7daystodie" from ich777 and check if it is running and working (need one run, to build all folders) I did not change any settings in the XML File ! Discription: https://github.com/ich777/docker-csmm-7dtd Forum: //forums.unraid.net/topic/79530-support-ich777-gameserver-dockers/ This takes some minutes (about 40) , check Log File - stops several times, then shows update states - counting. (waiting for client config...ok ----- takes long, then update state downloading progress 0 till 100) It is finished if it shows found path:/serverdata... add in the template with advanced view enabled in WebUI: http://[IP]:[PORT:8080] After that, you can check if the Server is running well also with the unraid IP and the port. (TCP2 - Web base control: Container Port 8080) takes some minutes after docker start till available. if you changed ports in the script, you have to change also the port in serverconfig.xml. !!! Also you must set ControlPanelEnable to "true", Check ControlPanelPort and set a ControlPanelPassword. !!! In my Case and if you did not change the port something like: 192.168.1.200:8080. you should see a Login screen. There is no password set. How to use the server's own dashboard on 7 Days to Die: for the new 7dtd integrated dashboard: To get access to the dashboard, you first have to become an admin on the server. How you can do that is described here: How to become an admin . If you are admin on your server, start your server and connect to it. Then open the console with [F1] and type: createwebuser Click OK in the message that appears. Now enter a user name and password. Tip: Write down your credentials as the password is saved in encrypted form. You can now view the server’s console and a live map of the areas you have already explored. 2. have a look where in unraid your appdata folder is. In there is now also the folder 7dtd. Create there a new folder "Mods" 3. Download latest build from Alloc`s Mod from https://7dtd.illy.bz/wiki/Server fixes#Download. I unpacked the server_fixes.tar.gz and the new file server_fixes.tar until you see a normal folder. in there is a folder Mods. copy the contend into the created Mod folder on your unraid server (point 2) Discription: https://docs.csmm.app/en/csmm/allocs.html#determine-whether-alloc-s-server-fixes-is-already-installed Adjust the Admin rules in \Saves\webpermissions.xml 4. check if the Mod is working too. So restart 7dtd server and open in Webbrowser your IP with port 8082 You should see now the a screen of Alloc`s Map Mod. If the map or anything else is missing, adjust webpermissions ! only admin with permission 0 can access the webmap. Make also shure, that in file serverconfig.xml the settings were made for: <!-- Admin interfaces --> <property name="WebDashboardEnabled" value="true"/> <property name="WebDashboardPort" value="8080"/> <property name="WebDashboardUrl" value=""/> <property name="EnableMapRendering" value="true"/> If this all works so far, your dedicated server is running well 🙂 To Logon in Vanilla Version of 7dtd the EAC must be switched on in the clients, otherwise Error "NullReferenceException: Object Reference Not Set To An Instance Of An Object" will pop up 5. Now you can edit the serverconfig.xml with an editor (Notepad++ is nice) in your Unraid/appdata/7dtd/ folder. (Description of Server Configuration here: https://www.gameserverkings.com/knowledge-base/7-days-to-die/7d2d-new-user-guide/ or here direct from Valve: https://developer.valvesoftware.com/wiki/7_Days_to_Die_Dedicated_Server Now comes the CSMM Docker Part of ich777. SO far as I know it is based on vinanrras work. Thanks both. Forum: //forums.unraid.net/topic/79530-support-ich777-gameserver-dockers/ Discription: https://hub.docker.com/r/ich777/csmm-7dtd what is CSMM: https://csmm.app/ This is what it looks like: https://community.7daystodie.com/topic/5797-csmm-cloud-hosted-server-manager/ 1. we have to setup the DYNDNS and reverse proxy. This guide helped me much: https://7dac.net/hosting-csmm-on-an-unraid-server/ it is easy, but very important to create a new variable CSMM_ADMINS in your CSMM XML . I used as Domain Name my duckdns from point 2 here. ( xxx.duckdns.org) 2. Download and install on your unraid server the CSMM of ich777. (search under Apps csmm 7dtd) you have to fill in: - Hostname created under 1. (in my case somthing like https://xxxxxxxxxxxxxxxxxx.duckdns.org - Steam API Key: (you can get it from: https://steamcommunity.com/dev/apikey ) - CSMM_ADMIN: (like created in 1.) Enter your steamID starting with 765.... 3. After that and if all worked without a problem, you should see after starting CSMM with the Port given in my case: http://192.168.1.200:1337/ the CSMM Login screen. 4. follow the instructions for Login in your steam account and finaly you should see your server list. 5. Add CSMM Server with + and fill in all required data as discribed. (https://docs.csmm.app/en/csmm/installation.html#video-tutorial open the ingame console while playing 7DtD with Key F1. Enter the following command to set up a web token: webtokens add <name> <token> 0 Replacing <name> with your desired token name. Replacing <token> with your desired token. Don’t forget the 0 at the end! It’s important CSMM has privilege 0 to ensure all functions can properly work. 6. forward required Ports in your Internet router to your unraid server https://7dtd.illy.bz/wiki/Ports howto: https://portforward.com/7-days-to-die/ 7 Days to Die - Steam: TCP: 8080-8081, 26900, 27015, 27036 UDP: 26900-26902, 27015, 27031-27036 it was for me the easiest way, to get it running. for Germans Fritzbox user: https://technium.ch/fritzbox-portfreigaben-einfach-einrichten/ Now everything should work fine. Hardware recommanded: CPU: AMD or Intel (2 Cores) from 2,4 Gigahertz for 1–4 player; 3 Gigahertz for 5–16 player RAM: 3–4 Gigabyte for 2–4 player; 8 Gigabyte for 5–16 player I do have a Intel® Xeon® W-1290P CPU @ 3.70GHz and game cpu core load is with 6 players around 5% 🙂 Important is RAM and fast cache (SSD or even better NVME) If you like to improve FPS, check this page: https://7daystodiewiki.com/fps-fix-for-7-days-to-die/ Best regards, Uncle09

