elmuziko
Members
-
Joined
-
Last visited
-
I'm posting this here because I couldn't find anything with 100% clarity of how to get AdventureLog onto Unraid. This is the closest official guide I could find but the PostGIS bits were missing crucial details that could leave people scratching their head. In my scenario I am exposing Adventure Log to the internet and therefore a lot of the variables around URL's are domain addresses. The guide below exposes AdventureLog to the internet but keeps the admin console on your home network. I think I like it this way. I will try and expose it to the internet so I can add to this post, but since i use WireGurd to remote back home when out of the house, this feels way more secure. For this guide I am assuming my UNRAID server is 10.0.0.18 on my network. Assumptions You've clicked AdventureLog --Backend and it's told you you need PostGIS. So you've installed PostGIS, then tried AdventureLog again and variables don't align. You were never asked to provide: Database - Name Database - User If you were to click the official guide, it tells you explicitly to use repo: postgis/postgis:15-3.3 So now you've gone back into the PostGIS container, changed the repo to the above, and now PostGIS won't start. If you look at the logs, you'll see you've installed a new version, then tried to blast with an old version, and it just doesn't like it. Now you're stuck. It's because of the above assumptions I'm writing this guide. I am not affiliated with PostGIS or AdventureLog. I just wanted the damn thing working as it looked cool. Word of caution. I'm gonna do a purge of dangling docker images and volumes. I'm not responsible for you knackering your Unraid/Docker server. It's perfectly safe to run the commands I'm using, but heed with caution. It's also perfectly safe to skip this step IF you rename your PostGIS install from the default setting. Clean your Docker Containers Remove PostGIS, and tick the box to remove the image. Click Add Container in the bottom left, find PostGIS in the list of existing templates and press the X to remove it. Navigate to Appdata and if PostGIS folder exists, delete it Open a Terminal window and type the following commands docker image prune -af docker volume prune -f You're now back to square one and can install PostGIS as per the official guide without issue. Docker Network If you've not created a custom Docker Network, use this command from the terminal (changing IP's accordingly) docker network create \ --driver=bridge \ --subnet=192.168.100.0/24 \ --gateway=192.168.100.1 \ adventurelog PostGIS Install The official guide says to use repo: postgis/postgis:15-3.3 That looks pretty old but I'm not here to question our dark overlords so lets do thy bidding. Hit up the APPS tab, find PostGIS and click install. Change the Repository to postgis/postgis:15-3.3 You'll notice you're still missing the extra variables, we'll get them in a mo. Install PostGIS as per the official guide. Make sure to pick a custom network. Once the install is done, fire up Terminal. Type docker exec -it PostGIS psql -u postgres (where PostGIS is your docker container name) Type \l You'll see a database called template_postgis. To spawn a new database from this template, type : CREATE DATABASE adventurelog TEMPLATE template_postgis; Now you have a list of databases and your missing variables. Database - User = postgres Database - Name = adventurelog AdventureLog---Backend Install With PostGIS installed successfully, you have the ammo you need to install AdventureLog---Backend now, but the chances are you're still gonna be slightly confused with a few variables. Here's a little helper for the requirements. Network Type Ensure you've set this to the same as PostGIS Database - Host This is the name of the container PostGIS. The default is likely going to be PostGIS Database - Name Assuming you've followed the instructions above, this is going to be adventurelog Database - User The default user based on the PostGIS install is postgres Database - Password This is what you used during the install of PostGIS Secret Key This can be anything you want Admin Username This can be anything you want that you're not likely to use as a standard user Admin Email Only one email per user so don't use an address you plan to set up for your standard account Admin Password Self explanatory Public URL So this one tripped me up. It's taken me countless hours, arguments with ChatGPT and many, many clicks in different Discord threads to get this working. This is the IP address of my UNRAID server plus the port number of this docker container. Example: http://10.0.0.18:8015 Frontend URL This is the IP address of your AdventureLog---Frontend install. If you have assigned an address within the docker container, this works. Or you can use your UNRAID public IP with port 8015 Example 1: http://192.168.100.25:8015 (where 192.168.100.25 is my docker container IP for frontend Example 2 http://10.0.0.18:8015 (my IP address for UNRAID) CSRF Trusted Origins: Throw every URL you've added so far in here. Plus your exposed https address. Separate each by a comer. Example: https://adventurelog.mynetgear.com,http://192.168.100.25:8015,http://10.0.0.18:8015,http://10.0.0.18:8016 Above breakdown: Exposed address, docker container + port for frontend, UNRAID IP + port for frontend, UNRAID IP + port for backend AdventureLog---Frontend Install This one is a little easier but the variables still aren't as obvious/explained as they could be. Public Server URL This is the name of your backend Docker + :8000 Example: http://AdventureLog---Backend:8000 Origin This should be your exposed address. Example: http://adventurelog.mynetgear.com Caveats I can't for the life of me log in with the local IP address. I get the login page, but I can't actually log in (no errors, but nothing happens). I'm ok with using my public facing https address so this is small fry. Immich Integration I'll update this when I get it working. No matter what options I set on my Immich API I get a "warning. Permissions shouldn't be empty"
-
Thank you for the response. I was hoping (but accept) no wasn't the answer. I made the mistake of asking ChatGPT for some raid help a month ago that cost me a disk worth of data. Even though - as you say - there's the extra protection with are you sure?, still very nervous about data loss again so was hoping to add another layer. As you say though, extra care at all times. Thanks
-
Wow, Frank, you seem angry. I'm doing a data migration of countless files and folders so it's entirely plausible something slips through the cracks. One folder, two folder, sure. Easy to spot. But not as easily when it's twenty, thirty. Please don't misunderstand, I'm not suggesting a bug/coding change. Far from it. I just want to see if there's any chmod level of permission sets that would prevent the gui log on account from being able to delete files from shares. Maybe a second account with read only permissions, or is a recycle bin setting I've not come across before.
-
Is that a thing? I use SHARES to do all my folder management stuff and it would be so easy for me to accidentally tick the wrong folder and hit delete. I use a plugin called Recycle Bin but it only captures samba deletions. Are there any permissions I can set to prevent my webGUI login from being able to delete folders? Ideally the only way I can shift them would be through the terminal? Or even perhaps give Sonarr/Radarr access only to delete files/folders in the media folder.
-
Hello again. Could do with some further help if that's ok. I've now bought a Thunderbolt device. An OWC ThunderBay 8. dmesg | grep -i thunderbolt [ 12.213797] ACPI: bus type thunderbolt registered [ 511.431435] thunderbolt 0-0:1.1: new retimer found, vendor=0x8087 device=0xd9c [ 512.193274] thunderbolt 0-1: new device found, vendor=0x5a device=0xde78 [ 512.193277] thunderbolt 0-1: Other World Computing ThunderBay 8 The only scenario I've managed so far where the thunderbay's disk show up (only in unassiged devices, not as an option in the array), is to turn off both unraid and thunderbay, unplug thunderbay, turn on unraid, wait until I can run terminal, plug thunderbay in, then run echo 1 > /sys/bus/pci/rescan - at whicn point it shows up as an unassigned device. Any ideas on how to get unraid to spot it at the point of powering on? I have ACTION=="add", SUBSYSTEM=="thunderbolt", ATTR{authorized}=="0", ATTR{authorized}="1" in 99-local.rules already. I've also tried this script #!/bin/bash LOGFILE="/boot/config/thunderbolt_log.txt" echo "--- $(date): Starting Thunderbolt init ---" >> "$LOGFILE" DEVICE_PATH="/sys/bus/thunderbolt/devices/0-1" # Wait for the Thunderbolt device to appear for i in {1..30}; do if [[ -d "$DEVICE_PATH" ]]; then echo "Device found at 0-1" >> "$LOGFILE" # Check if already authorized AUTH=$(cat "$DEVICE_PATH/authorized") if [[ "$AUTH" -eq 1 ]]; then echo "Already authorized" >> "$LOGFILE" else echo 1 > "$DEVICE_PATH/authorized" 2>>"$LOGFILE" || echo "Failed to authorize device" >> "$LOGFILE" fi break fi echo "Waiting for device... ($i)" >> "$LOGFILE" sleep 1 done # Rescan PCI to detect drives echo 1 > /sys/bus/pci/rescan echo "Rescanned PCI" >> "$LOGFILE" echo "--- Done ---" >> "$LOGFILE" running as a scheduled task "At First Array Start Only" with no joy. EDIT: I ran FORMAT from Unassigned Disk Devices to see if that would make it show up in ARRAY. It hasn't. I followed my own instructions and rebooted/plugged in. It's back in unassigned devices with FORMAT as an option text error warn system array login Jul 2 15:37:39 Node304 kernel: ata13: SATA max UDMA/133 abar m8192@0x86010000 port 0x86010100 irq 209 lpm-pol 0 Jul 2 15:37:39 Node304 kernel: ata13: SATA link up 6.0 Gbps (SStatus 133 SControl 300) Jul 2 15:37:39 Node304 kernel: ata13.00: ATA-10: TOSHIBA HDWG31G, 0601, max UDMA/133 Jul 2 15:37:39 Node304 kernel: ata13.00: 31251759104 sectors, multi 16: LBA48 NCQ (depth 32), AA Jul 2 15:37:39 Node304 kernel: ata13.00: Features: NCQ-prio Jul 2 15:37:39 Node304 kernel: ata13.00: configured for UDMA/133 Jul 2 15:37:39 Node304 kernel: sd 13:0:0:0: [sdf] 31251759104 512-byte logical blocks: (16.0 TB/14.6 TiB) Jul 2 15:37:39 Node304 kernel: sd 13:0:0:0: [sdf] 4096-byte physical blocks Jul 2 15:37:39 Node304 kernel: sd 13:0:0:0: [sdf] Write Protect is off Jul 2 15:37:39 Node304 kernel: sd 13:0:0:0: [sdf] Mode Sense: 00 3a 00 00 Jul 2 15:37:39 Node304 kernel: sd 13:0:0:0: [sdf] Write cache: enabled, read cache: enabled, doesn't support DPO or FUA Jul 2 15:37:39 Node304 kernel: sd 13:0:0:0: [sdf] Preferred minimum I/O size 4096 bytes Jul 2 15:37:39 Node304 kernel: sd 13:0:0:0: [sdf] Attached SCSI disk Jul 2 15:37:41 Node304 emhttpd: online: TOSHIBA_HDWG31G_Z3H0A00QFX0G (sdf) 512 31251759104 Jul 2 15:37:41 Node304 emhttpd: read SMART /dev/sdf Edit no 2. OK. So I've managed to get the disk in the array. It took 18 hours to clear (a second time), then formatted, then brought the array online. I then shut the server down and brought it back up. ThunderBay is missing. echo 1 > /sys/bus/pci/rescan does nothing. I shut down. Remove Thunderbay. Turn back on. Wait until system is settled. I then run echo 1 > /sys/bus/pci/rescan and the drive shows up in unassigned for a split second before disappearing. I wait for 30 seconds, then add an extra slot to the array, forcing the missing disk(s) to show up where it's expected. I have tested spin down on it, let it sleep then wake it up. No drop offs. This isn't ideal. I would like to be able to boot Unraid with it plugged in, but beggers can't be choosers.
-
I've done some more digging and found the Terramaster D3 uses the HighPoint RocketRAID 2720 controller, which on further research doesn't play friendly with Unraid. Sent the damn thing back. Thank you all for being super quick on this one.
-
@maxandcheese Thank you for the insanely fast response. I have just noticed I've been blindy editing 99-persistent_unassigned.rules There is no 99-local.rules in /etc/udev/rules.d I created one with just: ACTION=="add", SUBSYSTEM=="thunderbolt", ATTR{authorized}=="0", ATTR{authorized}="1" I saved it in both /etc/udev/rules.d and /boot/config/udev/ before editing go. Sadly, still nothing. Other things I've done is plug the TerraMaster into a windows machine and changed the setup to JBOD. I can't find anything in the BIOS about Thunderbolt security. I have TPM enabled.
-
@Marshalleq Or anyone else for that matter. I did a lot of research - albeit I've now discovered too much on chatGPT, and bought a Terramaster Thunderbolt 3 TDAS system to work on my ASRock B860I Lightning WiFi motherboard, supporting Thunderbolt 4 natively. Unraid doesn't see drives from the off. Below are two lines from: dmesg [ 14.057230] thunderbolt 0-1: new device found, vendor=0x1bf device=0x1 [ 14.057247] thunderbolt 0-1: TerraMaster Thunderbolt 3 TDAS lspci | grep -i thunderbolt 00:07.0 PCI bridge: Intel Corporation Meteor Lake-P Thunderbolt 4 PCI Express Root Port #0 (rev 10) 00:07.1 PCI bridge: Intel Corporation Meteor Lake-P Thunderbolt 4 PCI Express Root Port #1 (rev 10) 00:0d.0 USB controller: Intel Corporation Meteor Lake-P Thunderbolt 4 USB Controller (rev 10) 00:0d.2 USB controller: Intel Corporation Meteor Lake-P Thunderbolt 4 NHI #0 (rev 10) 02:00.0 PCI bridge: Intel Corporation JHL7440 Thunderbolt 3 Bridge [Titan Ridge DD 2018] (rev 06) 03:01.0 PCI bridge: Intel Corporation JHL7440 Thunderbolt 3 Bridge [Titan Ridge DD 2018] (rev 06) 03:02.0 PCI bridge: Intel Corporation JHL7440 Thunderbolt 3 Bridge [Titan Ridge DD 2018] (rev 06) 03:04.0 PCI bridge: Intel Corporation JHL7440 Thunderbolt 3 Bridge [Titan Ridge DD 2018] (rev 06) 05:00.0 USB controller: Intel Corporation JHL7440 Thunderbolt 3 USB Controller [Titan Ridge DD 2018] (rev 06) I don't see the drive using lsblk When I run nano 99-local.rules on /etc/udev/rules.d/ and add ACTION=="add", SUBSYSTEM=="thunderbolt", ATTR{authorized}=="0", ATTR{authorized}="1" sys/bus/thunderbolt/devices/domain0/0-0 Authorized is 1 sys/bus/thunderbolt/devices/domain0/0-0/0-1 Authorized is 0 (set to 1) On a reboot, the above 99-local.rules and Authorized reset. Any suggestions would be really helpful. My case won't support any more disks, this was supposed to be the best way around this issue
-
Perfect, thank you
-
Appreciate this has probably been covered a dozen and one times already, and it's because of that I've narrowed it down to two technologies; but what are your suggested means of creating a backup/DR of dockers with crucial live data on? Specifically I use Immich and SeaFile/OnlyOffice. For a while now I've been using an appdata backup script to backup Immich/Postgres/Redis then I copy said backups to a second Unraid server, along with the /mnt/user/photos data; and amazingly it just works. Presumably because the postgres DB points to a local file and not an IP address, it jhas no issue resolving file paths. This method is far from elegant bu suits Immich since on more than one occasion an update has added bugs, one of which took nearly a month to resolve. The same method does not work for SeaFile. I've edited static files for SeaFile and can log in then traverse my library, but try to open files and it references files from my production NAS. Presumably these links are buried within MariaDB, so even if I could get this working, it would be more than just a copy/paste affair every time I wanted to backup. Which should be weekly at the very least. I've read about rsync and have found what looks like a legacy guide at https://unraid.net/blog/unraid-server-to-server-backups-with-rsync-and-wireguard Has anyone here used such tool with a self hosted cloud system with success? Nextcloud, Seafile, Onecloud etc. Is this the best solution for immediately flipping the switch to a different server? Or is this purely a backup/restore solution. Does anyone have any alternative suggestions/solutions? Thank you, and Happy New Year
-
Have got it working. Because I've copied the database from unraid 1 to unraid 2, I needed to make sure the name of the docker container was correct. The default 'seafile-11' needing changing to seafile.
-
Having different problems with SeaFile myself which I presume isn't exclusive to this Docker. Background. I have two SeaFiles, one on UnRaid 1 using an older image, and another on UnRaid 2 using the latest version 11. I copied the contents of /mnt/user/SeaFile from UnRaid 1 to UnRaid 2 with success but had issues around SeaFile Origin hostnames. Went into the depths of it, edited all my conf files to point to a new hostname but still nothing. Assumed it would be related to copying older version files to the latest version so removed the docker container, renamed /mnt/user/SeaFile and started again. Now the damn thing won't start at all. So I removed it again, then used a script to purge hanging containers and volumes, then I deleted the xml template file. Same issue. I get this. [2024-12-27 11:17:50] Skip running setup-seafile-mysql.py because there is existing seafile-data folder. ** (process:67): WARNING **: 11:17:50.619: seafile-controller.c(558): invalid config_dir: /opt/seafile/ccnet ** (process:67): WARNING **: 11:17:50.619: seafile-controller.c(64): seaf-controller exited with code 1 Traceback (most recent call last): File "/scripts/start.py", line 94, in <module> main() File "/scripts/start.py", line 79, in main call('{} start'.format(get_script('seafile.sh'))) File "/scripts/utils.py", line 70, in call return subprocess.check_call(*a, **kw) File "/usr/lib/python3.10/subprocess.py", line 369, in check_call raise CalledProcessError(retcode, cmd) subprocess.CalledProcessError: Command '/opt/seafile/seafile-server-11.0.13/seafile.sh start' returned non-zero exit status 1. 2024-12-27 08:28:16 Nginx ready 2024-12-27 08:28:16 This is an idle script (infinite loop) to keep container running. Starting seafile server, please wait ... Failed to start seafile server 2024-12-27 08:44:03 Nginx ready 2024-12-27 08:44:03 This is an idle script (infinite loop) to keep container running. Starting seafile server, please wait ... Failed to start seafile server 2024-12-27 11:17:50 Nginx ready 2024-12-27 11:17:50 This is an idle script (infinite loop) to keep container running. When I fire up a terminal window, /opt only contains a "containerid" folder, not seafile. My /mnt/user/seafile has the expected top level folders but doesn't generate any sub directories and files. Any ideas?
-
A victim of a crappy n300 myself. 16tb drive, less than two years old. And I was so close to buying a bunch more too. Damn
-
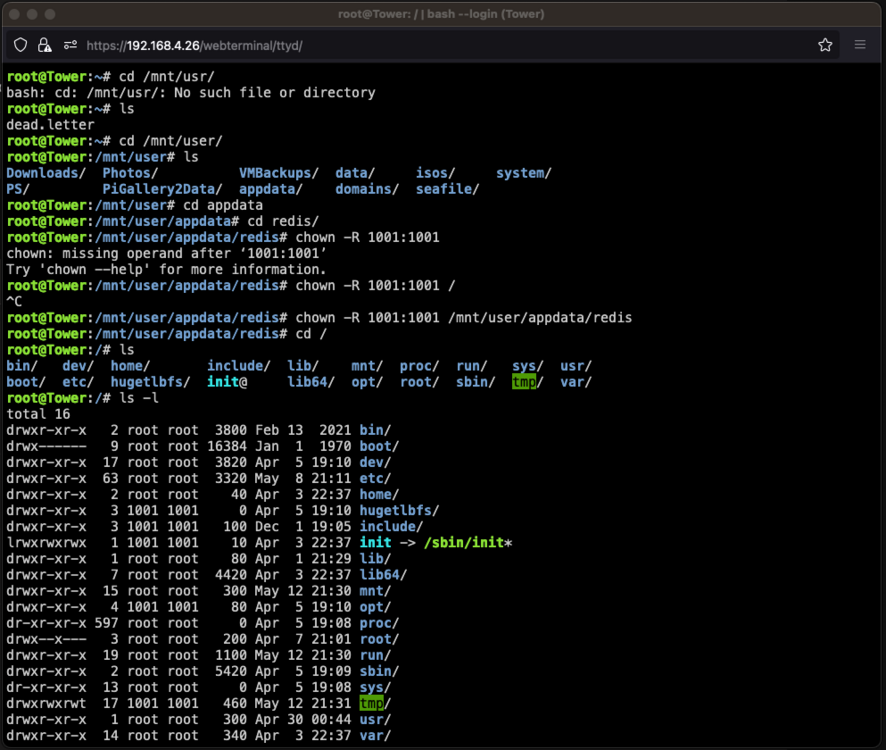
Hiya, Thanks for the response. Having ran it, it's worked against everything in /mnt but not the higher leveled stuff from the image. It doesn't seem to have changed the permissions, only owner.
-
Evening, Following instructions for Redis docker but because I'm daft, I think I've done some damage to Unraid and could do with some help. Assume I'm going to need to run chown -R root / to resolve this? Or more to it than that?