






ImSkully
Members
-
Joined
Everything posted by ImSkully
-
Yes, this is correct :) this is how standard Docker mappings work - it's also not hidden as you said, the /etc/vikunja/ mapping is the second entry in the configuration titled Configuration Directory and is always visible to you (not hidden) and this points Vikunja's configuration path to your appdata folder (or any location of your choosing). From there onwards, Vikunja expects all variables such as VIKUNJA_DATABASE_PATH to be relative to the configuration directory path set earlier. To clarify: within the container, the configuration directory and the SQLite database file is actually still in /etc/vikunja/ which is the correct configuration path as outlined in the official docs; the Docker path mapping to your /mnt/user/appdata/vikunja/config is what sets the real path of where it's stored on your array.
-
Added step-by-step guide for updating from FileRun 2024.x to the latest 2026.2, refer to the post under the main topic: I finally had some time to go through the update process myself and had a few minor hiccups though otherwise it's pretty seamless. I've captured everything regarding the process for Unraid users so if anyone was still holding off on updating now is a good time to do so :) the entire process should only take ~5 minutes. Let me know if you have issues!
-
Thanks for sharing! I'm pretty swamped this month with various work but will update the CA template and setup instructions soon.
-
Are you sure? Port 8080 works fine using this template and OpenProject begins listening on this port which is mapped to port :5683 by default if you don't change it otherwise in the template. Tested with a fresh deployment using latest CA template running openproject:17.0.2.
-
I've been keeping an eye on the 2026.1 update and following the forum thread, looks very exciting though there's still a few issues that need to be ironed out before its ready. Once the stable release is announced, I'll update the template and share notable breaking changes/migration steps for Unraid users to move over to the latest version with (hopefully) minimal disruption.
-
Thanks for letting me know, OpenProject doesn't provide an image with the :latest tag so the version number has to be manually bumped in the template every major version. I've updated to 17.0.2, should be refreshed within the hour - please let me know if you encounter any issues!
-
I've been running FileRun for years and pretty happy with it - that being said I don't use all the bells and whistles that come with it and mainly just use it as an archive for backups and documents/PDFs. If you don't have any greater requirements with it beyond it being a simple 'Google Drive' like solution, then you should be fine. That being said, @toxicPeary made a few good points regarding the fact that there's only a single person maintaining FileRun and receives very slow updates (last one was August 2024 though a new major update is coming in 2026). There is an online demo you can check out, or alternatively you can contact FileRun and ask for a trial license as outlined on the demo page.
-
https://github.com/go-vikunja/vikunja/blob/main/CHANGELOG.md#100-rc1---2025-08-17 Here's a highlight of the breaking changes: All of these don't appear to be relevant to the majority of users but YMMV. I auto updated a week ago and haven't had any issues.
-
There is a major update expected for FileRun at some point in the next few weeks January 2026 - hoping that will bring some improvements to Docker permissions.
-
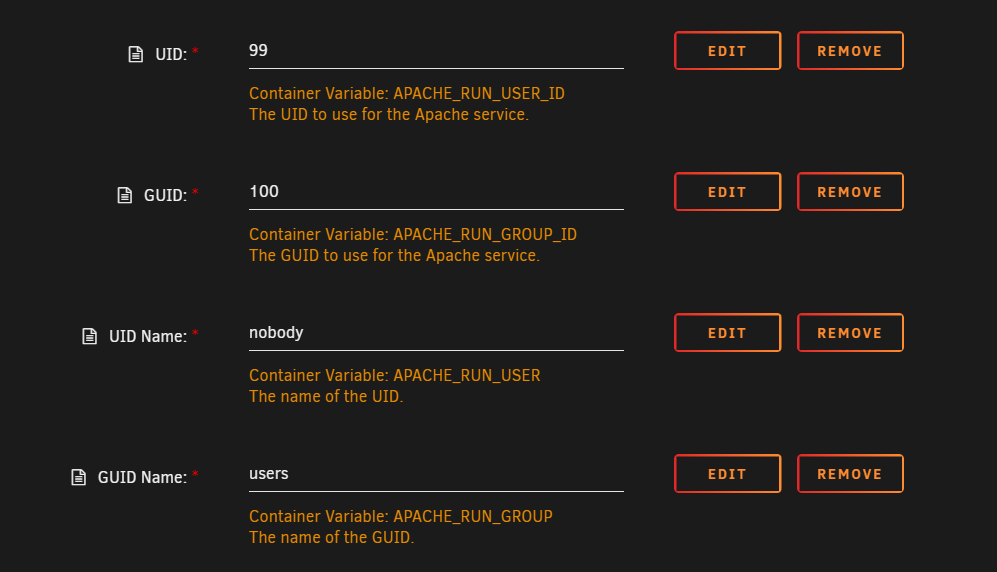
I started seeing this recently as well and tried reverting the UID/GUID settings which seems to have fixed it - give the below config a go and see if it resolves it:
-
The Installation & Setup section covers all the necessary steps, if you need help then you'll have to provide more specific information about the problems you are facing.
-
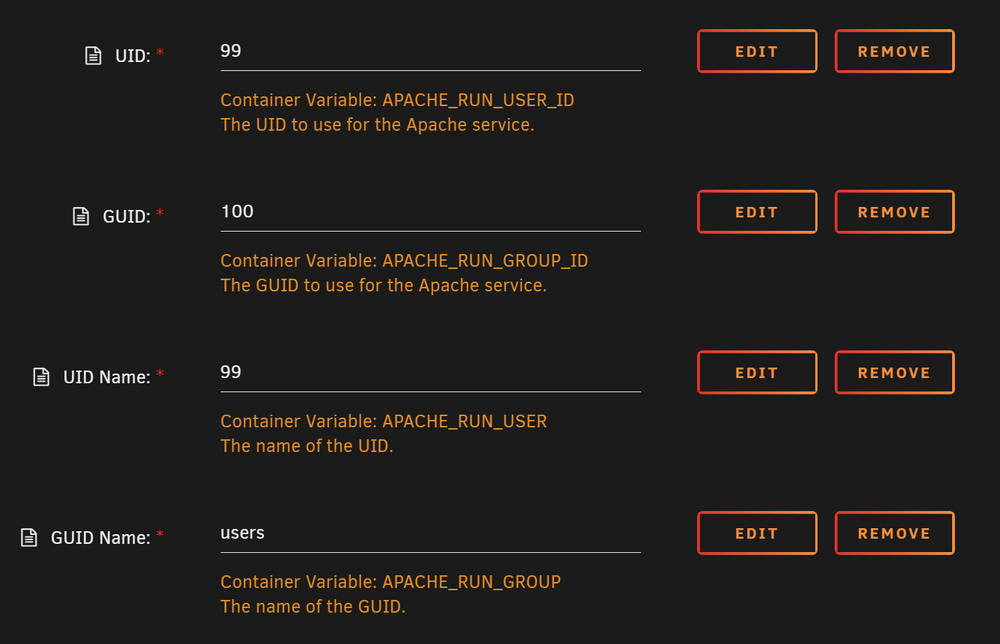
Just testing the above and can confirm that you are correct. The user:group gets set correctly and allows rename/deleting as well as being correctly set to nobody:users with the following UID/GUID config: Quite interesting considering nobody:users is what is stated on FileRun docs.
-
That's odd - APACHE_RUN_USER and APACHE_RUN_GROUP variables are intended to be the actual UID names and this is how I have always used it which works perfectly fine for me; this is also inline with FileRun docs which shows an example docker-compose.yml which uses these variables as string values of the UID/GUID name alongside the *_ID variables which is what the actual numeric IDs are.
-
My guess is you'd need to copy over the existing .ini files that are in the docker volume to go into the new mapped directory as it would be expecting to be there (likely generated during initial setup). By this do you mean you had to set the APACHE_RUN_USER_ID + APACHE_RUN_GROUP_ID environment variables in the template to 99 + 100? Or is there elsewhere a change is necessary? I ask this because the template should by default have these preconfigured so it works out of the box.
-
The internal PHP configuration file for FileRun is located in the docker volume at the /usr/local/etc/php/conf.d/ directory, you could add a volume mapping for this on Unraid in order to access it by pointing it to a folder in /mnt/user/appdata/filerun/ directory. Not sure how FileRun will behave if this is mapped on an existing container? I know once FileRun is running the PHP config file is /usr/local/etc/php/conf.d/filerun-optimization.ini which contains some preconfigured defaults but of course no upload_tmp_dir so you could create your own php.ini here and configure it (see FileRun docs: PHP configuration). There is an existing feature request here which goes over this exact problem. I also found topics on FileRun forums that are related to this with some useful bits of knowledge: Big WebDav Uploads fills Unraid Docker Image Disk Increasing upload size - Docker install Where to configure PHP options? I need to try this myself at some point to verify and then update the container template to include this mapping by default for Unraid users. There are also some advanced configuration options for FileRun that can be changed by creating a /mnt/user/appdata/filerun/customizables/config.php file which might also be of interest - I'm using this to adjust the thumbnail cache dir $config["path"]["thumbnail_cache"] to /var/www/html/_thumbnails/ so thumbnails are all located in one folder in FileRun's appdata (/mnt/cache/appdata/filerun/_thumbnails/) rather than being placed alongside the user files directory on my array share; this prevents disk spin up when navigating FileRun as thumbnails will then be loaded from appdata which is exclusively set to a cache pool.
-
@Saqqara Definitely sounds like there is something unrelated with your setup that is interfering with this, hard to say without knowing the full workings of your home server setup. Just a heads up, this is almost always a bad idea - DMZ should not be used especially if you are exposed to the internet as this opens you up to a whole world of security vulnerabilities.
-
@Saqqara Sounds like a lot of learnings along the way 😁 did you manage to get FileRun running fully locally in the end?
-
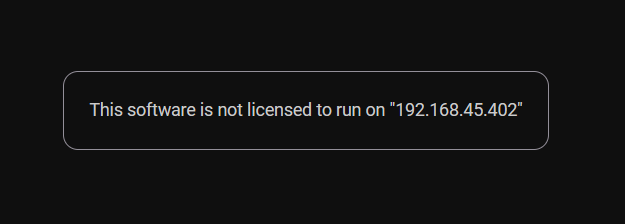
The need for a domain is only for the purpose of purchasing the FileRun license key, they require a host name that needs to be associated with the license key but that's about it - you won't actually need to expose FileRun or port forward at all if you don't wish to do so. If you try to access the web UI from the raw Unraid server IP:Port of the container then you'll be greeted with this: When you go through the installer and paste in your license key, it will verify that the domain you are visiting from is the same as what is registered on the key you use: you could simply just update your device hosts file and point said domain to your server and that will allow you to access FileRun. Though a step above this and the recommended approach to also make use of SSL is to configure your reverse proxy (such as NPM as shown in screenshots) to point to the FileRun container. Hope this makes sense! I'll update the original post to include more details on this and cover the steps to go down the hosts file route to provide an alternative setup without having to necessitate a domain.
-
⚠️Updating From 2024.1 to 2026.2+FileRun 2026 has been released and contains a ton new changes and improvements, it's highly recommended you have a read through everything that has changed and any breaking changes that may affect you: docs.filerun.com/2026 PrerequisitesStarting from FileRun 2026.1, you must ensure you are running a database version of MySQL 8.4 or higher, or MariaDB 10.11 or higher PHP & File Permissions From version 2026.1+ there are significant improvements made to file permissions and Docker that simplifies the user:group that is used by the Docker container for PHP and eliminates the need for the previous APACHE_* template variables. If you previously made adjustments to any file permissions or altered the PHP/Apache user or groups, then the update process may not be able to replace files during the update. To avoid this, please set the permission of the entire FileRun application data folder so that PHP can replace all files without issues (this will be set back to 99:100 after the update completes): chown -R 65534:100 /mnt/user/appdata/filerunPersonally, to stay on the safe side I highly recommend running the above command regardless of whether you have made any permission changes in the past to avoid any issues. Don't worry, if the update process fails at any point, you can retry it again - it's very graceful and will output any issues that need to be resolved should they occur. Backup Before Proceeding!Before proceeding with any update, it is highly advised to create backups of your FileRun instance including both the Application Data Directory contents and the FileRun database! Backup: Application Data DirectoryTo backup your FileRun application data directory (normally /mnt/user/appdata/filerun by default on the template) you can run the following command from the Unraid terminal: # cd into the application data directory where your FileRun folder is cd /mnt/user/appdata # create a zip file of all contents within filerun/ which will be stored as filerun.zip in the current location zip -r filerun.zip filerun/ Backup: DatabaseThis will vary depending on your database engine, either MySQL or MariaDB: if you are not familiar with how to export your database, follow the steps as outlined here: docs.filerun.com/backup Update ProcessEnsure you have your FileRun license key as it may be required to input this again following the update process (normally this will be automatically populated following the steps below, but should your installation fail now is a good time to check you know your key). To find your license key, in your FileRun instance head to Control Panel → FileRun or check the Your Licenses page on the official FileRun website in the client area Navigate to the Control Panel in your FileRun instance and check for updates at Control Panel → FileRun → Updates and press the Check for updates button This should automatically discover the latest FileRun version available, take a brief moment to read through any information and then press Download update After the update has downloaded, press Install update This step is where you might be likely to run into installation errors: if it fails, do NOT proceed further until you follow the steps in the error logs displayed or refer to the Troubleshooting section at the bottom of this post. After successful installation from the control panel, you should see the following at the bottom of the update logs: At this point reloading the page will now result in a HTTP 500 which is expected as the PHP version in the Docker image is outdated Stop the FileRun docker container and then edit the following values in the template: Change Repository from filerun/filerun:8.1 to filerun/filerun:latest Add the following in Extra parameters: --user 99:100 Scroll down to the template variables and remove all 4 of the following APACHE_* variables if they exist (press Show more settings to expand variables if hidden): Remove APACHE_RUN_USER_ID Remove APACHE_RUN_GROUP_ID Remove APACHE_RUN_USER Remove APACHE_RUN_GROUP Hit Apply and wait for the container to update to the latest image and start up again If you changed PHP file permissions to 65534:100 earlier, you should now set them back: chown -R 99:100 /mnt/user/appdata/filerun Go to your FileRun instance homepage, you will be prompted with: "Applying update: You are updating from version 2024.1.x to 2026.2.x" (versions may vary) → Press proceed You will be shown all installation requirements and statuses, ensure everything looks good before proceeding: Verify PHP version is 8.4+ Verify File permissions is Writable (if it's not writable, you didn't run step #9 and need to do so!) Press Proceed and input your license key if it is not automatically populated then press Validate You will be presented with your database details which should be automatically populated, ensure the details are correct and that the database user being used has ALTER/DROP privileges for the purpose of update (if not, you can temporarily specify a root user on this page) Press Next and you should see "Found version 2024.1.x, FileRun can update and use this database." If you see an error message relating to database versions, then you are running an incompatible database version: please update to MySQL 8.4+ or MariaDB 10.11+ Ensure Update and use the existing data is checked → press Install Done! 🎉 Troubleshooting❌ "/var/www/html" is not writable. Change its ownership or permissions and try again. Cleaning after previous update...Failed (Delete folder error: Delete folder error: Delete file error: unlink(/var/www/html/system/data/temp/_unzipped_update/files/api.php): Permission denied). Please manually delete "/var/www/html/system/data/temp/_unzipped_update" and try again. Issues with creating/deleting files or folders
-
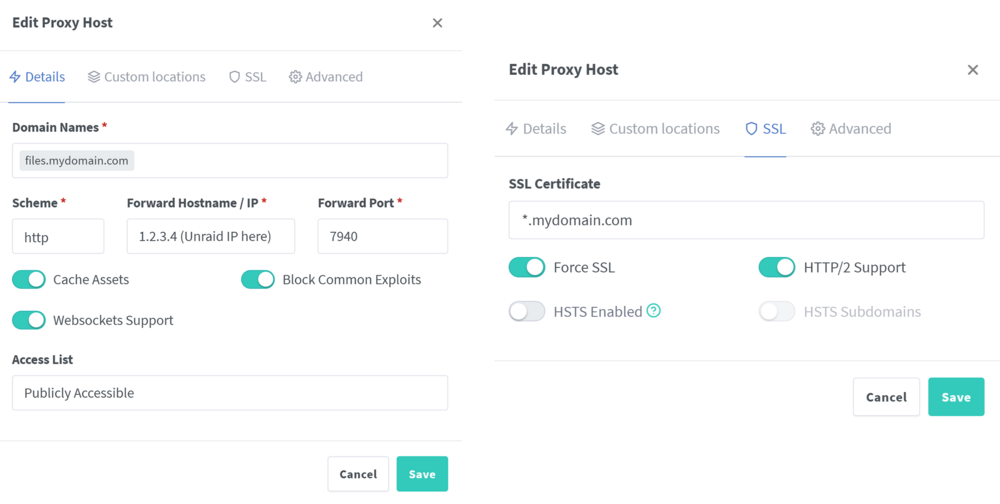
FileRun is a self-hosted file sync and share web-based application - Like Google Drive, but private! and under your full control. Website | Demo | Registry | Documentation | Template Repo This application template configures FileRun and prepares it for use however some additional manual installation steps are necessary in order to get up and running, refer to the installation steps below for more information. FileRun FeaturesGreat for photos: Fast thumbnail and preview generation. On the fly, while browsing folders Guest users: Collaborate with other people without creating accounts for them Metadata support: Automatically extracts and index information Exif, XMP and IPTC, so you can search photos by keywords, dates, author and more! Send file requests: File requests allow you to collect and receive files from anyone, right into your FileRun user account, with just a link And a lot more! Fully secure, desktop sync, full mobile support, virtual drives, extensive plugins (Google Docs, Microsoft Office, Autodesk) More information on what FileRun has to offer can be found on the official website. Screenshots RequirementsFileRun is a paid application — a perpetual license is required and can be obtained at: filerun.com/pricing A relational database is required for FileRun, you will need either: MySQL 8.4 (or higher) or MariaDB 10.11 (or higher) A reverse proxy (such as Nginx Proxy Manager) is required in order to serve your frontend at the FQDN registered to your FileRun license: this is still necessary even if you plan to run FileRun locally (though you do not need to make it public and can remain entirely local!) Installation & SetupInstall FileRun from the community applications store and configure the template as necessary, then create the container and allow it to start You will now need to download your copy of FileRun: Login to the client area at: my.filerun.com Go to Your Licenses from the navigation bar and note down your License key: this will be needed later following installation Go to Download FileRun from the top navigation bar, you will be redirected to a drive with downloads for the latest version of FileRun — download the ZIP file of the latest version (e.g. FileRun-2026.2.0-PHP-8.3.zip) Upload the ZIP file to the Application Data Directory that you configured for the container (by default this is: /mnt/user/appdata/filerun) Open a terminal and run the commands below to cd into this directory, unzip the file and then update ownership permissions to 99:100 (nobody:user): // cd into appdata directory (or whatever directory you are using) $ cd /mnt/user/appdata/filerun // Extra the FileRun zip and update permissions $ unzip -o "FileRun-2026.2.0-PHP-8.3.zip" && chown -R --no-dereference 99:100 . // You can remove the original zip file now :) $ rm "FileRun-2026.2.0-PHP-8.3.zip"Restart the container and visit the Web UI at the configured port (by default this is: 7940) and verify the frontend is up and running, however do not proceed with installation yet! You must complete installation using the FQDN registered to the license key that you wish to use for this instance. Setup your FileRun server to be accessible from your license hostname using a reverse proxy, for this example (and recommended) we will use Nginx Proxy Manager for a quick seamless setup: Go to Nginx Proxy Manager ➜ Proxy Hosts ➜ Add Proxy Host and fill in the Details and SSL tabs as shown below: This example creates a hostname for files.mydomain.com with SSL. Hit Save to create the proxy host and then visit your domain: the web UI should be accessible over HTTPS and you should see the same FileRun setup page from step 5. Proceed with installation through the Web UI: You will be shown a pre-install check screen that details various aspects of the upcoming install, if you see a warning that the /var/www/html directory is not writable then ensure the application data directory itself and all contents were set to the nobody:users permission group with: chown -R 99:100 /mnt/user/appdata/filerun Next you will be prompted for database creation, the database credentials should automatically have been populated into these fields from your template configuration ➜ proceed to the next step The database has been created, and you will be shown the FileRun superuser credentials - copy these details now. Proceed to the login page and use the superuser details from the previous step, after you login you will be prompted to update the superuser account: Under the Login tab change the username and password to your liking and press Save changes at the top Under the Permissions tab you will need to set the home folder Path to: /user-files and then press Check path to confirm that the directory exists and has the necessary permissions - finally, press Save changes at the top Note: If you are opting for a multi-user setup then ideally you will want to create separate folders within /user-files for each user and then assign the path in this home folders tab for each of your users in FileRun accordingly. Congratulations, FileRun is up and running! 🎉 SupportIf you have any issues with the template or it has gone out of date, please let me know and I will update it as soon as I can - otherwise you are welcome to leave any support queries below.
-
I'm not an active user of OpenProject myself but it should be agnostic of the fact that its on Unraid as compared to just Docker. Their documentation covers restoring from a backing using the all-in-one container which this template is based on (of course no postgres database if you are supplying your own postgres container via DATABASE_URL) and looking at the process it should be more or less the same? Instead of creating folders to be mounted, use an appdata directory > restore the database dump back into your postgres instance > restore attachments into appropriate appdata directory > start OpenProject container.
-
You need to go into postgres and manually create the database called `zipline` if you haven't already.
-
@Kev600 You are using an outdated version of the template, I can tell because you are setting the variable: CORE_DATABASE_URL'='postgresql://postgres:************@192.168.0.140:5432/zipline Change this from CORE_DATABASE_URL to just DATABASE_URL and give that a go for a quick fix, though you need to delete the existing template you have installed for Zipline and download a fresh copy from community app store. The new template for v4 removes nearly all environment variables in favour of the in-application configuration instead.
-
Could you please share the resulting docker run command after creating Zipline from the template? Redact any credentials in DB string. Also what image are you using for your postgres container?
-
⚠️ Breaking Changes: Zipline v3 > v4 (latest) Zipline pushed a major release a few days ago to the :latest docker tag which will cause the container to no longer start once updated - do not update your container if you wish to remain no v3 for a little longer, otherwise please follow the migration guide here. If your Zipline container automatically updated already and is now failing to start, you can revert back to v3 by changing the Repository to ghcr.io/diced/zipline:v3 in the template settings and then proceed with the migration guide. If you are migrating from v3, it is also recommended to use the latest application template which has now been updated to v4 environment variables. The majority of Zipline's configuration can now be completed in the application itself so the previous environment variables no longer have any effect.




