





Hellomynameisleo
Members
-
Joined
-
Last visited
Everything posted by Hellomynameisleo
-
Is it possible to change how unraid allocates files to certain disks on the array in a percentage basis instead of the raw value that is most free on the drives? For example if I have a 4TB drive and 16TB drive it will just keep filling the 16TB until it has equally the same free space at the 4TB but I want it to use both the 16TB and 4TB on a free space percentage value instead. Is something like this possible in UNRAID array?
-
I'll take a look at turbo write but it looks complicated in how it works. I'll try the plugin out. Yes it works as expected, just don't use /mnt/user as the source and then /mnt/disk1 /mnt/disk2 etc. as the destination otherwise it will end up deleting the file. Also it seems if you want to use /mnt/user/ where you just move the files to the folder name and add a "1" or something extra to the folder name so there's no conflict, then at the end of the script move it will rename the folder back to the original folder name. below example where it will move the folder music to music1 to the 4 disks in a round robin when its done rename folder "music1" to "music". import os import shutil # Define the paths of the disks disks = ['/mnt/disk1/Backup/Music1', '/mnt/disk2/Backup/Music1', '/mnt/disk3/Backup/Music1', '/mnt/disk4/Backup/Music1'] # Define the path of the source directory src_dir = '/mnt/user/Backup/Music' # Define a variable to keep track of the current disk index current_disk_index = 0 # Recursively walk through the source directory and move files for dirpath, dirnames, filenames in os.walk(src_dir): for filename in filenames: src_path = os.path.join(dirpath, filename) # Get the next disk path in a round-robin fashion current_disk = disks[current_disk_index] current_disk_index = (current_disk_index + 1) % len(disks) dst_path = os.path.join(current_disk, os.path.relpath(src_path, start=src_dir)) # Create the destination directory if it doesn't exist if not os.path.exists(os.path.dirname(dst_path)): os.makedirs(os.path.dirname(dst_path)) # Move the file to the destination directory shutil.move(src_path, dst_path) print("Moved {} to {}".format(src_path, dst_path)) # Rename the Music1 folder to Music old_dir = '/mnt/user/Backup/Music1' new_dir = '/mnt/user/Backup/Music' os.rename(old_dir, new_dir) print("Finished")
-
Is there a way to scatter where all the files are spread across all disks in the array similar to RAID (how it sripes all files across all disks) but with files instead. File-level striping at the file level rather than at the block level. I want to do this so it increase the I/O performance when accessing multiple files it will spin up and use multiple HDD instead of just a single one taking all the load. I want this as I perfer having higher I/O performance and don't mind the drives spinning up. I don't want to use actual RAID because of how inflexable it is with different drive sizes. Looks like this can be done in python, I used user script files plugin and just replace the "Disk = "with your dir destination location and "src_dir = " with your source directory. import os import shutil # Define the paths of the disks disks = ['D:/test', 'E:/test', 'F:/test'] # Define the path of the source directory src_dir = 'D:/test' # Define a variable to keep track of the current disk index current_disk_index = 0 # Recursively walk through the source directory and move files for dirpath, dirnames, filenames in os.walk(src_dir): for filename in filenames: src_path = os.path.join(dirpath, filename) # Get the next disk path in a round-robin fashion current_disk = disks[current_disk_index] current_disk_index = (current_disk_index + 1) % len(disks) dst_path = os.path.join(current_disk, os.path.relpath(src_path, start=src_dir)) # Create the destination directory if it doesn't exist if not os.path.exists(os.path.dirname(dst_path)): os.makedirs(os.path.dirname(dst_path)) # Move the file to the destination directory shutil.move(src_path, dst_path) print("Moved {} to {}".format(src_path, dst_path))
-
I want to mount it as a drive on UNRAID so I can also use it for dockers/apps/vm data on it not just on the Windows machine. I can also just use UNRAID share permissions as well to manage the TrueNAS share this way which makes it easier.
-
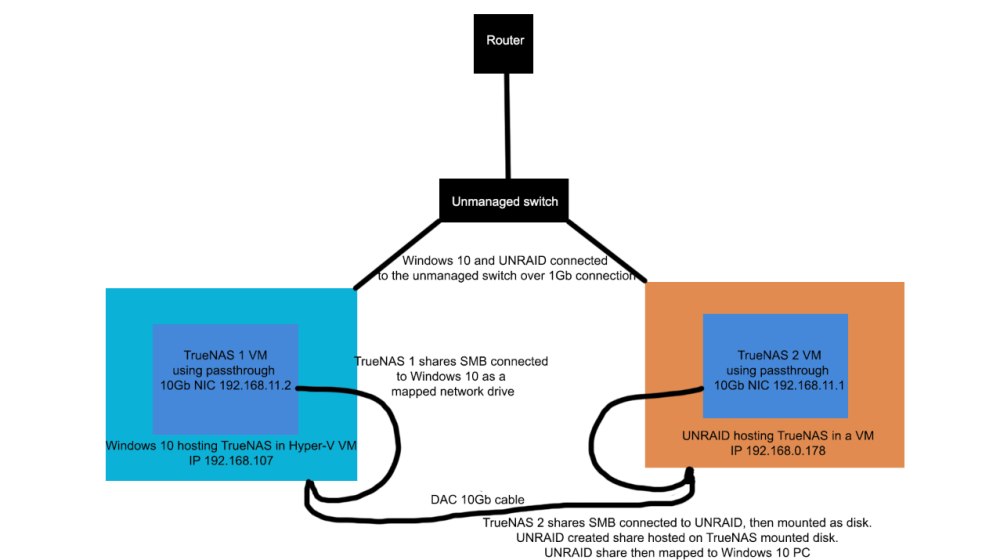
The truenas share are first mapped to their hosts, then in unraid its mapped as a drive where it can create a share on that mapped drive. That share is mapped to windows 10 machine. Not sure if this happens over the 10Gb NIC connection though.
-
I want to use TrueNas in a VM while using UNRAID host for everything else (dockers/VMs). Is the pictured configuration possible? UNRAID will use the 1Gb onboard ethernet IP 192.168.0.178 for internet access, and passing through a seperate 10Gb NIC to the TrueNAS VM. I don't have any HBA and so will passthrough the onboard sata controller with an SSD and some HDDs, and install TrueNAS VM on the SSD. The TrueNAS VM share will be mapped to UNRAID using SMB. Once the mapping is established, the TrueNAS VM share will be set up as a mounted disk on UNRAID. The mounted disk can then be used to set up shares on UNRAID. These shares can be used to store dockers/data. Here is where it gets complicated, I want to connect UNRAID share (which uses the TrueNAS VM share) to mapped Windows PC (IP 192.168.0.107). There is a direct connection using a DAC cable between the UNRAID and Windows PC. But the Windows 10 PC setup is similar to the UNRAID machine in that its also hosting another TrueNAS VM using Hyper-V with a passed through seperate 10Gb NIC (IP 192.168.11.2) and the TrueNAS VM shares are mapped to the host Windows 10. Essentially I have 1 TrueNAS (hosted in windows 10) and UNRAID share mapped to the Windows 10 PC. So when I transfer data between the mapped shares on Windows 10 machine it will do so through the DAC 10Gb cable. Is something like this possible or will UNRAID and windows 10 just communicate over the 1Gb link to the unmanaged switch?
-
I managed to fix it finally. It was my Windows 10 PC I put the NIC 10Gb on a electrical x1 gen 3.0 slot which was limiting the throughput. I've switched it to a electrical x16 slotinstead.
-
I'll get one ordered but I'm thinking the intel x520-DA1 maybe fakes as the speeds are capping right at 3.5Gb/s
-
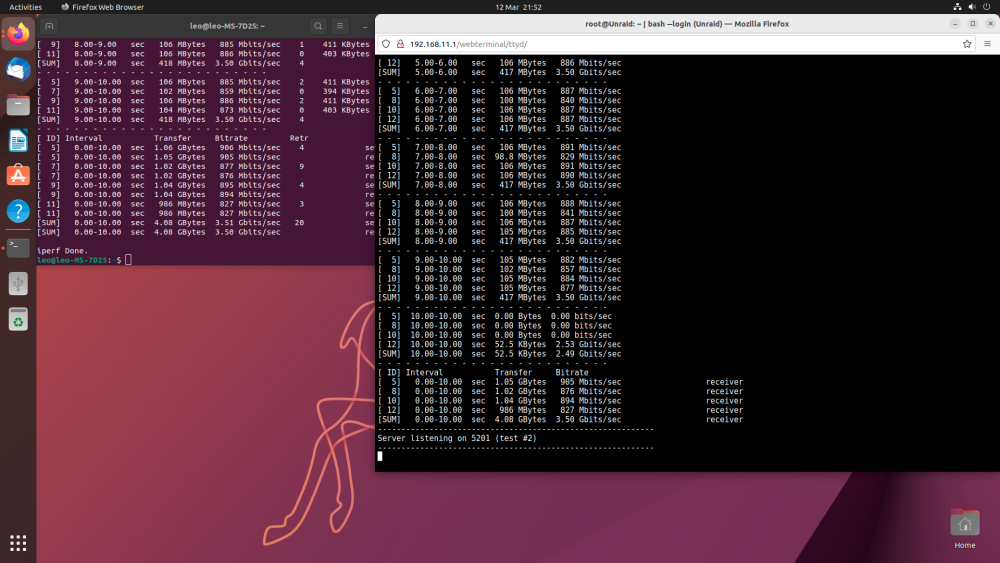
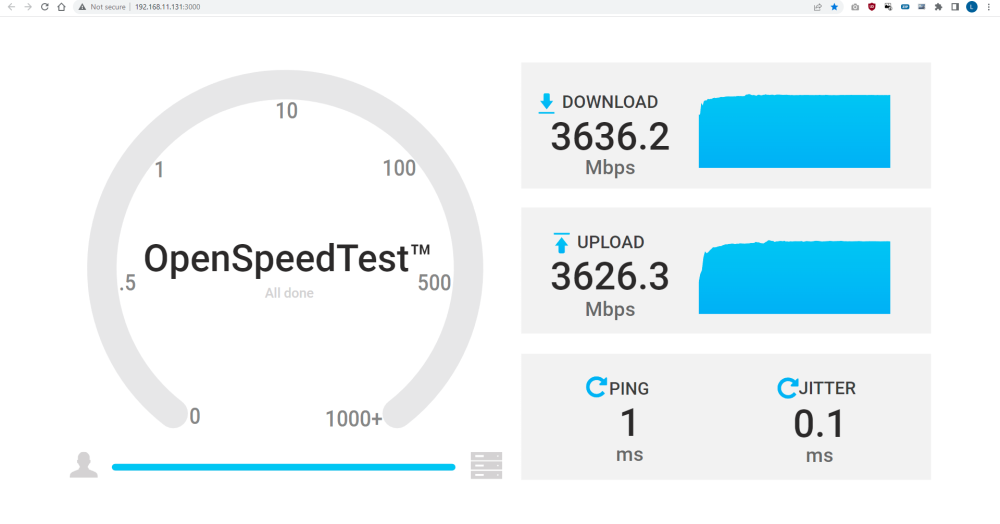
I've tried it in ubuntu fresh install to unraid and it still stuck at 3.5Gb/s. I've also installed the docker openspeedtest to my 10Gb NIC and it still shows the usual slow speed. Any ideas what is going wrong? I didn't expect it to be this hard to set the 10Gb NIC connection up
-
I don't have another spare USB around. I'll try booting to ubuntu and using iperf3 from my spare SSD
-
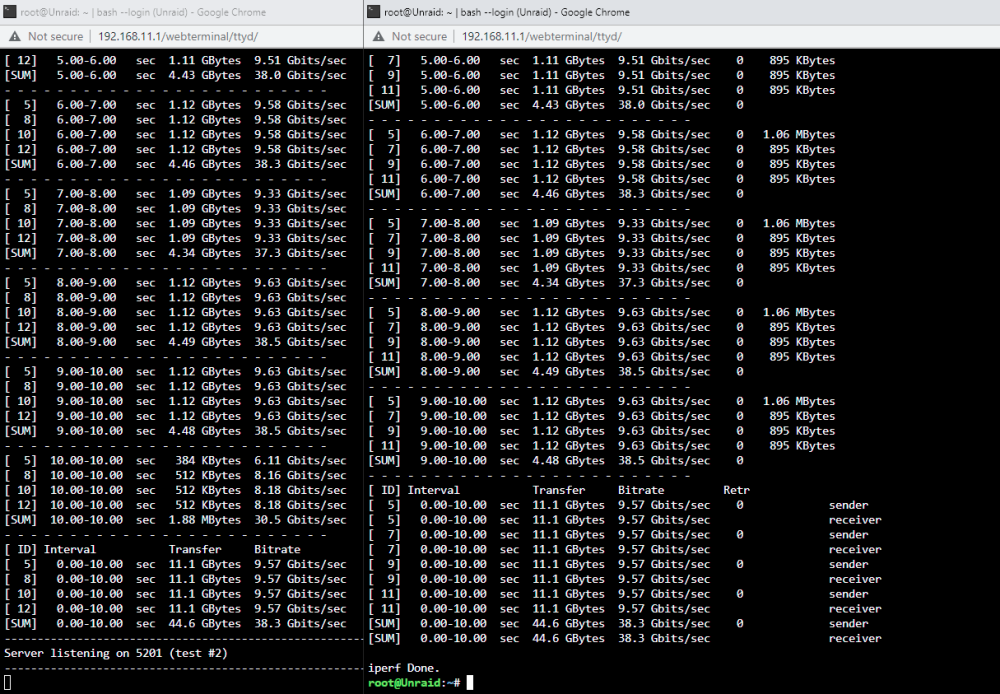
I've did listen to 192.168.11.1 (unraid IP) on unraid and then ran iperf3 on unraid again "iperf3 -c 192.168.11.1 -P 4". So it pinged itself if this is what you meant?
-
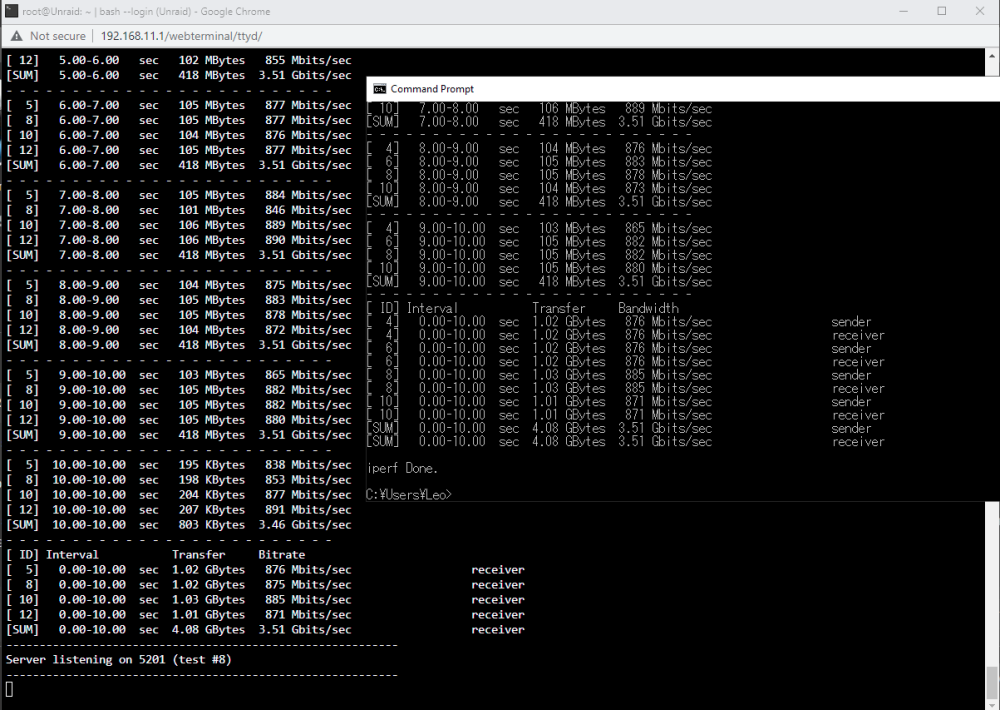
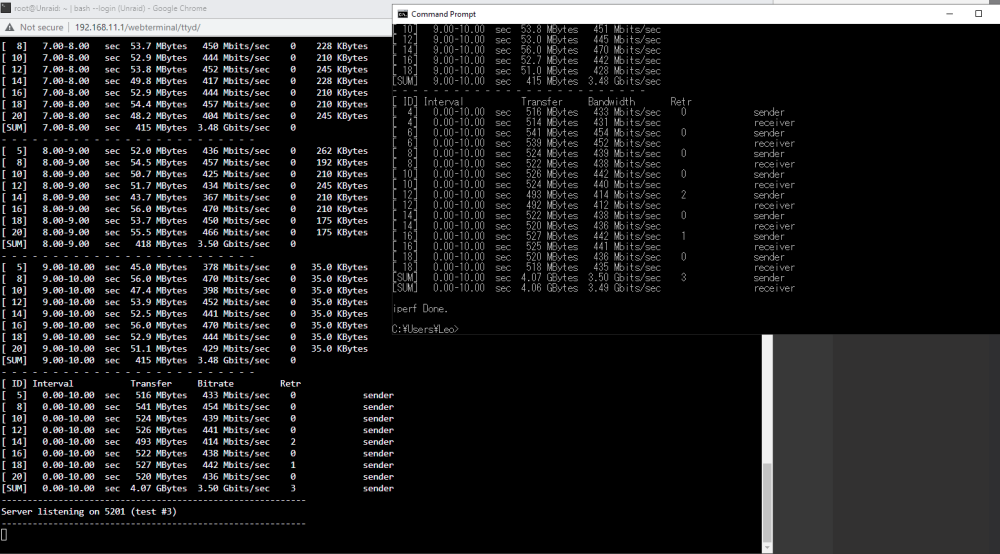
not sure why the DAC would cause it because I've seen a lot of people recommend and use a DAC as its much less costly. I can try buy another DAC and see if it makes a difference. The rety is because I've sent too many request at once, doesn't show up if I do 4 parallel.
-
Is the DAC causing the issue? It said on the seller amazon website that it has been tested on switches already and its branded 10Gtek DAC reputable. Also I don't really need a seperate module as its just 2 PCs.
-
I'm having slower than expected speeds between my Windows 10 and UNRAID NAS which both have a Intel x520-DA1 NIC in them connected directly over a 3m 10Gb/s SPF+ DAC Twinax Cable. I used "iperf3 NASip -P 8" and "iperf3 Windowsip -P 8" on both W10 and the NAS to see if there any difference but they both reach only 3.50Gb/s speeds which is far from the expected 10Gb/s speed I should be getting. I've already enabled jumbo frames to 9014 bytes already on UNRAID and W10 PC which helped speeds get to 3.50Gb/s. Also disabled offloading, enabling full-duplex and increased buffers within Windows 10 but there isn't any change in speeds. The latest drivers (version 4.1.249.0) has been installed on the Windows 10 x520 NIC already and CPU usage is below 10% so there isn't a bottleneck there either. I've tested over SMB file transfers and it indeed caps out at around 450MB/s. Any ideas what the issue could be?
-
Is there a way to setup unraid so it will distribute files across all drives evenly like ZFS does? I imagine the more drives I have the more the I/O performance if setup like this similar to ZFS adding more vdevs if I am correct? I use mostly small file reads and writes transfers.
-
If I have 0 partiy disk would spreading the files/folder result in improved performance? I'm using UNRAID as my main backup server so I didn't put parity disks
-
Would spreading my files and folders seperated on all disk improve the read/write performance? If I was to copy different files to multiple drives at the same it would spread out the work load and increase the write speed, similarly with reading multiple files but stored on different disks. Does it work this way or is it still the same performance if I was copying/reading to a single drive?
-
I used peazip to see how zstd compared to 7zip compression method and 7zip compresses a lot more better than zstd both at their highest compression level. I think its just better to set a cron job to make 7zip zip up the files in a directory instead of having btrfs do its compression
-
With that command do you have to apply it every time you start up the array or reboot?
-
it seems it does display it its just I had to use "mount -o remount,compress-force=zstd:15 /mnt/disk2" as it didn't compress with just the compress option
-
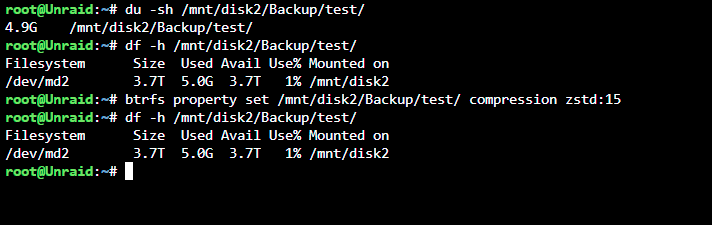
I've used both "btrfs property set /mnt/disk2/Backup/test/ compression zstd:15" and "mount -o remount,compress=zstd:15 /mnt/disk2". And then checked it and it still doesn't work... it may be buggy for me. I've tested comrpession with 7zip and it compresses a good 30%. With both set it has no compression as far as I can see when checking unraid GUI, or command line.
-
I've copied over files to the UNRAID smb share and it doesn't compress them at all.
-
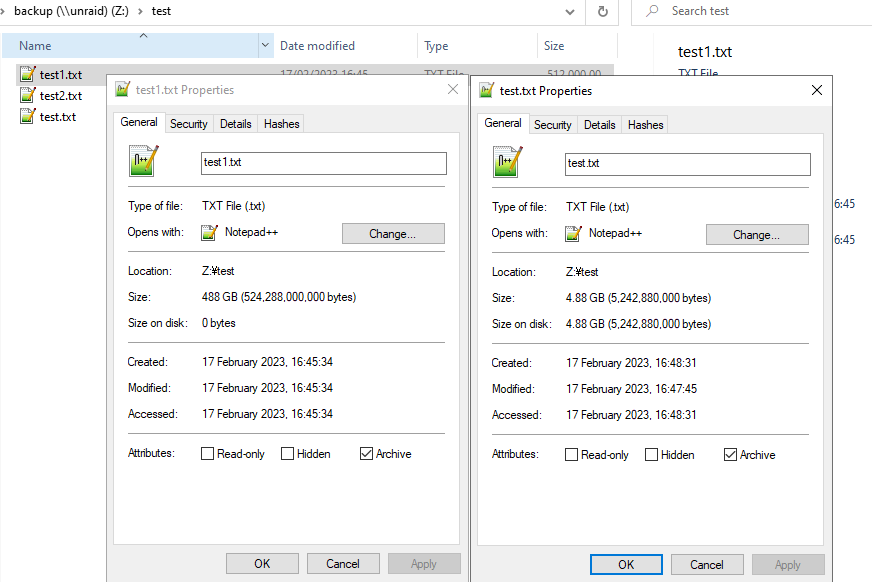
I created a 5GB text.txt file on Window 10 pc and copied it over and it didn't comrpess at all but if I make it directly on the UNRAID smb share it has 0 bytes size on disk as shown in test1.txt. Any idea why it behaves like this?
-
I've created an 5GB empty text tile and it doesn't compress anything as shown in the picture. I've even set it to the highest compression setting too.
-
I've tried a bunch some other things but can't get confirmation if its working. Is there a way to see if comrpession is actually enabled and see how much its actually comrpessed? I'm looking through the SMB share on windows 10 and don't see the files I copy over to UNRAID disk 1 being compressed at all


