





fredamn76
Members
-
Joined
-
Last visited
-
Here is my xml for the VM. I passthrough a Sonoff Zigbee 3.0 USB Dongle Plus. <?xml version='1.0' encoding='UTF-8'?> <domain type='kvm'> <name>HomeAssistant</name> <uuid>854cc52e-9548-406d-0910-34a145f0b30b</uuid> <metadata> <vmtemplate xmlns="unraid" name="Linux" icon="linux.png" os="linux"/> </metadata> <memory unit='KiB'>9437184</memory> <currentMemory unit='KiB'>4194304</currentMemory> <memoryBacking> <nosharepages/> </memoryBacking> <vcpu placement='static'>2</vcpu> <cputune> <vcpupin vcpu='0' cpuset='2'/> <vcpupin vcpu='1' cpuset='3'/> </cputune> <os> <type arch='x86_64' machine='pc-q35-7.1'>hvm</type> <loader readonly='yes' type='pflash'>/usr/share/qemu/ovmf-x64/OVMF_CODE-pure-efi.fd</loader> <nvram>/etc/libvirt/qemu/nvram/854cc52e-9548-406d-0910-34a145f0b30b_VARS-pure-efi.fd</nvram> </os> <features> <acpi/> <apic/> </features> <cpu mode='host-passthrough' check='none' migratable='on'> <topology sockets='1' dies='1' cores='2' threads='1'/> <cache mode='passthrough'/> </cpu> <clock offset='utc'> <timer name='rtc' tickpolicy='catchup'/> <timer name='pit' tickpolicy='delay'/> <timer name='hpet' present='no'/> </clock> <on_poweroff>destroy</on_poweroff> <on_reboot>restart</on_reboot> <on_crash>restart</on_crash> <devices> <emulator>/usr/local/sbin/qemu</emulator> <disk type='file' device='disk'> <driver name='qemu' type='qcow2' cache='writeback'/> <source file='/mnt/user/domains/HomeAssistant/haos_ova-10.1.qcow2'/> <target dev='hdc' bus='virtio'/> <boot order='1'/> <address type='pci' domain='0x0000' bus='0x03' slot='0x00' function='0x0'/> </disk> <controller type='usb' index='0' model='ich9-ehci1'> <address type='pci' domain='0x0000' bus='0x00' slot='0x07' function='0x7'/> </controller> <controller type='usb' index='0' model='ich9-uhci1'> <master startport='0'/> <address type='pci' domain='0x0000' bus='0x00' slot='0x07' function='0x0' multifunction='on'/> </controller> <controller type='usb' index='0' model='ich9-uhci2'> <master startport='2'/> <address type='pci' domain='0x0000' bus='0x00' slot='0x07' function='0x1'/> </controller> <controller type='usb' index='0' model='ich9-uhci3'> <master startport='4'/> <address type='pci' domain='0x0000' bus='0x00' slot='0x07' function='0x2'/> </controller> <controller type='pci' index='0' model='pcie-root'/> <controller type='pci' index='1' model='pcie-root-port'> <model name='pcie-root-port'/> <target chassis='1' port='0x10'/> <address type='pci' domain='0x0000' bus='0x00' slot='0x02' function='0x0' multifunction='on'/> </controller> <controller type='pci' index='2' model='pcie-root-port'> <model name='pcie-root-port'/> <target chassis='2' port='0x11'/> <address type='pci' domain='0x0000' bus='0x00' slot='0x02' function='0x1'/> </controller> <controller type='pci' index='3' model='pcie-root-port'> <model name='pcie-root-port'/> <target chassis='3' port='0x12'/> <address type='pci' domain='0x0000' bus='0x00' slot='0x02' function='0x2'/> </controller> <controller type='pci' index='4' model='pcie-root-port'> <model name='pcie-root-port'/> <target chassis='4' port='0x13'/> <address type='pci' domain='0x0000' bus='0x00' slot='0x02' function='0x3'/> </controller> <controller type='pci' index='5' model='pcie-root-port'> <model name='pcie-root-port'/> <target chassis='5' port='0x14'/> <address type='pci' domain='0x0000' bus='0x00' slot='0x02' function='0x4'/> </controller> <controller type='virtio-serial' index='0'> <address type='pci' domain='0x0000' bus='0x02' slot='0x00' function='0x0'/> </controller> <controller type='sata' index='0'> <address type='pci' domain='0x0000' bus='0x00' slot='0x1f' function='0x2'/> </controller> <interface type='bridge'> <mac address='52:54:00:71:7e:27'/> <source bridge='br0'/> <model type='virtio-net'/> <address type='pci' domain='0x0000' bus='0x01' slot='0x00' function='0x0'/> </interface> <serial type='pty'> <target type='isa-serial' port='0'> <model name='isa-serial'/> </target> </serial> <console type='pty'> <target type='serial' port='0'/> </console> <channel type='unix'> <target type='virtio' name='org.qemu.guest_agent.0'/> <address type='virtio-serial' controller='0' bus='0' port='1'/> </channel> <input type='tablet' bus='usb'> <address type='usb' bus='0' port='1'/> </input> <input type='mouse' bus='ps2'/> <input type='keyboard' bus='ps2'/> <graphics type='vnc' port='-1' autoport='yes' websocket='-1' listen='0.0.0.0' keymap='sv'> <listen type='address' address='0.0.0.0'/> </graphics> <audio id='1' type='none'/> <video> <model type='qxl' ram='65536' vram='65536' vgamem='16384' heads='1' primary='yes'/> <address type='pci' domain='0x0000' bus='0x00' slot='0x01' function='0x0'/> </video> <hostdev mode='subsystem' type='usb' managed='no'> <source> <vendor id='0x10c4'/> <product id='0xea60'/> </source> <address type='usb' bus='0' port='2'/> </hostdev> <memballoon model='virtio'> <address type='pci' domain='0x0000' bus='0x04' slot='0x00' function='0x0'/> </memballoon> </devices> </domain>
-
Hello, I have an issue when starting a VM with Home Assistant. Somehow it crashes Unraid webui and docker continers that are running cannot be accessed anymore. Then webui crashes i need to reboot of unraid to get access to webui. Any ideas that can be wrong? I attached my logs. tower-diagnostics-20240430-0856.zip
-
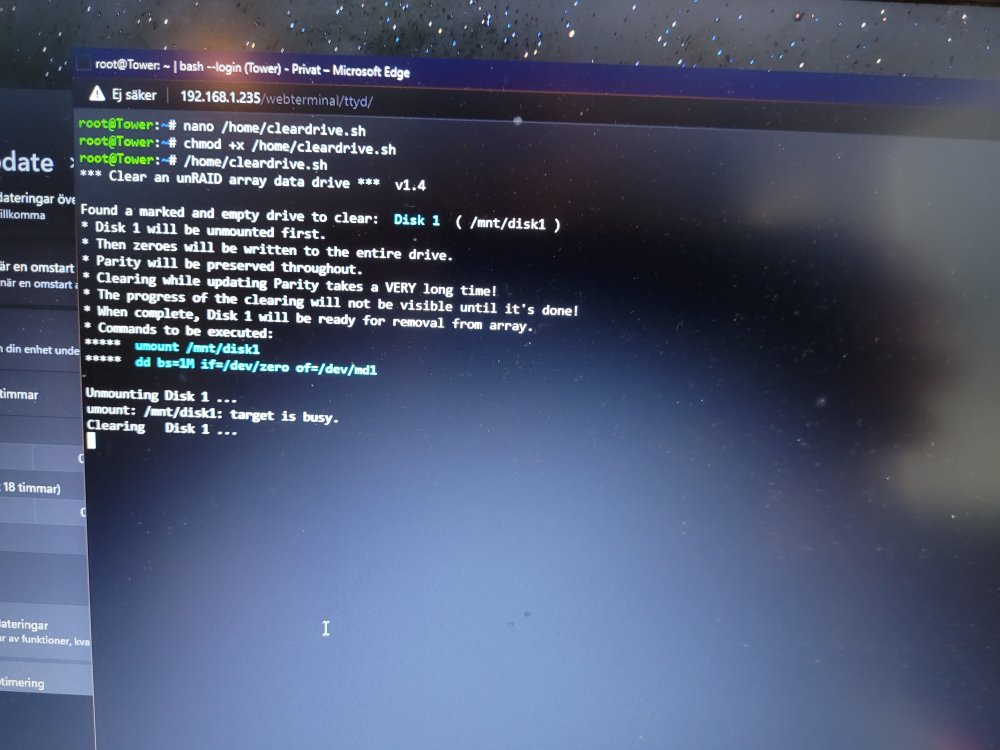
Hi. I'm using the script to write zeros on my 240 gb SSD. It has run over 6 hours no and still says "Clearing Disk 1 ..." . I cannot see a progressbar. How long should the script take?
-
Where should the config.gateway.json file be located? No sites folder has been created by the system in my data folder
-
I think you need to give all your channels a number in Tvheadend. it worked for me.
-
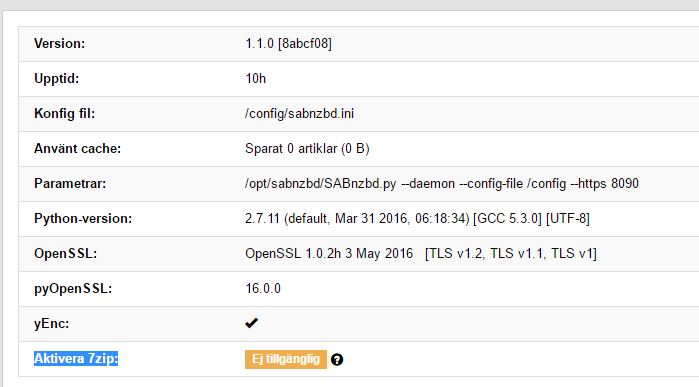
I'm assuming your running 6.1.9 and thus updates are broken, to work around this enable advanced view and then select force update to force the update. Sent from my SM-G900F using Tapatalk ive just checked and its not been updated on AUR yet so no update to 1.1.0 is available. once the image is built you would need to do a stop of your existing container, then remove image and container and then re-pull down and create the container by issuing the docker run command. Thank you for your response. I'll wait for AUR then. just so you know, this did get released and ive built the image so its now available. Thank you it works! However 7zip is missing. See attachmet. Can you fix it?
-
I'm assuming your running 6.1.9 and thus updates are broken, to work around this enable advanced view and then select force update to force the update. Sent from my SM-G900F using Tapatalk ive just checked and its not been updated on AUR yet so no update to 1.1.0 is available. once the image is built you would need to do a stop of your existing container, then remove image and container and then re-pull down and create the container by issuing the docker run command. Thank you for your response. I'll wait for AUR then.
-
I'm not running your container on Unraid at the moment. I use it on a Ubuntu system with docker installed. I'm assuming your running 6.1.9 and thus updates are broken, to work around this enable advanced view and then select force update to force the update. Sent from my SM-G900F using Tapatalk
-
how do i upgrade to Sabnzbd 1.1.0?
-
I got it working when i opened port 58846 -p 58846:58846 \
-
Any ideas why my downloads dont start downloading? docker run --restart always \ --cap-add=NET_ADMIN \ -p 9080:9080 \ --name=rtorrent \ -v /docker/fileshare/Downloading/:/data \ -v /docker/container-data/deluge:/config \ -v /etc/localtime:/etc/localtime:ro \ -e VPN_ENABLED=yes \ -e VPN_USER=username \ -e VPN_PASS=password \ -e VPN_REMOTE=nl.privateinternetaccess.com \ -e VPN_PORT=1198 \ -e VPN_PROTOCOL=udp \ -e VPN_PROV=pia \ -e STRONG_CERTS=no \ -e ENABLE_PRIVOXY=no \ -e LAN_NETWORK=192.168.0.0/24 \ -e DEBUG=false \ -e PHP_TZ=Europe/Stockholm \ -e PUID=1000 \ -e PGID=1000 \ binhex/arch-rtorrentvpn
-
Here we go localclient:5a710d20da30a6e110fe2fa445572b6c6c4aa26d:10 user76:Passwordfza904:10
-
Hi, I'm trying to get couchpotato to connect to DELUGEVPN. I fo?lowed this guide but can't get it working. I get error: Connection failed. My Couchpotato does not show any errors. Sickrage can connect just fine. I use this on a ubuntu box and not Unraid. Q6. How do i connect CouchPotato to DelugeVPN? A6. To connect CouchPotato to DelugeVPN perform the following:- IMPORTANT - If your connecting to DelugeVPN from a traditional (non dockerized) installation of CouchPotato then please ensure you have configured the LAN_NETWORK (see Q7. for details) environment variable for DelugeVPN (you can left click and "Edit" the configuration if you've already created the container). 1. Start DelugeVPN and login to the webui, then enable Preferences->Daemon->Allow Remote Connections 2. Restart DelugeVPN Docker container 3. Open Deluge "auth" file in /config and note username and password, it should be in the following format, if it doesn't exist then please add:- <admin username>:<admin password>:10 - e.g. admin:deluge:10 4. Go to the CouchPotato webui->Settings->Downloaders->Deluge 5. Configure Host as <unraid_server_ip>:58846 6. Configure the Username and Password as specified in the auth file 7. Click on Test Deluge button, if it all works then you should see success. My settings in Couchpotato. Deluge Use Deluge to download torrents. Label: movies Username: fred Password: ••••••••••••••••••• Directory: /downloads Host: 192.168.0.29:58846 My code for DelugeVPN looks like this docker run --restart always \ --cap-add=NET_ADMIN \ -p 8112:8112 \ -p 8119:8119 \ -p 58846:58846 \ --name=deluge \ -v /docker/fileshare/Downloading/:/data \ -v /docker/container-data/deluge:/config \ -v /etc/localtime:/etc/localtime:ro \ -e VPN_ENABLED=yes \ -e VPN_USER=pmyusername \ -e VPN_PASS=mypass \ -e VPN_REMOTE=nl.privateinternetaccess.com \ -e VPN_PORT=1198 \ -e VPN_PROTOCOL=udp \ -e VPN_PROV=pia \ -e STRONG_CERTS=no \ -e ENABLE_PRIVOXY=no \ -e LAN_NETWORK=192.168.0.0/24 \ -e DEBUG=false \ -e PUID=1000 \ -e PGID=1000 \ binhex/arch-delugevpn
-
Is it possible to automatic enable plugins such as labels?

