





DZMM
Members
-
Joined
-
Last visited
Everything posted by DZMM
-
Hi, I've just had the strangest evening. I've just isolated cores for the first time with 6.10 RC4 and built a fresh W11 VM expecting that I'd finally get a stutter free experience...and failed. I searched the forum for solutions vaguely remembering this thread...3 pages in I was still getting very confused, and then I got to the point where I was taking part in the thread 3 years ago and asking what seems like sensible questions! @Jerky_san because my 3.5 year older brain clearly has fewer brain cells, do you think your post above is still true? I.e I should just try adding the lines above to my "stock" W11 xml below? Also, should I try setting emulatorpin to 0,16 or is this a waste of time? I'm going to build another W11 VM on 5,21 6,22 and 7,23 - will the settings above still valid and what should I set emulatorpin to? Thanks in advance <?xml version='1.0' encoding='UTF-8'?> <domain type='kvm' id='3'> <name>Buzz_W11</name> <uuid>e9a443bd-7215-9da3-f4e0-674761f5a7a2</uuid> <metadata> <vmtemplate xmlns="unraid" name="Windows 11" icon="windows11.png" os="windowstpm"/> </metadata> <memory unit='KiB'>25165824</memory> <currentMemory unit='KiB'>25165824</currentMemory> <memoryBacking> <nosharepages/> </memoryBacking> <vcpu placement='static'>6</vcpu> <cputune> <vcpupin vcpu='0' cpuset='10'/> <vcpupin vcpu='1' cpuset='26'/> <vcpupin vcpu='2' cpuset='11'/> <vcpupin vcpu='3' cpuset='27'/> <vcpupin vcpu='4' cpuset='12'/> <vcpupin vcpu='5' cpuset='28'/> </cputune> <resource> <partition>/machine</partition> </resource> <os> <type arch='x86_64' machine='pc-q35-6.2'>hvm</type> <loader readonly='yes' type='pflash'>/usr/share/qemu/ovmf-x64/OVMF_CODE-pure-efi-tpm.fd</loader> <nvram>/etc/libvirt/qemu/nvram/e9a443bd-7215-9da3-f4e0-674761f5a7a2_VARS-pure-efi-tpm.fd</nvram> </os> <features> <acpi/> <apic/> <hyperv> <relaxed state='on'/> <vapic state='on'/> <spinlocks state='on' retries='8191'/> <vendor_id state='on' value='none'/> </hyperv> </features> <cpu mode='host-passthrough' check='none' migratable='on'> <topology sockets='1' dies='1' cores='3' threads='2'/> <cache mode='passthrough'/> <feature policy='require' name='topoext'/> </cpu> <clock offset='localtime'> <timer name='hypervclock' present='yes'/> <timer name='hpet' present='no'/> </clock> <on_poweroff>destroy</on_poweroff> <on_reboot>restart</on_reboot> <on_crash>restart</on_crash> <devices> <emulator>/usr/local/sbin/qemu</emulator> <disk type='file' device='disk'> <driver name='qemu' type='qcow2' cache='writeback'/> <source file='/mnt/user/domains/Buzz_W11/vdisk1.img' index='4'/> <backingStore/> <target dev='hdc' bus='virtio'/> <boot order='1'/> <alias name='virtio-disk2'/> <address type='pci' domain='0x0000' bus='0x03' slot='0x00' function='0x0'/> </disk> <disk type='file' device='disk'> <driver name='qemu' type='qcow2' cache='writeback'/> <source file='/mnt/user/domains/Buzz_W11/vdisk2.img' index='3'/> <backingStore/> <target dev='hdd' bus='virtio'/> <alias name='virtio-disk3'/> <address type='pci' domain='0x0000' bus='0x04' slot='0x00' function='0x0'/> </disk> <disk type='file' device='cdrom'> <driver name='qemu' type='raw'/> <source file='/mnt/user/iso/Win11_EnglishInternational_x64v1.iso' index='2'/> <backingStore/> <target dev='hda' bus='sata'/> <readonly/> <boot order='2'/> <alias name='sata0-0-0'/> <address type='drive' controller='0' bus='0' target='0' unit='0'/> </disk> <disk type='file' device='cdrom'> <driver name='qemu' type='raw'/> <source file='/mnt/user/iso/virtio-win-0.1.215-2.iso' index='1'/> <backingStore/> <target dev='hdb' bus='sata'/> <readonly/> <alias name='sata0-0-1'/> <address type='drive' controller='0' bus='0' target='0' unit='1'/> </disk> <controller type='usb' index='0' model='ich9-ehci1'> <alias name='usb'/> <address type='pci' domain='0x0000' bus='0x00' slot='0x07' function='0x7'/> </controller> <controller type='usb' index='0' model='ich9-uhci1'> <alias name='usb'/> <master startport='0'/> <address type='pci' domain='0x0000' bus='0x00' slot='0x07' function='0x0' multifunction='on'/> </controller> <controller type='usb' index='0' model='ich9-uhci2'> <alias name='usb'/> <master startport='2'/> <address type='pci' domain='0x0000' bus='0x00' slot='0x07' function='0x1'/> </controller> <controller type='usb' index='0' model='ich9-uhci3'> <alias name='usb'/> <master startport='4'/> <address type='pci' domain='0x0000' bus='0x00' slot='0x07' function='0x2'/> </controller> <controller type='sata' index='0'> <alias name='ide'/> <address type='pci' domain='0x0000' bus='0x00' slot='0x1f' function='0x2'/> </controller> <controller type='pci' index='0' model='pcie-root'> <alias name='pcie.0'/> </controller> <controller type='virtio-serial' index='0'> <alias name='virtio-serial0'/> <address type='pci' domain='0x0000' bus='0x02' slot='0x00' function='0x0'/> </controller> <controller type='pci' index='1' model='pcie-root-port'> <model name='pcie-root-port'/> <target chassis='1' port='0x8'/> <alias name='pci.1'/> <address type='pci' domain='0x0000' bus='0x00' slot='0x01' function='0x0' multifunction='on'/> </controller> <controller type='pci' index='2' model='pcie-root-port'> <model name='pcie-root-port'/> <target chassis='2' port='0x9'/> <alias name='pci.2'/> <address type='pci' domain='0x0000' bus='0x00' slot='0x01' function='0x1'/> </controller> <controller type='pci' index='3' model='pcie-root-port'> <model name='pcie-root-port'/> <target chassis='3' port='0xa'/> <alias name='pci.3'/> <address type='pci' domain='0x0000' bus='0x00' slot='0x01' function='0x2'/> </controller> <controller type='pci' index='4' model='pcie-root-port'> <model name='pcie-root-port'/> <target chassis='4' port='0xb'/> <alias name='pci.4'/> <address type='pci' domain='0x0000' bus='0x00' slot='0x01' function='0x3'/> </controller> <controller type='pci' index='5' model='pcie-root-port'> <model name='pcie-root-port'/> <target chassis='5' port='0xc'/> <alias name='pci.5'/> <address type='pci' domain='0x0000' bus='0x00' slot='0x01' function='0x4'/> </controller> <controller type='pci' index='6' model='pcie-root-port'> <model name='pcie-root-port'/> <target chassis='6' port='0xd'/> <alias name='pci.6'/> <address type='pci' domain='0x0000' bus='0x00' slot='0x01' function='0x5'/> </controller> <controller type='pci' index='7' model='pcie-root-port'> <model name='pcie-root-port'/> <target chassis='7' port='0xe'/> <alias name='pci.7'/> <address type='pci' domain='0x0000' bus='0x00' slot='0x01' function='0x6'/> </controller> <controller type='pci' index='8' model='pcie-root-port'> <model name='pcie-root-port'/> <target chassis='8' port='0xf'/> <alias name='pci.8'/> <address type='pci' domain='0x0000' bus='0x00' slot='0x01' function='0x7'/> </controller> <controller type='pci' index='9' model='pcie-root-port'> <model name='pcie-root-port'/> <target chassis='9' port='0x10'/> <alias name='pci.9'/> <address type='pci' domain='0x0000' bus='0x00' slot='0x02' function='0x0' multifunction='on'/> </controller> <controller type='pci' index='10' model='pcie-root-port'> <model name='pcie-root-port'/> <target chassis='10' port='0x11'/> <alias name='pci.10'/> <address type='pci' domain='0x0000' bus='0x00' slot='0x02' function='0x1'/> </controller> <controller type='pci' index='11' model='pcie-root-port'> <model name='pcie-root-port'/> <target chassis='11' port='0x12'/> <alias name='pci.11'/> <address type='pci' domain='0x0000' bus='0x00' slot='0x02' function='0x2'/> </controller> <interface type='bridge'> <mac address='52:54:00:7c:cc:0f'/> <source bridge='br0'/> <target dev='vnet2'/> <model type='virtio-net'/> <alias name='net0'/> <address type='pci' domain='0x0000' bus='0x01' slot='0x00' function='0x0'/> </interface> <serial type='pty'> <source path='/dev/pts/1'/> <target type='isa-serial' port='0'> <model name='isa-serial'/> </target> <alias name='serial0'/> </serial> <console type='pty' tty='/dev/pts/1'> <source path='/dev/pts/1'/> <target type='serial' port='0'/> <alias name='serial0'/> </console> <channel type='unix'> <source mode='bind' path='/var/lib/libvirt/qemu/channel/target/domain-3-Buzz_W11/org.qemu.guest_agent.0'/> <target type='virtio' name='org.qemu.guest_agent.0' state='connected'/> <alias name='channel0'/> <address type='virtio-serial' controller='0' bus='0' port='1'/> </channel> <input type='mouse' bus='ps2'> <alias name='input0'/> </input> <input type='keyboard' bus='ps2'> <alias name='input1'/> </input> <tpm model='tpm-tis'> <backend type='emulator' version='2.0' persistent_state='yes'/> <alias name='tpm0'/> </tpm> <audio id='1' type='none'/> <hostdev mode='subsystem' type='pci' managed='yes'> <driver name='vfio'/> <source> <address domain='0x0000' bus='0x43' slot='0x00' function='0x0'/> </source> <alias name='hostdev0'/> <rom file='/mnt/user/domains/gpu/gtx1660.dump'/> <address type='pci' domain='0x0000' bus='0x05' slot='0x00' function='0x0'/> </hostdev> <hostdev mode='subsystem' type='pci' managed='yes'> <driver name='vfio'/> <source> <address domain='0x0000' bus='0x0e' slot='0x00' function='0x3'/> </source> <alias name='hostdev1'/> <address type='pci' domain='0x0000' bus='0x06' slot='0x00' function='0x0'/> </hostdev> <hostdev mode='subsystem' type='pci' managed='yes'> <driver name='vfio'/> <source> <address domain='0x0000' bus='0x43' slot='0x00' function='0x1'/> </source> <alias name='hostdev2'/> <address type='pci' domain='0x0000' bus='0x07' slot='0x00' function='0x0'/> </hostdev> <hostdev mode='subsystem' type='pci' managed='yes'> <driver name='vfio'/> <source> <address domain='0x0000' bus='0x0d' slot='0x00' function='0x3'/> </source> <alias name='hostdev3'/> <address type='pci' domain='0x0000' bus='0x08' slot='0x00' function='0x0'/> </hostdev> <hostdev mode='subsystem' type='pci' managed='yes'> <driver name='vfio'/> <source> <address domain='0x0000' bus='0x43' slot='0x00' function='0x2'/> </source> <alias name='hostdev4'/> <address type='pci' domain='0x0000' bus='0x09' slot='0x00' function='0x0'/> </hostdev> <hostdev mode='subsystem' type='pci' managed='yes'> <driver name='vfio'/> <source> <address domain='0x0000' bus='0x43' slot='0x00' function='0x3'/> </source> <alias name='hostdev5'/> <address type='pci' domain='0x0000' bus='0x0a' slot='0x00' function='0x0'/> </hostdev> <memballoon model='none'/> </devices> <seclabel type='dynamic' model='dac' relabel='yes'> <label>+0:+100</label> <imagelabel>+0:+100</imagelabel> </seclabel> </domain>
-
Post your script and logs. Also, are you running the script in the background........
-
I've never had this problem (carefully) transferring files between shared drives.
-
Sorry, I didn't really understand the SA account creation bit myself and I think I fluked it! I can't remember who added the instructions to the Github as it wasn't me.
-
Probably Plex - stop each docker one by one to see what's hammering your mount
-
yes
-
The files are in the right place - /user/mount_mergerfs/gdrive as you are using mergerfs not unionfs (mergerfs replaced unionfs)
-
Dunno, maybe try /user? Maybe using /mnt/user does something odd

-
Instructions are on GitHub https://github.com/BinsonBuzz/unraid_rclone_mount
-
set your cron job and it will mount eventually - my cron is set to every 3 mins
-
Because unRAID doesn't support mergerfs so the script has to install it. which is supposed to happen you haven't installed the unmount/startup script to run at array start or array stop
-
you should point plex to the mergerfs folder. You have to start plex AFTER you've created the mount, which might explain your problem.
-
Maybe try moving your cache location?
-
sorry, I should have been more specific. I can list the shares, but when I try to connect it either (i) rejects my username and password, or (ii) just spins forever when I try to browse a share and then throws up an error.
-
For the last week or so I've been unable to connect to my unRAID SMB shares from VMs or my laptop. It all used to work fine, but access has gone completely for private shares. I'm not sure if this is the root cause but the problems might have started after I tried to upgrade to 6.10rc2 around the same time, but I had to rollback as my VM performance was terrible taking about 30 mins to boot. I've read through a few posts re SMB issues but nothing has worked. I'm getting a bit desperate now. Help please! highlander-diagnostics-20220226-1410.zip
-
All looks fine. Did you wait 15 mins after creating the test file?
-
add this to your upload script in the custom commands. It'll create a log file you can see: --log-file=/home/user/wherever_you_want_$CounterNumber.txt
-
use the user scripts plugin instead if you want to see logs
-
I don't think 0 is a good idea as e.g. it could mean that all writes will go direct to google drive and won't be retried if there's a problem. You'll also miss out on read benefits e.g. if same TV episode is accessed, it will load faster from the cache rather than downloading again - I think this also helps with seeking. I have my caches currently set to between 10 and 200GB depending on my retention target. After posting earlier I did some quick research and for a stable rclone experience you should put something in.
-
The vfs cache stores reads and writes on a first in, first out basis if the file isn't in use. E.g. it will store a plex stream so that it doesn't need downloading again for increased responsiveness, new writes direct to the mount (not the local folder via mergerfs) will go here first (if there's space). I keep mine small as my plex library scans and plex usage mean it would need to be massive to have a decent hit rate. I probably should investigate the implications of disabling it as it causes endless writes, and I'd probably be better off just using memory.
-
you must have -rc somewhere in the custom commands - you have to move it somewhere else. Re the bind mount - either change it to N, or make sure you enter a different IP for RCloneMountIP
-
read the message - you are trying to start the remote control twice and bind to the same IP.....
-
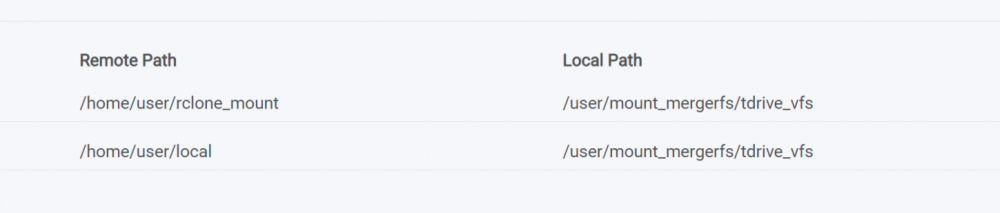
I've managed this weekend to successfully integrate a seedbox into my setup and I'm sharing how I did it. I've purchased a cheap seedbox as my Plex streams were taking up too much bandwidth as I've gone from a 1000/1000 -->360/180 -->1000/120 connection, so it's been a pain trying to balance each day the bandwidth and file space requirements of moving files from /local to the cloud, and having enough bandwidth for Plex, backup jobs etc etc My setup now is: 1. Seedbox downloading to /home/user/local/nzbget and /home/user/local/rutorrent 2. rclone script running each min to move files from /home/user/local/nzbget --> tdrive_vfs:seedbox/nzbget and sync files from /home/user/local/rutorrent --> tdrive:seedbox/rutorrent (torrent files need to stay for seeding) 3. added remote path to ***arr to look in /user/mount/mergerfs/tdrive_vfs for files in /home/user/local (thanks @Akatsuki) It's working perfectly so far as my local setup hasn't changed, with rclone polling locally for changes that have occured in the cloud. Here's my script - I've stripped out all the options as I don't need them: #!/bin/bash ###################### ### Upload Script #### ###################### ### Version 0.95.5 ### ###################### # REQUIRED SETTINGS ModSort="ascending" # "ascending" oldest files first, "descending" newest files first # Add extra commands or filters Command1="--exclude _unpack/**" Command2="--fast-list" Command3="" Command4="" Command5="" Command6="" Command7="" Command8="" # OPTIONAL SETTINGS CountServiceAccounts="14" ####### END SETTINGS ####### echo "$(date "+%d.%m.%Y %T") INFO: *** Starting Core Upload Script ***" ####### create directory for script files ####### mkdir -p /home/user/rclone/remotes/tdrive_vfs ####### Check if script already running ########## echo "$(date "+%d.%m.%Y %T") INFO: *** Starting rclone_upload script ***" if [[ -f "/home/user/rclone/remotes/tdrive_vfs/upload_running" ]]; then echo "$(date "+%d.%m.%Y %T") INFO: Exiting as script already running." exit else echo "$(date "+%d.%m.%Y %T") INFO: Script not running - proceeding." touch /home/user/rclone/remotes/tdrive_vfs/upload_running fi ####### Rotating serviceaccount.json file ####### cd /home/user/rclone/remotes/tdrive_vfs/ CounterNumber=$(find -name 'counter*' | cut -c 11,12) CounterCheck="1" if [[ "$CounterNumber" -ge "$CounterCheck" ]];then echo "$(date "+%d.%m.%Y %T") INFO: Counter file found." else echo "$(date "+%d.%m.%Y %T") INFO: No counter file found . Creating counter_1." touch /home/user/rclone/remotes/tdrive_vfs/counter_1 CounterNumber="1" fi ServiceAccount="--drive-service-account-file=/home/user/rclone/service_accounts/sa_spare_upload$CounterNumber.json" echo "$(date "+%d.%m.%Y %T") INFO: Adjusted service_account_file for upload remote to ${ServiceAccountFile}${CounterNumber}.json based on counter ${CounterNumber}." ####### Transfer files ########## # Upload nzbget files /usr/local/bin/rclone move /home/user/local tdrive_vfs: $ServiceAccount --config=/home/user/.config/rclone/rclone.conf --user-agent="external" -vv --order-by modtime,$ModSort --min-age 1m $Command1 $Command2 $Command3 $Command4 $Command5 $Command6 $Command7 $Command8 --drive-chunk-size=128M --transfers=4 --checkers=8 --exclude rutorrent/** --exclude deluge/** --exclude *fuse_hidden* --exclude *_HIDDEN --exclude .recycle** --exclude .Recycle.Bin/** --exclude *.backup~* --exclude *.partial~* --drive-stop-on-upload-limit --delete-empty-src-dirs --log-file=/home/user/rclone/upload_log.txt # Sync rutorrent files /usr/local/bin/rclone sync /home/user/local/seedbox/rutorrent tdrive_vfs:seedbox/rutorrent $ServiceAccount --config=/home/user/.config/rclone/rclone.conf --user-agent="external" -vv --order-by modtime,$ModSort --min-age 1m $Command1 $Command2 $Command3 $Command4 $Command5 $Command6 $Command7 $Command8 --drive-chunk-size=128M --transfers=4 --checkers=8 --exclude *fuse_hidden* --exclude *_HIDDEN --exclude .recycle** --exclude .Recycle.Bin/** --exclude *.backup~* --exclude *.partial~* --drive-stop-on-upload-limit --log-file=/home/user/rclone/sync_log.txt ####### Remove Control Files ########## # update counter and remove other control files if [[ "$CounterNumber" == "$CountServiceAccounts" ]];then rm /home/user/rclone/remotes/tdrive_vfs/counter_* touch /home/user/rclone/remotes/tdrive_vfs/counter_1 echo "$(date "+%d.%m.%Y %T") INFO: Final counter used - resetting loop and created counter_1." else rm /home/user/rclone/remotes/tdrive_vfs/counter_* CounterNumber=$((CounterNumber+1)) touch /home/user/rclone/remotes/tdrive_vfs/counter_$CounterNumber echo "$(date "+%d.%m.%Y %T") INFO: Created counter_${CounterNumber} for next upload run." fi # remove dummy files and replace directories rm /home/user/rclone/remotes/tdrive_vfs/upload_running mkdir -p /home/user/local/seedbox/nzbget/completed echo "$(date "+%d.%m.%Y %T") INFO: Script complete" exit
-
If you are sure the old one isn't in use, then yes.
-
I never said there was a problem with the mount! You have to open dockers that access the mount AFTER the mount has successfully been created. That's why the script takes care of this




