





Siwat2545
Members
-
Joined
-
Last visited
Everything posted by Siwat2545
-
I updated the container put git+https://github.com/luisiam/homebridge-liftmaster2.git in the packages field and it should work now!
-
Glad to hear it working (:
-
Installing from GitHub is not supported at the moment but in the meantime you can use the console to install it
-
Are your plugins configured correctly? Can you send me your logs
-
Search for HomeBridge With Gui for version with guix
-
There is no web ui in the no ui container if you want to use the ui please use the HomeBridge with webui container, the homekit code is in the container log or you could install this https://www.npmjs.com/package/homebridge-config-ui-x manually and access it on port 8080
-
Cool, Glad to hear that it worked
-
A config.json with all your config in it, please refer to homebridge documentation on how to write your config file
-
HomeBridge Instruction Instruction: 1. in the "packages" variable, place the all packages name you wanted in the box seperated by space (Example is in the box, Plugin list is in https://www.npmjs.com/search?q=homebridge-plugin) 2. create the container 3. create the config.json in the homebridge directory (/mnt/user/appdata/homebridge/config.json) 4. add your devices to the config.json by refering to https://github.com/nfarina/homebridge
-
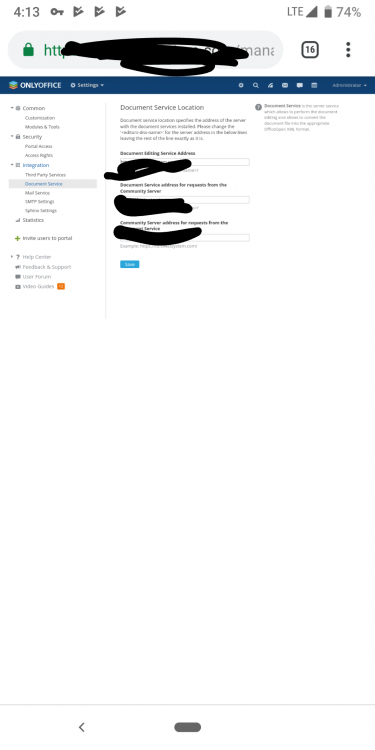
Here are some questions I need to ask 1.what is your unraid server internal ip 2.are you accessing it from the internal Network or the external Network 3.what are the configuration for the onlyoffice community edition server bridge (the page in the picture) 4.are you using reverse proxy?
-
I just created the homebridge docker, you can download it using community application now.
-
[Application List - Stable] 1. Facebox - Facebox detects and identifies faces in photos. You can teach facebox with as little as one sample image. Project Page : https://machinebox.io/docs/facebox Dockerhub Page : https://hub.docker.com/r/machinebox/facebox/ GitHub Page : https://github.com/SiwatINC/unraid-ca-repository/tree/master/docker-template Latest Version : Release 1.0 - 13/11/2018 Known Issue : Faces will disappear after an update. 2. OnlyOffice Document Server - ONLYOFFICE Document Server is an online office suite comprising viewers and editors for texts, spreadsheets and presentations, fully compatible with Office Open XML formats: .docx, .xlsx, .pptx and enabling collaborative editing in real time. Project Page : https://www.onlyoffice.com/ Dockerhub Page : https://hub.docker.com/r/onlyoffice/documentserver/ GitHub Page : https://github.com/SiwatINC/unraid-ca-repository/tree/master/docker-template Latest Version : Release 1.0 - 15/11/2018 Support: https://forum.onlyoffice.com/c/documents/32 3. OnlyOffice Community Server -ONLYOFFICE Community Server is a free open source collaborative system developed to manage documents, projects, customer relationship and email correspondence, all in one place. Project Page : https://www.onlyoffice.com/ Dockerhub Page : https://hub.docker.com/r/onlyoffice/communityserver/ GitHub Page : https://github.com/SiwatINC/unraid-ca-repository/tree/master/docker-template Latest Version : Release 1.0 - 15/11/2018 4. Homebridge - Homebridge is a lightweight NodeJS server you can run on your home network that emulates the iOS HomeKit API. It supports Plugins, which are community-contributed modules that provide a basic bridge from HomeKit to various 3rd-party APIs provided by manufacturers of "smart home" devices. Project Page : https://homebridge.io/ Dockerhub Page : https://hub.docker.com/r/siwatinc/homebridge_unraid/ GitHub Page : https://github.com/SiwatINC/unraid-ca-repository/tree/master/docker-template Latest Version : Release 1.0 - 17/11/2018 5. Homebridge with GUI - Homebridge with GUI (default user:pass=admin:admin) is a lightweight NodeJS server you can run on your home network that emulates the iOS HomeKit API. It supports Plugins, which are community-contributed modules that provide a basic bridge from HomeKit to various 3rd-party APIs provided by manufacturers of "smart home" devices. Project Page : https://homebridge.io/ Dockerhub Page : https://hub.docker.com/r/siwatinc/homebridge_gui_unraid/ GitHub Page : https://github.com/SiwatINC/unraid-ca-repository/tree/master/docker-template Latest Version : Release 1.0 - 17/11/2018 5. Phlex Phlex(Flex TV) is a web application that interfaces between google Assistant and Plex to allow you to control playback of media using Actions for Google or IFTTT. Additionally, it interfaces with the API’s for Sonarr, Radarr, Couchpotato, Sickbeard, and Sickrage. It also has customizeable webhooks, so you can basically control anything that has an open API with your voice. If you can send data to a URL to do a thing, you can program it in Flex TV. It is recomended to use reverse proxy to enable https Project Page : https://github.com/d8ahazard/Phlex Dockerhub Page : https://hub.docker.com/r/siwatinc/phlex_unraid/ GitHub Page : https://github.com/SiwatINC/unraid-ca-repository/tree/master/docker-template Latest Version : Release 1.0 - 20/11/2018 Disclaimer: I am not the developer of these application, I only port the application in to the docker format and write it's XML File!
-
Yes this will work on 6.5.3
-
There is some optimization on workstation uses but cuda IS NOT a quadro driver
-
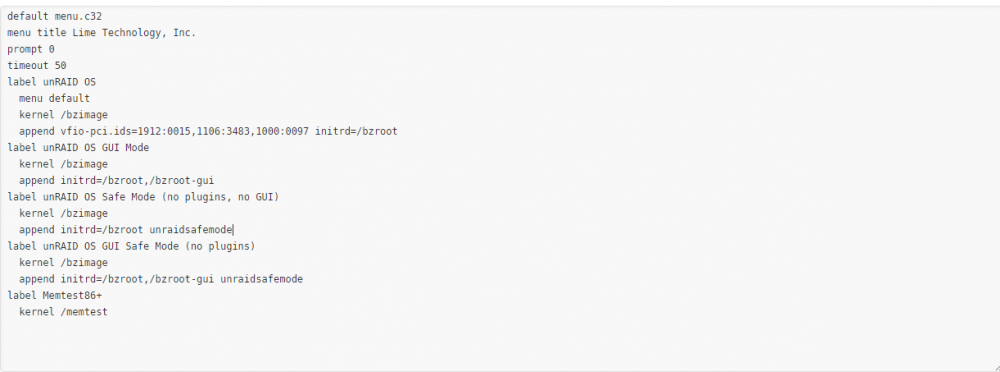
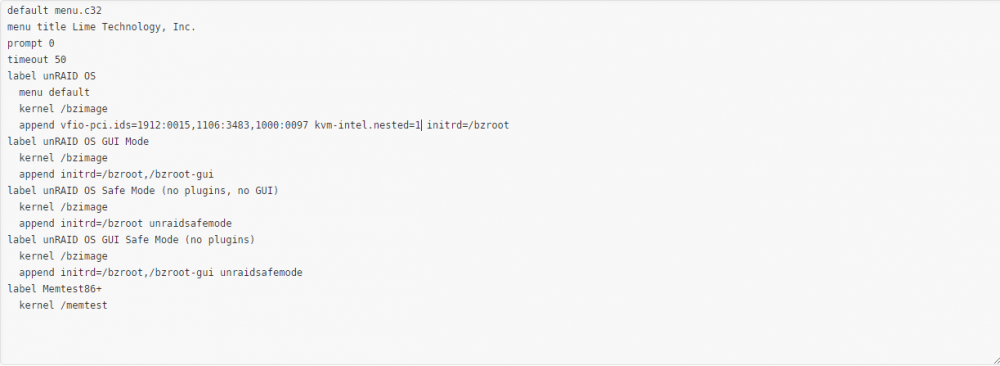
In this guide I will be tell you how to run Hardware accerated virturalization in Unraid VM Requirement Intel CPU that support vm-x NOTE : This won't work with Hyper-v on some case , I wouldn't try if I were you because if it fail It might corupt the vm ! First Go to Main Tab Click on The "Flash" text and an option to your sys linux Like the following BEFORE: AFTER: Reboot Then go to VM Tab and click on the vm you want to enable nested virturalization and click edit XML add <feature policy='require' name='vmx'/> and change model to custom like the following BEFORE: AFTER: click Apply Then Start, Done




-
This issue will solve the issue when Nvidia somehow find out that the machine is a virtural one even when hyper-v is turned off
-
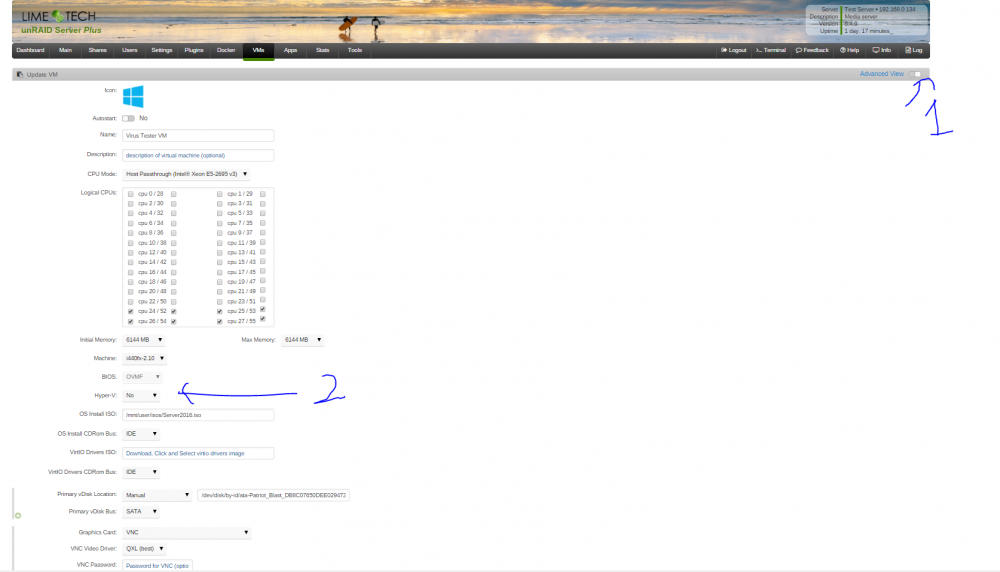
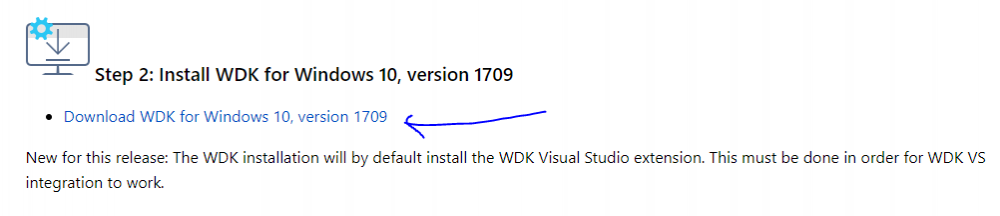
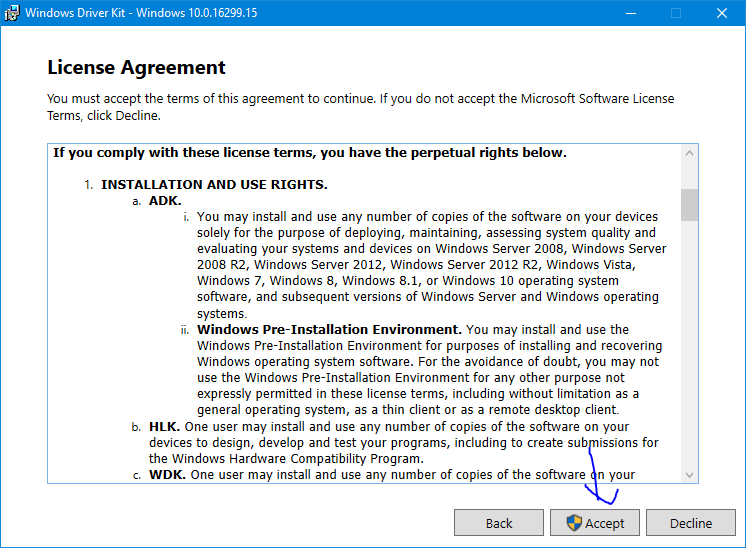
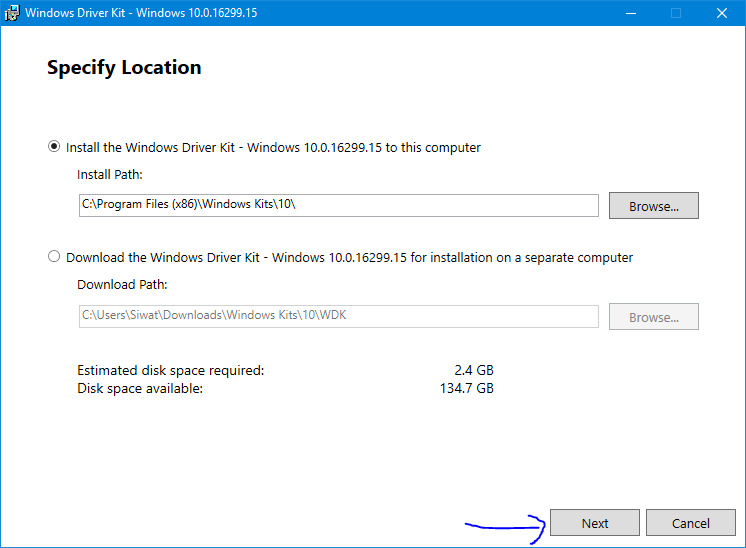
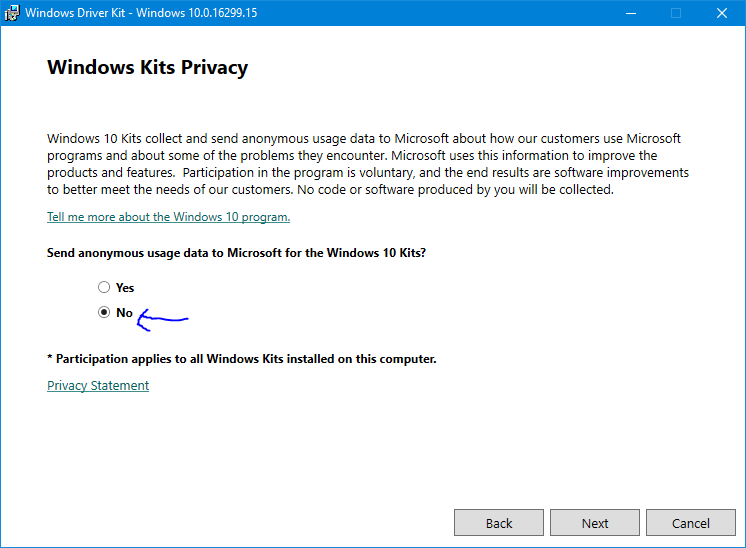
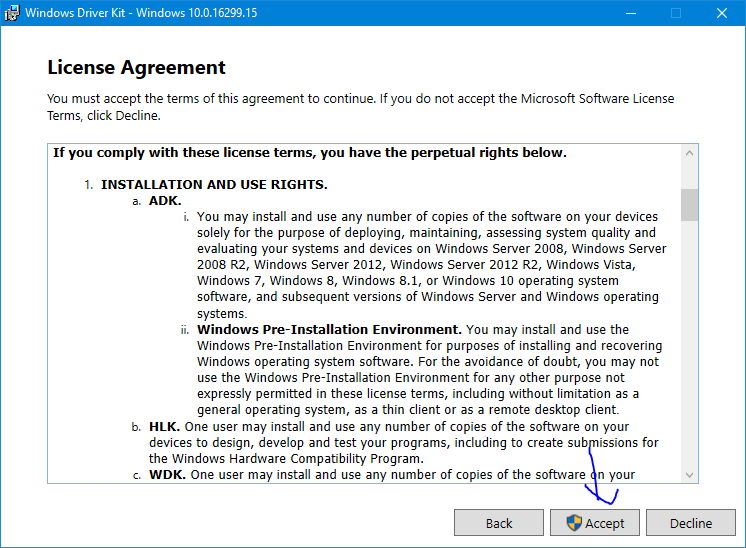
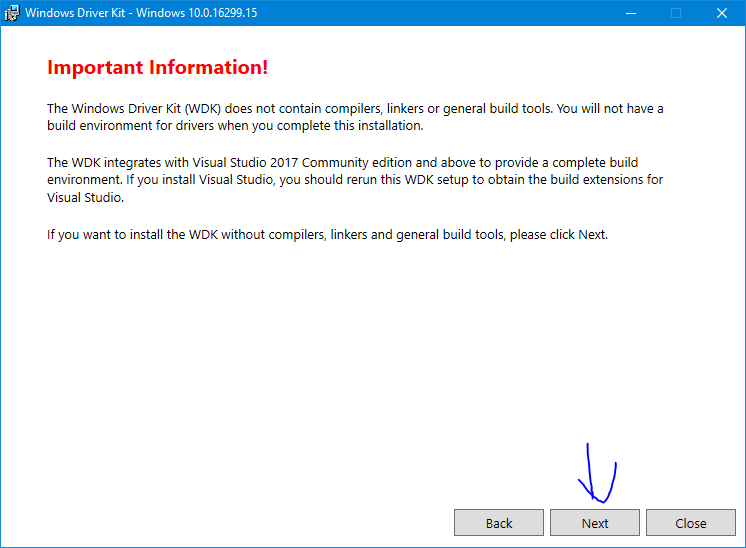
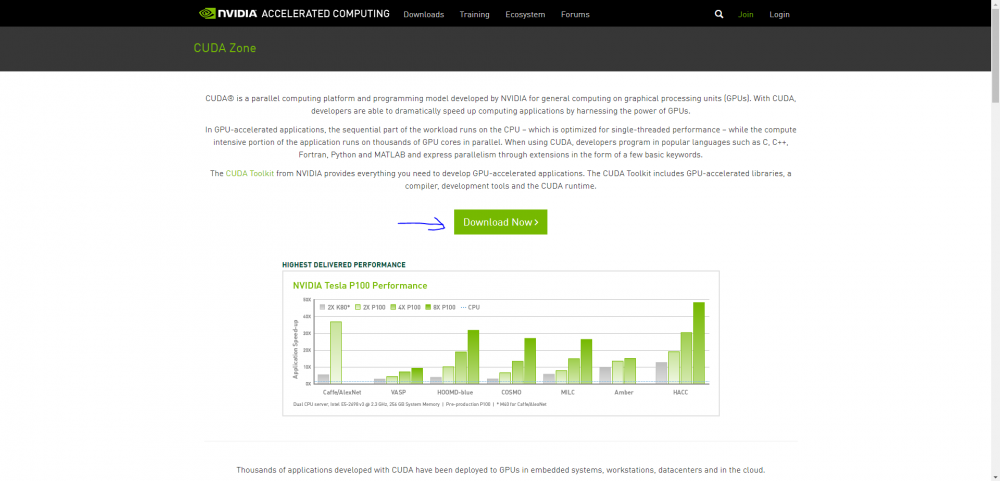
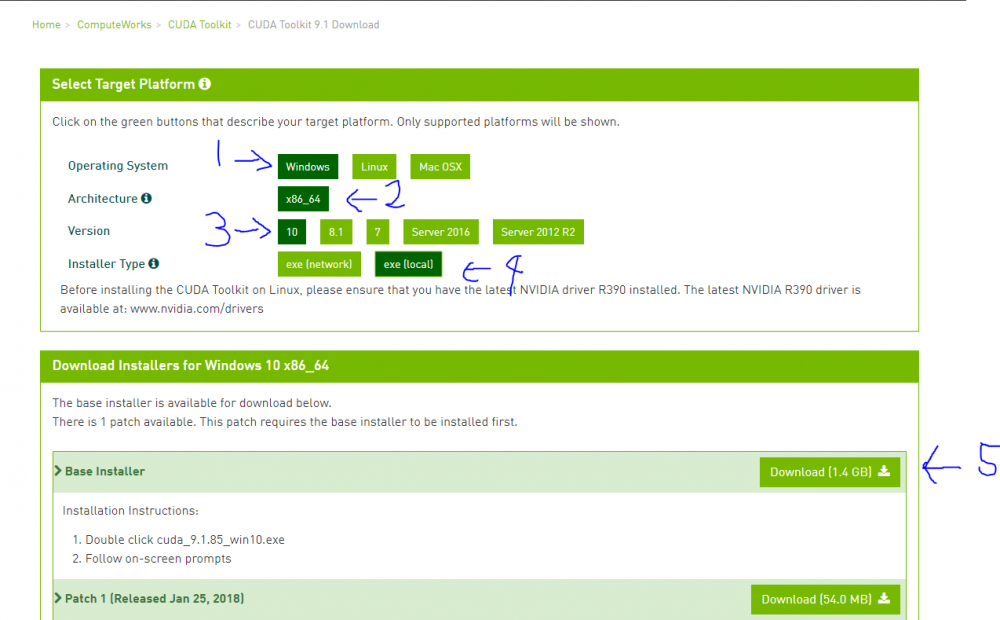
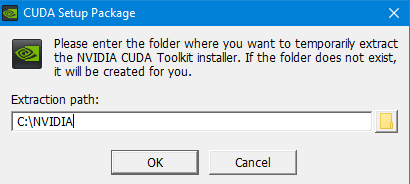
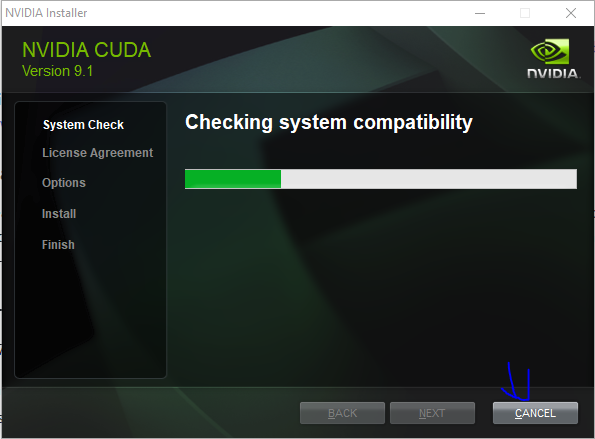
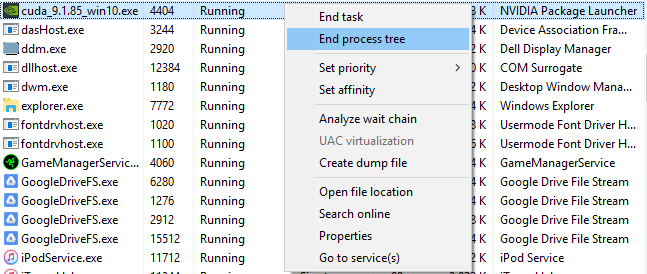
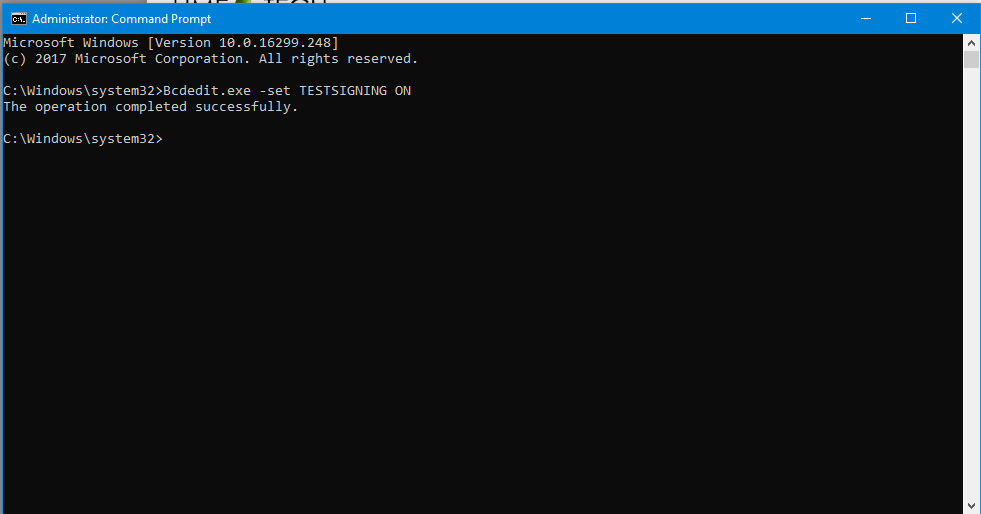
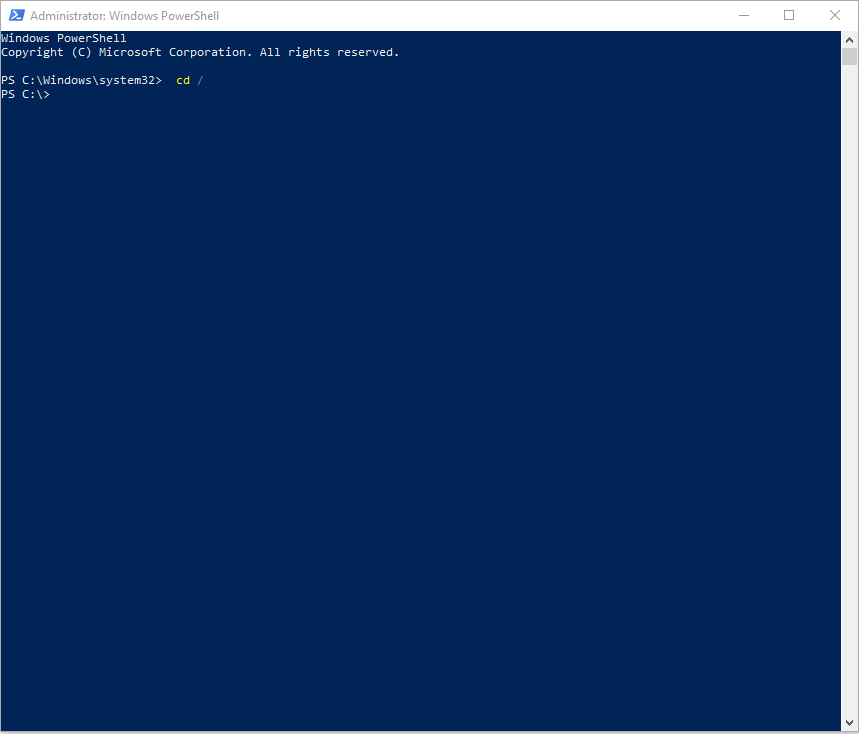
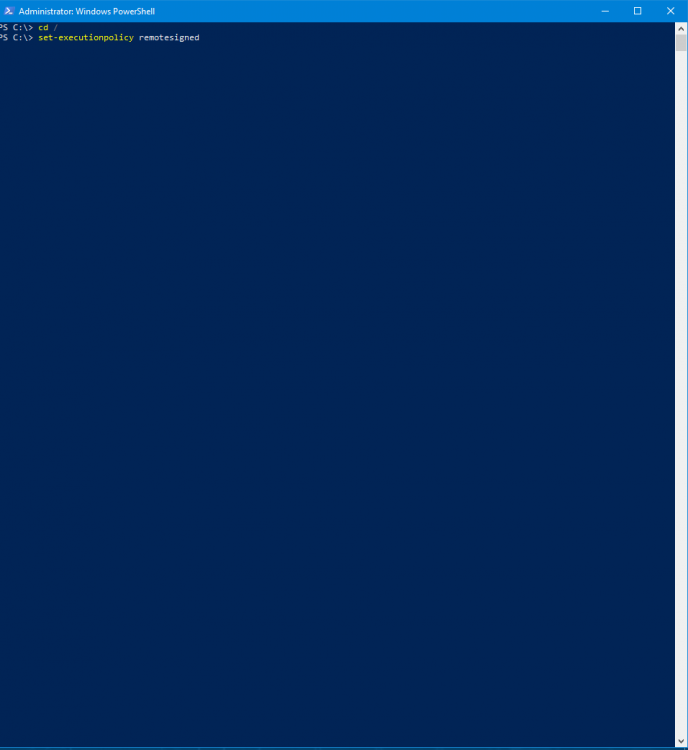
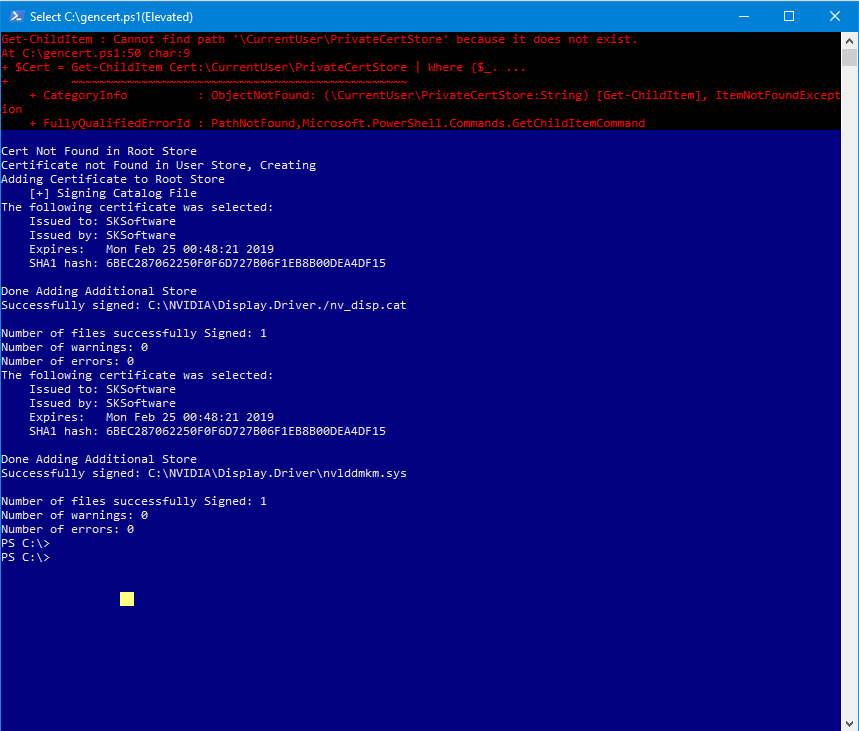
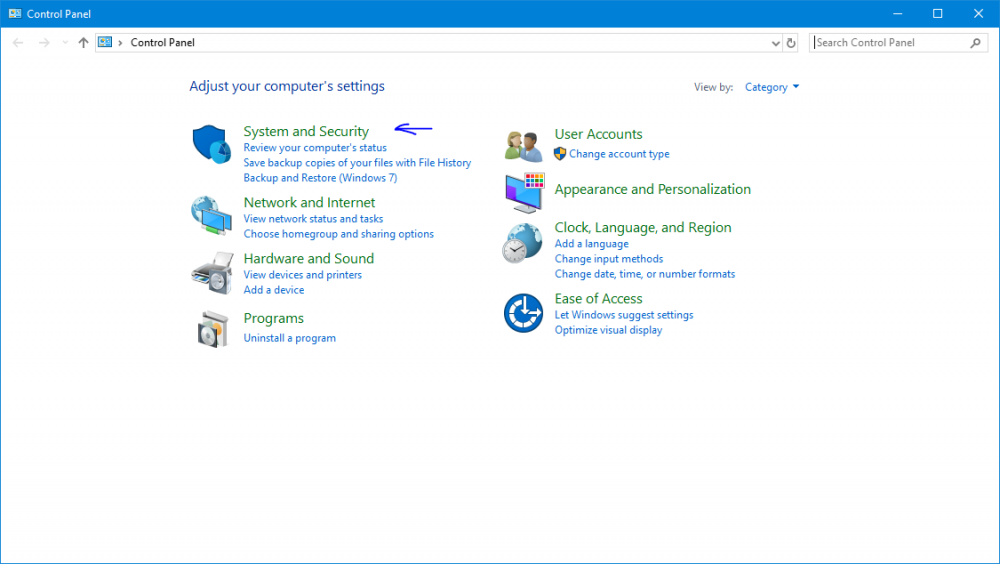
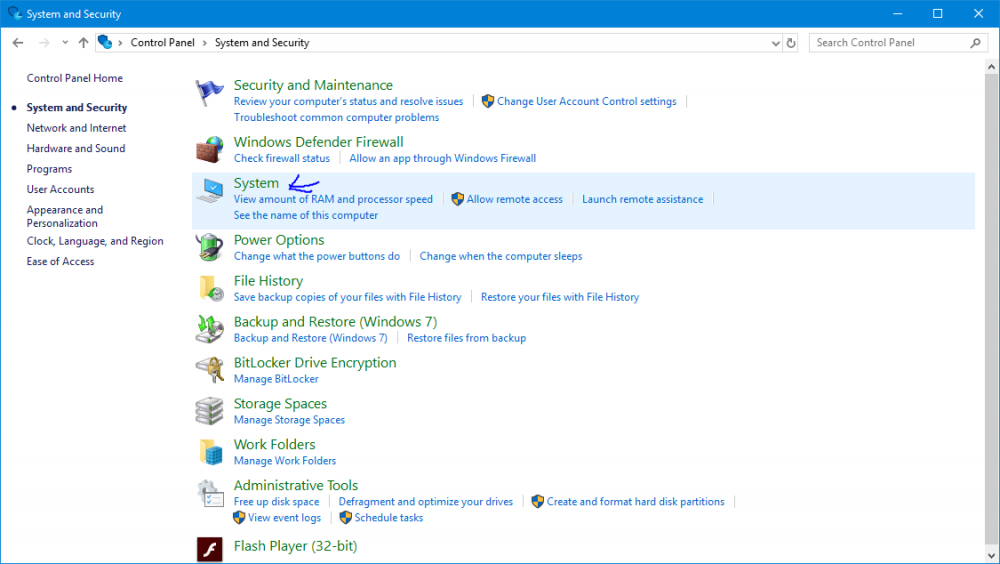
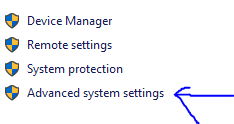
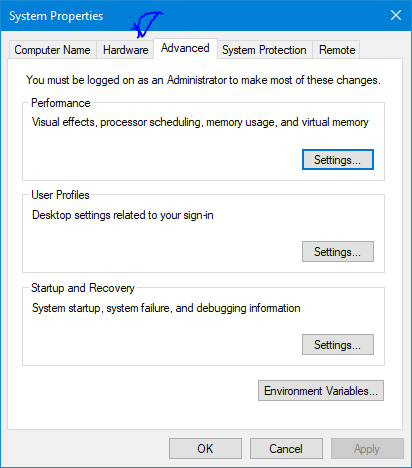
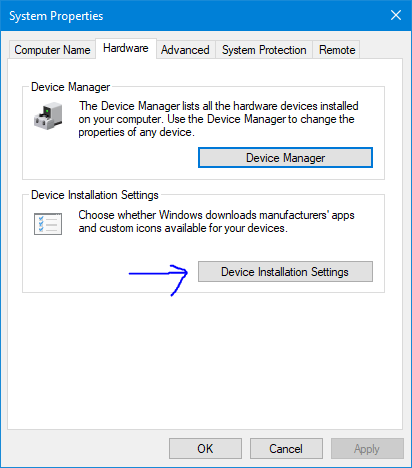
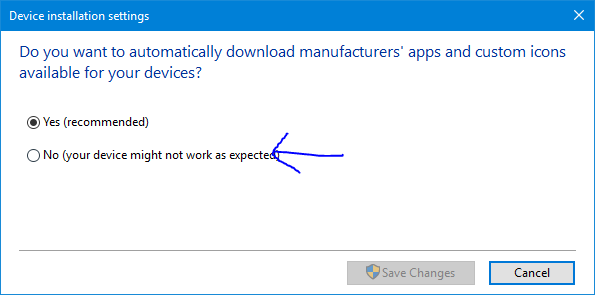
TLDR : This issue is caused by Nvidia driver refusing to be loaded when a virtural enviroment is detected. The Easy Work Around For most scarinos, setting the Hyper-V option to No 1. Go to VMs tab 2. Go to edit VM's Configuration 3. Switch to "Advance Mode" 4. Disable Hyper-V The More "Advanced Work Around" This method is for one's that turning hyper-v off does not help, In this method We'll be patching the nvidia drive. Requirement: Other Windows 10 Machine Decent Internet Connection Decent Disk Space Avaliable OVMF VM (SeaBIOS Won't Work) A USB Flash Drive Step 1: [On External Machine] Install Windows Driver Kit Navigate to the following Link : https://docs.microsoft.com/en-us/windows-hardware/drivers/download-the-wdk Download WDK for Windows 10 Downloading Nvidia CUDA : Navigate to https://developer.nvidia.com/cuda-zone After It has been download, Run it But change the extraction Path to C:\NVIDIA If the following windows are shown DO NOT CLICK CANCEL You must Quickly end It's process tree with task manager (Cancel Will result in the setup deleting the temp files) Now Let's Enable Test Signing, Open A CMD windows as Administrator and type the following in and press enter "Bcdedit.exe -set TESTSIGNING ON" It should Say "The operation completed successfully", Reboot Your Computer If the step is done correctly , You will See the message "Test Mode" on the buttom left of the wallpaper Next, Download nvidia-kvm-patcher by sk1080 from https://codeload.github.com/sk1080/nvidia-kvm-patcher/zip/master extract "patcher.ps1" and "gencert.ps1" to C:\ then Open A Powershell Windows as Administrator type in cd / Set Execution Policy to Remote Sign with "set-executionpolicy remotesigned" Press Y then Enter then type in ./patcher.ps1 C:\NVIDIA\Display.Driver The following Should Happen : Copy The NVIDIA Folder to your usb drive then unplug it and open CMD as administrator again Type in Bcdedit.exe -set TESTSIGNING OFF Open Powershell As Administrator, Type in "set-executionpolicy remotesigned" , This time answer N NOW LET'S CREATE OUR VMS ! Attach the usb drive you just moved your driver in to the unraid system Use Advance Mode Set Hyper-V to No,and Set BIOS to OVMF, attach your usb to the vm too USE VNC as your graphic and Select NONE as Sound Install windows as usual (DO NOT INSTALL THE NETWORK DRIVER) Disable Windows 10 Auto driver installation by [IN VM CONTROLLED USING VNC] 1. Open Control Panel Navigate by following the picture Click Save Changes [STILL IN VM] Next We need to disable driver signature enforcement by running cmd as administrator type in "bcdedit.exe /set nointegritychecks on" then reboot Next move the driver into your desktop Shutdown the VMs enable ACS override patch, Reboot Unraid attach the Graphic card and Sound Device Install The driver, Install Network Card Driver DO NOT UPDATE YOUR DRIVER DONE ! If the step doesn't work try with driver version 372.54 ******If all that doesn't work Here's a list of thing that It fixed client system (TLDR : System specific Fixes) 1. Changing the gpu slot to the second one and put another gpu in the first slot 2. vfio-pci the card 3. Disable Hyper-V 4. Dumping the bios (Work Quite Well) 5. Use VNC With The gpu 6. disable option rom on the gpu (Avaliable on some server board or workstation board, Rarely on consumer board) 7. use an older driver
-
I have X10DAC and It work just fine Sent from my iPhone using Tapatalk
-
I'm using unraid on my server Spec : 2xXeon E5 (vt-d Supported) Supermicro X10DAC 64 GB ECC memory Nvidia GTX1060 (VM graphic) ATI Card (console graphic) I passthrough Nvidia Quadro M2000 with no problem but this time I buy Zotac Geforce GTX 1060 and I installed it's driver and it fail with error code 43(device manager) I tried disable Hyper-V turn off hyper-V clock Add -kvm=off in qemu and assign rom file from techpowerup non of that work ----HERE--IS----MY---XML-FILE------------------------ <domain type='kvm'> <name>Gaming Rig</name> <uuid>fb11e9d7-11f5-6518-1eb4-f9baaa1404a5</uuid> <metadata> <vmtemplate xmlns="unraid" name="Windows 10" icon="windows.png" os="windows10"/> </metadata> <memory unit='KiB'>6291456</memory> <currentMemory unit='KiB'>6291456</currentMemory> <memoryBacking> <nosharepages/> <locked/> </memoryBacking> <vcpu placement='static'>12</vcpu> <cputune> <vcpupin vcpu='0' cpuset='44'/> <vcpupin vcpu='1' cpuset='45'/> <vcpupin vcpu='2' cpuset='46'/> <vcpupin vcpu='3' cpuset='47'/> <vcpupin vcpu='4' cpuset='48'/> <vcpupin vcpu='5' cpuset='49'/> <vcpupin vcpu='6' cpuset='50'/> <vcpupin vcpu='7' cpuset='51'/> <vcpupin vcpu='8' cpuset='52'/> <vcpupin vcpu='9' cpuset='53'/> <vcpupin vcpu='10' cpuset='54'/> <vcpupin vcpu='11' cpuset='55'/> </cputune> <os> <type arch='x86_64' machine='pc-q35-2.5'>hvm</type> </os> <features> <acpi/> <apic/> </features> <cpu> <topology sockets='1' cores='12' threads='1'/> </cpu> <clock offset='localtime'> <timer name='rtc' tickpolicy='catchup'/> <timer name='pit' tickpolicy='delay'/> <timer name='hpet' present='no'/> </clock> <on_poweroff>destroy</on_poweroff> <on_reboot>restart</on_reboot> <on_crash>restart</on_crash> <devices> <emulator>/usr/local/sbin/qemu</emulator> <disk type='file' device='cdrom'> <driver name='qemu' type='raw'/> <source file='/mnt/user/isos/Win10_Pro_1511_English_x64_july_2016.iso'/> <target dev='hda' bus='sata'/> <readonly/> <boot order='2'/> <address type='drive' controller='0' bus='0' target='0' unit='0'/> </disk> <disk type='file' device='cdrom'> <driver name='qemu' type='raw'/> <source file='/mnt/user/isos/virtio-win-0.1.126.iso'/> <target dev='hdb' bus='sata'/> <readonly/> <address type='drive' controller='0' bus='0' target='0' unit='1'/> </disk> <disk type='file' device='disk'> <driver name='qemu' type='raw' cache='writeback'/> <source file='/mnt/user/domains/Gaming Rig/vdisk1.img'/> <target dev='hdc' bus='sata'/> <boot order='1'/> <address type='drive' controller='0' bus='0' target='0' unit='2'/> </disk> <controller type='usb' index='0' model='nec-xhci'> <address type='pci' domain='0x0000' bus='0x00' slot='0x07' function='0x0'/> </controller> <controller type='sata' index='0'> <address type='pci' domain='0x0000' bus='0x00' slot='0x1f' function='0x2'/> </controller> <controller type='pci' index='0' model='pcie-root'/> <controller type='pci' index='1' model='dmi-to-pci-bridge'> <model name='i82801b11-bridge'/> <address type='pci' domain='0x0000' bus='0x00' slot='0x1e' function='0x0'/> </controller> <controller type='pci' index='2' model='pci-bridge'> <model name='pci-bridge'/> <target chassisNr='2'/> <address type='pci' domain='0x0000' bus='0x01' slot='0x01' function='0x0'/> </controller> <controller type='virtio-serial' index='0'> <address type='pci' domain='0x0000' bus='0x02' slot='0x02' function='0x0'/> </controller> <interface type='bridge'> <mac address='52:54:00:e3:46:31'/> <source bridge='br1'/> <model type='virtio'/> <address type='pci' domain='0x0000' bus='0x02' slot='0x01' function='0x0'/> </interface> <serial type='pty'> <target port='0'/> </serial> <console type='pty'> <target type='serial' port='0'/> </console> <channel type='unix'> <source mode='connect'/> <target type='virtio' name='org.qemu.guest_agent.0'/> <address type='virtio-serial' controller='0' bus='0' port='1'/> </channel> <input type='tablet' bus='usb'/> <input type='mouse' bus='ps2'/> <input type='keyboard' bus='ps2'/> <graphics type='vnc' port='-1' autoport='yes' websocket='-1' listen='0.0.0.0' keymap='en-us'> <listen type='address' address='0.0.0.0'/> </graphics> <video> <model type='qxl' ram='65536' vram='65536' vgamem='16384' heads='1'/> <address type='pci' domain='0x0000' bus='0x00' slot='0x01' function='0x0'/> </video> <hostdev mode='subsystem' type='pci' managed='yes'> <driver name='vfio'/> <source> <address domain='0x0000' bus='0x81' slot='0x00' function='0x0'/> </source> <address type='pci' domain='0x0000' bus='0x02' slot='0x03' function='0x0'/> </hostdev> <hostdev mode='subsystem' type='pci' managed='yes'> <driver name='vfio'/> <source> <address domain='0x0000' bus='0x81' slot='0x00' function='0x1'/> </source> <address type='pci' domain='0x0000' bus='0x02' slot='0x04' function='0x0'/> </hostdev> <hostdev mode='subsystem' type='usb' managed='no'> <source> <vendor id='0x048d'/> <product id='0x1172'/> </source> </hostdev> <hostdev mode='subsystem' type='usb' managed='no'> <source> <vendor id='0x093a'/> <product id='0x2700'/> </source> </hostdev> <hostdev mode='subsystem' type='usb' managed='no'> <source> <vendor id='0x1b1c'/> <product id='0x0c04'/> </source> </hostdev> <hostdev mode='subsystem' type='usb' managed='no'> <source> <vendor id='0x258a'/> <product id='0x0005'/> </source> </hostdev> <hostdev mode='subsystem' type='usb' managed='no'> <source> <vendor id='0x264a'/> <product id='0x2329'/> </source> </hostdev> <memballoon model='virtio'> <address type='pci' domain='0x0000' bus='0x02' slot='0x05' function='0x0'/> </memballoon> </devices> <qemu:commandline> <qemu:arg value='-cpu'/> <qemu:arg value='host,kvm=off'/> </qemu:commandline> </domain> ----------------------------------------------------------------------------






