





opixo
Members
-
Joined
-
Last visited
Everything posted by opixo
-
Hey, take a look here, might be interesting for you: (2198) Unraid 7.3 Beta: Set Up a New Server with Internal Boot - YouTube and this: Unraid 7.3 Beta: Convert Your Server to Internal Boot
-
Well, with a bit of help from Opus 4.7 here are a few reasonable things to check out, my main issue was that the USB drive (a very old one actually but very reliable) was partitioned in a way that Unraid 7.3.0 didn't like (strangely since I had same USB key since 2017 and never had any issues) however apparently yours might be related so something different. Also, my setup is a little bit more complex, I am using a Q-Nap JBOD and have had: 1. 8-year-old superfloppy USB — this is the headline. Most newer flash sticks were already MBR-partitioned, which is why this regression isn't hitting everybody. 2. Modded go script with custom boot-time stuff 3. Custom kernel cmdline (pcie_aspm=off pcie_port_pm=off for ASM1164) 4. /boot/extra/ with pulseway (manual package install from 2018) 5. All-ZFS topology (no Unraid btrfs cache pool, no parity disk for media) Couple of things worth checking — your symptom is actually a bit different from mine. Mine failed after the kernel was running (emhttpd rejecting the flash); yours is freezing visibly at loading /bzroot...ok, which is much earlier. That said, you might be hitting a display-only issue while the system is actually booting fine. The 7.3.0 kernel jumped from 6.12.x to 6.18.x and the new i915/DRM stack can blank the console on some Intel iGPU systems after bzroot even when boot proceeds normally. Please try these in order: 1. Power on, wait a full 5 minutes, then from another machine on the same network try: - ping <tower-ip> - Open http://<tower-ip> in a browser - ssh root@<tower-ip> If any of those respond, your system is booting fine and it's just a display issue — see step 3. 2. If nothing responds, take the flash to your Windows laptop and verify the rollback actually took: - On the USB root, check that bzimage, bzroot, bzroot-gui, bzfirmware, bzmodules have dates matching your old 7.2.3 (not 7.3.0). Easy to mistakenly copy the wrong direction. - Open bzimage.sha256 in Notepad and confirm the hash matches bzimage (you can compute it in PowerShell with Get-FileHash bzimage -Algorithm SHA256). Any mismatch and the kernel will refuse / hang. - Open syslinux/syslinux.cfg — the kernel /bzimage and initrd /bzroot,/bzfirmware,/bzmodules lines should not reference anything in /previous/. 3. If you can SSH in but the console is blank, you're hitting the iGPU/framebuffer issue. From SSH, edit /boot/syslinux/syslinux.cfg and add nomodeset video=vesafb:off i915.modeset=0 to the append line of the Unraid OS label. Reboot — console should come back. This is purely a display workaround, doesn't affect anything else. 4. Also check what my thread is really about (separate from your boot freeze): in Windows, open Disk Management, find the USB, and look at the partition layout. If it shows "Removable - no partition table" with a single FAT32 volume spanning the whole disk, you have the superfloppy layout my post addresses — and even if you get past your current boot freeze, you'll hit ENOFLASH4 next. If it shows a proper Partition 1: FAT32, that part of the layout is already fine and the issue is purely kernel/display. Report back what ping/ssh shows and what the partition layout looks like, happy to keep digging.
-
Please check here, is the USB partitioning basically [DIAGNOSED + WORKAROUND] 7.3.0: emhttpd ENOFLASH4 — flash rejected, GUID = (null) on legacy whole-device FAT (superfloppy) USBs - General Support - Unraid
-
Thanks Jorge, yes correct
-
I did but I was more comfortable to do it manually, i have a modded go file, just pers preference but I think main take away is 7.3.0 is picky about USB partitioning, mine worked since 2017 thru all the upgrades up to this point
-
Hey, please look at this might apply to you, worth a shot: [DIAGNOSED + WORKAROUND] 7.3.0: emhttpd ENOFLASH4 — flash rejected, GUID = (null) on legacy whole-device FAT (superfloppy) USBs - General Support - Unraid
-
Hi guys, had same problem, posting here as well might help other users, documented in the following post: [DIAGNOSED + WORKAROUND] 7.3.0: emhttpd ENOFLASH4 — flash rejected, GUID = (null) on legacy whole-device FAT (superfloppy) USBs - General Support - Unraid
-
Please see my post here, might be related, 7.3.0 is picky about how the USB drive is formatted: [DIAGNOSED + WORKAROUND] 7.3.0: emhttpd ENOFLASH4 — flash rejected, GUID = (null) on legacy whole-device FAT (superfloppy) USBs - General Support - Unraid I also had this issue with NGINX error after upgrading from 7.2.6 to 7.3.0 (worked perfectly fine since 2017 up to 2 days ago when upgraded to 7.3.0)
-
Please see my post here, might be related, 7.3.0 is picky about how the USB drive is formatted: [DIAGNOSED + WORKAROUND] 7.3.0: emhttpd ENOFLASH4 — flash rejected, GUID = (null) on legacy whole-device FAT (superfloppy) USBs - General Support - Unraid I also had this issue with NGINX error after upgrading from 7.2.6 to 7.3.0 (worked perfectly fine since 2017 up to 2 days ago when upgraded to 7.3.0)
-
Please see my post here, might be related, 7.3.0 is picky about how the USB drive is formatted: [DIAGNOSED + WORKAROUND] 7.3.0: emhttpd ENOFLASH4 — flash rejected, GUID = (null) on legacy whole-device FAT (superfloppy) USBs - General Support - Unraid I also had this issue with NGINX error after upgrading from 7.2.6 to 7.3.0 (worked perfectly fine since 2017 up to 2 days ago when upgraded to 7.3.0)
-
# [DIAGNOSED + WORKAROUND] 7.3.0: emhttpd ENOFLASH4 — flash rejected, GUID = (null) on legacy whole-device FAT (superfloppy) USBs **TL;DR** — If you upgraded 7.2.6 → 7.3.0 and your boot USB is suddenly rejected (`emhttpd: import flash device: (sda) ... Error: (/dev/sda) not known`, license shows `(null)`, GUI returns HTTP 500, array won't start), the cause is almost certainly that your USB has the legacy "superfloppy" layout — a FAT filesystem written directly to `/dev/sda` with no partition table — which 7.2.x and earlier accepted but **7.3.0 rejects**. The fix is to re-flash the same USB with a proper MBR + single FAT32 partition layout using the current Unraid USB Creator, then restore your `/config` from backup. **Same USB, same license, same GUID — it just needs the partition table.** Full procedure below. If this saves anyone the panic I had, mission accomplished. --- ## Symptoms (what 7.3.0 looks like when it rejects your flash) After the standard in-GUI Update OS to 7.3.0 stable and reboot: - Kernel boots, USB enumerates fine (`lsusb`, `dmesg` happy, `sda` present) - `emhttpd` starts, fails to classify the flash device: ``` emhttpd: import flash device: (sda) emhttpd: Error: shcmd ... mount /boot ... not known emhttpd: shcmd ... ENOFLASH4 ``` - `/var/local/emhttp/var.ini` is created but every classifier-derived value is `(null)`: ``` flashGUID="(null)" flashVendor="(null)" flashProduct="(null)" regGUID="(null)" regTy="(null)" ``` - WebUI loads the static login page (HTTP 302), but every authenticated request returns **HTTP 500** because `emhttpd` never created `/var/run/php-fpm.sock` - Array never starts, no pools imported, Docker daemon never started, no containers - SSH still works (root login is independent of `emhttpd`), which is your lifeline The `Plus.key`, `super.dat`, and the rest of `/boot/config/` are **not corrupted** — only the boot images (`bzimage`, `bzroot`, `bzfirmware`, `bzmodules`, `memtest`) were swapped by the upgrade. ## Root cause 7.3.0's flash classifier is stricter and **requires a proper MBR with a single primary FAT partition**. It rejects the legacy whole-device FAT (a.k.a. "superfloppy") layout that older Unraid releases were happy with. You can see the difference yourself. Old, rejected layout (this is what triggers the failure): ``` $ blkid /dev/sda /dev/sda: LABEL_FATBOOT="UNRAID" LABEL="UNRAID" UUID="XXXX-XXXX" BLOCK_SIZE="512" TYPE="vfat" # ↑ filesystem is on the raw disk, no PTUUID/PTTYPE, no /dev/sda1 $ fdisk -l /dev/sda Disk /dev/sda: 29.11 GiB, 31260704768 bytes, 61056064 sectors Disklabel type: dos # the partition entries fdisk shows are garbage — random bytes in the MBR area # being mis-interpreted; sector counts overflow the physical disk size ``` New, accepted layout (what every modern Unraid USB Creator produces): ``` $ blkid /dev/sda /dev/sda1 /dev/sda: PTUUID="xxxxxxxx" PTTYPE="dos" /dev/sda1: LABEL_FATBOOT="UNRAID" LABEL="UNRAID" UUID="XXXX-XXXX" TYPE="vfat" PARTUUID="..." # ↑ proper partition table on /dev/sda, FAT filesystem on /dev/sda1 $ fdisk -l /dev/sda Device Boot Start End Sectors Size Id Type /dev/sda1 * 2048 61054975 61052928 29.1G c W95 FAT32 (LBA) ``` Many older USBs prepared with the original `make_bootable` (especially SanDisk Cruzer Force and similar long-serving sticks) shipped/were-flashed in superfloppy mode. They booted fine for years on Unraid 6 and 7.0–7.2 because the classifier accepted both layouts. 7.3.0 no longer does. ## Proof it's purely the partition layout (not the kernel, not the license, not the USB hardware) Same physical SanDisk Cruzer Force, same `/boot/config/` (restored byte-for-byte from backup), same `Plus.key` (md5 unchanged), same machine, same kernel cmdline. The **only** thing that changed between "7.3.0 rejects" and "7.3.0 accepts" was the partition layout (superfloppy → MBR + sda1). After re-flashing the layout, 7.3.0 booted, `emhttpd` immediately classified the USB, computed the correct flashGUID, license validated as Plus, array started, all 6 ZFS pools imported, all 23 containers came up. Important: the `flashGUID` is derived from the USB controller's vendor/product/serial descriptors, which are unchanged by reformatting. **Your existing license stays bound to the same USB.** No Replace Key, no re-registration, no involvement from sales/support. ## The fix (procedure I followed — 30 minutes downtime, no key transfer required) > ⚠️ Read the whole thing before starting. **Take a full byte-level backup of the USB first** — if anything goes wrong, you can `dd` it back and you're exactly where you started. ### What you need - A working Linux machine to take a backup over SSH (or just plug the USB in directly) - A Windows or macOS machine to run the official Unraid USB Creator - Your most recent `/boot/config/` backup (the in-GUI **Tools → Backup/Flash** zip works, or a tarball you take manually). If you don't have one, take it now from 7.2.6 before doing anything else. ### Step 1 — Roll back to 7.2.6 (so you can use the GUI to take a clean backup) If you're stuck at the failing 7.3.0 boot but `/boot/previous/` exists (Unraid keeps the prior version's boot files there during an upgrade), copy these from `/boot/previous/` over `/boot/` via SSH and reboot: ``` bzimage bzimage.sha256 bzroot bzroot.sha256 bzroot-gui bzroot-gui.sha256 bzfirmware bzfirmware.sha256 bzmodules bzmodules.sha256 memtest memtest.sha256 ``` Don't touch `/boot/config/`, `/boot/syslinux/syslinux.cfg`, `Plus.key`, `super.dat`, or anything else. Reboot — you should be back on 7.2.6 with everything working. ### Step 2 — Take backups from working 7.2.6 From the GUI: **Tools → Backup/Flash → Backup**. Save the resulting zip somewhere off the USB. If you want a belt-and-braces byte-level backup of the USB itself (recommended), pull it from another machine over SSH: ```bash # from a Linux box, USB in the Tower as /dev/sda — DO NOT run this on the Tower itself ssh root@tower 'dd if=/dev/sda bs=4M status=progress 2>/tmp/dd.log | gzip -1 -c' \ > sandisk-backup.img.gz ``` (The `2>/tmp/dd.log` matters — if you let `dd`'s stderr into the pipe, gzip will ingest the progress messages as data and your backup will be silently corrupted. Don't ask me how I know.) ### Step 3 — Pull the USB and reformat it with the official Creator 1. Stop the array, shut down the Tower cleanly (Main → Stop, then Tools → Shutdown) 2. Pull the USB and put it into your Windows/macOS machine 3. Download the **Unraid USB Creator** from `unraid.net/download` (current release — make sure it's the new one, not the old `Unraid.USB.Creator` / `make_bootable.bat` from 2017) 4. Choose: **OS Version: 7.3.0**, **Server Name:** (your existing name), **Network Mode:** DHCP (or whatever you had), keep "format the USB device" enabled, write 5. After it finishes, on Windows it'll prompt you to run `make_bootable.bat` — **do that** (it installs the syslinux MBR for legacy BIOS boot) 6. The drive letter will change (Windows treats the new partition layout as a new volume). That's expected and harmless. ### Step 4 — Restore your `/config` and customizations The Creator wrote a fresh, default `/config/` directory (with a generic `network.cfg`, `go`, `ident.cfg`, etc). You need to overwrite it with your real config from the backup. From your `/boot/config/` backup: - **Delete** the auto-generated `\config\` on the new USB - **Copy** your backup's `config/` directory onto the USB so it lives at `\config\` (with all subfolders: `plugins/`, `pools/`, `shares/`, `ssh/`, `modprobe.d/`, etc — and the files `Plus.key`, `super.dat`, `network.cfg`, `ident.cfg`, `go`, `disk.cfg`, etc) - If you had anything in `/boot/extra/` (extra packages installed at boot — e.g. Pulseway), restore that to `\extra\` too If you had a customized `syslinux.cfg` (custom kernel args, default GUI mode, etc): - Take the **new 7.3.0 `syslinux/syslinux.cfg`** the Creator wrote as your base (in case Limetech changed something) - Add your custom kernel args back to the `Unraid OS` and `Unraid OS GUI Mode` `append` lines (e.g. `pcie_aspm=off pcie_port_pm=off`) - If you had `menu default` on a non-default label, re-add it - Make the same edits to **both** `\syslinux\syslinux.cfg` (BIOS) and `\EFI\boot\syslinux.cfg` (UEFI) - Do **not** copy your old `syslinux/*.c32` binaries over the new ones — keep the new 7.3.0 ones Verify before unplugging: - `\config\Plus.key` exists and md5 matches your backup - `\config\super.dat` exists - `\config\go` is your customized one (not the 1-line default) - `\config\plugins\` is populated with your plugins - `\config\pools\` (if you had one) is populated Safely eject the USB. ### Step 5 — Boot Put the USB back in the Tower, power on. Within ~3 minutes you should see: - Console gets to a login prompt - WebUI is up at `https://<tower-ip>` (HTTP 302 to the login page) - License shows correctly (Tools → Registration) - Array starts (it'll likely run a parity check because the previous shutdown wasn't graceful — this is normal, let it complete) - Containers come back Verify via SSH (handy one-liner): ``` cat /etc/unraid-version grep -E '^(flashGUID|flashVendor|flashProduct|regGUID|regTy|mdState|fsState)=' \ /var/local/emhttp/var.ini fdisk -l /dev/sda | head -15 ``` You should see `version="7.3.0"`, a non-`(null)` `flashGUID`, `regTy="Plus"` (or Pro/Trial), and `Disklabel type: dos` with a single `/dev/sda1` of type `W95 FAT32 (LBA)`. ## What I checked / ruled out before landing on the partition-layout theory - **Not the kernel cmdline** — `syslinux.cfg` was unchanged - **Not internal-boot vs flash-boot** — never opted into Internal Boot or TPM - **Not the license file** — `Plus.key` md5 unchanged before/after, works fine on 7.2.6 post-rollback and post-fix - **Not the `go` script** — `go` runs after `emhttpd`, so it can't cause `ENOFLASH4` - **Not a reverse-proxy issue** — the 500s come from `php-fpm.sock` not existing, which is downstream of `emhttpd` failing - **Not a hardware fault** — USB enumerates fine, reads/writes normally, healthy SMART - **Not a USB descriptor / VID:PID issue** — same descriptors before and after, same flashGUID computed both before the upgrade (on 7.2.6) and after the fix (on 7.3.0) ## Asks for Limetech (if anyone from staff reads this) The fact that the upgrade silently bricks the boot of users with the older USB layout is rough. Two suggestions, either would be a meaningful improvement: 1. **Pre-flight check in the in-GUI Update OS flow:** detect superfloppy layout before applying the upgrade, warn the user, and link to a "how to migrate to MBR layout" doc. The upgrade should not proceed without acknowledgement. 2. **Loosen the 7.3.x classifier** to accept the legacy whole-device FAT layout the way 7.2.x did, even if only as a deprecated fallback for one more minor release cycle. If neither is feasible, at minimum a release-note entry and a pinned thread documenting the symptom + workaround would save people a lot of time. ## Diagnostics available I have the original failing 7.3.0 boot files preserved, full syslogs from both the failing 7.3.0 boot and the working post-fix 7.3.0 boot, and a byte-level backup of the USB in its original superfloppy layout. Happy to share any of it with staff for analysis. ## System (for reference) - **Hardware:** Dell OptiPlex 7050 MFF, Intel i7-7700, 32 GB DDR4 - **Storage controllers:** onboard Intel + ASM1164 PCIe HBA - **Boot USB:** SanDisk Cruzer Force 32 GB, in service ~8 years - **License:** Plus / Lifetime (registered 2017) - **Working version before:** 7.2.6 (kernel 6.12.x) - **Failing version:** 7.3.0 stable (kernel 6.18.x) — *until* USB was re-partitioned, after which it works perfectly Hope this helps somebody. 🍻
-
I know its an old thread but it was bugging me for sol long, after 2 full days with AI on the task this is what it came up with, the below is written by the AI so take it with a pinch of salt but it works for me apparently. ZFS Pool HDD Spindown Fix — Unraid 7.xPlatform: Unraid 7.2.4 (ZFS pools on HDDs) | Problem: ZFS pool HDDs wake from standby within 30s of hdparm -y, despite zero user I/O ✅All 4 root causes identified and fixed — drives now stay spun down indefinitely. The ProblemAfter setting up a ZFS mirror pool on two HDDs in Unraid 7.x, the drives refused to stay spun down. Manual spindown via hdparm -y /dev/sdX would put them in standby, but they'd wake within 15–30 seconds every time. Array disks (XFS) had no issues spinning down — only the ZFS pool was affected. Root Causes (4 Found)1ZFS Master Plugin — 30-Second Polling LoopThe ZFS Master plugin (zfs.master) runs an nchan poller in an infinite loop. The default refresh_interval is 30 seconds — it calls zpool status, zfs list, and related commands which access the pool's vdevs, waking any spun-down drives. 🔍 Diagnosis: After killing the ZFS Master poller process, drives still woke (proving additional culprits existed), but this was confirmed as one source. ✅ Fix: Set refresh to manual-only: # /boot/config/plugins/zfs.master/zfs.master.cfg [general] refresh_interval=0The plugin stays installed and fully functional — it just only polls when you manually open the ZFS Master page in the WebUI. 2SMART Polling (poll_attributes) — 30-Second DefaultUnraid's emhttpd polls SMART attributes on all disks at the interval set by poll_attributes in /boot/config/disk.cfg. The default is 30 seconds. SMART queries send ATA commands that wake spun-down drives. Array disks appear to have standby-aware skip logic, but ZFS pool disks do not benefit from this — they get polled regardless of power state. 🔍 Diagnosis: /proc/diskstats monitoring showed drives waking with zero write sectors — pointed to ATA-level commands (SMART) rather than filesystem I/O. The wake interval perfectly matched the 30-second polling. ✅ Fix: Change from 30 to 7200 (2 hours): # /boot/config/disk.cfg poll_attributes="7200"Requires reboot to take effect. Drives will wake once every 2 hours for a SMART check, then spin back down after the configured idle timeout (e.g., 15 minutes). A value of 0 disables SMART polling entirely (not recommended). 3ZFS Transaction Group Timeout (txg_timeout) — 5-Second DefaultZFS flushes transaction groups every zfs_txg_timeout seconds (default: 5), even when there's zero pending data. This causes periodic metadata writes that keep drives active. ✅ Fix: Set to 300 seconds (5 minutes) via /boot/config/go so it persists across reboots: # Add to /boot/config/go (before the last line) echo 300 > /sys/module/zfs/parameters/zfs_txg_timeoutThis is safe for a backup/archive pool. For pools with active writes, a lower value (30–60) may be more appropriate. 4Cache Dirs Plugin (dynamix.cache.dirs) — PeriodicfindThe Dynamix Cache Dirs plugin runs periodic find commands to warm directory listings in RAM. If any share on your ZFS pool is in the plugin's include list, it will periodically walk the entire directory tree, generating heavy read I/O on the pool disks. In our case, a backup share containing thousands of nested iCloud directories was in the include list — each scan read extensively from the ZFS pool drives. 🔍 Diagnosis: Used kernel ftrace to catch the exact process: echo 1 > /sys/kernel/debug/tracing/events/block/enable cat /sys/kernel/debug/tracing/trace_pipe | grep "sd[gh]" # Caught: find-91408 reading blocks from sdg✅ Fix: Remove ZFS pool shares from the cache_dirs include list: # /boot/config/plugins/dynamix.cache.dirs/dynamix.cache.dirs.cfg# Remove your ZFS pool share names from both 'include=' and 'options=' linesThen kill and restart the cache_dirs process: pkill -f "scripts/cache_dirs" # It will auto-restart, or rebootAdditional Fixes (May Also Help)Disable autotrim for HDD pools: zpool set autotrim=off <pool> — TRIM is useless for HDDs Set atime=off: zfs set atime=off <pool> — prevents access time updates on reads Check for btrfs cron jobs on ZFS pools: Unraid's Scheduler may generate btrfs balance/scrub cron jobs for ZFS pools (wrong filesystem type). Check /boot/config/plugins/dynamix/balance_*.cron and scrub_*.cron — delete any that reference your ZFS pool. Also check /etc/cron.d/root for active entries. How to Diagnose Spindown IssuesStep 1: Baseline Testhdparm -y /dev/sdX # Spin down sleep 30 hdparm -C /dev/sdX # Check: "standby" = good, "active/idle" = something woke itStep 2: Monitor Block I/O# Watch /proc/diskstats for your drives (e.g., sdg) while true; do grep "sdg " /proc/diskstats | awk '{print strftime("%H:%M:%S"), "reads:"$4, "writes:"$8, "read_KB:"$6/2, "write_KB:"$10/2}' sleep 15 doneIf drives wake with zero write sectors, the cause is likely ATA commands (SMART polling, power management queries), not filesystem I/O. Step 3: Pool Export Test (Definitive)zpool export <pool> # Detach pool from ZFS hdparm -y /dev/sdX # Spin down sleep 120 # Wait 2 minutes hdparm -C /dev/sdX # If standby: ZFS/related processes are the cause zpool import <pool> # Re-import when doneIf drives stay in standby with the pool exported, the wake source is definitely something interacting with ZFS — not hardware or BIOS. Step 4: Kernel Ftrace (Catch the Exact Process)# Enable block-level tracing (no extra tools needed on Unraid) echo 1 > /sys/kernel/debug/tracing/events/block/enable cat /sys/kernel/debug/tracing/trace_pipe | grep "sdX" # Output shows: processname-PID reading/writing blocks# Press Ctrl+C when done, then: echo 0 > /sys/kernel/debug/tracing/events/block/enableStep 5: Check zpool I/Ozpool iostat <pool> 5 # 5-second intervals# If all zeros but drives still wake → ATA-level commands, not I/OBIOS Considerations⚠️ Note: If you've disabled CPU C-States, Deep Sleep, or ASPM (e.g., for HBA/JBOD card compatibility), be aware these keep SATA controllers fully active at all times. While they don't directly wake drives, they remove the power-saving buffer that might otherwise mask brief wake events. Summary# Culprit Default Wake Interval Fix 1 ZFS Master plugin 30s refresh Every 30s refresh_interval=0 2 SMART polling 30s poll Every 30s poll_attributes="7200" 3 ZFS txg_timeout 5s flush Every 5s Set to 300 via /boot/config/go 4 cache_dirs plugin Varies Periodic Remove ZFS pool shares from include list Available Diagnostic Tools on Unraid❌ Don't Work on Unraidblktrace, strace, auditctl, fatrace, iotop ✅ Do Work on Unraidhdparm -C, /proc/diskstats, zpool iostat, kernel ftrace, inotifywait Tested on Unraid 7.2.4 with ZFS mirror pool (2×2TB HDDs) on a QNAP QXP-800eS JBOD card. After applying all 4 fixes, drives confirmed staying in standby for 5+ minutes (previously woke within 15–30 seconds every time).
-
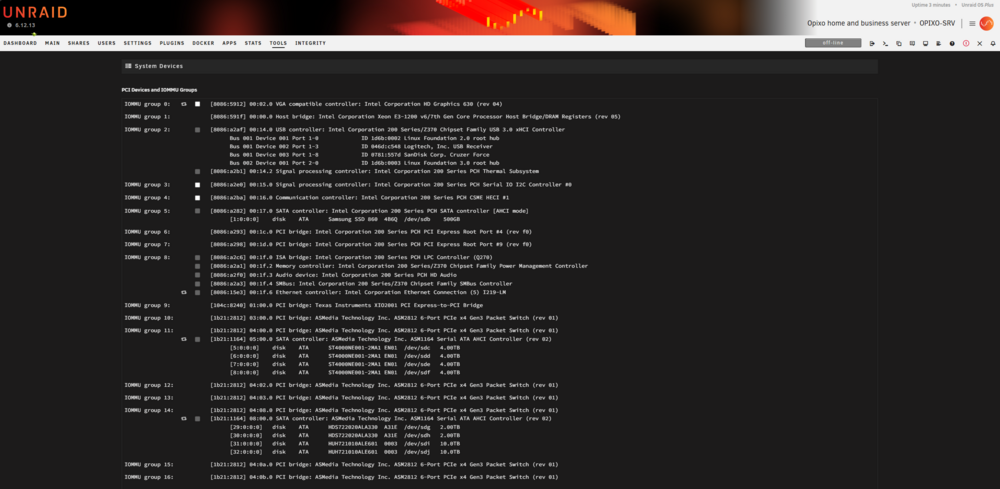
This is a very old post, but maybe will help someone in same situation as me. Today, i finally had some time to troubleshoot it and togheder with my friend the AI who is also writing the solution below we manage to fix it. Here is what we did: 🔧 [RESOLVED] Dell OptiPlex 7050 + QNAP TL-D800S JBOD — Complete Fix GuideHey everyone, follow-up to my original post from August 2024. After a LOT more troubleshooting (and almost losing my mind), I've fully resolved the cold boot drive failure issue with the QNAP QXP-800eS-A1164 PCIe card. First — thank you to @Vr2Io and @Frank1940 for the suggestions in the original thread. You were both pointing in the right direction: @Vr2Io: The PCIe AER Fatal errors WERE the key symptom. Couldn't force PCIe 2.0 in the Dell BIOS, but the fix was disabling power management features that were destabilizing the PCIe link. @Frank1940: Disabling array autostart + waiting before starting was absolutely the right instinct. The go script solution below is essentially an automated version of that, plus NCQ disable. Posting this in detail because I found very few resources for this specific combination and hopefully it saves someone else days of headaches. 🖥️ HardwareServer Dell OptiPlex 7050 Tower (i7-7700, 32GB DDR4, BIOS v1.27.0) JBOD QNAP TL-D800S (8-bay, SFF-8088 connection) PCIe Card QNAP QXP-800eS-A1164 (ASM2812 switch + 2x ASM1164 AHCI controllers) OS Unraid 7.2.3, kernel 6.12.54-Unraid Array Drives 4x Seagate ST4000NE001 4TB (1 parity + 3 data) Pool Drives 2x Hitachi 2TB (ZFS mirror) + 2x HGST 10TB (ZFS stripe) 💥 The ProblemEvery cold boot, array drives on ASM1164 controller #1 would fail. Two types of errors depending on what was going wrong: Type 1 — PCIe AER Fatal errors (from original post, Aug 2024): pcieport 0000:00:1d.0: AER: Multiple Uncorrected (Fatal) error received from 0000:03:00.0 pcieport 0000:04:02.0: device [1b21:2812] error status/mask=00100000/04400000 pcieport 0000:04:02.0: [20] UnsupReq (First) ahci 0000:05:00.0: AER: can't recover (no error_detected callback) pcieport 0000:00:1d.0: AER: device recovery failedType 2 — SATA/AHCI errors (after PCIe stabilized with BIOS fixes): ata5.00: exception Emask 0x0 SAct 0x7fffffff SErr 0x0 action 0x6 frozen ata5.00: failed command: WRITE FPDMA QUEUED ata5: hard resetting link ata5.00: failed to IDENTIFY (I/O error, err_mask=0x4)Both types would crash ALL 4 ports on the same ASM1164 chip simultaneously, cascade into hard reset loops, and disable all drives. The array would hang during start and require SysRq reboot (echo b > /proc/sysrq-trigger) because ZFS import processes get stuck in uninterruptible D-state. Warm reboots sometimes worked. Safe mode always worked. 100% reproducible on cold boot under any I/O load. 🔍 Root Cause — THREE Issues Stacked Together1. ASM1164 NCQ BugThe ASM1164 has a known bug with Native Command Queuing (NCQ). Commands sent as WRITE FPDMA QUEUED (NCQ) would timeout and crash the controller. This is documented across multiple platforms — Raspberry Pi Linux, openSUSE forums, various NAS communities. 2. Dell BIOS Power ManagementThe OptiPlex 7050's default BIOS settings include aggressive power saving that destabilizes PCIe devices: Deep Sleep Control: enabled by default (cuts power to PCIe in S4/S5) C-States: enabled (CPU power states affect PCIe link stability) Block Sleep: disabled (allows S3 sleep which kills PCIe) AC Recovery: Off (no auto-restart after power loss) 3. PCIe Remove/Rescan Hack Breaking BIOS InitializationThis was the hardest to find. I had a workaround in /boot/config/go that did: echo 1 > /sys/bus/pci/devices/0000:04:00.0/remove sleep 5 echo 1 > /sys/bus/pci/rescanThis was supposed to "reset" the card. What it ACTUALLY did was destroy the proper firmware initialization that BIOS performed during POST. The Linux PCIe rescan does NOT perform the full firmware handshake — it just re-enumerates the device. The controller appeared to work for light I/O but would crash under sustained mixed read+write workloads (like parity rebuild). The smoking gun was in dmesg timestamps: all drives were detected at 3–9 seconds (BIOS init), then the go script removed the card at ~35s and re-scanned at ~147s, causing drives to be detected a SECOND time with degraded initialization. ✅ The Complete FixAll three issues needed to be addressed: Fix 1: JBOD Firmware UpdateUpdated TL-D800S firmware: 1.4.1 → 1.5.0 Download from QNAP website. I had to temporarily move the QXP card to a Windows PC to run the QNAP firmware update utility. The JBOD firmware update is separate from the QXP card firmware. Fix 2: Dell BIOS Settings (F2 at boot)Section Setting Value Priority Power Management Deep Sleep Control DISABLED ⚠️ Critical Power Management AC Recovery Last Power State Recommended Power Management Block Sleep ENABLED Recommended Performance Intel SpeedStep DISABLED Recommended Performance C-States Control DISABLED ⚠️ Critical POST Behavior Fastboot Thorough Recommended These settings prevent the motherboard from doing anything that could affect PCIe link stability during boot or runtime. Fix 3: Go Script — NCQ Disable Only (NO PCIe hack!)File: /boot/config/go #!/bin/bash # === ASM1164 / QXP-800eS Workaround v4 === # BIOS fixes (Deep Sleep off, C-States off, ASPM off) + JBOD firmware 1.5.0 # now allow proper cold boot detection. PCIe remove/rescan REMOVED — it was # breaking the BIOS-initialized controller state. QXP_BRIDGE="0000:04:00.0" ASM_VENDOR="1b21:1164" if lspci -d $ASM_VENDOR &>/dev/null; then logger "go: ASM1164 QXP card detected" # Phase 1: Let drives fully spin up and settle (BIOS already detected them) logger "go: Phase 1 — 30s drive settle..." sleep 30 # Phase 2: Disable NCQ for all drives on the QXP card # ASM1164 has known issues with NCQ (WRITE FPDMA QUEUED timeouts) logger "go: Phase 2 — Disabling NCQ for ASM1164 drives..." for dev in /sys/block/sd*; do devpath=$(readlink -f "$dev") if echo "$devpath" | grep -q "$QXP_BRIDGE"; then echo 1 > "$dev/device/queue_depth" 2>/dev/null logger "go: NCQ disabled for $(basename $dev) (queue_depth=1)" fi done logger "go: ASM1164 workaround complete — starting emhttp" else logger "go: No ASM1164 detected — normal boot" fi # Start the Management Utility /usr/local/sbin/emhttpKey points about the go script: 🚫 DO NOT do PCIe remove/rescan — it breaks the BIOS initialization queue_depth=1 forces commands to DMA mode instead of FPDMA (NCQ). Verify with: dmesg | grep "ata[5-8]" — commands should show READ DMA / WRITE DMA EXT, NOT WRITE FPDMA QUEUED 30s settle time gives drives time to fully spin up after BIOS detection The script auto-detects drives behind the QXP bridge, so it won't affect onboard SATA drives Kernel Boot ParametersIn syslinux config (append line): pcie_aspm=off pcie_port_pm=offDisables PCIe Active State Power Management at the kernel level. Belt and suspenders with the BIOS ASPM disable. 🎉 After the FixDid a New Config (Tools → New Config → Preserve All → Apply) to get a clean super.dat, then started the array normally (not maintenance mode, parity NOT already valid). Results: ✅ All 8 drives detected cleanly in 3–9 seconds during boot ✅ Zero ATA errors in dmesg ✅ Parity rebuild running at 224 MB/s with zero errors ✅ All ZFS pools mounted with zero checksum errors ✅ SMB shares working, Docker containers running ✅ Array fully stable under sustained I/O for the first time ❌ What Didn't Work (save yourself the time)SATA link power management (max_performance) — no effect PCIe device remove + rescan in go script — MADE IT WORSE Longer delays alone (90s, 125s) — didn't help without BIOS fixes Starting in maintenance mode — controller still crashed after ~30s Direct dd write tests to diagnose — just kills drives when controller crashes 🔎 How to Diagnose If You Have This IssueCheck if errors say WRITE FPDMA QUEUED — that's the NCQ bug Check dmesg for duplicate drive detection (drives appearing twice = PCIe rescan issue) Check if ALL ports on one ASM1164 die simultaneously — that's the controller, not individual drives Test drives individually with dd reads when array is stopped — if they read fine, the drives are healthy Look for hostbyte=0x04 (DID_ERROR) — that means host adapter error, not drive error ZFS checksum verification: zpool status shows 0 errors = your data is intact regardless of md errors 🛠️ Useful CommandsCheck NCQ is disabled (should show queue_depth=1): for d in /sys/block/sd*; do echo "$(basename $d): $(cat $d/device/queue_depth 2>/dev/null)" doneCheck for ATA errors: dmesg | grep -iE "ata[0-9]+.*(error|fail|reset|frozen)" | tail -20Check parity rebuild progress: mdcmd status | grep -E "mdResyncPos|mdResyncSize|rdevNumErrors"Emergency reboot when array hangs (D-state processes block normal reboot): echo b > /proc/sysrq-trigger💡 Hardware NotesThe ASM1164 is a known problematic controller. If you're building new, avoid it and get an LSI 9211-8i or similar HBA instead. But if you already have the QNAP QXP-800eS + TL-D800S combo, the fix above makes it work reliably. The Dell OptiPlex 7050 is a solid Unraid server otherwise — the i7-7700 handles transcoding, VMs, and Docker well. Just fix the BIOS power management settings. Hope this helps someone. Happy to answer questions! 🤙
-
Anyways, thank you so much. will write after the test on the other computer.
-
I will try tomorrow to put the PCIe card in my main PC and try to boot UnRaid there, see if this happens there as well, might be that the Optiplex has an issue with PCIe. I recently bought it from eBay...
-
This is what I am getting regarding PCIe AER, but it's so strange because its not always, it's random when rebooting Aug 30 22:56:29 OPIXO-SRV kernel: pcieport 0000:00:1d.0: AER: Multiple Uncorrected (Fatal) error message received from 0000:03:00.0 Aug 30 22:56:29 OPIXO-SRV kernel: pcieport 0000:03:00.0: AER: PCIe Bus Error: severity=Uncorrected (Fatal), type=Inaccessible, (Unregistered Agent ID) Aug 30 22:56:29 OPIXO-SRV kernel: pcieport 0000:03:00.0: AER: Error of this Agent is reported first Aug 30 22:56:29 OPIXO-SRV kernel: pcieport 0000:04:02.0: PCIe Bus Error: severity=Uncorrected (Fatal), type=Transaction Layer, (Requester ID) Aug 30 22:56:29 OPIXO-SRV kernel: pcieport 0000:04:02.0: device [1b21:2812] error status/mask=00100000/04400000 Aug 30 22:56:29 OPIXO-SRV kernel: pcieport 0000:04:02.0: [20] UnsupReq (First) Aug 30 22:56:29 OPIXO-SRV kernel: pcieport 0000:04:02.0: AER: TLP Header: 04000001 0000000f 06000006 00000000 Aug 30 22:56:29 OPIXO-SRV kernel: pcieport 0000:04:03.0: PCIe Bus Error: severity=Uncorrected (Fatal), type=Transaction Layer, (Requester ID) Aug 30 22:56:29 OPIXO-SRV kernel: pcieport 0000:04:03.0: device [1b21:2812] error status/mask=00100000/04400000 Aug 30 22:56:29 OPIXO-SRV kernel: pcieport 0000:04:03.0: [20] UnsupReq (First) Aug 30 22:56:29 OPIXO-SRV kernel: pcieport 0000:04:03.0: AER: TLP Header: 04000001 0000000f 07000007 00000000 Aug 30 22:56:29 OPIXO-SRV kernel: pcieport 0000:04:0a.0: PCIe Bus Error: severity=Uncorrected (Fatal), type=Transaction Layer, (Requester ID) Aug 30 22:56:29 OPIXO-SRV kernel: pcieport 0000:04:0a.0: device [1b21:2812] error status/mask=00100000/04400000 Aug 30 22:56:29 OPIXO-SRV kernel: pcieport 0000:04:0a.0: [20] UnsupReq (First) Aug 30 22:56:29 OPIXO-SRV kernel: pcieport 0000:04:0a.0: AER: TLP Header: 04000001 0000000f 09000009 00000000 Aug 30 22:56:29 OPIXO-SRV kernel: pcieport 0000:04:0b.0: PCIe Bus Error: severity=Uncorrected (Fatal), type=Transaction Layer, (Requester ID) Aug 30 22:56:29 OPIXO-SRV kernel: pcieport 0000:04:0b.0: device [1b21:2812] error status/mask=00100000/04400000 Aug 30 22:56:29 OPIXO-SRV kernel: pcieport 0000:04:0b.0: [20] UnsupReq (First) Aug 30 22:56:29 OPIXO-SRV kernel: pcieport 0000:04:0b.0: AER: TLP Header: 04000001 0000000f 0a00000a 00000000 Aug 30 22:56:29 OPIXO-SRV kernel: ahci 0000:05:00.0: AER: can't recover (no error_detected callback) Aug 30 22:56:29 OPIXO-SRV kernel: ahci 0000:08:00.0: AER: can't recover (no error_detected callback) Aug 30 22:56:29 OPIXO-SRV kernel: pcieport 0000:00:1d.0: AER: Root Port link has been reset (0) Aug 30 22:56:29 OPIXO-SRV kernel: pcieport 0000:00:1d.0: AER: device recovery failed Aug 30 22:56:29 OPIXO-SRV kernel: pcieport 0000:04:02.0: Unable to change power state from D0 to D3hot, device inaccessible Aug 30 22:56:29 OPIXO-SRV kernel: pcieport 0000:04:03.0: Unable to change power state from D0 to D3hot, device inaccessible Aug 30 22:56:29 OPIXO-SRV kernel: pcieport 0000:04:0a.0: Unable to change power state from D0 to D3hot, device inaccessible Aug 30 22:56:29 OPIXO-SRV kernel: pcieport 0000:04:0b.0: Unable to change power state from D0 to D3hot, device inaccessible
-
Thank you so much Vr2Io, yes I saw some PCIe AER errors in the logs I think. I looked in the BIOS couldn't find an option to switch to PCIe 2.0 unfortunately.
-
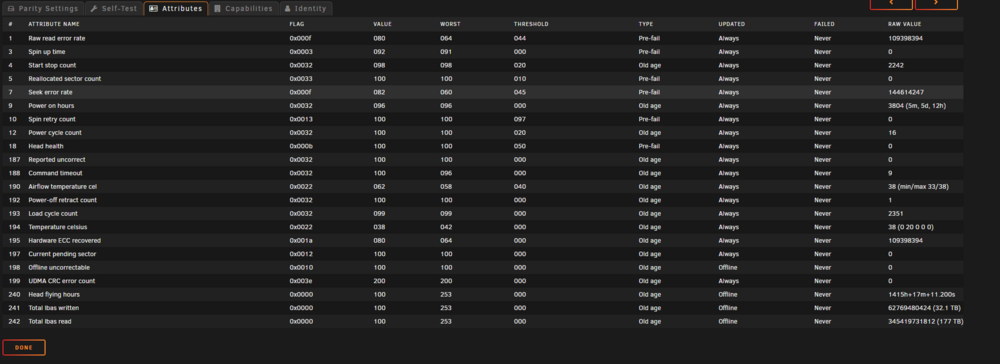
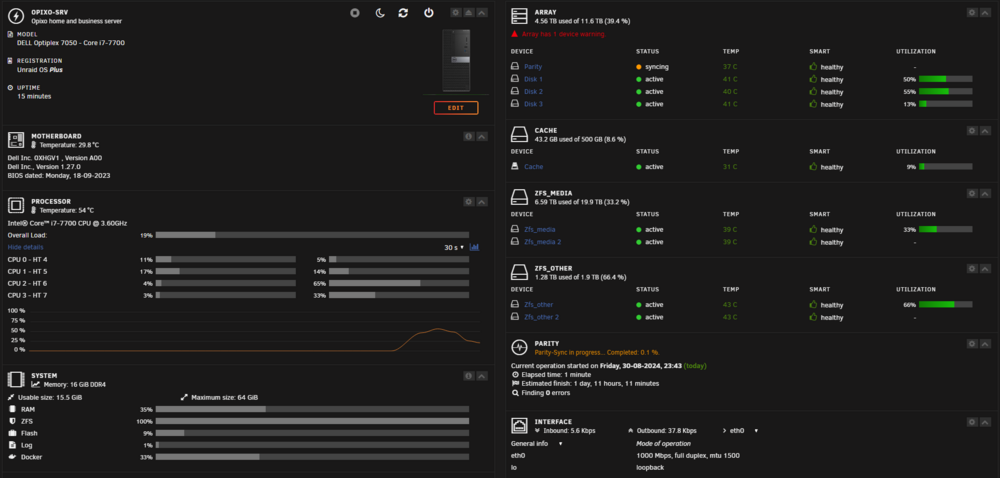
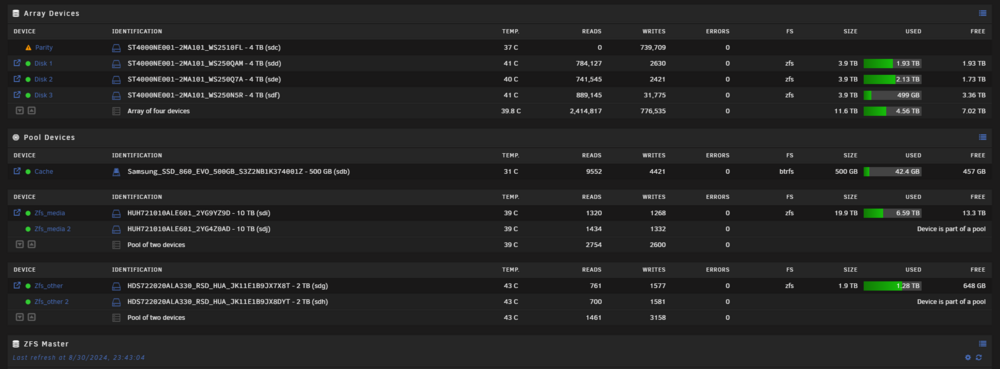
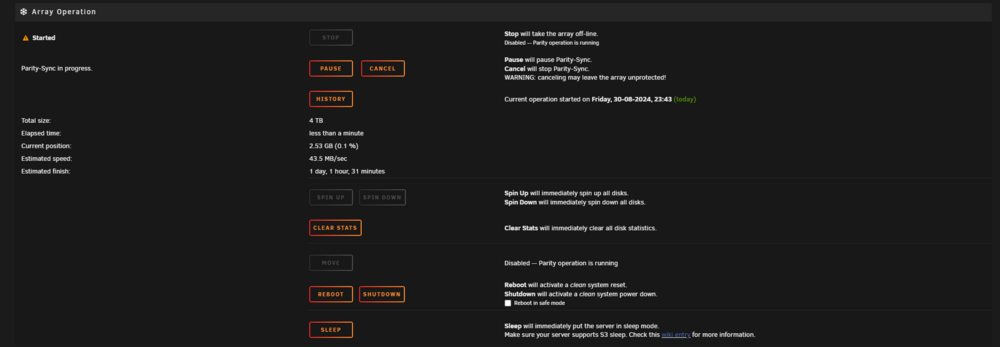
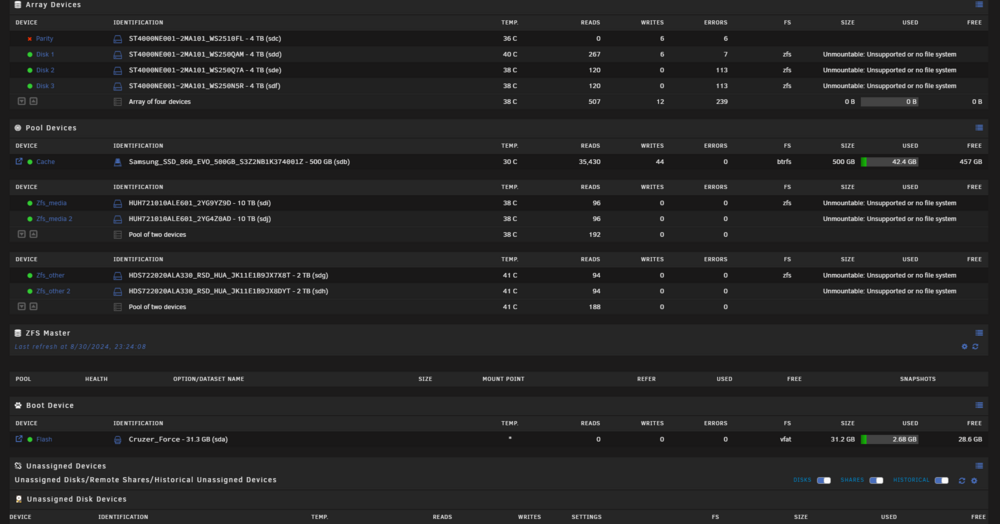
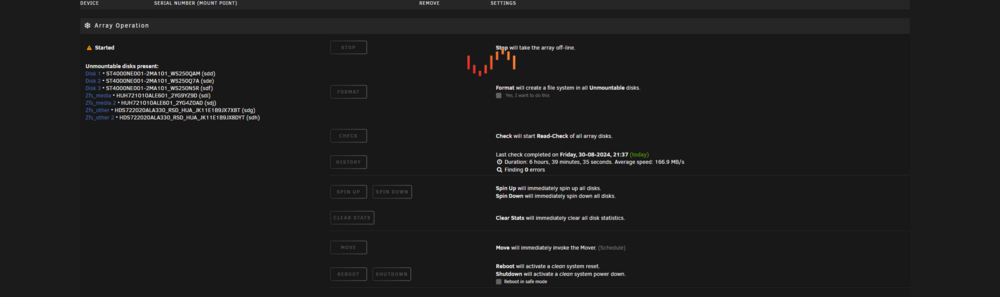
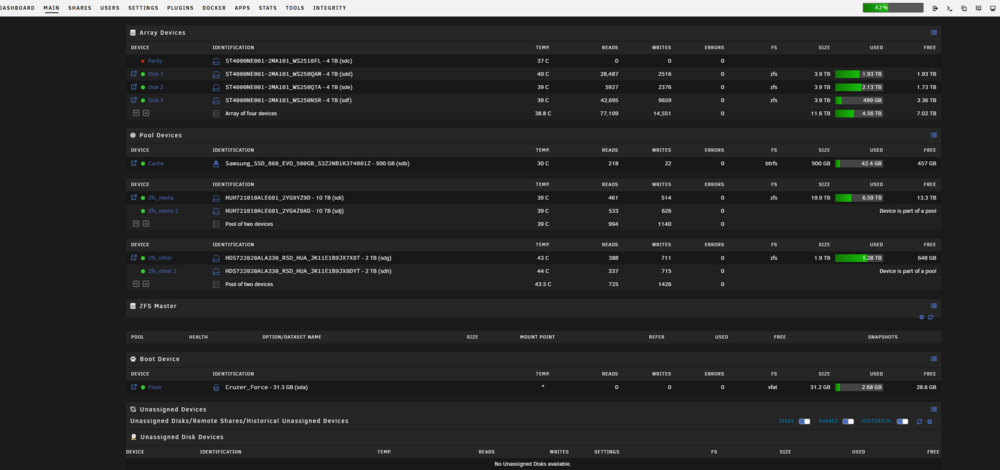
Now, I have stopped the array after managing to strat it as you can see in the last picture above, and removed the parity, started the array in maintenance mode without it and then stopped again, I then reselected the parity drive and started the array normally. It is now rebuilding the parity. Forgot to mention, because of this stuff I also got a lot of SMART errors on my drives now (188 Command timeout) for the parity drive and Disk 1 (seems that only these 2 drives are affected) and 199 - CRC error count for the cache SSD.
-
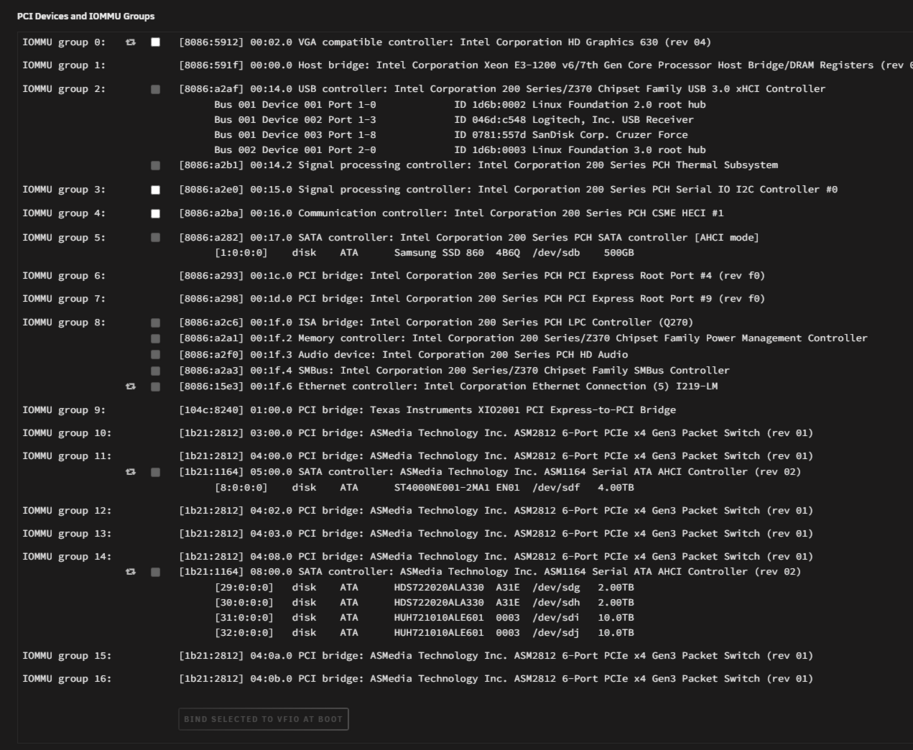
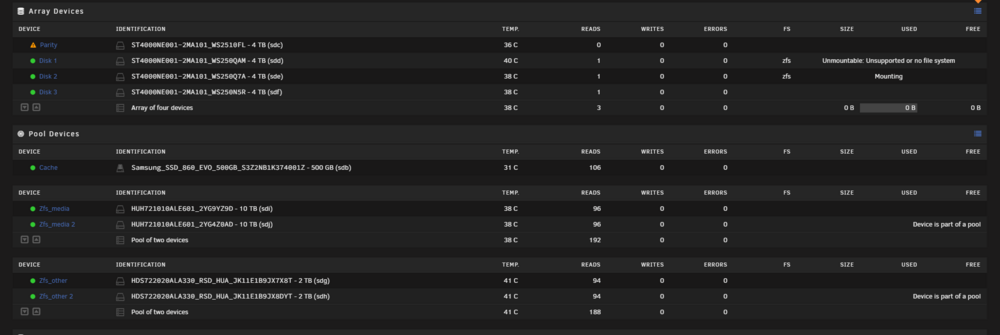
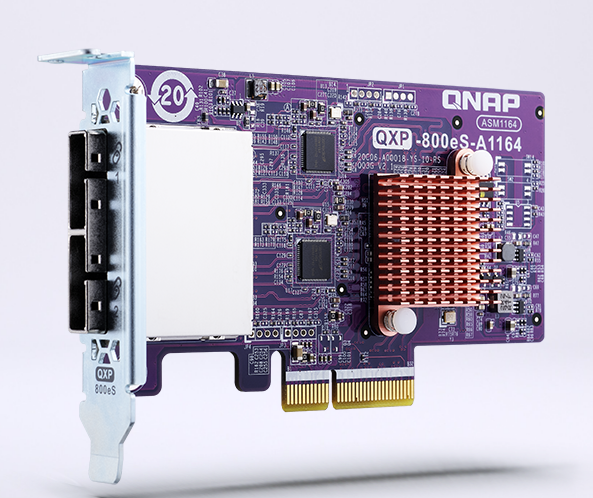
Hi guys, hope someone can point me in the right direction here. I was running UnRaid on a Minisforum MS-01 with the same JBOD enclosure from QNAP and it was working flowless. The JBOD enclosure is meant to be connected to the server by means of a PCIe card (QXP-800e-A1164 card) with 2 x SFF-8088 to SFF-8088 cables. On the Minisforum I never had any issues. Now, I am in need of adding a GPU (still looking for something) but since the MS-01 had only one PCIe slot I decided to sell it and get an Dell Optiplex 7050 with an i7-7700. The computer is much slower than the Minisforum of course but gives me more expansion. Now the problem is that I can't get my array to start with this new computer, I have tried different PCIe slots and it's hit and miss. On boot it always recognises the QXP-800e-A1164 card however when I start the array sometimes it is starting but with one drive disabled (usually parity or first disk), then i rebuild the array and everything looks fine until next restart. I have rebuild the parity drive 2 times already and after rebuilding and doing a parity check I don't get any errors but when I restart the server, this happens again. Sometimes i get: Unmountable: Unsupported or no file system on all drives. I don't know what to do anymore, tried booting in safe mode, tried upgrading to the latest BIOS, nothing seems to work and every time I manage to make it work after a few reboots whenever I restart the server this happens again. I was also swapping the cables between them because I was not sure if the cables order is important so maybe that mess things up... Note that in the screenshot with a red X marked this is how I see the JBOD before trying to initialize the array. Once I initialize the array the disks keep disappearing from there. The second log .zip (2336.zip) is before starting the array. I really hope someone can give me a hand on this one because i am truly lost here. Thanks all! P.S.: Now while writing this after downloading the second diagnostics file, the array started, again without the parity but started anyhow, see last screenshot... opixo-srv-diagnostics-20240830-2304.zip opixo-srv-diagnostics-20240830-2336.zip
-
Hi guys, I am hoping someone can give me some good ideas about how to set up my UnRaid. I have a Minisforum MS-01 (12900H variant with 64Gb RAM) and a QNAP TL-D800S JBOD (8 bays) enclosure connected to the Minisforum via 2 x SFF-8088 cables. In the past, I had UnRaid running on a PowerEdge T710, but I moved to another country where energy is much more expensive, and I live in a fairly small apartment where noise is an important factor. Therefore, I chose to invest in new hardware, hence the hardware mentioned above. From the old server, I salvaged 2 x 10TB HDDs and 6 x 2TB HDDs, as well as the UnRaid USB key with a Plus license. Also, on my Minisforum, I have 2 x 1TB NVME drives. So to recap, I now have 2 x 10TB HDD, 6 x 2TB HDD and 2 x 1TB NVME. My main usage for the UnRaid server will be Nextcloud and OnlyOffice + Jellyfinn, alongside a few other dockers, but nothing crazy. I will also have a media library, but nothing crazy, and I am not even sure I would need redundancy for my media library. However, Nextcloud data is very important as I will use it instead of iCloud with critical documents. I was thinking of creating some ZFS pools, but I saw online that, in theory, ZFS consumes more power than the UnRaid array as with unraid array disk can spin down more efficiently when not in use. Now, I am contemplating the following scenarios: 1. - UnRaid XFS array with 2 x 2TB parity and 4x2TB drives + 2 x 10TB drives stripe in a ZFS pool (I am aware of not having redundancy however, I would use this only for media like movies and TV that I don't really care if I lose) + 2 x 1TB NVMEs for cache in a ZFS pool mirrored giving me redundancy and ability to take snapshots. I could also replicate this cache pool onto the 2x10TB HDD pool for added redundancy. 2. Use all 8 HDDs in the UnRaid array and only use the 2 NVMEs for the cache as ZFS. I am not sure how this would work since I would have very different HDD sizes in the array. Can you guys please tell me what option you would choose and why? I am also interested if you have any better ideas about how I should implement this? Thank you all and sorry for the long post.




