Daniel Ehrhardt
Members
-
Joined
Everything posted by Daniel Ehrhardt
-
Tried both. Still the Same Problem. Is there a way that i provide you more Information? What is the best way to Mount the EFI Partition to copy the opencore Stuff? I do not know if it is allowed but for me it would be also fine if i Pay you and you connect over Teamviewer or AnyDesk to my PC to try it out by yourself? The Mac VM is fresh so you can delete it and recreate it.
-
<qemu:arg value='Penryn,vmx,rdtscp,kvm=on,vendor=GenuineIntel,+invtsc,vmware-cpuid-freq=on,+pcid,+ssse3,+sse4.2,+popcnt,+avx,+aes,+xsave,+xsaveopt,check'/> --> --> Normal Boot <qemu:arg value='host,+hypervisor,migratable=no,-erms,+invtsc,kvm=on,+topoext,+invtsc,+avx,+aes,+xsave,+xsaveopt,+ssse3,+sse4_2,+popcnt,+arat,+pclmuldq,+pdpe1gb,+rdtscp,+vme,+umip,check'/> --> --> Black Screen i can provide any Logs you need. I will try out to flash opencore.
-
If you want to test my Configuration you can download Macinabox from the Unraid App Store and then Setup a Default Catalina Image. This is what i did. 10.15.4 Catalina Yes i tried the CPU Spoof.
-
I think i am to dumb to install the opencore Version. Maybe we are able to find out why the Blackscreen is happening after the Clover Boot Screen. I tried Clover stuff like verbose mode but it does not change. The wried thing is the the first CPU Core is at 100% when the Blackscreen is Visible. Maybe we could find a log Clover log.
-
Thank you for the Quick Reply. Yes i saw that you are using opencore now. Do you have a Guide how to setup opencore? Where can i find the Clover logs?
-
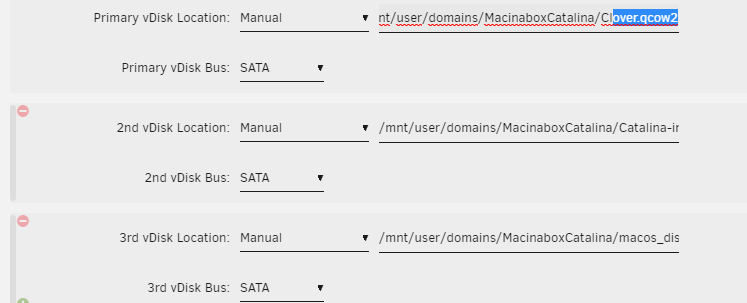
xml2.xml I tried your quem CPU Settings. But the Problem is, that when i boot the Mac then i can see the Clover boot Screen and after some Seconds when it should start to boot up the Screen is Black and nothing happens anymore. I used Macinabox Catalina to create the Mac at all. I connect while testing over noVNC to the VM. If i add Verbose mode the Same thing happen. -boot strict=on \ -device pcie-root-port,port=0x10,chassis=1,id=pci.1,bus=pcie.0,multifunction=on,addr=0x2 \ -device pcie-root-port,port=0x11,chassis=2,id=pci.2,bus=pcie.0,addr=0x2.0x1 \ -device pcie-root-port,port=0x12,chassis=3,id=pci.3,bus=pcie.0,addr=0x2.0x2 \ -device pcie-root-port,port=0x13,chassis=4,id=pci.4,bus=pcie.0,addr=0x2.0x3 \ -device ich9-usb-ehci1,id=usb,bus=pcie.0,addr=0x7.0x7 \ -device ich9-usb-uhci1,masterbus=usb.0,firstport=0,bus=pcie.0,multifunction=on,addr=0x7 \ -device ich9-usb-uhci2,masterbus=usb.0,firstport=2,bus=pcie.0,addr=0x7.0x1 \ -device ich9-usb-uhci3,masterbus=usb.0,firstport=4,bus=pcie.0,addr=0x7.0x2 \ -device virtio-serial-pci,id=virtio-serial0,bus=pci.2,addr=0x0 \ -blockdev '{"driver":"file","filename":"/mnt/user/domains/MacinaboxCatalina/Clover.qcow2","node-name":"libvirt-3-storage","cache":{"direct":false,"no-flush":false},"auto-read-only":true,"discard":"unmap"}' \ -blockdev '{"node-name":"libvirt-3-format","read-only":false,"cache":{"direct":false,"no-flush":false},"driver":"qcow2","file":"libvirt-3-storage","backing":null}' \ -device ide-hd,bus=ide.2,drive=libvirt-3-format,id=sata0-0-2,bootindex=1,write-cache=on \ -blockdev '{"driver":"file","filename":"/mnt/user/domains/MacinaboxCatalina/Catalina-install.img","node-name":"libvirt-2-storage","cache":{"direct":false,"no-flush":false},"auto-read-only":true,"discard":"unmap"}' \ -blockdev '{"node-name":"libvirt-2-format","read-only":false,"cache":{"direct":false,"no-flush":false},"driver":"raw","file":"libvirt-2-storage"}' \ -device ide-hd,bus=ide.3,drive=libvirt-2-format,id=sata0-0-3,write-cache=on \ -blockdev '{"driver":"file","filename":"/mnt/user/domains/MacinaboxCatalina/macos_disk.img","node-name":"libvirt-1-storage","cache":{"direct":false,"no-flush":false},"auto-read-only":true,"discard":"unmap"}' \ -blockdev '{"node-name":"libvirt-1-format","read-only":false,"cache":{"direct":false,"no-flush":false},"driver":"raw","file":"libvirt-1-storage"}' \ -device ide-hd,bus=ide.4,drive=libvirt-1-format,id=sata0-0-4,write-cache=on \ -netdev tap,fd=35,id=hostnet0 \ -device vmxnet3,netdev=hostnet0,id=net0,mac=52:54:00:54:3a:24,bus=pci.1,addr=0x0 \ -chardev pty,id=charserial0 \ -device isa-serial,chardev=charserial0,id=serial0 \ -chardev socket,id=charchannel0,fd=36,server,nowait \ -device virtserialport,bus=virtio-serial0.0,nr=1,chardev=charchannel0,id=channel0,name=org.qemu.guest_agent.0 \ -device usb-tablet,id=input0,bus=usb.0,port=1 \ -vnc 0.0.0.0:0,websocket=5700 \ -k en-us \ -device qxl-vga,id=video0,ram_size=67108864,vram_size=67108864,vram64_size_mb=0,vgamem_mb=16,max_outputs=1,bus=pcie.0,addr=0x1 \ -device virtio-balloon-pci,id=balloon0,bus=pci.3,addr=0x0 \ -usb \ -device usb-kbd,bus=usb-bus.0 \ -device '************************' \ -smbios type=2 \ -cpu host,+hypervisor,migratable=no,-erms,+invtsc,kvm=on,+topoext,+invtsc,+avx,+aes,+xsave,+xsaveopt,+ssse3,+sse4_2,+popcnt,+arat,+pclmuldq,+pdpe1gb,+rdtscp,+vme,+umip,check \ -sandbox on,obsolete=deny,elevateprivileges=deny,spawn=deny,resourcecontrol=deny \ -msg timestamp=on 2020-04-26 10:38:34.865+0000: Domain id=51 is tainted: high-privileges 2020-04-26 10:38:34.865+0000: Domain id=51 is tainted: custom-argv 2020-04-26 10:38:34.865+0000: Domain id=51 is tainted: host-cpu char device redirected to /dev/pts/2 (label charserial0)
-
Thank You!! Could you post your xml file? Then i can compare. CPU: Intel® Core™ i5-7600K CPU @ 3.80GHz BIOS: i tried to add <qemu:arg value='host,kvm=on,+invtsc,+hypervisor'/> but then the vm does not boot

-
daniel@daniels-iMac voltageshift-10 % sudo chmod -R 755 VoltageShift.kext Password: daniel@daniels-iMac voltageshift-10 % sudo chown -R root:wheel VoltageShift.kext daniel@daniels-iMac voltageshift-10 % sudo ./voltageshift read 0x3a RDMSR 3a returns value 0x5 (00000000 00000000 00000000 00000000 00000000 00000000 00000000 00000101) daniel@daniels-iMac voltageshift-10 % daniel@daniels-iMac ~ % sysctl -a | grep machdep.cpu machdep.cpu.max_basic: 13 machdep.cpu.max_ext: 2147483656 machdep.cpu.vendor: GenuineIntel machdep.cpu.brand_string: Intel Core 2 Duo P9xxx (Penryn Class Core 2) machdep.cpu.family: 6 machdep.cpu.model: 23 machdep.cpu.extmodel: 1 machdep.cpu.extfamily: 0 machdep.cpu.stepping: 3 machdep.cpu.feature_bits: 11437491729185111039 machdep.cpu.extfeature_bits: 4967106816 machdep.cpu.signature: 67187 machdep.cpu.brand: 0 machdep.cpu.features: FPU VME DE PSE TSC MSR PAE MCE CX8 APIC SEP MTRR PGE MCA CMOV PAT PSE36 CLFSH MMX FXSR SSE SSE2 HTT SSE3 VMX SSSE3 CX16 SSE4.1 SSE4.2 x2APIC POPCNT AES VMM PCID XSAVE OSXSAVE AVX1.0 machdep.cpu.extfeatures: SYSCALL XD EM64T LAHF RDTSCP TSCI machdep.cpu.logical_per_package: 2 machdep.cpu.cores_per_package: 2 machdep.cpu.microcode_version: 1 machdep.cpu.processor_flag: 0 machdep.cpu.mwait.linesize_min: 0 machdep.cpu.mwait.linesize_max: 0 machdep.cpu.mwait.extensions: 3 machdep.cpu.mwait.sub_Cstates: 0 machdep.cpu.thermal.sensor: 0 machdep.cpu.thermal.dynamic_acceleration: 0 machdep.cpu.thermal.invariant_APIC_timer: 0 machdep.cpu.thermal.thresholds: 0 machdep.cpu.thermal.ACNT_MCNT: 0 machdep.cpu.thermal.core_power_limits: 0 machdep.cpu.thermal.fine_grain_clock_mod: 0 machdep.cpu.thermal.package_thermal_intr: 0 machdep.cpu.thermal.hardware_feedback: 0 machdep.cpu.thermal.energy_policy: 0 machdep.cpu.xsave.extended_state: 7 832 832 0 machdep.cpu.xsave.extended_state1: 1 0 0 0 machdep.cpu.arch_perf.version: 0 machdep.cpu.arch_perf.number: 0 daniel@daniels-iMac voltageshift-10 % sysctl kern.hv_support kern.hv_support: 0 daniel@daniels-iMac voltageshift-10 % I did all steps you wrote. Still have hv_support 0. Does hv_support return 1 at your environment? mac.xmlI attached my xml File
-
Does someone was able to get Docker working?
-
Does someone know if it would be possible to run Docker inside the the Mac VM? i get hv_support 0
-
Is there a fix when i have Issue to Login to the App Store?
-
@tjb_altf4 thank you for the quick reply. 1. Shutdown all VMs 2. Open the Unraid Terminal modprobe -r kvm_intel modprobe kvm_intel nested=1 3. Open VM Settings -> Toggle XML View Add <feature policy='require' name='vmx'/> to the CPU Section 4. Start the VM
-
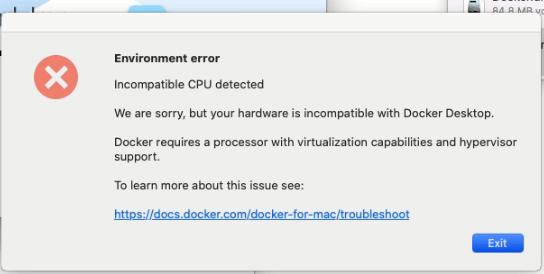
Hi, i want to ask if it is possible to enable VT-d Support inside a VM. I try to use docker inside a VM. Is this in general Possible? I get an error. Screenshot Attached. Best, Daniel