


Redindian
Members
-
Joined
-
Last visited
Everything posted by Redindian
-
@cyberteer Thanks for the how to! Just installed the docker using your guide. I also ran into the "EVS" problem and fixed it using "./idrive -C". I just used your template and let it auto-create the directories. BTW. there is a small typo in this closing tag <WebUI/> in the template. Just started my backup on iDrive. Thanks again!
-
If you are not using the GPU as a passthrough for a VM, but like to use it for Docker you can set it to idle mode as follows. Install the following plugins. NVIDIA drivers: https://forums.unraid.net/topic/98978-plugin-nvidia-driver/ GPU Statistics: https://forums.unraid.net/topic/89453-plugin-gpu-statistics/ UserScripts: https://forums.unraid.net/topic/48286-plugin-ca-user-scripts/ You can add the command to run at "First start of Array" only to set the GPU to idle mode on boot. Or any other schedule of course. nvidia-smi --persistence-mode=ENABLED Very nice! 👍
-
Thanks, sounds interesting! I'm getting an error on Ubuntu even with sudo: nvidia-persistenced failed to initialize. Check syslog for more details. And the syslog: Apr 24 19:20:31 ubuntu nvidia-persistenced: Failed to lock PID file: Resource temporarily unavailable Apr 24 19:20:31 ubuntu nvidia-persistenced: Shutdown (3457) The manual says you don't need to run it directly and use nvidia-smi: Once the init script is installed so that the daemon is running, users should not normally need to manually interact with nvidia-persistenced: the NVIDIA management utilities, such as nvidia-smi, can communicate with it automatically as necessary to manage persistence mode. I was able to set it using: sudo nvidia-smi --persistence-mode=ENABLED First that increased power usage to 49W. And then it dropped back to 20W. So that seems to be an easier alternative. Thanks!
-
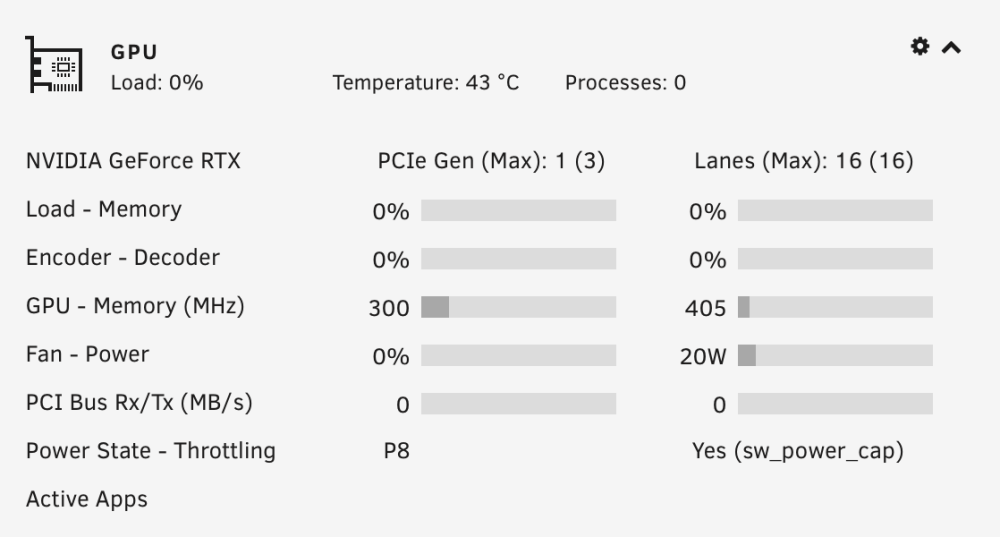
My new server has a NVIDIA RTX2070 Super GPU which was having a relatively high idle power. The link to this topic discusses that and proposes as a solution to run a Windows VM which sets the GPU to use less power. Since Windows tends to do a lot of other things in the background I wanted to see if this could be done in a Linux VM as well. As mentioned by @SimonF below, an easier alternative is just setting persistence mode on the GPU: sudo nvidia-smi --persistence-mode=ENABLED So the information below is just for reference if people come here from a search engine. And it shows the reduced power usage. 🙂 The nvidia-smi tool can show the current performance mode: Performance State The current performance state for the GPU. States range from P0 (maximum performance) to P12 (minimum performance). See: nvidia-smi docs Mine says P0 which according to the manual is the highest performance which uses 38W while idle: |===============================+======================+======================| | 0 NVIDIA GeForce ... Off | 00000000:04:00.0 Off | N/A | | 0% 48C P0 38W / 215W | 0MiB / 8192MiB | 0% Default | | | | N/A | +-------------------------------+----------------------+----------------------+ You can change the performance mode using nvidia-settings: nvidia-settings -a "[gpu:0]/GpuPowerMizerMode=2" See Nvidia-settings docs. Trying to do so results in this error message: Unable to init server: Could not connect: Connection refused ERROR: The control display is undefined; please run `nvidia-settings --help` for usage information. It requires a graphical user interface which we don't have in the terminal. You can fix this by running a dummy X server as explained here: https://serverfault.com/a/1055788 After doing this my GPU was set to P8 and only uses 20W idle: |===============================+======================+======================| | 0 NVIDIA GeForce ... Off | 00000000:04:00.0 Off | N/A | | 0% 36C P8 20W / 215W | 7MiB / 8192MiB | 0% Default | | | | N/A | +-------------------------------+----------------------+----------------------+ Aso it runs a bit cooler which is a nice extra. More information and screenshots about the performance mode can be read here: https://rastating.github.io/how-to-permanently-set-nvidia-powermizer-settings-in-ubuntu/ Unfortunately I was unable to set it to P12 which should be the minimal power usage. Although it says 20W, my meter only shows around 10-15W extra after adding the GPU. Which is what it should be if I read idle power usage of a RTX2070 super online. Not sure how that is possible. In my experience this is the same as using the Windows VM. But I'd rather run a small Linux VM to keep my GPU idle power to a minimum than running a Windows VM. Still looking for a real solution, but until that I'll keep the GPU power to minimum this way when I'm not using it.
-
Little feedback, rebuild the parity disk in the original HP server with the RAID controller. Then moved all disks back to the new server. Just make sure you use the exact same disk assignment. Then start the array. It won't be able to read the partitions but that's ok. Then stop the array, remove one of the data disks (not the parity). Start again to register the missing disk. You'll now be able to browse the missing disk and see all the files and confirm that is correct. Stop the array. Then re-add the missing disk and start in maintenance. Then rebuild the re-added disk. Repeat for all data disks. Took 3 x 8 hours, but everything is working again!
-
Sorry, I see that the link seems to answer all of my questions. Will read up on the procedure there. Thanks again for helping!
-
Ok, and then I follow this procedure? https://wiki.unraid.net/Manual/Storage_Management#Rebuilding_a_drive_onto_itself And this is possible regardless of the “Unmountable: Unsupported partition layout” status of the other drives? And as the array starts in the new server it will try to sync parity. Any way to prevent this? Or should I let it run a sync first and then remove one of the drives and re-add and rebuild it?
-
Thanks for the explanation. Too bad. I could put the disks back in the original server and sync parity there. Would that be possible? Would I still need the extra disk then? Because I don’t have a spare disk at the moment.
-
Thanks a lot! That seems to be the problem. I installed Unassigned devices and was able to mount the disks and browse them to verify all the data is still there. After reading the other post I have a few questions. “I unmounted it from Unassigned Devices, and with it unassigned from the array, I started the array.” So I would start the array with 3 disks including parity and leave one data disk out of the array? As soon as I start the array the parity sync starts. I canceled this, so I think my parity is not original anymore. “The emulated disk mounted and as far as I can tell the data still looks good, so I think I can proceed to rebuilding the disk.” What is an emulated disk? This is the one data disk not in the array right? And how do I rebuild that disk? Does it need the parity? Or are we rebuilding a disk from the array? Would be great if you could point my in the right direction or maybe the steps I should follow.
-
Hi, I had an Unraid server with 4x 4TB drives. It was a HP server with a RAID controller but it was configured as JBOD so no RAID. Everything was running smoothly, but I wanted to upgrade. So I wrote down the disks order and moved them to a new Unraid server. Connected them in the same order, then configured the array accordingly. But now all disks show “Unmountable: Unsupported partition layout”. I tried without a parity disk first but no luck. Then I configured the parity and it starts syncing the parity. I know it is a risk but it thought maybe it needs the parity to start. This should be the old parity so I’m not too worried about that. Am I doing something wrong here? It is a new Unraid installation on a new USB. I still have the old server and the old USB. So probably I could move the disks back and I should be able to access my data, but then I still don’t have a new server to move it too.
-
Just after posting this my container started working again. I switched to older versions, then back to latest and forced an update using "advanced settings" in Docker page on Unraid. Then restarted, didn't work. Opened a console in the Docker, tried to find logs and checked processes. Then posted my post above and when I went back I thought let's give the Web UI one more try and it worked! Sorry, no real solution here, but you might try forcing an update using "Advanced View". Click on "Basic View" in the upper right corner and then scroll to the docker and click "force update".
-
Same here, tried everything. Anyone any tips?
-
Thanks! That fixed it. I ran: btrfs balance start -dusage=75 /mnt/cache and the alert was resolved. While I was waiting I explored the GUI some more and noticed there is also a button to do this:

-
I just installed Netdata too and it's really great! But within one day I also have this alert. Did you ever find out how to solve or clear it?
-
Back on the latest version. After disabling backups the docker seems to keep working:
-
There is a lot of information here: https://community.ui.com/questions/Error-on-startup-of-Unifi-Controller-on-Raspberry-Pi-Error-processing-element-InMemoryAppender/4ed28ed2-fa98-4d7a-b242-80a4100b7529?page=2 Possible solutions: Modify the package Change backups to settings only Upgrade to 6.2.17
-
This error seems to occur starting version 6.1.71, but a number of other people reporting this using Raspberry Pi or Synology say it is working fine despite this error. I have also noticed increased CPU usage when it fails. My docker is limited to 2GB of memory. Could this be related? I will try and remove this limit and see how long it runs then.
-
I'm seeing this in the logs: [services.d] starting services [services.d] done. 2021-04-27 10:36:23,747 main ERROR Error processing element InMemoryAppender ([Appenders: null]): CLASS_NOT_FOUND 2021-04-27 10:36:24,096 main ERROR Unable to locate appender "InMemoryAppender" for logger config "root"
-
Anyone else having problems lately with latest version of Unifi controller becoming unresponsive after a few hours/days? I can't login anymore until I reboot it. I tried downgrading to 6.0.45, but got a message upgrading to 6.1.71 is not supported.
-
Yes, just start another, this will be a separate Docker on the same Unraid Docker server.
-
First of all, thank you for all your great work! Been using a number of your Dockers for a while now. I discovered this great photo management program called digiKam (https://www.digikam.org/) with great features (https://www.digikam.org/about/features/). The latest version 7.0.0 is available on Arch Linux so I tried to make a Docker for it. With your excellent base template it was quite easy. I'm running it now from a private repository on my Unraid and it seems to work quite well. Would you be interested in adding it to your official repository? Here is what I have so far: https://github.com/redindian/unraid https://github.com/redindian/arch-digikam https://hub.docker.com/repository/docker/redindian/arch-digikam


