





undone
Members
-
Joined
-
Last visited
Everything posted by undone
-
Just wanted to report back that it worked, even if the encryption caused self-created problems ... Just read the windows that appear carefully and don't enter an extra password, not even the same as the array, because the system can't manage that at all .
-
Well, that was quick, thank you. I'll try it at the weekend.
-
Hi guys, I just got a good deal for new pool and cache drives and would now like to swap my current ones for the new ones. First of all, I have found the FAQ, but I would like to make sure and have additional questions. My current setup: Pool of two devices, encrypted, RAID1, 1TB each SSD → Docker etc. Cache of one device, encrypted, 1TB SSD → Cache for the array disks New SSD: for the pool, two 1TB SSD for the cache, one 2TB SSD Questions: If I have understood it correctly, for the pool i will remove one old SSD, replace it with a new SSD and go through the procedure of the linked FAQ. After that I do the same with the second old SSD and replace it with the second new SSD. - Is that it, or is there anything else to consider, also in terms of encryption? For the cache drive I would move all files to the array, remove the old drive and add the new drive, with the same name and if necessary allocate all array disks to the new cache. - Will that work? Is there a better way? Is there anything else to consider for the procedure that I haven't noted?
-
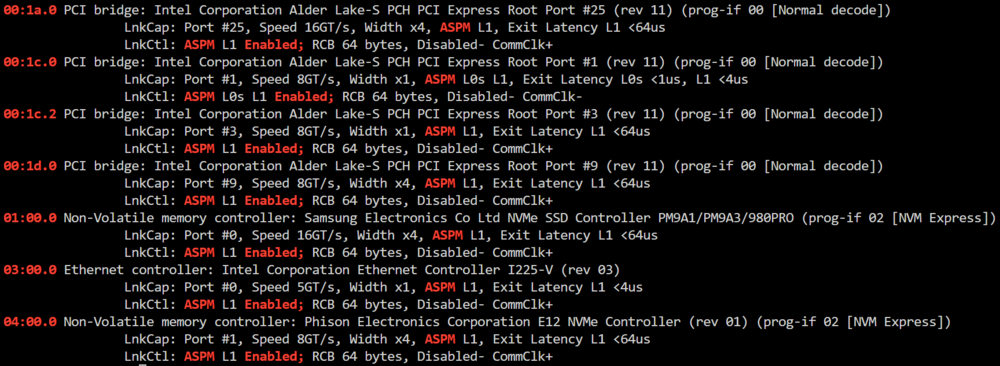
Komme wohl erst morgen früh dazu es zu testen, schaue mir dann das BIOS, suche nach dem ASPM und vergleiche es auch noch mit diesem Thread: Wenn das nichts bringt entferne ich die SSDs wie von dir beschrieben und lasse powertop laufen: Seagate > Corsair > Samsung Danke schonmal soweit. EDIT für @MPC561: Die BIOS-Optimierung (ASPM einschalten + Einstellungen des oberen Links übernehmen) hat alleine nichts gebracht, nach 1h wurden trotz Spindown immer noch C3 angezeigt. Das Aufbauen der ersten SSD (Seagate IronWolf 510) hat wiederum den Erfolg gebracht, C8 nach "auto-tune" in PowerTop (PowerTop komplett: https://pastebin.com/m7ji4JEU) lspci sieht wie folgt aus: Da ich keine vergleichbare SSD rumliegen habe kann ich diese nicht tauschen um das Array zu starten, ich werde mir demnach eine neue zulegen müssen. Gibt es für die M.2 PCIe SSDs generell Hersteller oder Angaben auf welche man für den Server, bzw. C-State, achten sollte? Oder einfach bei Geizhals die günstigste TLC mit DRAM-Cache nehmen?
-
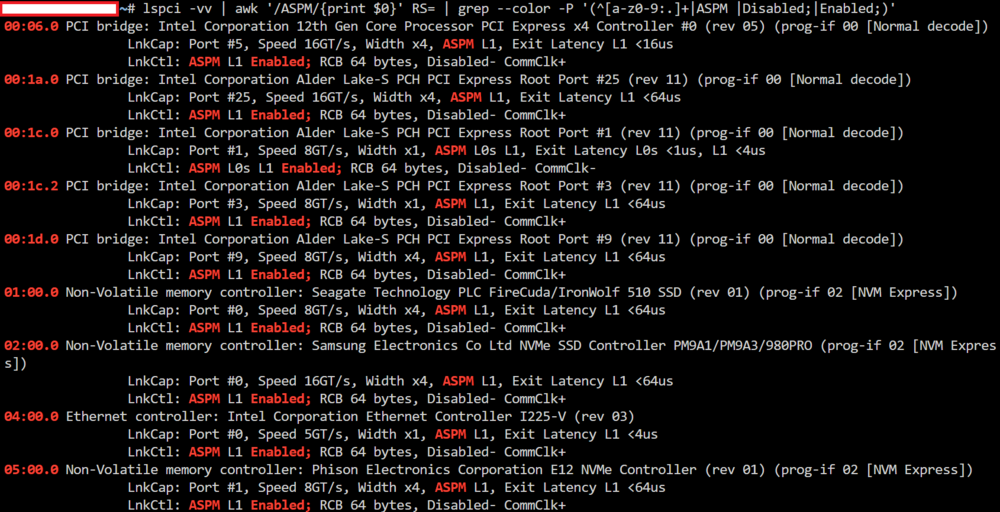
Auto-Tune ist durchgeführt, die HDDs gehen in den spindown und wachen auch wieder auf wenn eine Datei benötigt wird, eingespart werden dabei ~30W. Der C-State hat sich nach der Zeit nicht geändert, immer noch C3, daher der Befehl: lspci -vv | awk '/ASPM/{print $0}' RS= | grep --color -P '(^[a-z0-9:.]+|ASPM |Disabled;|Enabled;)' Ausgabe: Wenn ich es korrekt verstanden habe, wäre der nächste Schritt die Hardware zu suchen, welche den C-State bei C3 hält - am besten mit einer gesonderten Platte mit Ubuntu etc. und die restliche Hardware nach und nach hinzufügen und PowerTop laufen lassen. Gibt es hier was zu beachten um die Hardware anschließend wieder mit Unraid zu nutzen, bzw. einen besseren Weg?
-
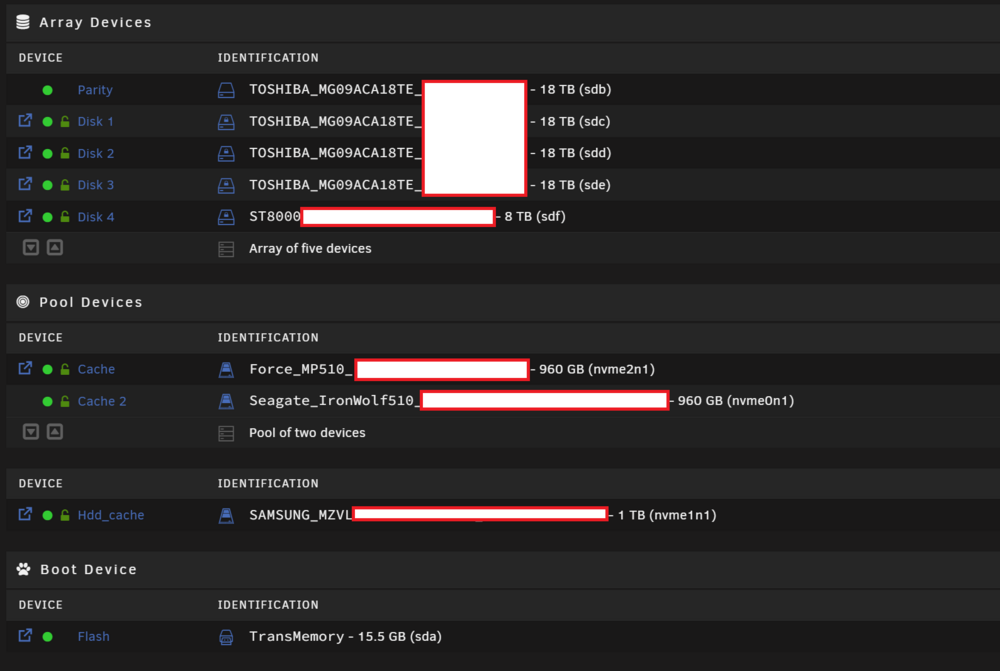
Ausgeführt habe ich bei Powertop noch nichts, daher die Frage zu beginn. Im BIOS habe ich hauptsächlich C10 gewählt und ErP etc. aktiviert, muss ich aber nochmal drüberschauen. Ist sie nicht, es ist eine SSD als HDD Cache, damit alle neuen Dateien erst auf die SSD geschrieben und dann einmal am Tag auf die HDDs im Array geschoben werden. lspci -vvv | grep "ASPM": lspci -vvv | grep "ASPM" LnkCap: Port #5, Speed 16GT/s, Width x4, ASPM L1, Exit Latency L1 <16us ClockPM- Surprise- LLActRep+ BwNot+ ASPMOptComp+ LnkCtl: ASPM L1 Enabled; RCB 64 bytes, Disabled- CommClk+ LnkCap: Port #25, Speed 16GT/s, Width x4, ASPM L1, Exit Latency L1 <64us ClockPM- Surprise- LLActRep+ BwNot+ ASPMOptComp+ LnkCtl: ASPM L1 Enabled; RCB 64 bytes, Disabled- CommClk+ LnkCap: Port #1, Speed 8GT/s, Width x1, ASPM L0s L1, Exit Latency L0s <1us, L1 <4us ClockPM- Surprise- LLActRep+ BwNot+ ASPMOptComp+ LnkCtl: ASPM L0s L1 Enabled; RCB 64 bytes, Disabled- CommClk- LnkCap: Port #3, Speed 8GT/s, Width x1, ASPM L1, Exit Latency L1 <64us ClockPM- Surprise- LLActRep+ BwNot+ ASPMOptComp+ LnkCtl: ASPM L1 Enabled; RCB 64 bytes, Disabled- CommClk+ LnkCap: Port #9, Speed 8GT/s, Width x4, ASPM L1, Exit Latency L1 <64us ClockPM- Surprise- LLActRep+ BwNot+ ASPMOptComp+ LnkCtl: ASPM L1 Enabled; RCB 64 bytes, Disabled- CommClk+ LnkCap: Port #0, Speed 8GT/s, Width x4, ASPM L1, Exit Latency L1 <64us ClockPM- Surprise- LLActRep- BwNot- ASPMOptComp+ LnkCtl: ASPM L1 Enabled; RCB 64 bytes, Disabled- CommClk+ L1SubCap: PCI-PM_L1.2+ PCI-PM_L1.1+ ASPM_L1.2+ ASPM_L1.1+ L1_PM_Substates+ L1SubCtl1: PCI-PM_L1.2- PCI-PM_L1.1- ASPM_L1.2- ASPM_L1.1- LnkCap: Port #0, Speed 16GT/s, Width x4, ASPM L1, Exit Latency L1 <64us ClockPM+ Surprise- LLActRep- BwNot- ASPMOptComp+ LnkCtl: ASPM L1 Enabled; RCB 64 bytes, Disabled- CommClk+ L1SubCap: PCI-PM_L1.2+ PCI-PM_L1.1+ ASPM_L1.2+ ASPM_L1.1+ L1_PM_Substates+ L1SubCtl1: PCI-PM_L1.2- PCI-PM_L1.1- ASPM_L1.2- ASPM_L1.1- LnkCap: Port #0, Speed 5GT/s, Width x1, ASPM L1, Exit Latency L1 <4us ClockPM- Surprise- LLActRep- BwNot- ASPMOptComp+ LnkCtl: ASPM L1 Enabled; RCB 64 bytes, Disabled- CommClk+ L1SubCap: PCI-PM_L1.2- PCI-PM_L1.1+ ASPM_L1.2- ASPM_L1.1+ L1_PM_Substates+ L1SubCtl1: PCI-PM_L1.2- PCI-PM_L1.1- ASPM_L1.2- ASPM_L1.1- LnkCap: Port #1, Speed 8GT/s, Width x4, ASPM L1, Exit Latency L1 <64us ClockPM- Surprise- LLActRep- BwNot- ASPMOptComp+ LnkCtl: ASPM L1 Enabled; RCB 64 bytes, Disabled- CommClk+ L1SubCap: PCI-PM_L1.2+ PCI-PM_L1.1+ ASPM_L1.2+ ASPM_L1.1+ L1_PM_Substates+ L1SubCtl1: PCI-PM_L1.2- PCI-PM_L1.1- ASPM_L1.2- ASPM_L1.1- lspci -v: https://pastebin.com/B7bS81a6 PowerTOP komplett: https://pastebin.com/jMRNwPRz Die HDD sind wie folgt verteilt:
-
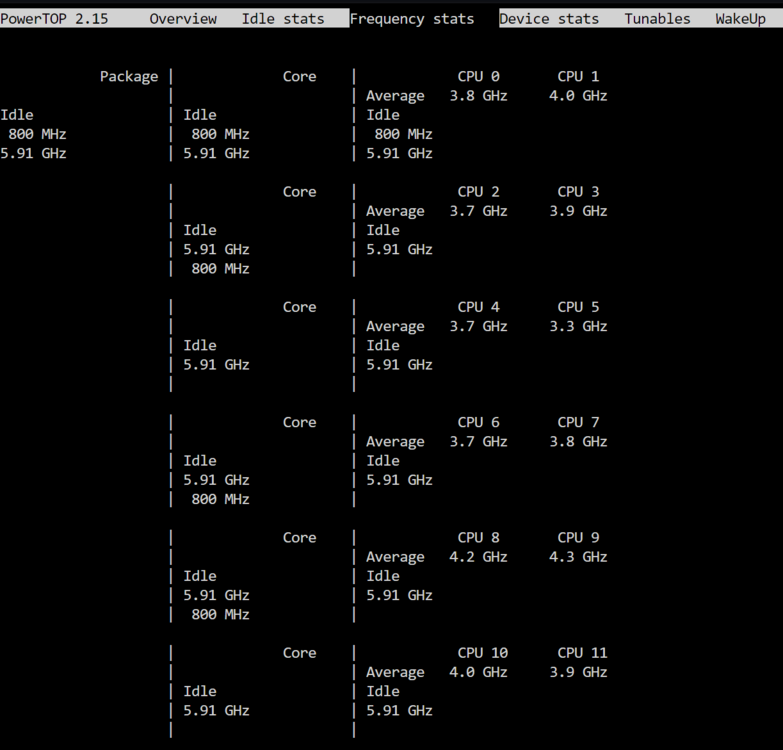
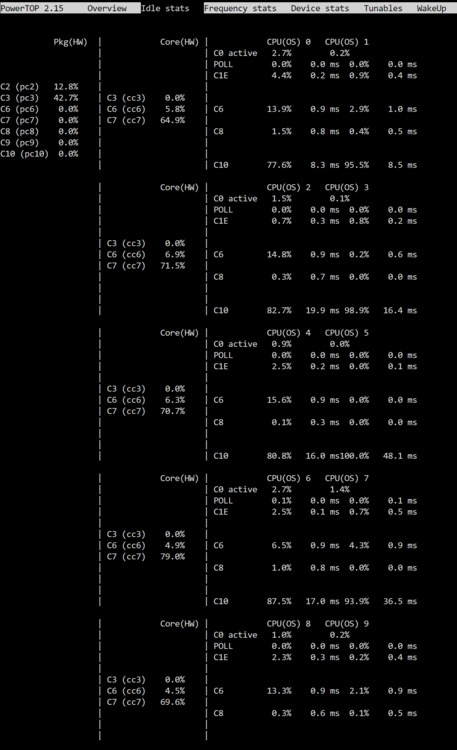
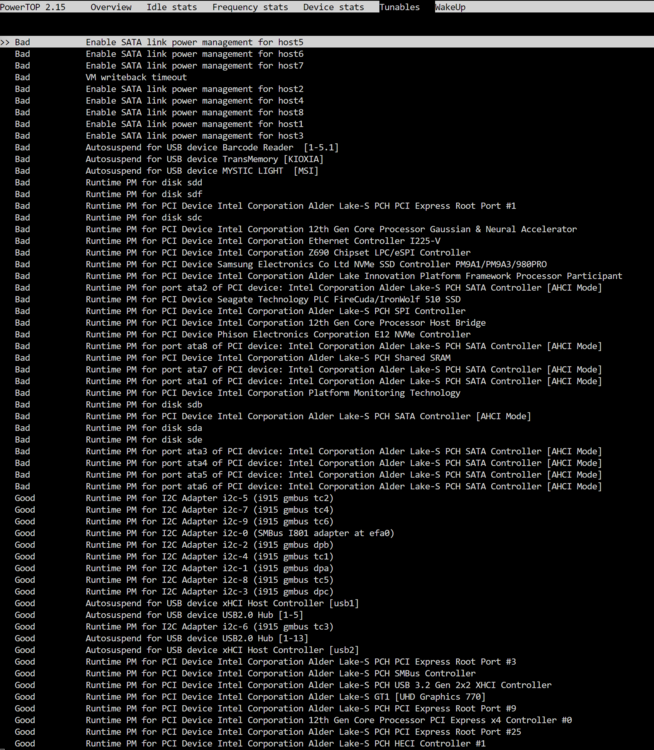
Hallo zusammen, bevor ich via Powertop für den Boot-Stick und die SATA-Festplatten etwas verschlimmbessere, wollte ich fragen ob ihr mir bei dem passenden command weiterhelfen könnt? Bzw. sagen könnt was ich wie anpassen muss. Powertop Screenshots habe ich angehängt. Hardware: - Intel i5 12500 - MSI PRO Z690-A DDR4 (neustes BIOS, C10 State eingestellt) + 4x 16GB RAM - HDD 4x 18TB; 1x 8TB - alle direkt am MB via SATA - SSD 2x 960GB RAID1; 1x 1TB HDD-Cache - alle direkt auf dem MB via M2 - Lüfter nach Temp. geregelt 4x 120mm (20-50%); 2x 80mm (0-50%) Verbrauch: - ca. 90W "Idle", alle Docker gestartet ohne Aktivität, VM gestoppt, HDD und SSD bei ~0%, CPU bei ~5% (<20W hatte es nach der ersten Einrichtung ohne laufende Docker und ohne HDD)
-
Hi guys, I just tried to create a virtual machine running Windows 11 for some offline testing e.g. of different software, but I had to chose a network source while creating it. Is it somehow possible to not give the VM any network connection? (like with Virtual Box where I just remove the network card) Or is a local connection necessary to connect via VNC? - If so, please let me know if it is possible just in my own network? To transfer files, I would like to copy and past it over VNC, or to allocate a dedicated storage with access for the VM and my PC.
-
mach natürlich sinn Werde das mal in einer ruhigen Minute testen, danke dir. EDIT Es hat wie bei der Lösung beschrieben funktioniert, selbst tausende Dateien waren so binnen weniger Sekunden umbenannt. Danke nochmal.
-
Genau, die Daten sind auf drei HDDs verstreut samt einer Parity. Gibt es dazu eine gute Anleitung für Anfänger? Auch wenn die Daten verstreut liegen, könnte ich doch einfach zum Beispiel disk1/media/ zu disk1/data/media/ "verschieben"? Gibt es hinsichtlich der Partiy was zu beachten? Das war mir bekannt. Hatte ja gehofft das Linux so schlau ist und einfach das Verzeichnis der Datei anpassen kann. _______________ Ich habe mir das gerade nochmal genauer angeschaut, die Daten sind wie folgt verteilt: /mnt/disk1/media/ /mnt/disk2/media/ /mnt/disk3/media/ Ich würde also auf allen Disks folgende Verzeichnisse erstellen: /mnt/disk1/data/media/ /mnt/disk2/data/media/ /mnt/disk3/data/media/ Wenn ich nun über das webterminal den mv Befehl ausführe sollte das instant klappen (Alle Docker die darauf zugreifen beendet)? mv /mnt/disk1/media/ /mnt/disk1/data/media/
-
Hallo, ich habe eine große Menge an Dateien in einem Pfad (1) liegen, welche auf ein anderes Pfad (2) verschieben möchte. Mit dem "move" command dauert das bis zu zwei Wochen, weshalb ich nach einer schnelleren Lösung suche. Die Daten welche liegen aktuell hier (1): /mnt/user/media/... verschoben werden sollen die Daten hier her (2): /mnt/user/data/media/... In den "Shares" sind beide Verzeichnisse ohne Cache eingestellt, dieser hätte ca 500GB zur Verfügung. Beim RAM könnte ich gute 32GB zur Verfügung stellen, sollte das etwas helfen. Mit dem "Dynamix File Manager" habe ich in den Shares den zu verschiebenden Ordner ausgewählt und via move angefangen die Daten zu verschieben. Anfänglich erreichten die Platten Geschwindigkeiten von >200MB/s, doch zeigte sich nach wenigen Minuten schon das es auch mal bis in den KB/s Bereich abrutschen kann, was die anfänglichen ~8h um ein vielfaches erhöht. Es würde mich freuen wenn jemand einen Tipp hat wodurch ich die Dauer verringern kann.
-
@mgutt Danke dir für die Erläuterung. Das System läuft jetzt seit 3 Tagen wie anfangs gewünscht, mit Plex gab es durch das Kopieren von mir etwas Probleme, welche aber wieder gelöst sind.
-
Danke. Da ich davon ausging ich könnte schonmal die Ordner Kopieren ("Copy") damit diese auf einer HDD gesichert sind, das Original sollte das ja nicht beeinflussen. Beim Cache hatte ich auf "No" gestellt, da bevor der dieser eingebaut wurde, auch alles auf "No" war - leider hat Unraid dadurch wohl das Problem, die Docker nicht mehr zuordnen zu können, selbst nach umstellen auf "Prefer:Cache" und dem Neustart des Array sind die Docker für Unraid verschollen (Wird nicht mehr angezeigt/ Nicht installiert) - die VM ist davon nicht betroffen. *da alles auf der HDD gesichert war, konnte Unraid die Docker wiederfinden nachdem die SSD1 aus dem Array entfernt war. Das mit den Dockern ist jetzt nicht zu tragisch, da bis auf Plex alles schnell eingerichtet ist - für Plex wiederum sollte es genügen die gesicherten Ordner nach einer erneuten Installation passend zu verschieben. Okay, dann wird es das RAID1. Nein, ich hatte nichts speziell eingestellt, nur die Cache SSD2 und die HDDs eingebaut, zugeordnet und eine Nacht laufen lassen. Als nächstes werde ich einfach deine Anleitung von oben befolgen.
-
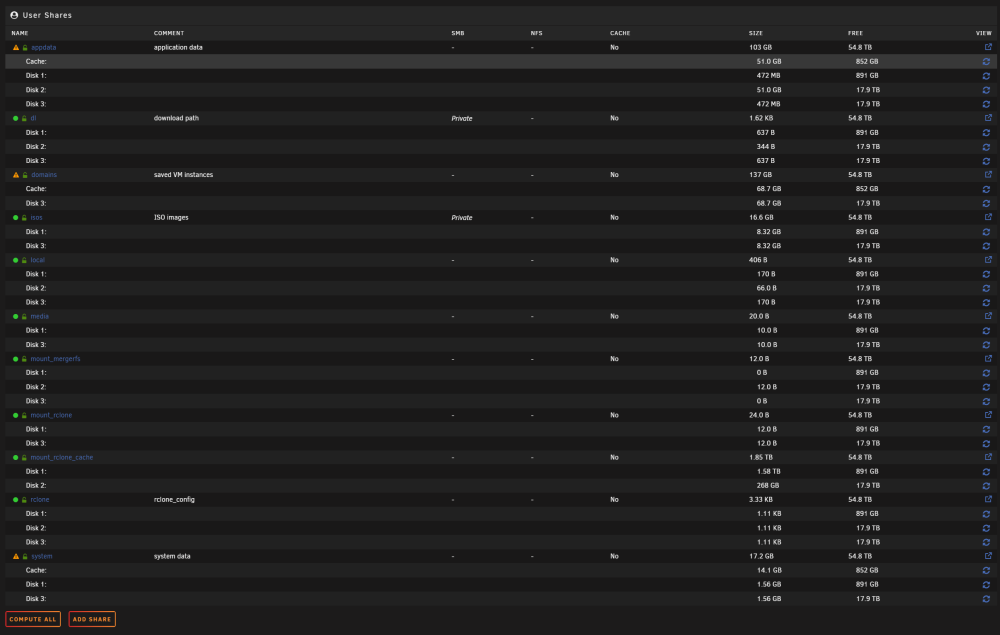
@mgutt danke dir für die Erklärung, leider kann ich dieser nicht ganz folgen und würde mich freuen wenn du folgendes näher erläutern würdest: Ich habe das Plugin installiert. Appdata, domains und system sind auf der SSD1 im Array. Mit den Einstellungen auf "Nein" stellen meinst du bei "Select cache pool"? Wo stelle ich das bei der VM ein? Die ganzen Shares habe ich auf die HDDs kopiert, den Cache auf "No" gesetzt Wird ein RAID1 hier empfohlen? Wie sieht es mit zwei Pools aus, einer als Cache und eine SSD für die Docker und VM? Aktuell sieht es bei mir so aus wie angehängt.
-
Hallo, auf meinem Homeserver lief bisher nur eine SSD als Array Device, alle genutzten Daten waren auf einem Cloudspeicher, welchen ich über rclone eingebunden habe. Auf der SSD1 wurden die Docker, VM und der Cache gespeichert. Seit kurzer Zeit habe ich als Datengrab HDDs erworben und in das Unraid Array samt Parity eingebunden. Da die SSD1 noch in dem Array ist, dort aber keinen Leistungsvorteile bringt, würde ich diese gerne in den Pool verschieben und dort für Docker und VM nutzen. Weiter konnte ich aus einem Rechner eine zweite SSD2 entwenden, und habe diese als Cache Pool eingebunden - RAM Cache kommt in der Zukunft irgendwann. Die Frage ist nun wie ich das ganze umziehen kann - wie bekomme ich die SSD1 aus dem Array in einen Pool, ohne das die Daten verloren gehen? HDDs: SATA 3,5" 18TB = 3x "Disk" + 1x "Parity" SSD1: M2 PCIe Seagate IronWolf510 1TB = Docker + VM SSD2: M2 PCIe Corsair Force MP510 1TB = Cache Danke vorab.
-
Das ist ja bescheiden, überrascht mich etwas das es hierfür scheinbar keine einfache Software Lösung gibt. Jaein, ich habe eine 250 Mbps Leitung von der Telekom, bis zu 270 Mbps kommen an, welche der Server auch komplett Auslastet solange wie nötig. Wenn ich nebenher einen Livestream auf FullHD laufen lasse, stockt dieser alle paar Minuten für ein paar Sekunden, auf HD geht es ohne Probleme - lässt sich für die Zeit auch aushalten. Ich sehe das Problem aber mehr beim remote Arbeiten, hier wäre es schlecht wenn die Verbindung abbricht, nur weil der Server gerade am rödeln ist. Bei dem Speedport Smart 4 kann man leider kaum Einstellungen vornehmen, zumindest aber das Signal an einen anderen Router durchschleifen und somit nur als Modem fungieren. Es wird dann wohl darauf rauslaufen einen gesonderten Router zu schalten (ein Modem gab es von der Telekom leider nicht und kostet ähnlich zu dem Router). Ich bin gerne noch für andere Vorschläge offen.
-
Wenn mein Router das könnte müsste ich hier nicht fragen . Habe aber leider einen Speedport (not so-) Smart 4, bei welchem ich schon froh war eine feste IP für den Server vergeben zu können, selbst im "hidden-Menü" kann man nicht mehr einstellen. Extra Hardware wäre natürlich eine Option, diese möchte ich aber - wenn anders machbar - vermeiden.
-
Hallo, wenn ich bei diversen Dockern (zb. Plex mit ua. Cloud Speicher) bestimmte Aktionen auslöse, kann es sein das mein komplett verfügbares Internet überlastet ist. Gewisse Docker bieten interne Limitierungen, aber eben nicht alle, bzw. nicht für Download und Upload. Daher meine Frage, wie kann ich Unraid/ einzelne Docker in der Internet/ Netzwerk Geschwindigkeit limitieren/ drosseln? Nach einer Limitierung für Docker hatte ich schon gesucht, doch nichts zufriedenstellendes gefunden. Somit würde es mir auch genügen den gesamten Server für Internet (und wenn nötig Intranet) zu drosseln. Gerne auch als User Script zum aus/ einschalten.
-
I am already aware of this, but I took the risk knowing that no single employee looks at which files are stored and that this runs automatically via the hash value - this should be changed by encrypting the file. Even if an employee then looks manually, he sees a ".bin" file without a password to decrypt it, and Google doesn't really have to care how I name my Linux Isos and holiday videos. But an offline solution is already being created, which is why I switched to Unraid. Sorry for the off-topic, back to the topic.
-
Well, after a few initial difficulties a couple of years ago, it has been running without any problems so far. gsuite:/crypt/media works /cache leads to /mnt/cache and also works the "&" is included, it just was not copied I added it because of a failure running the script. After a reboot I seems to work without it. What do you mean with "anything"? The file is encrypted with the password in the crypt config and the naming can be anything, nothing to hide behind my 'Merval Endgames 37 8K Premium 20.4 THEx.mp3.bin'. That was obviously the problem. If it runs in the background, there is also a connection in the appropriate folder. With the background process as predefined, it can simply be found at /mnt/user/mount_rclone/gcrypt/ . With the path from 2. the following also works (fusermount -uz /mnt/user/mount_rclone/gcrypt && fusermount -uz /mnt/user/mount_mergerfs/gcrypt/) and the array can be stopped. Thank you very much, I hope that is it for now with my problems.
-
I finally found the right lines where I needed to insert it, thank you. The mount script now also runs without error messages, but I cannot use rclone as I did with my old server (A). There (A) I can enter the following line and have direct access to the files in the cloud, but this does not work on the new server (B). ls /mnt/gsuite/ >List of all connected cloud files< In the new server (B), I cannot find the appropriate /mnt/ to access the data. Here is the comparison of the old- (A) und new- (B) server: Old-Server (A) | 1. Start server (ssd mounted) → 2. cmd → 3. past mount line → 4. rclone is mounted CONFIG: [gsuite] type = drive client_id = ########## client_secret = ########## scope = drive team_drive = token = ########## [gcrypt] type = crypt remote = gsuite:/crypt/media filename_encryption = off directory_name_encryption = false password = ########## password2 = ########## MOUNT: rclone mount --allow-other --no-check-certificate --cache-dir=/cache --dir-cache-time 168h --vfs-cache-mode full --vfs-cache-max-size 50G --vfs-cache-max-age 72h gcrypt: /mnt/gsuite -------------------------------------------------- New-Server (B) | 1. Start server → 2. mount array → 3. run "rclone mount script" → 4. ... is rclone mounted? CONFIG: [gsuite] type = drive client_id = ##########new client_secret = ##########new scope = drive team_drive = token = ##########new [gcrypt] type = crypt remote = gsuite:/crypt/media filename_encryption = off directory_name_encryption = false password = ########## password2 = ########## MOUNT_SCRIPT (only the changes i have made): ###################### #### Mount Script #### ###################### ## Version 0.96.9.3 ## ###################### # REQUIRED SETTINGS RcloneRemoteName="gcrypt" # Name of rclone remote mount WITHOUT ':'. NOTE: Choose your encrypted remote for sensitive data RcloneMountShare="/mnt/user/mount_rclone" # where your rclone remote will be located without trailing slash e.g. /mnt/user/mount_rclone RcloneMountDirCacheTime="168h" # rclone dir cache time LocalFilesShare="/mnt/user/local" # location of the local files and MountFolders you want to upload without trailing slash to rclone e.g. /mnt/user/local. Enter 'ignore' to disable RcloneCacheShare="/mnt/user0/mount_rclone_cache" # location of rclone cache files without trailing slash e.g. /mnt/user0/mount_rclone RcloneCacheMaxSize="100G" # Maximum size of rclone cache RcloneCacheMaxAge="168h" # Maximum age of cache files MergerfsMountShare="/mnt/user/mount_mergerfs" # location without trailing slash e.g. /mnt/user/mount_mergerfs. Enter 'ignore' to disable DockerStart="plex tautulli tinymedia manager sabnzbd nzbget sonarr radarr ombi overseerr" # list of dockers, separated by space, to start once mergerfs mount verified. Remember to disable AUTOSTART for dockers added in docker settings page MountFolders=\{"load/nzb,load/complete,temp,movies,tv,anime,docu,concert"\} # comma separated list of folders to create within the mount # Add extra paths to mergerfs mount in addition to LocalFilesShare LocalFilesShare2="ignore" # without trailing slash e.g. /mnt/user/other__remote_mount/or_other_local_folder. Enter 'ignore' to disable LocalFilesShare3="ignore" LocalFilesShare4="ignore" # Add extra commands or filters Command1="--rc" Command2="--config=/mnt/disk1/rclone/rclone.conf" Command3="--allow-non-empty" CreateBindMount="N" # Y/N. Choose whether to bind traffic to a particular network adapter RCloneMountIP="192.168.2.200" # My unraid IP is 172.30.12.2 so I create another similar IP address NetworkAdapter="eth0" # choose your network adapter. eth0 recommended VirtualIPNumber="2" # creates eth0:x e.g. eth0:1. I create a unique virtual IP addresses for each mount & upload so I can monitor and traffic shape for each of them ####### END SETTINGS ####### ####### Create Rclone Mount ####### # Check If Rclone Mount Already Created if [[ -f "$RcloneMountLocation/mountcheck" ]]; then echo "$(date "+%d.%m.%Y %T") INFO: Success ${RcloneRemoteName} remote is already mounted." else echo "$(date "+%d.%m.%Y %T") INFO: Mount not running. Will now mount ${RcloneRemoteName} remote." # Creating mountcheck file in case it doesn't already exist echo "$(date "+%d.%m.%Y %T") INFO: Recreating mountcheck file for ${RcloneRemoteName} remote." touch mountcheck rclone copy mountcheck $RcloneRemoteName: -vv --no-traverse --config=/mnt/disk1/rclone/rclone.conf 1. does the script work as described above if I do not get any errors when I click on "run script" and it shows "script complete" at the end? 2. How can I access my cloud mount from the command line? 3. how can I stop the mount again (my array cannot be stopped (stop-loop) when the array is still running/ after I started the script)? I don't have any other scripts running. The mount is not visible in the array.
-
Well, that is what i've done, and it works by hand if I run rclone without script:
-
Hi, i have the rclone.config life in a different direction, is it somehow possible to tell the script where the new config file is located? e.g. the new path is "/mnt/disk1/rclone/rclone.conf"
-
Thank you, after a few tries I got it with the following line: rcloneorig config --config=/mnt/disk1/rclone/rclone.conf If I understood right, there is now way to replace the standard path "/root/...", so I have to use the line above every time instead of just "rcloneorig config"?
-
Is it somehow possible to move the config file to another location (e.g. the encrypted array SSD)? If I currently restart Unraid without starting the array, the configuration file can be accessed with all sensitive information - I would like to change that. Sorry if the question has already been asked in the earlier pages.



