






DirtyDarrell
Members
-
Joined
-
Last visited
-
Apologies for the late reply, but yes to my understanding all B550 mobos support Windows 11 integration. @ShahmattYes, you'll need some sort of GPU for the setup, esp with hosting VM's. It really depends on what you're trying to achieve to be honest, but even a cheaper low end series 1650 or 1660ti does wonders for VMs and Headless stuff (very easy on pockets too). @JsfunkThe Z690 and Z790 (I assume you meant Z790 instead of "Z760") chipsets both support Intel 12th-gen (Alder Lake) and 13th-gen (Raptor Lake) CPUs, and with BIOS updates, they can also support 14th-gen (Raptor Lake Refresh). I don't have much personal experience here, but both are very solid options IMO
-
Sounds like a solid plan! If it's been running fine for over a year with no hardware changes, an update or config tweak does seem like the likely culprit. Hopefully, one of the suggestions helps pinpoint the issue. Best of luck with the troubleshooting, hope one of these steps gets you back up and running! Keep me posted on what you find and if you hit a roadblock, I’m happy to help brainstorm more solutions. Cheers & Best, -DirtyDarrell
-
🦾Hey spyder, It looks like your Unraid server is booting and operating correctly, but the local console display goes blank once Unraid loads. Since you’ve already ruled out issues with the KVM port and cables, here are a few potential causes and solutions to help resolve the issue: Possible Causes & Solutions: 1. Have You Tried Booting Unraid in Terminal Mode or Safe Mode? Before diving into deeper troubleshooting, I’d recommend testing the following boot options: Terminal Mode: -When booting Unraid, select "Unraid OS GUI Mode" from the boot menu to see if the display issue is specific to standard boot. -If the issue persists, try "Unraid OS (Terminal Mode)" to check if the console is functional without the GUI. Safe Mode: -Try booting into "Unraid OS Safe Mode (No Plugins)" from the Unraid boot menu. -If the display works in Safe Mode, a plugin may be interfering with the normal console operation. KVM Process: Access the Unraid Boot Menu: -From the Unraid WebGUI: Navigate to Main > Boot > Device > Flash > Syslinux Configuration. -Advanced View: Select "advanced view" in the Syslinux Configuration. -Select Safe Mode: Choose the "safe mode" option. -Apply and Reboot: Apply the changes and reboot the system. Booting to Terminal: -Unraid Boot Menu: Follow the same process as above to access the Unraid boot menu. -Select Terminal: Instead of "safe mode", select the option that allows you to boot to a terminal or command line interface. 2. Terminal/Console Output Disabled or Redirected -Unraid may be booting without a visible console session due to framebuffer settings or redirection to a serial console. -Solution: Try switching to a different virtual terminal by pressing Ctrl + Alt + F1 through Ctrl + Alt + F6 to see if one of them brings the display back. 3. GPU/Console Framebuffer Issue -Some Unraid versions and hardware combinations may have issues displaying the console if the framebuffer (fb) is misconfigured. -Solution: Try booting with Legacy Mode (CSM) instead of UEFI in the BIOS, or vice versa, if supported. You can also try adding the following boot parameter to your syslinux configuration: *-----Access the Unraid flash drive via the web GUI (Main > Boot Device > Flash > Syslinux Configuration). *-----Under the "Unraid OS" section, append the following after append initrd=/bzroot: "nomodeset" -Save and reboot. This forces Unraid to disable kernel mode setting, which can resolve blank screen issues on some hardware. 4. Unraid Console Output to Serial Port -On Dell PowerEdge servers, the console might be defaulting to a serial output, especially if the iDRAC Serial Console is enabled. -Solution: Check your BIOS settings: *-----Disable Serial Console Redirection in BIOS. *-----Disable Redirection After Boot in the iDRAC settings if applicable. *-----Ensure the primary video output is set to VGA or Integrated Video instead of serial. 5. BIOS/Unraid Version Compatibility -Some firmware versions on Dell servers may not play well with newer Unraid versions regarding console output. -Solution: Consider updating your BIOS and iDRAC firmware to the latest versions available from Dell’s support site. 6. Corrupt Boot or GUI Mode Issue -If the system is attempting to load a GUI but fails, it may result in a blank screen. -Solution: If you haven't already, try booting into Safe Mode (as mentioned above) to rule out plugin interference. Other Steps: If none of the above solutions resolve the issue, you may want to: -Check Unraid logs by connecting via SSH (ssh root@server-ip) and running: "dmesg | grep -i video" -This may provide hints about display issues. -Try connecting a different monitor directly to the server. -If using a discrete GPU, test with the integrated VGA output. I’ve included a few different troubleshooting steps that should help diagnose and resolve the issue. Hopefully, one of these solutions restores your console visibility! If you’re still experiencing problems or need further assistance, feel free to share any updates, I'll check back as much as I can. Best & Success, -DirtyDarrell
-
👋Hey Jsfunk, Keep in mind, this is my brain at almost 3 AM EST, just rambling about a very generic build question, lol. Obviously, more detailed or in-depth builds can scale up depending on your needs (power users, please don’t come for me—I swear I respect your 50-drive, water-cooled NAS fortresses). But hey, if you just want a solid, no-fuss Unraid setup, here’s what I’d suggest! If You’re an Intel Guy: -If reliability and power efficiency are priorities, Intel is a great choice for an Unraid NAS, especially if you ever want to add Docker containers or Plex in the future. Intel CPUs with Quick Sync can handle video streaming and transcoding well, even if you don’t need it now. Recommended Specs: -CPU: Intel i3-12100 (great efficiency) or i5-12600 for more overhead -Motherboard: B660 or Z690 with at least 6 SATA ports (expandable via HBA card) -RAM: 16GB DDR4/DDR5 (32GB if you ever add Docker/VMs) -Storage Controller (if needed): LSI 9211-8i or Dell H310 (flashed to IT mode) for extra SATA ports -Cache Drive: NVMe 500GB-1TB SSD (Samsung 970 Evo or WD SN770) -Power Supply: Gold-rated 500-650W (Seasonic or Corsair) Why Intel? -Lower power consumption -Quick Sync for future Plex use -Strong single-thread performance for NAS workloads If You’re an AMD Guy: -If you want a powerful and scalable system that can handle more than just storage, AMD is a great option. Ryzen CPUs offer more cores for the price, which is useful for things like Docker, VMs, or extra server tasks. Recommended Specs: -CPU: AMD Ryzen 5 5600 or Ryzen 7 5700X (low power, high performance) -Motherboard: B550 or X570 with at least 6 SATA ports (expandable via HBA card) -RAM: 16GB DDR4 (upgrade to 32GB if running extra services) -Storage Controller (if needed): LSI 9211-8i or Dell H310 (flashed to IT mode) -Cache Drive: NVMe 500GB-1TB SSD (Crucial P3 Plus or WD Black SN850) -Power Supply: Gold-rated 500-650W (EVGA, Seasonic) Why AMD? -More cores for multi-tasking -Better performance in workloads beyond just storage -Can be more cost-effective than Intel at higher core counts *Since your main priority is storage expansion, both Intel and AMD are solid choices. If you’re all about power efficiency and simplicity, Intel is great. If you want more flexibility to add extra services later, AMD gives you more bang for your buck. Either way, just make sure you have enough SATA ports (or an HBA card), and you’ll be golden. And if you ever feel like diving deeper into power-user territory, well… that’s how you end up with a full-rack server in your basement and an ever-growing electricity bill.😆 Best of luck with your new server (or should I say, your next great brainchild?), -DirtyDarrell
-
👋Hey kirkt, It sounds like a potential permissions issue or something related to your share settings. Since the first 3/4 of the files copied fine but the last 1/4 didn’t, a few things might be happening here. Troubleshooting Steps: 1. Check Share Permissions & Ownership -Run the following command via SSH or the terminal in Unraid to check permissions: ls -lah /mnt/user/"TV unwatched" -If some files have different owners or permissions, it could be causing the transfer issue. 2. Run the "New Permissions" Tool -Go to Tools → New Permissions in the Unraid WebUI. -Select the affected share (TV unwatched) and apply the fix. -This will reset ownership to nobody:users and should resolve most permission-related problems. 3. Check Available Space on Individual Disks -Even though Unraid shows 10TB free, if the share is configured with certain split-level settings or minimum free space settings, it might be refusing new files. -Go to Shares → TV unwatched → Included Disks & Allocation Method to see if space is actually available on the assigned disks. 4. Copy the Files to a Different Share -Since you mentioned that other shares work, try copying the problematic files to a test share. -If they copy successfully, the issue is likely specific to the "TV unwatched" share. 5. Check Logs for Errors -Your Unraid diagnostics might contain relevant errors related to SMB/NFS or filesystem issues. -You can check Tools → System Log or open your diagnostics ZIP file and review logs/syslog.txt. Try running the New Permissions tool first, then attempt the copy again. If that doesn’t work, check the disk space per disk and your allocation settings. Hope this helps! And if the problem persists, don’t hesitate to reach out, happy to help! Best & Success, -DirtyDarrell
-
👋Hey tomtom, Your current setup has clearly been getting the job done nicely, but if you're feeling it's time for an upgrade without touching your storage drives, here are a few exciting improvements you might consider to refresh and enhance your Unraid server: 1. CPU & Motherboard Upgrade -Since you do heavy Plex transcoding, upgrading to a newer platform with Quick Sync or dedicated GPU transcoding will make a huge difference. -If you're an Intel guy, consider 10th-gen and up (i.e., i5-10600, i7-11700, or newer) for better integrated Quick Sync performance. -If you prefer AMD, look at Ryzen 5000/7000 series, but keep in mind that AMD lacks Quick Sync, so a dedicated GPU is recommended. 2. Dedicated GPU for Plex Transcoding -Adding an NVIDIA GPU for transcoding is a solid move. Some good options: -----Quadro P2000/P4000 – Hardware unlocked for unlimited Plex transcodes. -----T400/T600/T1000 (Ampere-based) – Efficient, supports newer codecs. -----RTX 3050/3060 – Consumer-grade but works well with Plex. -Be sure to patch Plex’s hardware transcoding limit if using a consumer GPU. 3. NVMe Cache Upgrade -Replacing your SATA SSD cache with NVMe is a great idea for improved performance, especially if you deal with large file transfers. -Consider a PCIe 3.0 or 4.0 NVMe drive, depending on your motherboard. -If your board lacks NVMe slots, you can use a PCIe adapter (just be aware of the the potential bottlenecks and issues here). 4. Power Supply & Cooling Considerations -Ensure your PSU can handle a GPU upgrade (look for 80+ Gold or up with sufficient wattage). -Improved cooling may be needed if you’re adding more powerful components (I'm an air cooled guy in my server. Liquid + Data = No from me dawg). Your IBM SAS controller in IT Mode is a solid choice (same here!), no need to change that unless you’re looking to expand your storage. I tried to throw a little bit of everything in here for you with a CPU/motherboard upgrade, a dedicated GPU for Plex, and NVMe cache, you should see a big performance boost without having to overhaul the whole system (semi-budget friendly depending on what/when you buy it). If you have any questions or ever want to pick my brain some more, feel free to reach out, always happy to help! Wishing you the best of luck with the rebuild! Hope it all comes together smoothly. Best & Success, -DirtyDarrell
-
There has been a lot of discussion in older threads regarding the Tunable (md_num_stripes) setting, with many recommending increasing it to 4096 for systems with sufficient RAM. However, recent official guidance on this setting is somewhat limited. From what I understand, md_num_stripes controls the number of memory buffers allocated for parity and data disk operations. Increasing this value can improve performance, especially for high-bandwidth workloads, by reducing disk I/O contention. Since your system has 32GB of RAM and is only utilizing ~10GB, you likely have room to increase this value. Should You Increase md_num_stripes? -If your system experiences slow parity checks, disk write slowdowns, or frequent disk I/O bottlenecks, increasing md_num_stripes could help. -Many users have reported performance improvements by setting this to 4096, but results may vary based on workload and hardware. -Keep in mind that each additional stripe consumes memory, so monitor your RAM usage after making changes. Other Related Tunables: -md_queue_limit: Controls the maximum number of queued operations per disk. A higher value can improve parallel disk operations but may not always translate to real-world gains. -md_sync_limit: Defines the number of sync operations Unraid can run in parallel. Increasing this might speed up parity syncs and rebuilds but could also increase disk contention. -md_write_method: "Auto" will default to reconstruct write (turbo write) if conditions allow, which can significantly improve write speeds at the cost of spinning up all disks. Next Steps: -If you want to experiment, try increasing md_num_stripes to 4096, then test parity checks and large file transfers to see if performance improves. -Monitor your RAM usage to ensure there are no unintended memory constraints. -If you encounter instability, revert to the default 1280 and test again. For official Unraid documentation, these tunables are not extensively covered in the manual, but you may find discussions on the Unraid forums or through user benchmarks (when I was looking into it way back ago there was an awesome dude on Reddit that explained it very well in depth, ill try to dig that up). Hope this helps and sheds some more light on the topic! If you’re looking for deeper insights, digging through some of the older, outdated Reddit posts and older Official Unraid forum threads might provide additional clarity. I tried to explain that the best I could, but it had been a while. If I can explain it any better or give any more info just let me know! Best & Success -DirtyDarrell
-
DirtyDarrell changed their profile photo
-
Oh man, Unraid seems to pick the best moments to hiccup eh? Swapped some PCIe drives, moved to a new USB, and now it’s throwing a license key tantrum. No worries.. Let's try and get this sorted out! ALSO, Check out the official Unraid docs for the proper steps to change your flash device. 1. Verify the USB Drive is Functioning Properly: -Since both USB drives checked out fine in Windows, we can assume they are not physically faulty. -However, Unraid is particular about USB drives. If you're using a new one, ensure it's a high-quality USB 2.0 drive (Unraid works best with those). 2. Ensure the Correct *.key File is Being Used: -Go to your Unraid /config directory on the USB drive. -Locate your *.key file (e.g., Pro.key, Plus.key, Basic.key). -Ensure that the key matches the GUID of the USB drive you are using. 3. Confirm the USB is Being Read Properly: -Boot into Unraid GUI or SSH into the system. -Run the command: ls /boot/config -You should see Pro.key, Plus.key, or Basic.key. -If the key is missing, manually copy it over from a backup. 4. Check the Unraid Registration Page: -Open Unraid’s Web UI and go to Settings → Management Access. -Check if the USB is properly detected under System Devices. 5. Request a Replacement Key (If Needed): -If Unraid still reports an invalid key, go to: Unraid Key Replacement Portal. (Like @MAM59 said here, these transfers can only be done once a year, but if you message them and kind of explain whats going on.. they may work with you.) -Log into Unraid.net and request a replacement key for the new USB. 6. Reinstall Unraid on the USB (If All Else Fails): -Use the Unraid USB Creator Tool to create a fresh install. -Copy your /config folder (except the corrupted *.key file) from your backup. -Boot the server and manually assign drives if needed. Official Unraid Docs for changing the flash device: https://docs.unraid.net/unraid-os/manual/changing-the-flash-device/ Hope this helps clear things up! If Unraid is still being stubborn and rejecting multiple valid USB drives, it could be a GUID issue or maybe even some sneaky BIOS setting causing trouble. Give these steps a shot, and let me know how it goes. Best & Success, -DirtyDarrell
-
Hopefully, your new USB arrives soon! Wishing you the best of luck with the server rebuild. I don’t think we’ll run into any issues, but if anything comes up or there's any confusion, feel free to reach out. Just a heads-up, sometimes it might be a day or two before I check my notifications on the forums. 💾 Best of luck, -DirtyDarrell
-
Your Unraid configuration files are still present in the diagnostics, which is a good sign. Here's what you can do: 1.) Backup Your Current USB Drive -Before doing anything else, copy everything from your existing flash drive to a safe location. 2.) Check for Super.dat File -The super.dat file in config/ stores your drive assignments. If it's intact, your array configuration should be recoverable. 3.) Prepare a New Flash Drive -Install a fresh copy of Unraid on the new USB drive using the Unraid USB Creator. -Copy the entire /config/ folder from your backup (or extracted diagnostics) to the new flash drive. -Ensure the super.dat and ident.cfg files are included. 4.) Reboot and Check Assignments -Insert the new USB into your server and boot up. -Check if your disk assignments and settings are restored. 5.) Manually Reassign Drives (If Needed) -If Unraid doesn't detect your previous assignments, manually assign them without formatting. -Your parity should remain valid unless you made changes after the outage. Potential Issue with Cloud Backup Overwrite: If your flash backup on Unraid.net (or MyServers plugin) was overwritten with the post-failure state, you might not be able to restore directly from the cloud. However, since your diagnostics still contain super.dat and ident.cfg, you should be able to manually recover your array. I hope this sheds at least a little light, Lemme know if I can help anymore! Best & Success, -DirtyDarrell
-
I set up a similar Unraid backup & sync strategy for a friend after moving from Synology, and here’s what’s been working great for his setup: 1️⃣Desktop → Unraid Backup: -Syncthing for real-time sync of active files. -Duplicati for versioned backups (encrypted, scheduled). 2️⃣Unraid → OneDrive Sync (Offsite Backup): -Rclone (best for OneDrive API support, scheduled via User Scripts). -Duplicati (GUI alternative for OneDrive backups). 3️⃣Remote Access (Without Duplicating Files): -WireGuard VPN (built into Unraid, seamless & secure). -Nextcloud (if you want a Dropbox-like private cloud). This setup gave him fast local access, versioned backups, offsite redundancy, and remote access without duplicating data in a second share. Hope this helps! Best & Success, -DirtyDarrell
-
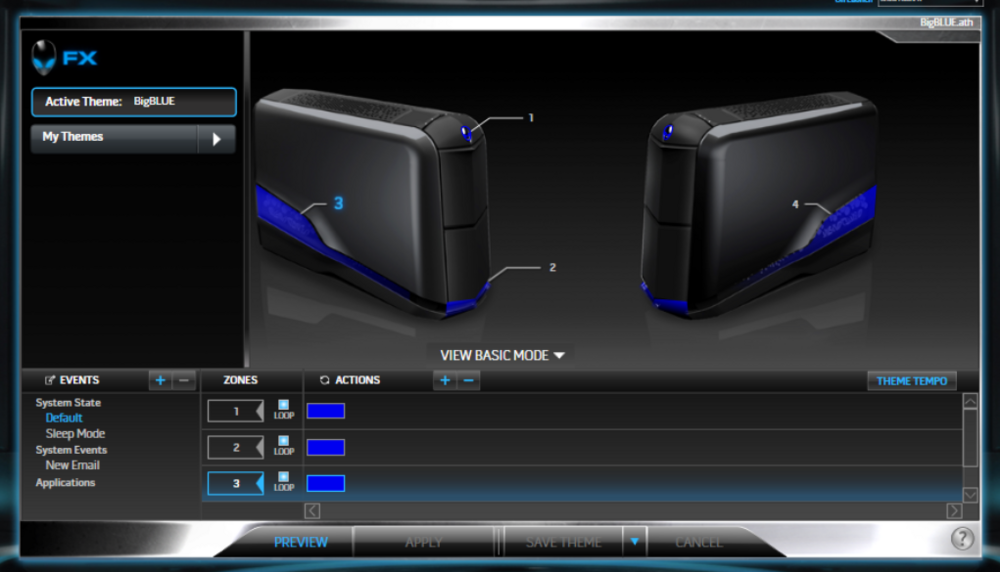
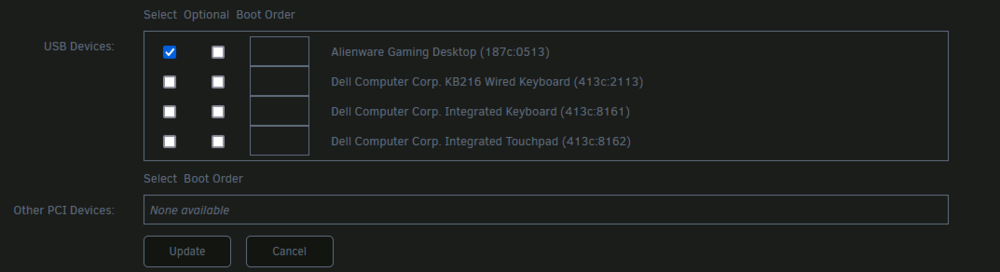
UPDATE: This issue has been Fixed finally! Issue Overview: I encountered a persistent issue where the side panel LEDs on my Alienware Aurora R1 would not function when running Unraid, despite working fine in bare metal Windows 10 (installed on a separate SSD). -When booting into Windows 10, all AlienFX lighting zones (including Zone 3 - side panel) worked perfectly. -However, as soon as Unraid booted, the side panel LED would turn off, even though the front and bottom LEDs remained functional. -This issue first appeared in Unraid 6.12.2 and persisted through multiple updates, until it was finally resolved in Unraid 6.12.15. -The behavior almost resembled AWCC's default "Sleep Mode" being activated by Unraid, turning off certain lighting zones (specifically Zone 3 - the side panel). -Initially, I attempted to run Alienware Command Center (AWCC) inside a Windows 10 VM to gain control of the lighting. However, AWCC failed to recognize the LED controller and did not allow me to change the lighting settings within the VM. Due to this, I opted to manage the lighting from a bare metal Windows 10 SSD, as I didn’t frequently adjust the effects. Additionally, I suspected that the chipset lacked proper passthrough support for AWCC to function correctly within the VM, making a dedicated Windows installation the more reliable option. After extensive troubleshooting, I successfully restored full functionality to the AlienFX lighting system, including the side panel, while running Unraid 6.12.15. Below is a detailed write-up of what was happening and how it was resolved. 🔹Root Cause Analysis: After testing multiple configurations, I determined that Unraid was either disabling power to the HID controller or failing to initialize it properly. Key observations: ✅The side panel LED worked during BIOS boot and in bare metal Windows 10. ❌As soon as Unraid took over, the side panel LED turned off. ✅Front and bottom LEDs continued to work in Unraid. ❌AlienFX settings had no effect while Unraid was running. -This strongly indicated that Unraid was either suspending the USB HID device or not initializing it properly at boot. 1️⃣Ensure Unraid Is Not Disabling USB Power: Unraid may automatically place USB devices into power-saving mode, which can cause issues with HID devices like the Alienware LED controller. 🔹Check USB Power Mode Run this command in the Unraid terminal to check if USB devices are in power-saving mode: cat /sys/bus/usb/devices/usb*/power/control *If the output says "auto", Unraid is managing USB power dynamically, which can turn off LEDs. *If the output says "on", USB power is fully enabled. 🔹Force USB to Stay Powered On To prevent Unraid from disabling USB power, run: echo "on" | tee /sys/bus/usb/devices/usb*/power/control *Verify the change: cat /sys/bus/usb/devices/usb*/power/control *Now all devices should say "on". 2️⃣Detect and Load Necessary Kernel Modules (lm-sensors) Certain kernel modules need to be loaded for Unraid to properly detect and communicate with HID devices like the Alienware LED controller. 🔹Detect System Sensors Run the following command: sensors-detect *Accept all default prompts (Press Enter for each). *The system will suggest kernel modules to load. 🔹Load Recommended Kernel Modules After sensors-detect completes, manually load the recommended modules: modprobe usbhid modprobe usbcore modprobe hid-generic *Confirm the modules are loaded: lsmod | grep hid 3️⃣Manually Reset the Alienware HID LED Controller: Since Unraid sometimes fails to initialize HID devices properly, manually unbinding and rebinding the HID controller can force it to work. 🔹Identify the HID Device Run the following to list all detected HID devices: ls /sys/bus/hid/devices/ *Look for an entry containing 187C:0513, which is the Alienware Gaming Desktop LED Controller. (This may vary depending on your model) 🔹Unbind and Rebind the HID Device Use the correct device ID from the previous command and run: echo -n "0003:187C:0513" | tee /sys/bus/hid/drivers/hid-generic/unbind sleep 2 echo -n "0003:187C:0513" | tee /sys/bus/hid/drivers/hid-generic/bind *(If your HID ID is different, replace 0003:187C:0513 with the correct one from lsusb.) 4️⃣Test if This Works After Reboot: Now that we’ve: -Enabled USB power -Loaded the required kernel modules -Manually reset the HID device We need to fully reboot Unraid: reboot *After rebooting, check if the side panel LED remains functional. ✅Automate the Fix on Every Boot: To ensure that Unraid always keeps the USB power settings and HID devices properly initialized, you can add the commands to Unraid’s startup script. 1️⃣Open the Unraid startup script (go file): nano /boot/config/go 2️⃣Add the following lines before the last exit line: # Ensure USB devices stay powered on echo "on" | tee /sys/bus/usb/devices/usb*/power/control # Load HID kernel modules modprobe usbhid modprobe usbcore modprobe hid-generic # Reset Alienware HID device echo -n "0003:187C:0513" | tee /sys/bus/hid/drivers/hid-generic/unbind sleep 2 echo -n "0003:187C:0513" | tee /sys/bus/hid/drivers/hid-generic/bind 3️⃣Save and exit (CTRL + X, then Y, then Enter). 4️⃣Reboot Unraid and confirm the fix persists. 🚀Ensure the Alienware Gaming Desktop HID Device Is Enabled in the VM: After resolving the Unraid-side issues, the next step was ensuring that the Windows 10 VM properly recognized and initialized the Alienware LED controller. 🔹Pass the HID Device to the Windows 10 VM -Go to the Unraid WebUI > VMs. -Edit your Windows 10 VM configuration. -Under the USB Devices section, select and pass through the Alienware HID device (187C:0513). -Save the configuration and restart the VM. 🔹Enable the Alienware HID Device in Windows 10 -Start the Windows 10 VM. -Open Device Manager (devmgmt.msc). -Expand Human Interface Devices (HID). -Locate HID-compliant vendor-defined device or Alienware Gaming Desktop. -Right-click and ensure the device is enabled. -Reboot the VM and check if the side panel LEDs are now working inside Alienware Command Center (AWCC). 🔹Final Thoughts: After following these steps, I was able to fully restore AlienFX lighting control, including the side panel LEDs, on my Alienware Aurora R1 and control everything within a VM while running Unraid 6.12.15. The issue started back in Unraid 6.12.2 and was likely due to USB power management changes, HID initialization bugs in earlier versions, invalid VM setups on my side, or a little combination of all these things. As of 6.12.15, this fix is confirmed to work and is running perfectly! I’m posting this solution here in case anyone else encounters similar problems with Alienware lighting control being disabled in Unraid. If anyone has further questions, feel free to reply or message me directly! Hope this helps! Best & Success, -DirtyDarrell
-
Hey Paff, I just came across your message, and I sincerely apologize for the extremely delayed response—I didn’t see it until now. To answer your question, I use this repo for Jellyfin: lscr.io/linuxserver/jellyfin. It has been reliable for me since my original post with no issues, so I’ve stuck with it. I’m not sure if you were able to resolve your issue in the meantime, but if you’re still having trouble or need any input, feel free to reach out! (I promise I'll be faster this time lol) Again, I apologize for not seeing this sooner. Let me know if I can help. Best & Success, -DirtyDarrell
-
SOLVED :: Was using the wrong Jellyfin Repo to begin with.
-
Hey mrkenori, Depending on how your appdata and system shares are configured, everything should be on the ssd you have with your appdata/docker info. With that being said, if you just plug your old USB into the new system with the old ssd and new Array.. everything should just carry over. Like I said, this depends also on how you have appdata/docker setting configured, like where they are stored at. If you're wanting to start fresh, that's essentially what I would do. Build a new system, plug and play my old USB and SSD. The appdata/docker info should carry over like this. If the USB is an issue or if you are upgrading that as well, you can also just backup the USB image, and flash that to a new USB using the tool you used the first time. I hope this helps some. Best, -Darrell



