





luzfcb
Members
-
Joined
-
Last visited
Everything posted by luzfcb
-
Hello, I would like to know how I can configure Mover to ignore arbitrary directories in Cache and thus avoid moving these files to the Array. Problem: I have Nextcloud installed via Nextcloud AIO. Nextcloud AIO is a docker application that manages docker itself (it has access to the docker socket), that is, it is Nextcloud AIO that creates, updates, fixes and removes all the containers necessary for Nextcloud to work. I would like to prevent the Nextcloud image and video preview directory from being moved from the Cache to the Array, however, I want almost all the other data to be in the array and not in the Cache. The question is: Is there any way to inform one or more directories so that Mover ignores them at all? In my case, I want Mover to ignore the directory /mnt/user0/nextcloud_arquivos/appdata_oc1ualjr5msd/preview and all its subdirectories. I could solve this with some changes to the Nextcloud container's mount points if I managed this container directly, however since it is managed via Nextcloud AIO, this is not possible (other options are not maintainable). Is there a way natively in Unraid or via a plugin to define one or more arbitrary directories and then have Move ignore them recursively?
-
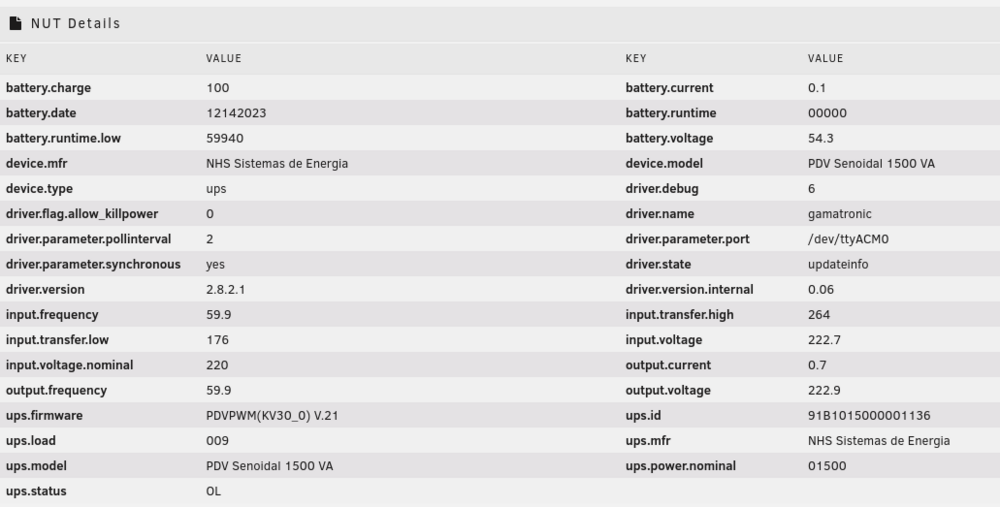
@Rysz Thanks again for generating the new build from the NUT master branch. The NUT fixes for Gamatronic Driver worked, and it's finally the first time I've been able to get NUT to start on my UPS "Nobreak NHS Premium PDV Senoidal 1500 VA" from Brazillian brand "NHS Sistemas de Energia"
-
Thank you for generating the compiled version with DEBUG active, however unfortunately I still haven't been able to find out for sure the cause of the segmentation fault. However, I discovered some useful settings for debugging and extra configurations. In ups.conf , there are some additional settings that live outside the driver section, that is, they must be placed BEFORE the [driver-configuration-name] and are not valid to define inside the driver section. (https://github.com/networkupstools/nut/blob/ff045c089b362085ec0abd651da5e9216c49e281/conf/ups.conf.sample#L45-L80) In my case, I changed the "Enable Manual Configuration:" option in the Nut Unraid UI to "for UPS Driver" and my ups.conf looked like this: maxretry = 3 user = nut group = nut debug_min = 6 synchronous = yes [nhs] driver = gamatronic port = /dev/ttyACM0 desc = "nhs_1500va" After that, I started the NUT driver directly (gamatronic) with some debug options and got this: > Note: In case anyone reads this and doesn't understand, each NUT driver is an independent executable, so I can use it directly instead of using `upsdrvctl`. The problem with using upsdrvctl for debugging is that not every driver has the same arguments and upsdrvctl can hide some of the error messages, which makes debugging difficult; root@f:~# /usr/libexec/nut/gamatronic -DDDDDDD -a nhs -u root Network UPS Tools - Gamatronic UPS driver 0.03 (2.7.4.1) 0.000000 [D5] send_to_all: SETINFO driver.parameter.port "/dev/ttyACM0" 0.000019 [D1] debug level is '7' 0.000296 [D5] send_to_all: SETINFO device.type "ups" Connected to UPS on /dev/ttyACM0 baudrate: 2400 2.209413 [D5] send_to_all: SETINFO driver.version "2.7.4.1" 2.209425 [D5] send_to_all: SETINFO driver.version.internal "0.03" 2.209430 [D5] send_to_all: SETINFO driver.name "gamatronic" 2.209435 [D1] PC-->UPS: "^P003AP1" 2.209506 [D1] send returned: 8 3.631085 [D1] UPS<--PC: "3,6,7,8,9,10,14,16,18,19,20,21,224,28,4,28,29,33,36,37,38,39,43" 3.631097 [D1] PC-->UPS: "^P003AP2" 3.631171 [D1] send returned: 8 5.130488 [D1] UPS<--PC: "47,51,54,55,56,57,58,59,61,62,63,64,65,68,69,776,77,80,81,82,84,87,88,7,88,89" 5.130515 [D1] Query 0 is ST5 5.130518 [D1] Querying varnum 3 5.130522 [D1] Querying varnum 6 5.130526 [D1] Querying varnum 7 5.130530 [D1] Querying varnum 8 5.130535 [D1] Querying varnum 9 5.130543 [D1] Querying varnum 10 5.130548 [D1] Querying varnum 14 5.130552 [D1] Query 1 is NOM 5.130554 [D1] Querying varnum 16 5.130557 [D1] Query 2 is ST1 5.130559 [D1] Querying varnum 18 5.130564 [D1] Querying varnum 19 5.130568 [D1] Querying varnum 20 5.130570 [D1] Querying varnum 21 Segmentation fault Apparently, the driver is able to initiate communication with the UPS, but fails at some point. That said, 4 hours ago some fixes for the gamatronic driver were merged into NUT ( gamatronic driver revised for safer memory operations. [#2427]. I'm hoping this is a possible fix for the bug I'm experiencing. @Rysz If it's not too much to ask, could you generate a new build from the current master branch of NUT?
-
@Rysz How are you compiling NUT? I looked for compilation docs and/or scripts or anything similar in the repository https://github.com/desertwitch/NUT-unRAID, but I couldn't find them. My plan is to compile NUT from source using Slackware 15 (or Unraid itself), and include some debug configuration ( ./autogen.sh; ./configure --with-debuginfo=auto <other-args> ) and extra stuff to maybe figure out why I'm getting segmentation fault in Unraid. In other words, I want to compile NUT in a way compatible with your plugin. The interesting thing is that I compiled nut from the source code in Ubuntu 22.04 and the gametronic driver does not raise an segmentation fault and works as expected.
-
@Rysz It possible to generate a release with debug symbols, by using https://github.com/networkupstools/nut/pull/2310/files ? I'm currently getting "Segmentation fault" when starting the driver for my UPS. It uses SEC protocol via gametronic driver. The manufacturer does not officially support nut, but he told me that I should configure the serial connection to: - Baud rate: 2400; - Data bits: 8; - Stop bits: 1; - Parity: None; - Minimum request interval: 600ms; This is my manual attempt to debug the error: root@f:/tmp/aaa# /usr/sbin/upsdrvctl -FF -DDDDD -u root start Network UPS Tools - UPS driver controller 2.8.2 0.000000 [D2] If you're not a NUT core developer, chances are that you're told to enable debugging to see why a driver isn't working for you. We're sorry for the confusion, but this is the 'upsdrvctl' wrapper, not the driver you're interested in. Below you'll find one or more lines starting with 'exec:' followed by an absolute path to the driver binary and some command line option. This is what the driver starts and you need to copy and paste that line and append the debug flags to that line (less the 'exec:' prefix). Alternately, provide an additional '-d' (lower-case) parameter to 'upsdrvctl' to pass its current debug level to the launched driver, and '-B' keeps it backgrounded. 0.000041 [D1] upsdrvctl commanding all drivers (1 found): (null) 0.000045 [D1] Starting UPS: nhs 0.000052 [D2] 1 remaining attempts 0.000056 [D2] exec: /usr/libexec/nut/gamatronic -FF -a nhs -u root 0.000059 [D1] Starting the only driver with explicitly requested foregrounding mode, not forking Network UPS Tools - Gamatronic UPS driver 0.05 (2.8.2) Connected to UPS on /dev/ttyACM0 baudrate: 2400 UPS: NHS Sistemas de Energia PDV Senoidal 1500 VA Segmentation fault I'm wondering if a version with debug symbos included might make it easier to discover the cause of errors and thus perhaps obtain minimal information so that I can open an issue in NUT
-
NUT 2.8.2 was released almost 1 hour ago: https://github.com/networkupstools/nut/releases/tag/v2.8.2 https://github.com/networkupstools/nut/blob/master/NEWS.adoc#release-notes-for-nut-282---whats-new-since-281 https://github.com/networkupstools/nut/blob/master/UPGRADING.adoc#changes-from-281-to-282 I'm looking forward to when 2.8.2 is available in Unraid NUT plugin because maybe the gamatronic driver will works without raising a weird segmentation fault.
-
Hello, on my Unraid 6.12.8, I have 2 1TB nvme SSDs from the same manufacturer, acting as cache using BTFS I recently noticed in the logs that apparently one of the SSDs might be dying. Mar 13 18:35:13 f kernel: btrfs_end_super_write: 282 callbacks suppressed Mar 13 18:35:13 f kernel: BTRFS warning (device nvme0n1p1): lost page write due to IO error on /dev/nvme0n1p1 (-5) Mar 13 18:35:13 f kernel: BTRFS error (device nvme0n1p1): bdev /dev/nvme0n1p1 errs: wr 326893147, rd 40441477, flush 23342600, corrupt 3, gen 0 Mar 13 18:35:13 f kernel: BTRFS error (device nvme0n1p1): error writing primary super block to device 1 Mar 13 18:35:13 f kernel: BTRFS error (device nvme0n1p1): bdev /dev/nvme0n1p1 errs: wr 326893148, rd 40441477, flush 23342600, corrupt 3, gen 0 Mar 13 18:35:13 f kernel: BTRFS error (device nvme0n1p1): bdev /dev/nvme0n1p1 errs: wr 326893149, rd 40441477, flush 23342600, corrupt 3, gen 0 Mar 13 18:35:13 f kernel: BTRFS warning (device nvme0n1p1): lost page write due to IO error on /dev/nvme0n1p1 (-5) Mar 13 18:35:13 f kernel: BTRFS error (device nvme0n1p1): error writing primary super block to device 1 When I click on the device name and then go to the Self-Test tab, and then click on Download, a .zip file is downloaded and inside it, there is a TXT file, that contains the result of the SMART analysis. It turns out that only on 1 of the SSDs, the TXT file contains the SMART test report, on the other SSD the TXT file only contains smartctl 7.4 2023-08-01 r5530 [x86_64-linux-6.1.74-Unraid] (local build) Copyright (C) 2002-23, Bruce Allen, Christian Franke, www.smartmontools.org Smartctl open device: /dev/nvme0 failed: No such device Questions: 1 - Is this a bug? 2 - Why apparently only 1 of the SSDs is being used? ( Cache 2 is used but the ) 3 - In the Self-Test tab of Cache 2, when clicking SMART error log, the error is displayed: Num ErrCount SQId CmdId Status PELoc LBA NSID VS Message 0 106 0 0x0001 0x4004 - 0 0 - Invalid Field in Command Why is the error not counted in "Pool Devices" -> "Errors" column? Some extra information: root@f:~# cat /etc/unraid-version version="6.12.8" root@f:~# mount | grep nvm /dev/nvme0n1p1 on /mnt/cache type btrfs (rw,noatime,ssd,discard=async,space_cache=v2,subvolid=5,subvol=/) root@f:~# ls /dev/ | grep nvm nvme1 nvme1n1 nvme1n1p1 Cache 1: Cache 2: .
-
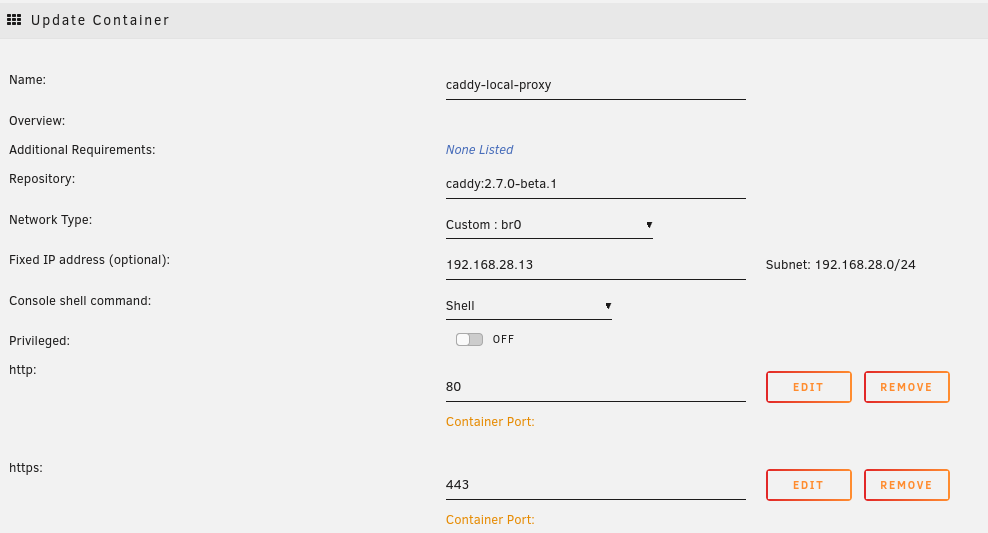
First of all, I'm new to Unraid and I don't know if this functionality exists or if there's a better way to do it. Problem: I have a maybe a bit complex setup. On Unraid server I have Nextcloud AIO installed from the official docker image and I would like to make it accessible over the internet. The company that provides my internet connection does not give me any access to the router (equipment that converts a fiber optic signal to an Ethernet cable), and because of this I cannot allow access to external ports or do port forwarding, etc. . Also, it gives me a dynamic IP address, which tends to change frequently. One of the ways around this is by using VPN. I then bought a domain name, rented a low latency VPS server for my region, and created a VPN network using Netmaker installed via docker. On my VPS server, I have Caddy as a reverse proxy that forwards requests to the Netmarker client host which effectively gives me access to the exposed ports of the Unraid server. All of this has been working fine, that is, I have no problems accessing my Nextcloud server via my domain. Although the setup worked fine, there is a problem: When I am indoors accessing the same network as the Unraid server, when the Nextcloud mobile app uploads something, the request is sent via the internet to my VPS server and then via the network VPN goes back to Unraid server. Since I pay data traffic on the VPS server and my internet connection, this is not a good thing. The solution for this was: 1 - Create a new container with Caddy with a fixed IP that reverse proxy directly to the Nextcloud containers without going through the VPN > I have a cron task that from time to time enters my VPS server and copies the Caddy certificates from the VPS to the Caddy running in Unraid and keeps the Unraid Caddy in sync. 2 - Install Pi-hole and include a dns record to resolve my domain address directly to the Caddy IP running in Unraid. This is the configuration I have now for Caddy running on Unraid: Nextcloud AIO creates its own docker network named nextcloud-aio. To make Caddy in Unraid have access to Nextcloud's internal network (aka nextcloud-aio docker network), it is necessary manually execute docker network connect nextcloud-aio caddy-local-proxy Connecting the network manually works fine, however the configuration does not resist the way Unraid recreates the containers, that is, if you click on edit the caddy-local-proxy container for example and apply it, Unraid will delete the previous container and create it again, however the previously connected extra networks will not be connected again. The Feature Request: One way I thought to solve this, is to include an additional step to be performed automatically by Unraid when Unraid starts and/or recreates the containers: Create a new UI way for the user to add via the dropdown selector (something as shown in the Network Type dropdown) which additional networks they want to connect to. From that list, run docker network connect Currently, I have a cron job to check this from time to time and ensure that a given container has access to a given network, but I think if that functionality or better functionality doesn't exist, it might be a nice addition to Unraid. #!/bin/bash # Define the list of container-network pairs container_network_pairs=( "caddy-local-proxy nextcloud-aio" # Add more pairs as needed ) # Wait until Docker daemon is available while ! docker info >/dev/null 2>&1; do echo "Waiting for Docker daemon to start..." sleep 1 done # Function to check and connect container-network pairs check_and_connect_network() { local container="${1}" local network="${2}" # Wait until the container is running while ! docker container inspect -f '{{.State.Running}}' "${container}" >/dev/null 2>&1; do echo "Waiting for container '${container}' to start..." sleep 1 done # Check if the container is connected to the network if docker container inspect "${container}" | jq -e --arg network "${network}" '.[0].NetworkSettings.Networks[$network]' >/dev/null 2>&1; then echo "Container '${container}' is already connected to the '${network}' network." else echo "Container '${container}' is not connected to the '${network}' network. Connecting..." if docker network connect "${network}" "${container}" >/dev/null 2>&1; then echo "Successfully connected '${container}' to the '${network}' network." else echo "Failed to connect '${container}' to the '${network}' network." exit 1 fi fi } # Iterate over the container-network pairs and check/connect each pair for pair in "${container_network_pairs[@]}"; do container="$(echo "${pair}" | awk '{print $1}')" network="$(echo "${pair}" | awk '{print $2}')" check_and_connect_network "${container}" "${network}" done exit 0
-
Question about Dynamix System Autofan: Is there a way to fully disable turn off a FAN? I have a set of Fans to cool the HDDs. They also indirectly help to cool other components. When the HDDs sleep, the auto fan turns the FANs off and I would like instead to just slow them down instead of turning them off.
-
Hello, I'm trying to build my homemade server and I think the integration with docker is very good, however, I miss the docker autocomplete properly installed and configured when I need to do some things manually in docker via terminal. Unraid 6.12 RC5 includes docker 20.10.23, and the bash completion file for that version is https://raw.githubusercontent.com/docker/cli/v20.10.23/contrib/completion/bash/docker Note: I expect that the final version Unraid 6.12 include at least the latest docker version at this time, that is, docker v23.0.6

