





timg11
Members
-
Joined
-
Last visited
Everything posted by timg11
-
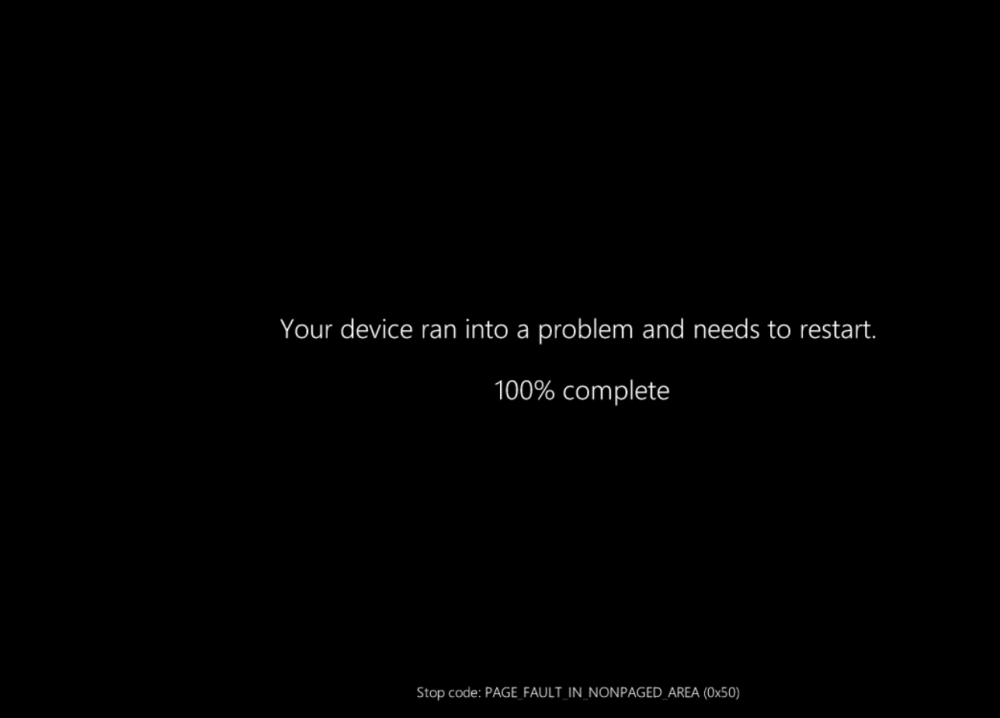
Jorge, New diagnostics attached. In the VM Event Viewer → Windows Logs → System, There are no occurrences of Event ID 1001 related to the 2nd CPU addition on October 14th. The last 1001 bugcheck recorded by Windows was 9/28/2026 3:04:25 PM. "The computer has rebooted from a bugcheck. The bugcheck was: 0x0000007e (0xffffffffc0000005, 0xfffff8007de73c35, 0xfffffc038d91e558, 0xfffffc038d91dd60). A dump was saved in: C:\WINDOWS\MEMORY.DMP. Report Id: 8a458a27-5a37-429f-b881-76ea501b4b0f." I have a screenshot of that one 2026-09-28 150454.png. System Thread Exception Not Handled (0x7E) "C:\Windows\MEMORY.DMP" at 9/28/2026 3:04:25 PM is still available in the VM. Those were during the VM boot process after the Unraid OS update as described at the start of this thread. But I have seen BSODs occasionally over the past year since creating the VM. Once the VM boots, it works fine, so I try to avoid restarting it unless necessary. Related to the addition of the 2nd CPU, my October 14th screenshot shows the Page Fault in nonpaged area 0x50 at time 2026-10-14 122805. At 12:31 the log has Event ID 46 "Crash dump initialization failed!" followed by Event ID 162 "Dump file generation succeded." a few seconds later. In the VM's minidump, the latest file is 092826-6593-01.dmp. Is there any way to get better logging of these early in the boot process crashes? The libvert-qemu-windows11.log available now seems to be from a small window of time from 17:26 to 17:30. Are there other logs available from Unraid or elsewhere? t440-diagnostics-anon-20261016-1408.zip libvert-qemu-windows11.log
-
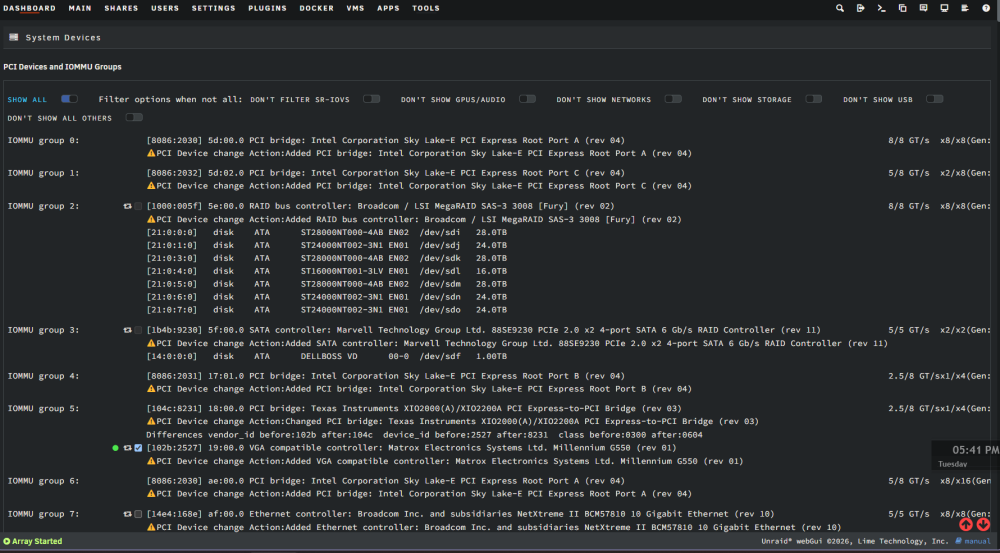
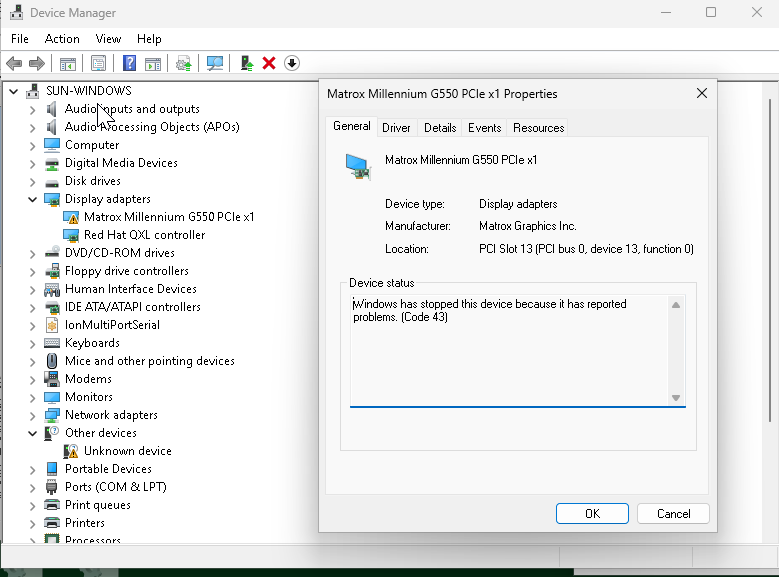
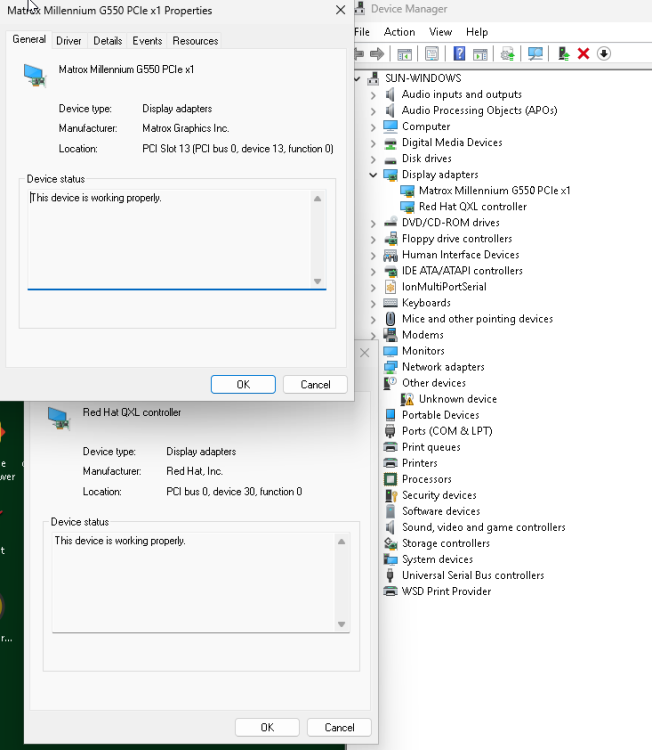
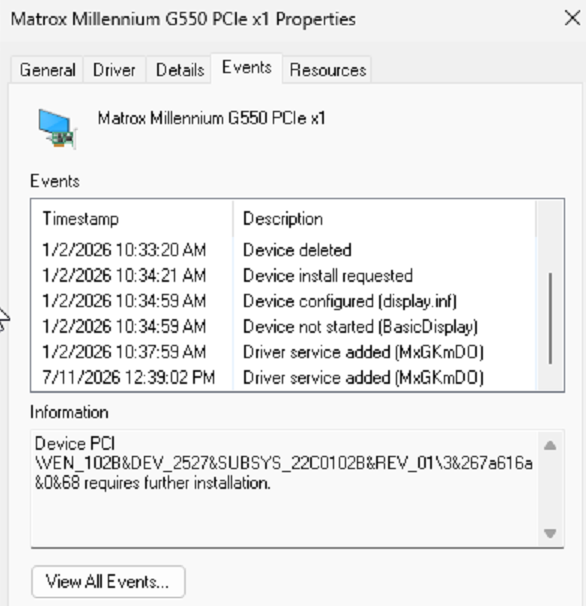
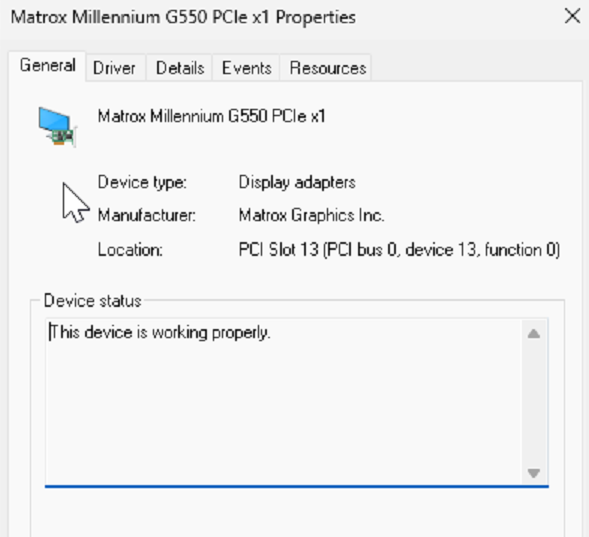
Jorge, The addition of a 2nd CPU to the host T440 server caused the G550 to remove itself since the PCI bus was renumbered. In that process, the VM was run without the G550 with the QXL monitor only. I had Claude describe the details of the process of adjusting to the second CPU. The final condition is the VM is able to boot with both G550 monitors and the QXL some of the time. About 50% of boots still result in failures with BSOD - SYSTEM_THREAD_EXCEPTION_NOT_HANDLED (0x7E) or PAGE_FAULT_IN_NONPAGED_AREA (0x50), which are only recoverable with Force Stop. Thanks! Claude report ---- ## VM behavior after adding second CPU to host T440 system JorgeB (on the Unraid forum) asked for a specific test: remove the Matrox G550 passthrough and restart the VM, to see whether the QXL/virtual-console device initializes cleanly once it has no passthrough GPU to contend with for boot/POST ownership. That exact test was never run deliberately - but the Phase 3 CPU2 install (bus renumbering, full mechanism in the "Update 2026-10-14" section right below) put the VM through a sequence of boots that amounts to the same experiment, plus its reverse (G550 restored), with more boot-by-boot detail than was captured when this was first logged. Recorded here in full since the data speaks to his question either way. ### Boot 0 - G550 hostdev entirely absent from the XML (never actually started) During the Phase 3 troubleshooting, an attempt to fix Unraid's Form View tracking (uncheck -> Update -> re-check -> Update) deleted the Matrox hostdev block from the VM's live domain XML entirely, rather than just toggling it - confirmed later by pulling the actual live XML and finding only the ASMedia USB hostdev present. At the same time, Unraid's own safety checks ("VM Autostart disabled due to vfio-bind error", "Start disabled due to PCI changes") were blocking Start outright, and ls /var/log/libvirt/qemu/ on the host showed only Debian.log - libvirt had never even been invoked for this VM, so no boot attempt happened yet, successful or not. The user declined to force a start in this state to see what would happen, for a sound reason: **"I have not yet attempted to start the Windows VM - we're just working on getting the hardware configured... what good would it do to try and run it without the video at all?"** Fair point, agreed at the time - so this is the one boot in the sequence that did not happen, by deliberate choice, not a gap in the data. Passthrough re-enabled for IOMMU Group 5: ### Boot 1 - G550 hostdev present (correct bus 0x19), but non-functional (bar='off' missing) Once the bus address was corrected and Unraid's PCI-change flags were acknowledged, Start became available and the VM was booted for the first time since the CPU2 install. At this point the hostdev was present and bound to the right device - Device Manager showed it at PCI slot 13, matching the guest-side slot='0x0d', so Windows had it and was binding to the correct device, just failing to initialize it - because Unraid's own Form-View save had silently stripped the bar='off' attribute from the hostdev's <rom> line that the pre-Phase-3 working XML had. Result, reported in real time: > "VM started fine. The Windows boot 'welcome screen' showed on the QEMU VNC console. The Unraid > boot logo is on one of the two G550 monitors, frozen. Now the QXL is working and the Matrox is > code 43." So: QXL initialized and ran cleanly through to the Windows welcome screen with no issue - it had no working competing GPU in play (the G550 was present as a device but non-functional), which is functionally the condition JorgeB's test was trying to isolate. The G550 itself got as far as painting the Unraid/OVMF boot logo on one physical output, then froze there permanently - no further output, Code 43 in Device Manager ("Windows has stopped this device because it has reported problems"). The second G550 output never initialized at all for the duration of this boot. ### Boot 2 - full stop/restart, bar='off' restored via XML View About ten minutes later, after re-adding <rom bar='off' file='.../matrox_g550.rom'/> (via XML View this time, not Form View, since Form View has no field for bar and had already been shown to drop it on save), the VM was stopped and started again - a genuine full restart, not a live edit: > "Did it, G550 showing on the physical monitor now, no Code 43." Clean boot, G550 rendering natively on the physical display, no Code 43. QXL's own state in this specific boot wasn't separately checked or reported - the focus at the time was confirming the physical-display fix held, not re-litigating the console. The next full boot cycle that same evening (after adding a <numatune> memory-pinning block, a separate and unrelated XML change) is where QXL and both G550 outputs were explicitly confirmed working together, with the most granular device-handoff sequence captured so far - see "Recurrence, 2026-10-14" further down. Operational state: ### Reading this against JorgeB's hypothesis Boot 1 is the closest thing to his requested experiment that has actually happened: with the G550 unable to do anything (Code 43, frozen at its own boot logo), QXL initialized and ran without issue. That's consistent with - though doesn't by itself prove - his point that something about having both devices present and racing for boot/POST ownership is the trigger, rather than QXL being broken on its own. It doesn't settle the harder question still open in this doc: why the same, unmodified, both-devices-present configuration sometimes boots clean (all three displays, as in several other boots logged below) and sometimes doesn't (Code 43, Code 10, or an outright BSOD) - that's the race-condition hypothesis the "Update 2026-10-14" and "Recurrence" sections below are about, and where his read on QEMU's version-specific POST/VGA-arbitration handling would be the most useful next input.
-
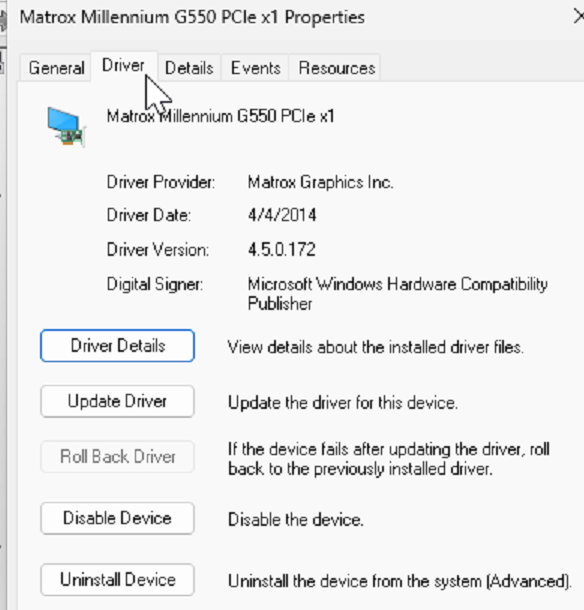
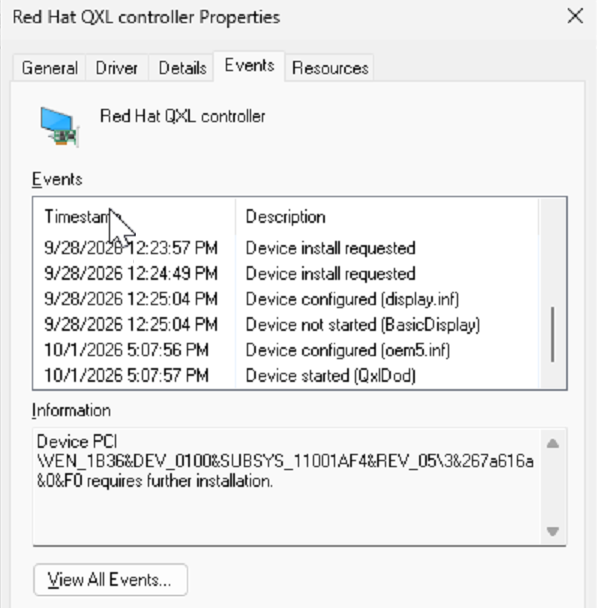
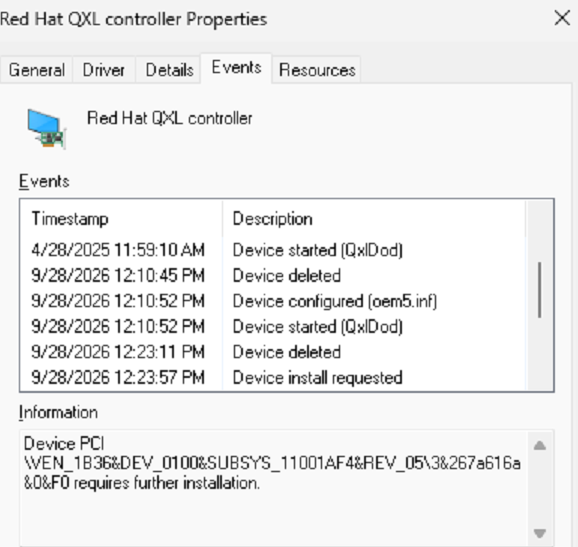
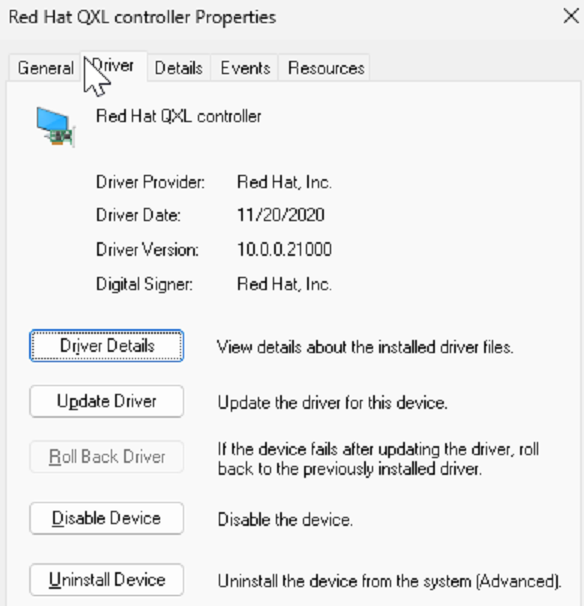
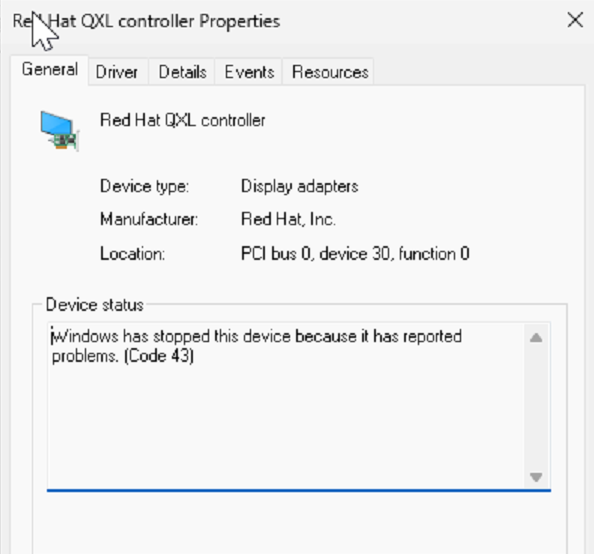
Winver 25H2 26200.8655. See images below for driver properties. Reviewing these proposed steps: 1. Save the current XML. (done) 2. Make sure the QXL driver is installed (not Basic Display). (Yes It is) 3. Shut Windows down cleanly. (In the VM from desktop start menu, shut down? Or from the VM control "Stop") 4. Remove only the G550 hostdev. You can keep the USB controller. (By editing the XML while the VM is shut down). 5. Start the VM with the console. (OK, if the same behavior as before, the VNC console shows the boot animation, then freezes before desktop) 6. Note whether QXL works and what Device Manager shows, then restore the XML. (Restoring XML is with VM shut down. If the QXL works and a desktop is available, easy to shut down. If no desktop, No VNC, and no monitor, how to shut down. From VM Control Stop or Force Stop?) QXL Driver Event View.xml
-
Thanks Jorge, The second PCI device: ASMedia USB 3.1 controller (host 01:00.0), passed through for USB. The GPU is a Matrox G550 PCIe (host 18:00.0, legacy VBIOS dumped and supplied via <rom bar='off' file='/mnt/user/isos/vbios/matrox_g550.rom'/> One extra data point on the XML: my nightly backup captures the live virsh dumpxml of the running VM. 2026-09-27 (7.2.2) vs 2026-10-01 (7.3.2) differ only in runtime ids/vnet names and a rom bar='off' I added while testing. Same machine type (pc-i440fx-9.1), same resolved QXL sizing (ram=131072 vram=65536 vram64=64512 vgamem=65536). So libvirt resolves it identically; whatever changed is below libvirt. > Attached: diagnostics taken with the VM running and noVNC black, the VM XML, the VM log (QEMU args), and Windows build/driver/event-log output. I'm hesitant to delete the Matrox while QXL is broken, which could cause me to be "locked out" of the VM entirely. Let's see what can be learned from this information. t440-diagnostics-20261007-1708.zip windows11VM-XML.txt windows11VM-QEMU-log.txt
-
Upgraded a long-running Windows 11 VM's host from Unraid 7.2.2 to 7.3.2 (QEMU went 9.2.3 -> 10.2.3 in that jump). VM has GPU passthrough (a Matrox G550, but I don't think the specific card matters) as a secondary physical display. The emulated QXL device (for Unraid's built-in noVNC console) is the primary monitor. This combo worked fine for over a year with 7.2.2. Symptom: After the upgrade, the QXL device shows Code 43 ("Windows has stopped this device because it has reported problems") in Device Manager. noVNC shows a black screen. If I start noVNC with the VM (Start with Console), the WIndows boot animation shows, but freezes as soon as the desktop on the physical monitor initializes. What I've ruled out: - VM XML is byte-identical before/after the upgrade (diffed the backup copies) - not a config/drift issue. - Reinstalling the QXL driver from the current virtio-win-0.1.271.ISO does nothing ("best driver already installed"). - Fully uninstalling the device (driver removal + reboot) makes Windows fall back to the generic Microsoft Basic Display Adapter - which also fails to start, with Code 10: "The driver trying to start is not the same as the driver for the POSTed display adapter." Does this indicate this isn't a QXL driver problem at all? Would the Basic driver be able to initialize the virtual video? It looks like a Windows kernel-level PnP check comparing which PCI device owns the boot/POST framebuffer against whatever's trying to bind a driver to it. Maybe something changed in how QEMU 10.x negotiates that against a GPU-passthrough device sharing the same VM. - I tried disabling the passthrough GPU's ROM BAR exposure (<rom bar='off'/> on its hostdev, to remove it from VGA/POST arbitration) - no change. QXL/noVNC renders the OVMF boot logo and the Windows boot spinner, then freezes the instant the passthrough GPU takes over as the real display. Physical monitor via the passthrough GPU works fine as a single primary monitor. It is supposed to be a secondary monitor. I connected another monitor to the second video output of the G550, thinking I could eventually use an EDID emulator on the first port. The second video output will not initialize and the Detect another Monitor function does not find it. I had never used the second port before the upgrade so I don't know if it is related to the QXL/noVNC path or has been broken all along. Has anyone else hit this specific combination (GPU passthrough + QXL secondary display) breaking across a QEMU 9.x -> 10.x jump? I'm trying to figure out if this is a known QEMU/libvirt regression with a documented fix, or something I need to work around some other way (e.g. swapping QXL for virtio-gpu). Happy to pull more diagnostics if anyone's seen this before. <graphics type='vnc' port='5901' autoport='yes' websocket='5701' listen='0.0.0.0' sharePolicy='ignore'> <listen type='address' address='0.0.0.0'/> </graphics> <audio id='1' type='none'/> <video> <model type='qxl' ram='131072' vram='65536' vram64='64512' vgamem='65536' heads='1' primary='yes'/> <alias name='video0'/> <address type='pci' domain='0x0000' bus='0x00' slot='0x1e' function='0x0'/> </video> <hostdev mode='subsystem' type='pci' managed='yes'> <driver name='vfio'/> <source> <address domain='0x0000' bus='0x18' slot='0x00' function='0x0'/> </source> <alias name='hostdev0'/> <rom bar='off' file='/mnt/user/isos/vbios/matrox_g550.rom'/> <address type='pci' domain='0x0000' bus='0x00' slot='0x0d' function='0x0'/> </hostdev> <hostdev mode='subsystem' type='pci' managed='yes'> <driver name='vfio'/> <source> <address domain='0x0000' bus='0x01' slot='0x00' function='0x0'/> </source> <alias name='hostdev1'/> <address type='pci' domain='0x0000' bus='0x00' slot='0x0e' function='0x0'/> </hostdev>
-
I've been running Unraid 7.2.2 since I installed it about a year ago on my T440 server. I'm preparing to add a second CPU and additional RAM to the T440 to allow me to use the PCIe x16 slot for a GbE NIC. I want to upgrade the OS while I'm at it. I've been watching the announcements and OS 7.3.3-rc.1 is still the latest, and 7.4 is still in beta. Is there anything I should keep in mind when adding a second CPU to a T440. Just shut everything down, disconnect power, add the CPU and RAM, and power it back up? Upgrade to 7.3.3-rc.1 beforehand? Wait for 7.4? or does it even matter? Edit ----------------- I did more research and learned that Unraid is running two parallel stable branches right now 7.2.8 (latest, 2026-07-29) 7.3.2 (2026-07-08, "recommended for all users" 7.3.3-rc.1 (2026-09-03) literally the least-baked build So based on that information, and my desire for a low risk path, I'm favoring 7.3.2. Again, any implications for me imminent move to dual CPU? Also anything w.r.t changes in the boot flash?
-
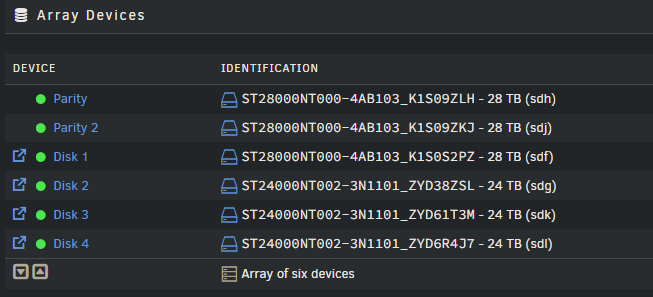
Getting back to the slow write issue on my array Last large copy to the array: Logs analysis by AI: "Every one of those disks is topping out around 21.6 MB/s despite being large 28TB/24TB Exos-class drives rated for 250+ MB/s sequential. That gap is the real story — the physical disks aren't spinning at their limit, something is throttling how much work reaches them." I set md_sync_limit to 10. reconstruct_write was already set. During copying activity, array activity goes up to 75%, and CPU rises from its nominal of 10% to about 40% (The copy is from a Windows VM to a share on the array, so anything on the Windows VM uses lots of CPI Is there anything changed in Unraid 7.2.8 that would help in this area? Have any other techniques for improving array performance been identified?
-
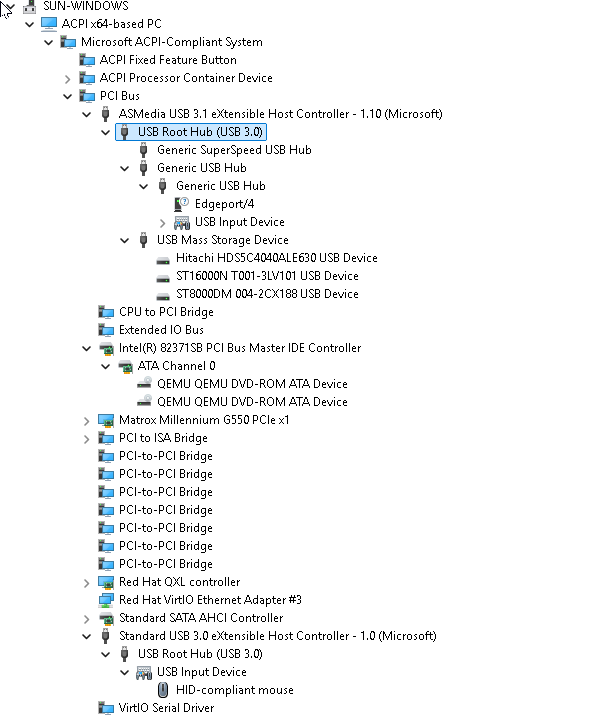
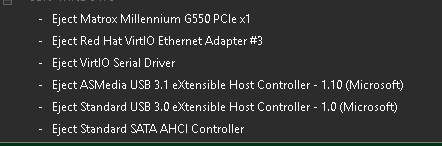
In my Windows 11 VM running under Unraid 7.2.2, it is difficult or impossible to safely remove USB drives that are mounted in the VM. One of the host system's USB3 controllers (ASMedia) is passed through to the VM. It is a physical USB3 controller on a PCIe card. Devices that are directly and locally used by the Windows VM are connected there. In the Windows VM, the device Manager tree looks like this: The problem is the "Safely Remove Device" dialog in the tray looks like this: If I remove the ASMedia USB3.1 controller, it also removes devices unrelated to the USB hard drives and used by applications, and would affect system operation. The USB Mass Storage Device that holds the drives is a Sabrent 4-bay drive docking controller Attempting to disable this device in Device Manager results in a prompt to reboot. Has anyone found a clean way to shut down drives for replacement without shutting down the VM?

-
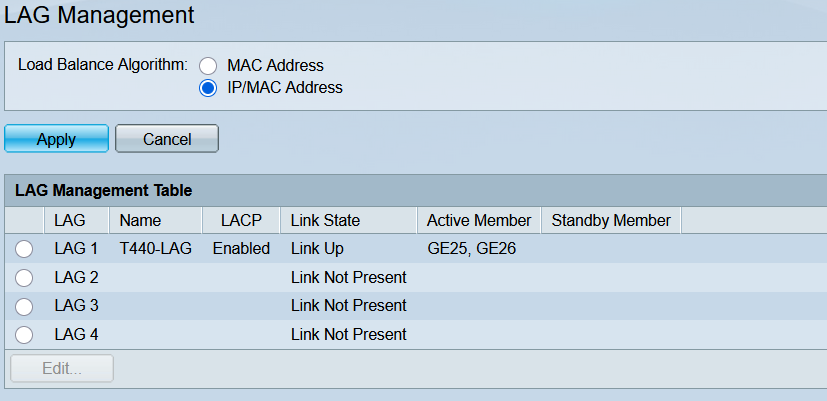
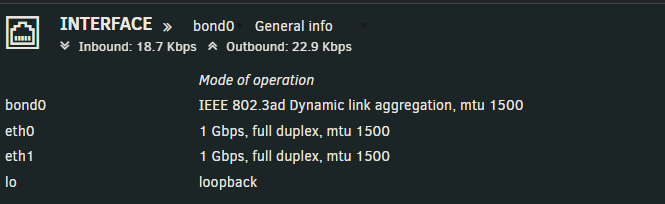
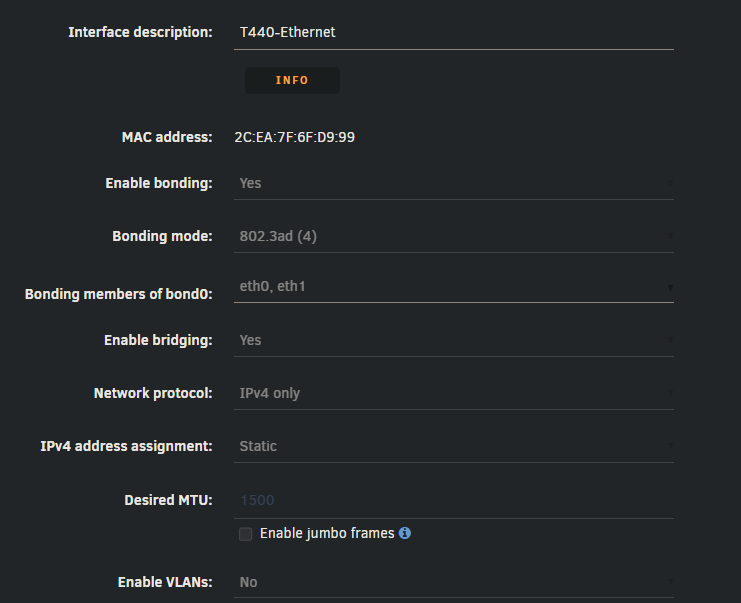
I run Unraid 7.2.0 on a Dell T440 server with two Gigabit Ethernet ports. They are bonded as bond0 using 802.1ad LAG. The two ports connect to a Cisco SG200-26 26-Port Gigabit Smart Switch, on ports GE25 and GE26. They are also configured as LAG. When I first built the system, I did an informal test copying large files from network hosts to the array. On the Dashboard Interface, I saw the Inbound go well above 1000 Mbps, so I thought Bonding was OK. Now I've run a more precise test with iperf. Running a single iperf test with the client on a system on the LAN to the Unraid Server running iperf server shows throughput of 950 Mbps. I expected running simultaneous iperf (from separate hosts on the LAN to two different iperf server ports on Unraid) would show a speed around 1900 Mbps due to LAG. What actually happens is each iperf test slows down to about 300 Mbps when run concurrently. Gemini suggested changing Unraid xmit_hash policy. It is currently layer2: root@T440:~# cat /sys/class/net/bond0/bonding/xmit_hash_policy layer2 0 The recommendation is ifconfig bond0 down echo layer3+4 > /sys/class/net/bond0/bonding/xmit_hash_policy ifconfig bond0 up I have not done that because the only way I access Unraid is by the network, so I'd have to add a monitor and keyboard to retain connectivity. Is this the first thing to look at for poor network performance with Bonding and Lag?

-
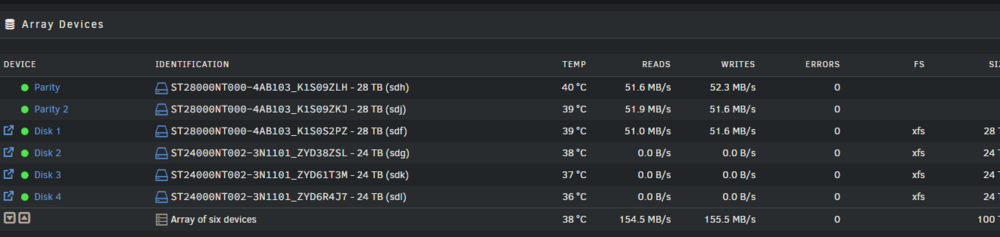
I have an array of 4 Seagate IronWolf Pro drives in this Unraid 7.2.2 system. When copying large files from another system to the Array, I'm seeing about 50 - 55 MB/s write speed. The CPU is running 6-10%, and the network interface is running about 500 Mbps. The "theoretical" write rate of IronWolf Pro is about 200 MB/s. Is there something wrong or misconfigured, or is this all these drives can actually deliver in a real-world Unraid array? Here's the results of a copy process writing a group of 100 2 GB files to the array from another computer over the network. Everything else is idle on the Unraid system. The sending computer is not CPU limited or network limited. I'm curious why the read rate is about the same as the write rate? Is that expected? Diagnostics attached: t440-diagnostics-20260118-1201.zip
-
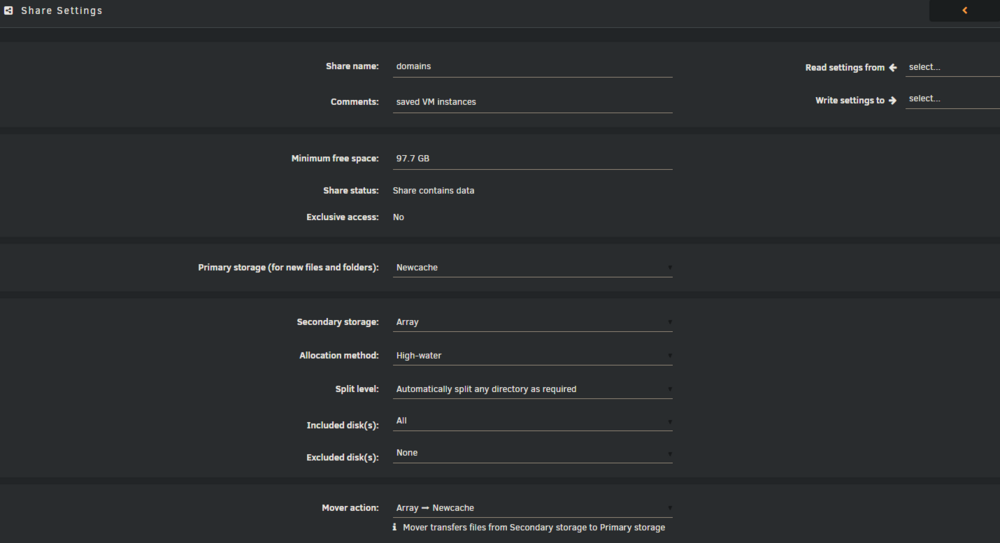
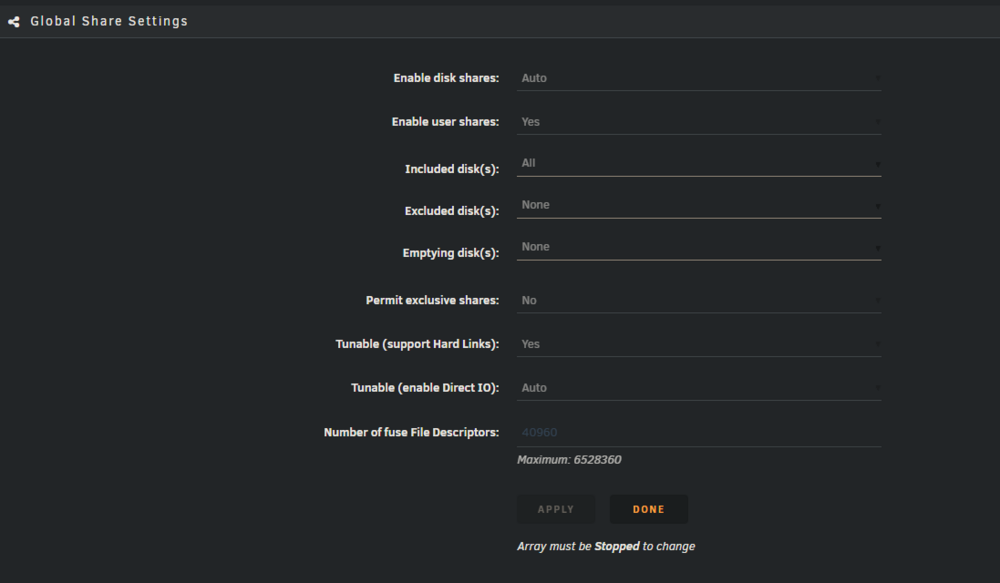
@trurl here are the user share settings for domains: and my global share settings: It looks like I'd need to Permit Exclusive Shares, and then set that in the domains share settings. Making that change would apparently require shutting down everything, VMs, Dockers, and the Array. And the benefit is better VM performance? Is there any downside? I think I set up the "mover" thinking it would be easy to back up the VMs to the Array, but it turned out that copying a VM .img from newcache to array is incredibly slow. I don't want to leave the VMs shut down that long. But using the magic of btrfs, I can shut down a VM, copy its image file to a folder on newcache (which takes about a second), restart the VM, and let Unraid perform the leisurely copy of the .img file copy to the Array. Once copied to the Arrary, I can then delete the copy from newcache.
-
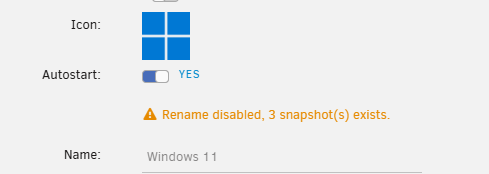
I've been running with the snapshots flattened, and down to a single .img file. However, Unraid still thinks that snapshots exist. You said to remove the .db files, but where do I find them to remove them?
-
I have a Windows 11 VM with image files located on /mnt/newcache/domains/Windows11. The VM primary (boot drive) vdisk image is 100G. When I was debugging, I was frustrated that when I stopped the VM to copy the .img file to my array, it was unexpectedly slow. It took about 1 hour to copy 100 GB from newcache to array (made of Seagate IronWolf Pro drives). 100,000 MB / 3600 seconds = 28 MB / s. This was on an unloaded system, <10% total CPU use during the copy. When the array is operating I can see individual disk rates of 200 MB / s on sustained transfer on the Unraid Main tab. I have not solved that issue yet. As an alternative, I explored keeping the backup images on the newcache drive. It is 1T in size, and only 150 GB was in use. With the VM stopped, I ran the commands: root@T440:/mnt/newcache/domains/Windows11# mkdir imgbackup root@T440:/mnt/newcache/domains/Windows11# cp vdisk1.img imgbackup/ This command completed in about 1 second! I thought it didn't work, but the copy of the file was there. I asked Gemini if this was something done internally by the DELLBOSS card, but it said it was a result of btrfs: The 1 second "copy" is not trickery from your Dell BOSS card, but a brilliant feature of the BTRFS (or XFS) file system Unraid uses for cache pools called Reflink (Reference Link). 1. The "Magic" of Reflink Copies When you use cp on the same NVMe pool, the file system doesn't actually move the 100GB of data bits. Instead, it creates a new "pointer" (metadata) that points to the exact same physical data blocks on the drive. Space Savings: Currently, that 100GB copy is taking up zero extra bytes on your NVMe. Instant Backup: It is 100% bit-perfect and safe. Copy-on-Write (CoW): If you start the original VM and it changes a single block of data, the file system will only then write that specific change to a new area of the drive. The backup in your working_img_0102 folder will remain unchanged, frozen at the moment you made the copy. Is this true? It seems to be, at least in terms of space, since I have created 4 "copies" of the 100G img file and the total space is only up to 268 G now. Is there any performance overhead leaving several versions of the image file reflinked like that on the drive? Should I move them off to the Array once the VM is stable? Presumably I could copy the backup copies to the array while the VM is running?

-
That sounds like a great idea! I had not heard that suggestion before, but it makes sense. I will try it the next time I'm feeling adventurous and have time for debugging.
-
I believe my image files are on a cache drive There appears to be two ways to access the same place. root@T440:/mnt/user/domains/Windows11# ls -l total 36480328 drwxrwxrwx 1 root root 264 Jan 1 17:54 badimage/ drwxrwxrwx 1 root root 20 Jan 1 18:06 badimage2/ -rwxrwxrwx 1 root users 107374182400 Jan 4 16:11 vdisk1.img* -rwxrwxrwx 1 nobody users 1073741824 Dec 31 16:21 vdisk2.img* drwxrwxrwx 1 root root 184 Jan 2 10:18 working_img_0102/ drwxrwxrwx 1 root root 184 Jan 2 13:16 working_img_2026-01-02_13_10_44/ root@T440:/mnt/user/domains/Windows11# cd /mnt/newcache/domains/Windows11/ root@T440:/mnt/newcache/domains/Windows11# ls -l total 36480772 drwxrwxrwx 1 root root 264 Jan 1 17:54 badimage/ drwxrwxrwx 1 root root 20 Jan 1 18:06 badimage2/ -rwxrwxrwx 1 root users 107374182400 Jan 4 16:12 vdisk1.img* -rwxrwxrwx 1 nobody users 1073741824 Dec 31 16:21 vdisk2.img* drwxrwxrwx 1 root root 184 Jan 2 10:18 working_img_0102/ drwxrwxrwx 1 root root 184 Jan 2 13:16 working_img_2026-01-02_13_10_44/ root@T440:/mnt/newcache/domains/Windows11# I was under the impression that the /mnt/newcache/domains/Windows11 was the best choice for the VM's vdisk, since it would not have the overhead of the FUSE filesystem that paths through /mnt/user incur. I could be wrong - please educate me. t440-diagnostics-20260104-1618.zip

-
That is exactly what I did. Stop VM, add 2nd vdisk as VirtIO. Start VM, load drivers. I saw the RedHat VirtIO serial driver was installed for the 2nd disk, with no errors in Device Manager. I then stopped the VM, changed the boot disk vdisk1 to VirtIO and restarted. The noVNC console was black for over 5 minutes. No spinning circle, no Unraid Logo, nothing. Unraid said VM was running. I tried Force Stop, waited a couple minutes, then restarted VM. BSOD - PAGEFAULT IN NONPAGED AREA. I forced stop, and tried to reset the VM configuration for vdisk1 back to SATA. Restarting gave BSOD SYSTEM THREAD EXCEPTION NOT HANDLED. It went downhill from there.
-
Maybe that's an easy process for you, but it has been a nightmare for me. The basic issue is the VM now uses SATA for the boot drive. It can't be changed without updating the drivers, which can't be changed without the VM running - catch 22. The process I tried (suggested by Gemini) was to create a 1G small vdisk2, and set it to VirtIO. That was supposed to cause Windows to load the needed VirtIO driver for vdisk2, then I could stop and change the boot vdisk1 to VirtIO and it would use the driver for vdisk1 and it would be happy. Not at all! I've been through two full days of BSOD, boot device inaccessible, SYSTEM THREAD EXCEPTION NOT HANDLED, SYSTEM THREAD EXCEPTION, PAGE_FAULT_IN_NONPAGED_AREA, Windows Automatic Repair, booting off the ISO, diskpart, bcdedit, and on and on. Sometimes I could get the VM to boot, but the desktop would freeze after less than a minute. I was trying to use Gemini, but had to keep reigning it in as it always want to keep pressing on in the same direction, rather than step back for a broader look. Gemini was always making excuses for each new failure, which made me think the QEMU / Windows combination is like a house of cards or a 100m high Jenga tower. After two days spent, I finally set aside the failed image, restored a backup vdisk1.img (fortunately saved off before trying VirtIO), and put the XML back to the way it was. Surprisingly, I still had BSODs, and learned from Gemini that there is another "State" file - the NVRAM images in /etc/libvirt/qemu/nvram/. It keeps hardware details and had no doubt become a mess during all the trials, failed boots, force stops, and BSODs. I had to find the one for the Windows VM and delete it. Finally I can run the VM again, but of course it is still slow. Is there any other resource, white paper, thread, or other place I can go for guidance on the correct way to approach updating a WIndows VM to use VirtIO for its boot drive?
-
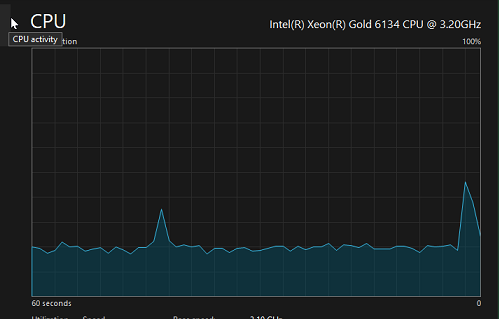
AI makes this suggestion. Can any expert confirm if it is correct? 1. Storage – Biggest Likely Culprit Your vdisk is at /mnt/user/domains/Windows 11/vdisk1.img. /mnt/user/ paths go through Unraid's FUSE/shfs layer, adding overhead—even if the files are on cache. This often causes VM sluggishness (high disk latency, slow responsiveness). Fix: Move to a direct cache path for better IO: Stop the VM. Create a dedicated folder (e.g., via terminal: mkdir -p /mnt/cache/domains). Move the img file: mv /mnt/user/domains/Windows\ 11/vdisk1.img /mnt/cache/domains/. Edit VM > Primary vDisk Location: Change to Manual and set /mnt/cache/domains/vdisk1.img. Ensure your "domains" share is set to Use cache: Prefer or Only (Settings > Shares). Bonus: Enable SSD and Discard: Unmap (Trim) (already on in your screenshot—good for SSD cache). I was unable to find a "Use cache:" setting under Settings / Shares. CPU use on the VM does not seem unusually high:

-
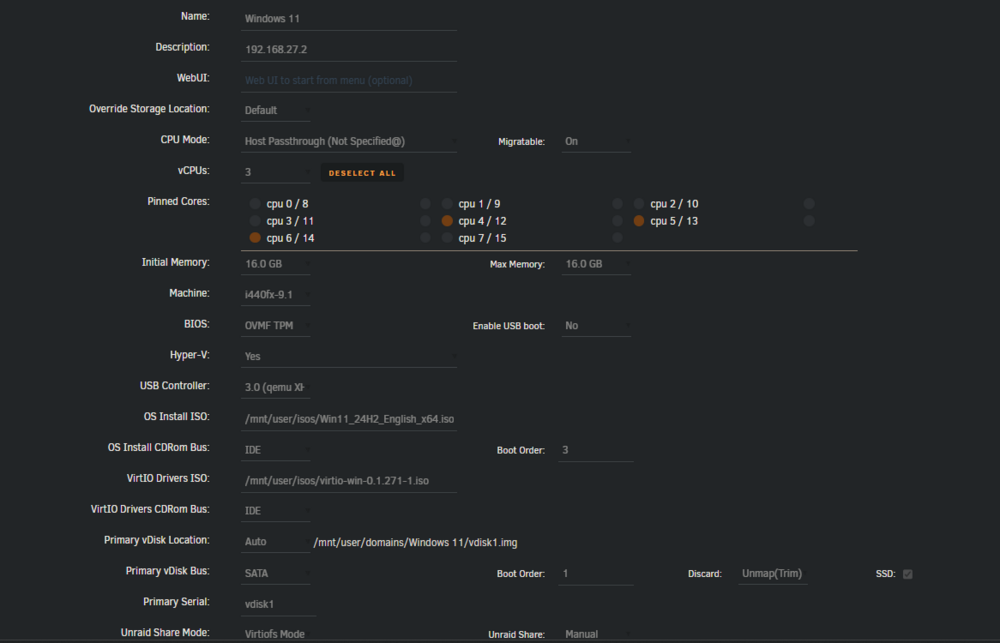
I migrated a Windows system running on a Core2 CPU to a Windows 11 VM on my T440 with Intel Gold 6134 8 Core (3.20Ghz). 3 of the 8 cores are dedicated to the Windows VM, and 16G of the total 64G of RAM are dedicated to Windows. I interacted with the old system using TightVNC and I interact with the new system using TightVNC, so that much is constant. (Not the VM's VNC (which has problems with mouse), but a separate server) However, the Windows VM performance under UnRaid is terrible. Typing in a terminal gets behind. Everything is sluggish. I would estimate it is running 20% as fast as the old system. Most functions of the old server have been migrated to a Debian VM or Docker containers under Unraid, but there are some Windows-only programs. It is not a heavy CPU load at all, but the slowness of the UI makes it painful to use. Is there any white paper or guidance on performance tuning VMs? What techniques for benchmarking can identify performance issues?
-
Here's how my "domains" folders look now: root@T440:/mnt/user/domains# cd Debian/ root@T440:/mnt/user/domains/Debian# ls -l total 9140352 drwxrwxrwx 1 root root 590 Dec 27 10:38 temp/ -rw-r--r-- 1 root users 32212254720 Dec 29 17:18 vdisk1.img root@T440:/mnt/user/domains/Debian# cd ../Windows\ 11/ root@T440:/mnt/user/domains/Windows 11# ls -l total 38000332 -rw-r--r-- 1 root root 7148 Sep 1 16:47 2025-09-01--generate.running -rw-r--r-- 1 root root 6778 Jun 21 2025 S20250621140445.running -rw-r--r-- 1 root root 6960 Aug 24 13:27 S20250824132729.running -rw-r--r-- 1 root root 7349 Sep 27 12:32 S20250927123248.running -rw-r--r-- 1 root root 6778 Jun 21 2025 Windows--generate.running -rwxrwxrwx 1 root users 107374182400 Dec 29 17:19 vdisk1.img* root@T440:/mnt/user/domains/Windows 11# Which of these would be the "snapshot dB" file that causes the GUI to show the old snapshots?
-
@SimonF Thanks for your help. I performed the flatten process and now the Debian directory looks like this with a single image file: root@T440:/mnt/user/domains/Debian# ls -ltr total 11438560 drwxrwxrwx 1 root root 590 Dec 27 10:38 temp/ -rw-r--r-- 1 root users 32212254720 Dec 27 10:53 vdisk1.img root@T440:/mnt/user/domains/Debian# When I edited the vdisk back to vdisk1.img, it changed its setting from Manual to Automatic after I Updated. I am seeing the bug where the old snapshots still show in the GUI: Is there a manual fix for that, or should I just ignore it?


-
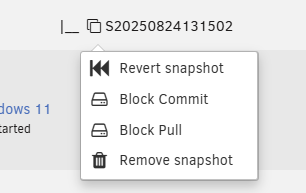
@simonF, It seems that my Unraid 7.2 setup differs from your, which makes me nervous. You say "base is the first image in the tree with top being the latest." Here is my snapshot tree for Debian: Using the DATE/TIME field, it appears the latest is at the bottom. Here are the raw files, which don't lie, but also don't show the tree relationship. root@T440:/mnt/user/domains/Debian# ls -l total 23813084 -rw-r--r-- 1 root root 7353 Jun 21 2025 Debian2025-06-21--generate.running -rw-r--r-- 1 root root 7540 Jul 13 16:38 S20250713163832.running -rw-r--r-- 1 root root 7724 Aug 10 13:18 S20250810131826.running -rw-r--r-- 1 root root 7724 Aug 10 13:18 S20250810131841.running -rw-r--r-- 1 root root 7916 Aug 24 13:15 S20250824131502.running -rw-r--r-- 1 root root 7353 Jun 21 2025 debian-snap-2025-06-21--generate.running -rw------- 1 root users 1130758144 Jul 13 16:38 vdisk1.Debian2025-06-21--generateqcow2 -rw------- 1 root users 777977856 Aug 10 13:18 vdisk1.S20250713163832qcow2 -rw------- 1 root users 9655549952 Aug 24 13:15 vdisk1.S20250810131841qcow2 -rw------- 1 root users 9864347648 Dec 22 16:17 vdisk1.S20250824131502qcow2 -rwxrwxrwx 1 root users 32212254720 Jun 21 2025 vdisk1.img* root@T440:/mnt/user/domains/Debian# Because the snapshot UI has bugs and inconsistencies, I got an AI recommendation to go with CLI: 🛠️ How to Flatten your Snapshot ChainThis process will create a new, 100% independent "Gold Image" from your current state. Stop the VM: You cannot safely flatten the chain while the VM is running. Open the Unraid Terminal: Navigate to your VM directory: cd /mnt/user/domains/Debian/ Run the Convert Command: Identify your latest snapshot file from your ls output: vdisk1.S20250824131502qcow2. Run this command: Bash qemu-img convert -O raw vdisk1.S20250824131502qcow2 vdisk1_flattened.img What this does: It reads the latest snapshot, looks back through every parent file in the chain, and writes one single, consolidated raw image file containing everything. 🔄 Swapping to the New Flattened ImageOnce the command finishes, you will have a new file named vdisk1_flattened.img. To use it: Backup the old files: Move the old .qcow2 files and the original vdisk1.img into a "TEMP" folder just in case. Rename: Rename vdisk1_flattened.img to vdisk1.img. Edit VM Settings: In the Unraid VM settings, ensure the Primary vDisk is pointing to the new vdisk1.img. Start the VM: It should boot exactly as it was, but now it is a "single file" VM again with no dependencies on snapshots. Is that process valid and safe to get back to a single IMG? If the web UI is up to the task and better than the AI's CLI process, can you give me a step by step procedure? Maybe it is just as simple as this: 1) click on most recent snapshot (Bottom). In my case, it is S20250824131502. Click on Block Commit. 2) wait for process to finish. 3) click on next most recent snapshot (now moved to bottom of tree since the prior one has been merged?) Click on Block Commit. 4) repeat (working up the tree from bottom leaf to top root, until all snapshots are gone (or will they never by gone because of the bug with the ghost record you mentioned?) PS - I have changed my profile "Personal text" and "About Me" to "Unraid 7.2.2 on Dell T440 server with Windows 11 VM and Debian 13 VM" yet every post still has Unraid 7.0.1. Is posting signature yet another setting I am unable to find?

-
I second this. Replacing an existing disk in an array with a larger one should take the time of copying the data on the replaced disk, not the new (blank) one. Scenario: I originally set up my array with 16T drives. I upgraded the Parity to 28T, now I'm upgrading data drives to 28T as they are affordable. If the disk contains a maximum of 16T of data, why spend the time copying 28T? This makes a big difference as we get to these larger drives that take multiple days to fully copy. The related question is why if the disk is 50% full and is replaced with one of the same size, why does the full capacity of the drive have to be copied?
-
The thing I'm looking for experts to confirm is the correct procedure for removing and merging unwanted snapshots back into the base IMG. There was conflicting information earlier in the thread on how to proceed with a Block Commit when there are multiple snapshots. Should I start with the most recent (at the bottom of the tree), and sequentially work my way up performing a block commit on each? Or start with the top of the tree (first/oldest snapshot), do a block commit on it, and it will automatically incorporates the changes from the subsequent snapshots in the tree below it? Either approach sounds plausible, and I expect doing it wrong could result in data loss by setting the VM to a point in the past.
-
@JorgeB Thanks for the reply. So if I want to move the PSQL data off the primary share I would just shut down the PSQL Container, run a command like this from Unraid SSH: mv /mnt/user/d/postgresql18/* /mnt/user/some/other/share/ Then change the volume mapping of the docker container to /var/lib/postgresql <--> /mnt/user/some/other/share/ To my original question on how to back up PSQL, I presume use something like pg_dumpall > /mnt/user/d/postgresqlbackup/psql_dumpfile.dat That can create a backup while the psql container is running. Set it up as a user scripts scheduled process once a day or something? That would write its output to the d share and get backed up automatically.


