-
Posts
269 -
Joined
-
Last visited
Content Type
Profiles
Forums
Downloads
Store
Gallery
Bug Reports
Documentation
Landing
Posts posted by Jorgen
-
-
2 hours ago, sir_storealot said:
I cant seem to solve this

Any idea how to find out what deluge is doing?
One thing that could lead to some of those symptoms is running out of space in the /downloads directory.
for example: I have my downloads go to a disk outside the array mounted by unassigned devices, and somehow the disk got unmourned but the mount point remained. This caused deluge to write all downloads into a temp ram area in unraid, which filled up quickly and caused issues. I never found any logs showing this problem, just stumbled upon it by chance while troubleshooting. -
On 3/25/2023 at 12:57 PM, mitch98 said:
Running a Windows VM? No chance in my (albeit limited) experience on Unraid.
Since you’re new to unraid, have you looked at Spaceinvaderone’s video guides?
There are tweaks you can do on the Windows side to get it to work better as an unraid VM. I had similar CPU spiking issues until I tweaked the MSI interrupt settings inside Windows.
The hyper-v changes in this thread also helped of course.
I’m not actually sure if the MSI interrupts were covered in this video series, could also have been in:
-
On 3/14/2023 at 3:20 AM, C-Dub said:
I don't mind starting Prowlarr again from scratch but I don't know enough about Unraid/Docker/databases to fix this without help.
1. Stop container2. Backup Prowlarr appdata folder
3. Delete everything in prowlarr appdata folder
4. Start container
you can also uninstall container after step 1 and reinstall it after step 3
-
On 7/4/2021 at 1:03 AM, TexasUnraid said:
Like above first you need to log the appdata folder to see where the writes come from:
This command will watch the appdata folder for writes and log them to /mnt/user/system/appdata_recentXXXXXX.txt
inotifywait -e create,modify,attrib,moved_from,moved_to --timefmt %c --format '%T %_e %w %f' -mr /mnt/user/appdata/*[!ramdisk] > /mnt/user/system/appdata_recent_modified_files_$(date +"%Y%m%d_%H%M%S").txtI had problems with this inotify command. It ran and created the text file, but nothing was ever logged to the file.
I can only get it to log anything by removing *[!ramdisk] AND pointing it to mnt/cache/appdata.
Just curious if anyone can explain why this is?
I have my appdata share defined (cache prefer setting) as /mnt/cache/appdata for all containers and as the default in docker settings, but I would have thought that /mnt/user/appdata should still work? -
Prowlarr is up and running. I am using Deluge VPN for torrents, but I can't seem to get it working with Usenet. Do I need a separate downloader set up for this? I have NZBGeek set up as an indexer and it tests out just fine.
Yes, deluge only does torrents, you’ll need something like NZBget for Usenet
Sent from my iPhone using Tapatalk -
Maybe I am doing something wrong. I have all my *arr stack on one docker network, however, when I go to link them together, I have to use the IP addresses of the docker network, which means that I need them to startup in a certain order. I set sonarr get the bit-torrent program, but as soon as I add binhex-sabnzbdvpn to the name to allow it to go the sab it gives me the error unable to connect. Test was aborted due to an error, HTTP failed forbidden. When I type in the docker IP address, everything works fine.
anything I can try?
Use localhost instead of docker network IP
Sent from my iPhone using Tapatalk -
Sounds like the morhterboard, but it's defenitly not for certain.
First step would be to hook up a monitor and keybord directlly to the server, power up and see if it gets past the POST stage. if it doesn't you'll need to dig into the beep codes to identify which component is faulty. This will be your first hurdle, I have the same mobo and it doesn't have a built-in speaker, so you'll need to rig somehting up yourself....
-
Yeah that should work.
Looks like other ubiquity products auto-renews the selfsigned cert on Boot if it’s within a certain amount of days from expiry. Not sure if unifi does the same?
Sent from my iPhone using Tapatalk -
Ah ok. The controller already ships with a self-signed cert, you should be able to extract it from /config/data/keystore or even download it from the controller web page using the browser “inspect cert” functions. I assume Safari have those somewhere.
Unless you need it for your own domain name, then you’ll need to create it with pfsense and import it into the keystore as per above
Sent from my iPhone using Tapatalk -
19 hours ago, wgstarks said:
I’ve been trying to find a way to install my own ssl certificate in this docker to stop the constant browser warnings re certificate not valid.
Depends on your situation. To start with you need your own domain, pointing to your unifi controller IP. This guide will walk you through creating a new cert specifically for your unifi domain/sub-domain: https://community.ui.com/questions/UniFi-Controller-SSL-Certificate-installation/2e0bb632-bd9a-406f-b675-651e068de973
I think you need to register for the unifi forum to access it.
It also has info on how the default keystore works. For this docker the files are in /config/data (which is also mapped to your appdata share). You need to create a new keystore using the "unifi" alias and the default password "aircontrolenterprise".
All commands can be run from the docker console.
If you already have an existing wildcard cert for your domain you should be able to import it. You'll need to turn it into a pkcs12 then convert that to a keystore that unifi will accept. Something like this if you have a private key and signed cert: https://stackoverflow.com/a/8224863
Caveat: I never got it to work for me. My controller is only avialbe on my LAN, I don't have an existing wildcard cert for my domain and I didn't want to pay for one, and using the free certs form LetsEncrypt required a public IP + refresh every 90 days which seems complicated for this use case. So I put it in the too hard basket.
-
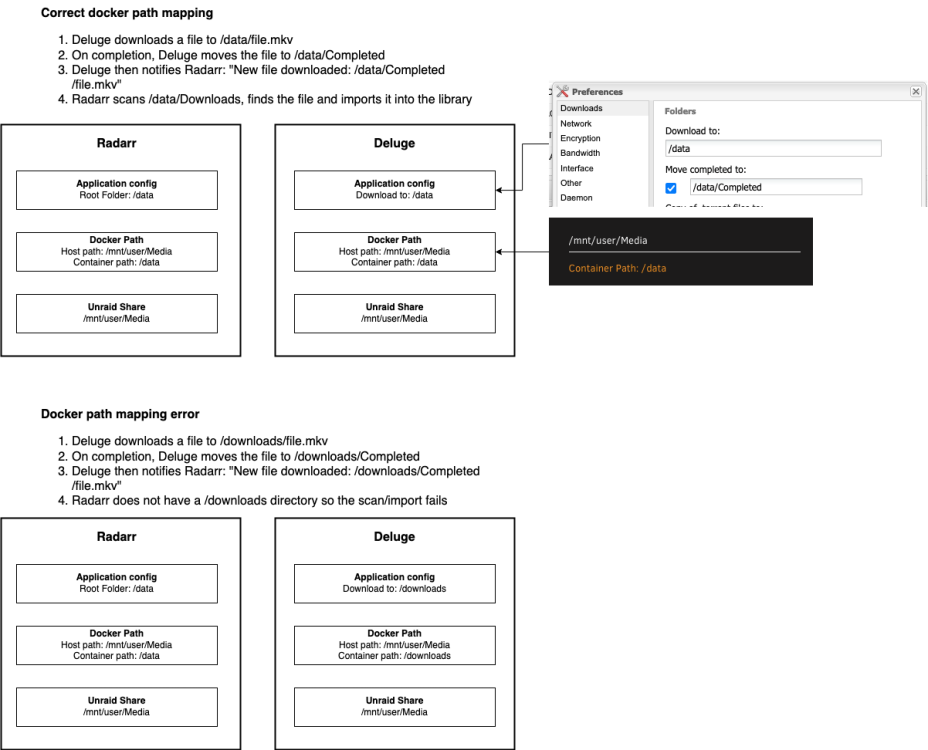
Since the topic of mismatched docker path mappings comes up quite often with Radarr/Sonarr and download clients, maybe this diagram helps to visualize the three levels of folder config and how they interact?
Important to realize is that the application running inside the docker container knows nothing about the Unraid shares. It can ONLY access folders you have specifically added as a container path in the docker config.
-
But I'm not able to open the binhex-prowlarr webinterface anymore.
Q25 here: https://github.com/binhex/documentation/blob/master/docker/faq/vpn.md
Sent from my iPhone using Tapatalk-
 1
1
-
-
Nice solution @TurboStreetCar and thanks for sharing!
Sent from my iPhone using Tapatalk-
 1
1
-
-
@Jorgen I went into the container console and modified the file "usr/lib/python3.10/site-packages/deluge/log.py" and changed:
DEFAULT_LOGGING_FORMAT % MAX_LOGGER_NAME_LENGTH, datefmt='%H:%M:%S'TO:DEFAULT_LOGGING_FORMAT % MAX_LOGGER_NAME_LENGTH, datefmt='%Y-%d-%m - %H:%M:%S'
Would having Binhex modify the container be the only way to use the --logrotate option?
Thanks!
Oh ok, that file is in the cocker image and needs to be patched with your changes every time you update the container.
I was thinking of scripting the change via “extra parameters” but after some research it appears that is not available. See this thread for background and potential workaround using user scripts.
https://forums.unraid.net/topic/58700-passing-commandsargs-to-docker-containers-request/?do=findComment&comment=670979
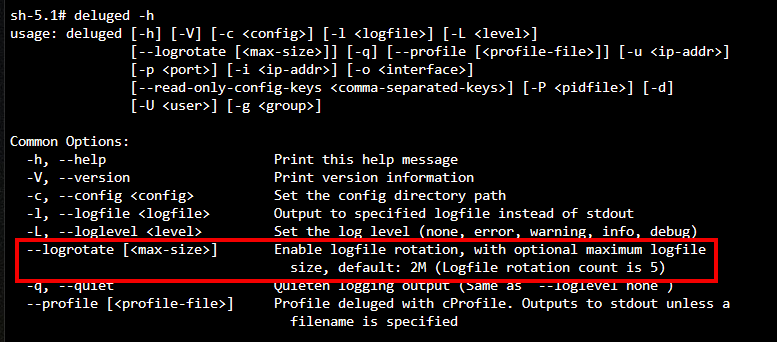
Deluge daemon needs to be started with the —logrotate option for it to work. And it’s started by one of binhex’s scripts that is part of the image. So you’re in the same situation as you log modifications. Either binhex Updates the image to support logrotate, or you need to patch that script yourself
For persistent logs, I think logrotate would be the better option, but there are other ways. Here are some random thoughts, I’m no particular order of suitability or ease to implement…
- user script parses the logs on a schedule and writes the required data into a persistent file outside the container
- user script simply copies the whole log file into persistent storage (you’ll end up with lots of duplication though)
- write your own deluge plug-in to export the data to a persistent file
- identify another trigger to script your own log file, e.g. are the torrents added by radarr that might have better script support?
Sent from my iPhone using Tapatalk-
 1
1
-
-
7 hours ago, Brandon_K said:
  -e 'LAN_NETWORK'='192.168.10.0/24'

  --sysctl="net.ipv4.conf.all.src_valid_mark=1"
--sysctl="net.ipv4.conf.all.src_valid_mark=1" is only needed for Wireguard. Since you're using OVPN change this back to the default:
--cap-add=NET_ADMIN
Can you double check the LAN_NETWORK value, specifically the mask, using Q4 here: https://github.com/binhex/documentation/blob/master/docker/faq/vpn.md
I actually think it's correct, but you might be using another mask on your network.
While you're on that page, check if any other FAQs match your case, if you haven't done that already.
Your log still looks like a successful start of the VPN tunnel and the applications, but it's hard to tell as it's not a complete log. If the changes above doesn't fix the problem, can you upload complete debug logs please? https://github.com/binhex/documentation/blob/master/docker/faq/help.md
Remember to redact any user name and passwords from the logs before uploading here, they could be in multiple places.
-
On 9/12/2022 at 5:33 AM, TurboStreetCar said:
Hello, ive found some info in adding the date to the deluged.log which i find useful in keeping track of when torrents are added/removed. If the docker is updated will this persist? Or will the update revert the log to time only?
If you describe what you did to configure this we'll have a better chance of answering that question. Generally, anything you add to a running container, via the container CLI for example, is purged when you rebuild the container. But there are way to pass in extra commands on start of a new container. So it depends on how you are making those changes to the logging function.
On 9/12/2022 at 5:33 AM, TurboStreetCar said:Id also like to somehow have the deluged.log be persistent, so new entries are appended, instead of the logfile being overwritten entirely on restart.
Is this possible?Looks like what you want is to start the deluge daemon with the option --logrotate, see below.
This is not currently possible as far as I know, but Binhex COULD add in another environment variable to control this (or just turn it on by default for everyone). Similar to how we can already control the log level for the daemon. You might have to bribe him with some beer money though...

-
2 hours ago, Brandon_K said:
I've temporarily port-forwarded it's port through my router to attempt to access it externally, no luck. Console works.
Unraid 6.11-RC4. binhex-delugevpn, whatever the latest version is. Network is bridge, accessing it via http://mylocalIP:8112. Subnet is correct in the config, 192.168.10.0/24[edit]
Logs are helpful I suppose.
If the VPN is enabled (in container settings) I get the following log and errors. If it is disabled, I get my webgui back. Obviously I have an issue with the VPN setup (I think), but I'm not sure what it is?
Don't port-forward on your router, it has no effect on the VPN tunnel, it just adds security risks.
The logs show a successful start, so the VPN tunnel should be up.
The symptoms you describe definitely sounds like a mismatch between the LAN_NETWORK range on the container (192.168.10.0/24) and the computer you're accessing it from. What's the IP of your PC and the unraid server?
-
On 8/30/2022 at 3:23 AM, Duckers said:
I want to request a "discover new media" for sonarr. And possibly a category/genre too within "filters"
While the first one sounds like a good idea, you need to request that from the app developers, not the container dev. So add your feature request here: https://forums.sonarr.tv/
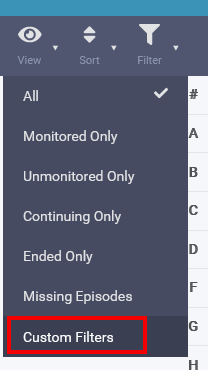
For the second one, you can do this already with a custom filter

-
 1
1
-
-
Wow, that is an awesome plug-in, not sure how I’ve managed to miss it! Thanks @SimonF
Sent from my iPhone using Tapatalk -
3 hours ago, Lacy said:
Is this possible, to have a USB device associated with a VM, but not have to be present in order to boot the machine?
BTW, my reply only applies to this part, I have no idea what happens if the VM boots wihtout the device present, then you add it later. But I assume that the plugins Squid mentions would solve for that part.
I've raised a feature request to have the optional startup policy added to the VM form view:
-
Currently, unraid requires all USB devices added to a VM to be present on startup of that VM, or the startup fails. Libvirt actually supports adding USB devices as optional for VM startup using hostdev startuppolicy, see details below.
But this can only be done in the XML view.
It would be great if we could have another checkbox in the form view to specify that we want a specific USB device to be included with startuppolicy = optional. This will reduce the need to edit the XML directly, which always risks breaking the VM and deters many users. Something like this perhaps:

Libvirt supports adding USB devices as optional for VM startup, using the hostdev source startupolicy = optional.
https://libvirt.org/formatdomain.html#usb-pci-scsi-devices
For example:
  <hostdev mode='subsystem' type='usb'>
    <source startupPolicy='optional'>
      <vendor id='0x1234'/>
      <product id='0xbeef'/>
    </source>
  </hostdev>
It seems to work well in my limited testing, after some initial unrelated problems, see:
-
-
On 8/31/2022 at 8:42 PM, Ostracizado said:
Hey,
I'm using delugevpn, with Docker, on a Synology.
I'm wondering if there's a way to send the completed download to a folder outside the /data.
For instance, my /data path is: /usbshare1-2/Torrent (external HDD)
But I have another shared folder (/volume1/videos) where I have and send all my videos (NAS).
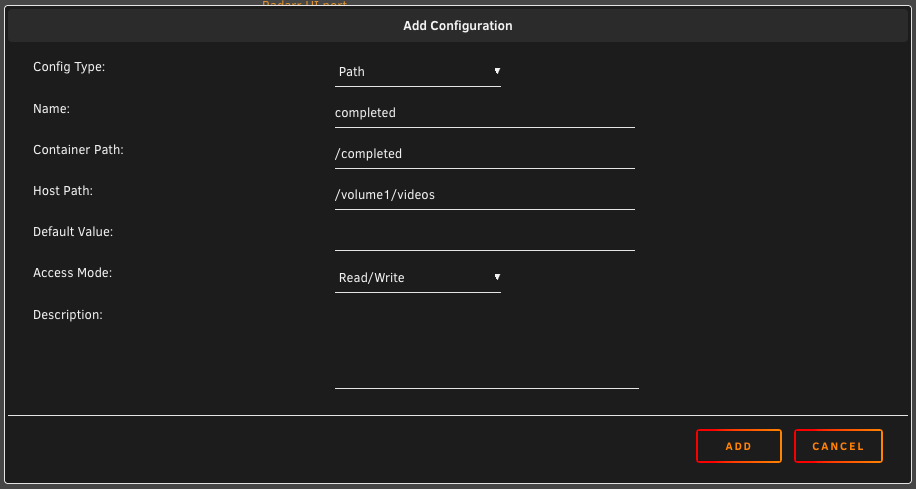
Yes, add another variable to DelugeVPN docker
Type = Path
Name = completed
Container path = /completed
Host Path = /volume1/videos
Access mode = Read/Write

Open Deluge Web UI, go to Preferences/Downloads, enable Move completed to and type in /completed

Important:
If you use any other integrated docker apps like Radarr, Sonarr etc. you'll need to add the same path variable to those dockers with the exact same name and capitalization.
This is because when Deluge has completed a download and moved it to the new destination, it will tell Radarr that the file is available at /completed/filename.mov.
If you don't add the matching path variable to the Radarr docker, Radarr doesn't have a way to access /completed and the import will fail.
This is all working on unraid, I assume Synology works the same way...
-
On 8/31/2022 at 5:47 AM, elco1965 said:
My desktop runs Ubuntu. When I try to proxy the desktop through the DelugeVPN Docker the VPN works but I cannot access any GUI via LAN address like unRAID or my pfSense router.
I think you need to bypass the proxy for access to devices on your local LAN, otherwise the requests are proxied through the VPN tunnel which doesn't have access to your local devices.
Add your local LAN network range (e.g. 192.168.1.0/24) to the Ignore Hosts field in the Ubuntu Proxy manager.


Hosting Mac Photo Library on Unraid?
in Lounge
Posted
Yes, unfortunately. Unless your library and everything else Apple likes to store in iCloud comes in under 5GB…