


FoxxMD
Members
-
Joined
-
Last visited
Everything posted by FoxxMD
-
@rogales There are many existing Sources to choose from. You can even use some Clients as Sources like a relay IE Your favorite app scrobbles to Last.FM -> mutli-scrobbler uses Last.fm as a Source -> Scrobbles to Maloja If you are talking about adding a new Source not already coded for yeah I can do that but it depends on if the program/service provides connectivity. You can describe your scenario here but I'd prefer a new issue on github as it's easier for me to keep track of (and take a look at existing issues to see if your Source has already been requested).
-
@rogales multi-scrobbler is like middleware that gets your listening activity from Sources like Spotify, Plex, etc... and then forwards them to Clients like Last.fm, Listenbrainz, and Maloja. In your screenshot you have Last.fm configured as a Client (MS will sends scrobbles to it) but you do not have Sources configured to get scrobbles from.
-
@thenexus Yes you can use rtl_tcp to expose your RTL-SDR device on a port that any other rtl_tcp client can then consume/control. The underlying library for controlling receivers in ShinySDR, gr-osmosdr, supports RTL-TCP. To add an RTL-TCP device to ShinySDR config you would add a device like this: config.devices.add(u'osmo', OsmoSDRDevice('rtl_tcp=HOST_IP_AND_PORT')) I have a docker-compose project that utilizes rtl_tcp and shinysdr that you can use a reference for setting this up, assuming you wanted to dockerize the rtl_tcp device as well: https://github.com/FoxxMD/rtl-sdr-icecast-docker Instead of using the compose file you would instead setup the rtl_tcp container on the machine you have in the "main room" and then configure ShinySDR on unraid to use the above config (or reference config from the project here)
-
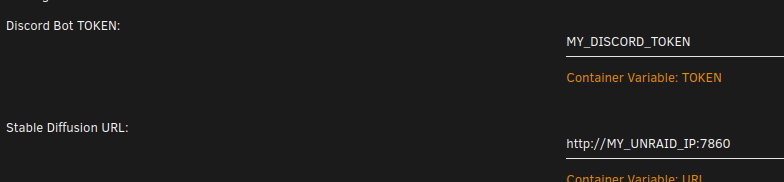
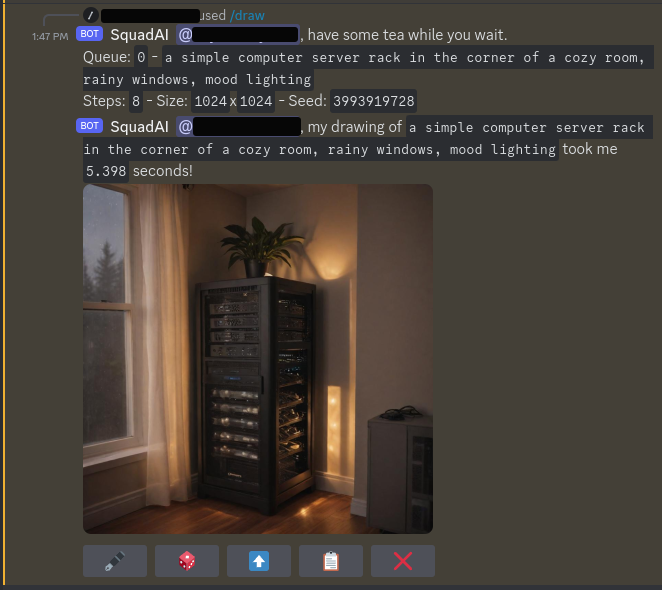
Application Name: aiyabot Application Site: https://github.com/Kilvoctu/aiyabot Github Repo: https://github.com/Kilvoctu/aiyabot Docker Hub: https://github.com/Kilvoctu/aiyabot/pkgs/container/aiyabot Template Repo: https://github.com/FoxxMD/unraid-docker-templates Overview aiyabot is a self-hosted discord bot for interacting with a Stable Diffusion API to create AI generated images. It is compatible with AUTOMATIC1111's Stable Diffusion web UI or SD.Next APIs and provides these features through Discord commands: text2image image2image prompt from image generate prompts from text upscale image image identification (metadata query) Generation settings are also configurable globally or per channel: Model to generate with Width/Height Extra nets (lora, hypernet) Prompt/Negative prompt Batch generation settings highres fix/face restore/VAE strength/guidance(cfg)/clip skip/styles mark as spoiler Be aware that aiyabot will help you craft valid generation commands but it does not magically "make good images" -- the bot will only generate with the settings you specifically configure. You will need a basic understanding of Stable Diffusion in order to achieve good result. Requirements Discord Bot - You need to create a Discord bot in a Server you have appropriate permissions in and have a token ready to use with Aiyabot. This is covered in Setting up a Discord bot in the project wiki. Compatible Stable Diffusion instance - The bot needs access to a SD API. Recommend to use stable-diffusion in CA Apps with (04 SD.Next) or (02 Automatic1111) Usage Map the SD container's API port: * Container Port 7860 -> Host Port 7860 Fill in the CA app template with your discord bot token and URL to the SD API and the start the app to get the bot running. All commands and configuration is done through discord slash commands in the server the bot is running on. Generating Prompts Prompt generation (using /generate command) is disabled by default because it requires downloading and installing an ML model into the container which can be a large download and take a long time to process. If you wish to use this command then modify the CA template variable for USE_GENERATE (Download and install optional prompt generation command) from false to true.
-
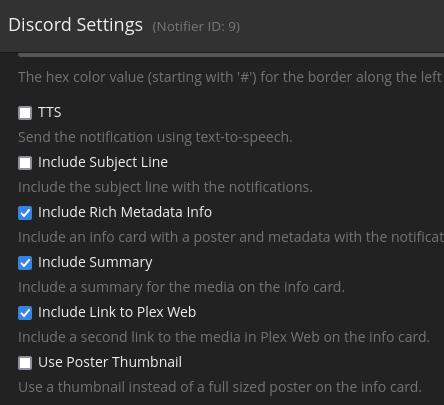
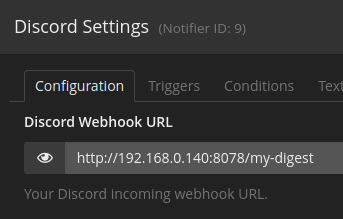
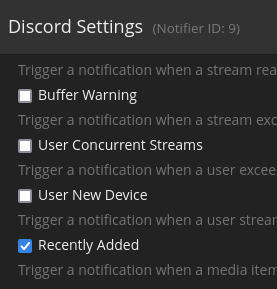
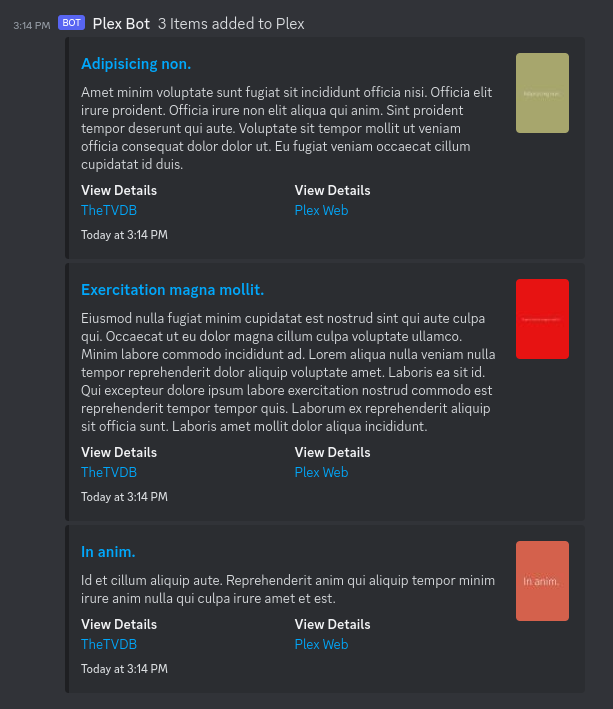
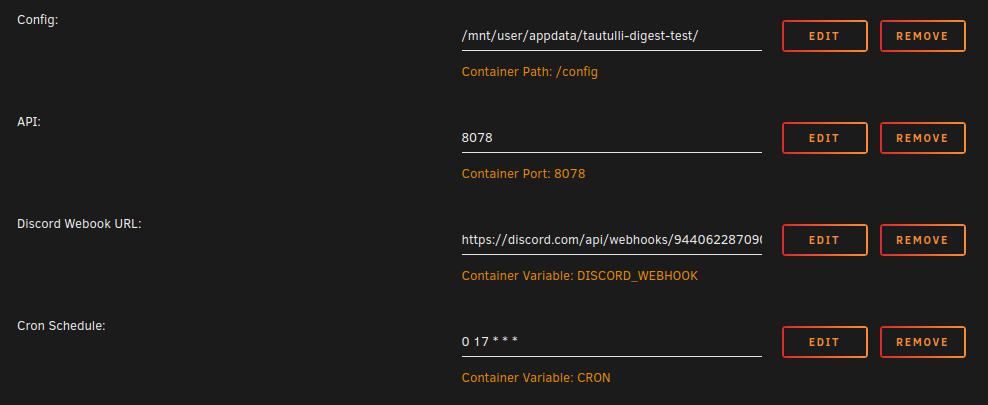
Application Name: tautulli-notification-digest Application Site: https://github.com/FoxxMD/tautulli-notification-digest Github Repo: https://github.com/FoxxMD/tautulli-notification-digest Docker Hub: https://hub.docker.com/r/foxxmd/tautulli-notification-digest Template Repo: https://github.com/FoxxMD/unraid-docker-templates Overview tautuilli-notification-digest (TND) creates a "digest" (timed summary) of notifications of "Recently Added" events for discord using Tautulli's Discord notification agent. Tautulli already provides an email "newsletter" that compiles triggered events (media added) from Plex and then sends it as one email at a set time. This same functionality does not exist for notifications. This functionality is often requested for discord and there are even some existing guides but they are quite involved. This app provides a drop-in solution for timed notifications that compile all of your "Recently Added" Tautulli events into one notification. Usage These instructions are mostly the same as the Setup section in the project readme but are tailored for unraid. Create a Discord Webhook If you don't already have a webhook then create one for the channel you want to post digests to. If you have an existing one then we will reuse it later. Create/Modify a Tautulli Discord Notification Agent Create a notification agent for Tautulli for use with Discord. If you already have one you can modify it. Settings for the agent must be set like this: Configuration Discord Webhook URL https://YOUR_UNRAID_IP:8078/my-digest This assumes you use the unraid app template default settings ✅ Include Rich Metadata Info ✅ Include Summary ✅ Include Link to Plex Web (optional) ❎ Use Poster Thumbnail Triggers ✅ Recently Added Update the TND unraid App Template DISCORD_WEBHOOK - This is the actual Discord URL you created earlier. TND will post the digest to this URL at the specified time CRON - A cron expression that determines when TND posts the digest. Use a site like crontab.guru if you need help setting this up. You're Done That's it! Your Recently Added media will now be compiled by TND into a digest that will be posted once a day at 5pm. Check the docker logs for activity and notification status. Running Pending Notifications Any Time Pending notifications can be run before the scheduled time by sending a POST request to http://SERVER_IP:8078/api/my-digest To do this with a browser use https://www.yourjs.com/bookmarklet in the Bookmarklet Javascript box: fetch('http://MY_IP:8078/api/my-digest', {method: 'POST'}).then(); Convert to Data URL Drag and drop converted data url into your bookmarks Then the bookmark can be clicked to trigger pending notifications to run. Further Configuration The unraid default template and the instructions above assumes using ENV config which generates a default URL slug (my-digest) for you. TND can handle multiple notification agents using different slugs (which creates multiple digests). Digests can further be configured using a yaml config to customize embed formats and collapse thresholds.
-
Can you try modifying this line in 05.sh to include curl? conda install -c conda-forge git curl python=3.11 pip gxx libcurand --solver=libmamba -y
-
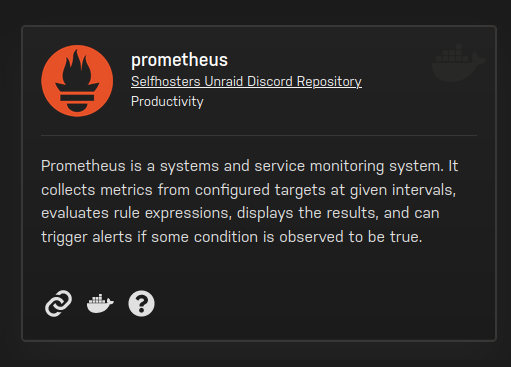
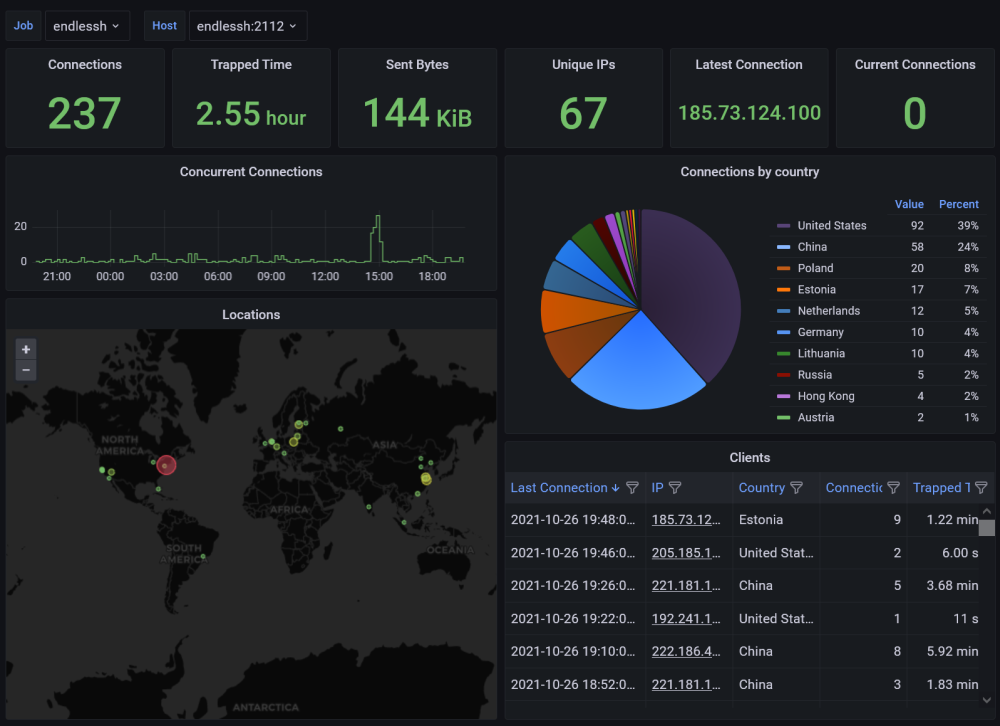
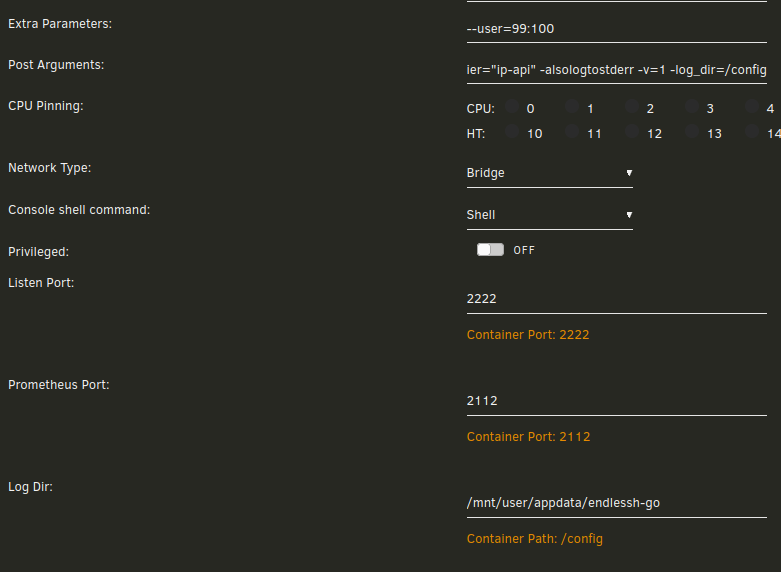
Application Name: endlessh-go Application Site: https://github.com/shizunge/endlessh-go Github Repo: https://github.com/shizunge/endlessh-go Docker Hub: https://hub.docker.com/r/shizunge/endlessh-go Template Repo: https://github.com/FoxxMD/unraid-docker-templates Overview Endlessh is an SSH tarpit that very slowly sends an endless, random SSH banner. It keeps SSH clients locked up for hours or even days at a time. The purpose is to put your real SSH server on another port and then let the script kiddies get stuck in this tarpit instead of bothering a real server. Linuxserver.io provides the original endlessh on CA -- this is not that. This is a re-implementation of the original endlessh in golang with additional features, namely, translating IP addresses to Geohash and exporting Prometheus metrics which can be visualized with a Grafana dashboard. Usage The app requires no setup outside of what the template already provides. You do not need to use the exported metrics in order for the app to work for its primary function (SSH tarpit). !!!!!!!! Be extremely careful when configuring port forwarding for this !!!!!!!!: DO NOT forward port 22 directly to unraid. Instead, forward external port 22 to unraid on port 2222 (or whatever you configure for the container) Double check your unraid SSH settings under Management Access If you do not need SSH, make sure "Use SSH" is set to "No" If you do need it, make sure it is NOT the same port you are forwarding to unraid for Endlessh Setting up Metrics In order to use and visualize the exported metrics you will need to set up a Prometheus container and a Grafana container. Prometheus Find in CA under "Prometheus" and install In /mnt/user/appdata/prometheus/etc create or edit prometheus.yml to include this text block: scrape_configs: - job_name: 'endlessh' scrape_interval: 60s static_configs: - targets: ['HOST_IP:2112'] Replace HOST_IP with the IP of your unraid host machine. Restart the Prometheus container to start collecting metrics. Grafana Find in CA under "Grafana" and install After you have gone through initial setup and logged in to Grafana: Open hamburger menu (top left) -> Connections -> Add new connection -> Prometheus Under Connection (Prometheus server URL) use your unraid host IP and the Port Prometheus was configured with: http://UNRAID_IP:9090 Save & Test Open hamburger menu -> Dashboards New -> Import Use ID 15156 -> Load Select a Prometheus data source -> use the prometheus data source you just created Import You should now have a saved Dashboard that will visualize your endlessh-go metrics like this It may take some time for anything to populate as you need to wait for attackers to find your honeypot Logging The container logs all output to the docker container logs by default. If you wish to also log to file modify your container like so: In Post Arguments replace -logtostderr with -alsologtostderr In Post Arguments append this to the end: -log_dir=/config In Extra Parameters add this: --user=99:100 Add a new Path variable Container Path: /config Host Path: /mnt/user/appdata/endlessh-go Your settings will look like this after all modifications are done:

-
@Pentacore and youre running this on unraid? What version? Do you have the container in a custom network or anything? Can you try this while using Automatic1111: 1. Shell into the container (Console from unraid docker page on the container) 2. Run apt install ca-certificates 3. Run update-ca-certificates 4. nano entry.sh 4a. Above the "case "$WEBUI_VERSION" line add this: export SSL_CERT_FILE=/etc/ssl/certs/ca-certificates.crt 4b. hit Control + o , then Enter to save the file 5. Restart the container See if this fixes anything for you EDIT: Many other people say that if you are using a network monitor appliance, network wide, like zscaler or maybe something on your router, that their certificate may not be present in the container. https://stackoverflow.com/questions/71798420/why-i-get-ssl-errors-while-installing-packages-on-dockeron-mac https://stackoverflow.com/a/76954389
-
Yes it is. You can change this by updating the version in 06.sh line 15: conda install -c conda-forge git python=3.10 pip --solver=libmamba -y
-
This one is squarely on Fooocus It looks like they updated requirements_versions.txt two days ago and added onnxruntime==1.16.3 which conflicts with the existing numpy==1.23.5 in the same file. I would open an issue on their repo or you can try manually editing requirements_versions.txt (in your persisted folder in the 06-Fooocus folder) to specify the correct numpy version and then restart the container.
-
@BigD ah yes that happens because s6 is the init process for the container and using init: true injects tini, so you end up with container init'ing tini init'ing s6! This is likely happening because some process started by Fooocus is not respecting shutdown signals or is frozen (or it may be the entry process for the container by holaf!) You can adjust how long s6 waits for processes to finish gracefully using an ENV to customize s6 behavior. I would look at S6_KILL_FINISH_MAXTIME and S6_KILL_GRACETIME
-
what is your WEBUI_VERSION
-
You don't want to run it on CPU and integrated GPUs are much too weak to use. Stable Diffusion requires a recent-ish released dedicated graphics card with a decent amount of VRAM (8GB+ recommended) to run at reasonable speeds. It can run on CPU but you'll be waiting like an hour to generate one image.
-
@wtfreely should be fixed now
-
@Joly0 @BigD I forked holaf's repository, available at foxxmd/stable-diffusion, and have been improving off of it instead of using the repo from last post. There are individual pull requests in for all my improvements on his repository BUT the main branch on my repo has everything combined as well and where i'll be working on things until/if holaf merges my PRs. My combined main branch is also available as a docker image at foxxmd/stable-diffusion:latest on dockerhub and ghcr.io/foxxmd/stable-diffusion:latest I have tested with SD.Next only but everything else should also work. To migrate from holaf to my image on unraid edit (or create) the stable-diffusion template: Repository => foxxmd/stable-diffusion:latest Edit Stable-Diffusion UI Path Container Path => /config Remove Outputs These will still be generated at /mnt/user/appdata/stable-diffusion/outputs Add Variable Name/Key => PUID Value => 99 Add Variable Name/Key => PGID Value => 100 _______ Changes (as of this post): Switched to Linuxserver.io ubuntu base image Installed missing git dependency Fixed SD.Next memory leak For SD.Next and automatic1111 Packages (venv) are only re-installed if your container is out-of-date with upstream git repository -- this reduces startup time after first install by like 90% Packages can be forced to be reinstalled by setting the environmental variable CLEAN_ENV=true on your docker container (Variable in unraid template) ______ If you have issues you must post your problem with the WEBUI_VERSION you are using
-
Yes I'll make PRs. The memory leak fix and lsio rework are not dependent on each other so they'll be separate.
-
@Joly0 @BigD I got tired of waiting for the code so I just reverse engineered it 😄 https://github.com/FoxxMD/stable-diffusion-multi The master branch is, AFAIK, the same as the current latest tag for holaf's image. I have not published an image on dockerhub for this but you can use it to build your own locally. The lsio branch is my rework of holaf's code to work on Linuxserver.io's ubuntu base image. This is published on dockerhub at foxxmd/stable-diffusion:lsio. It includes fixes for SD.Next memory leak and I plan on making more improvements next week. If anyone wants to migrate from holaf's to this one make sure you check the migration steps as it is slightly different in folder structure. Also I haven't thoroughly checked everything actually works..just 04-SD-Next on my dev machine (no gpu for use here yet). I will better test both master/lsio next week when i get around to improvements as well. EDIT: see this post below for updated image, repository, and migration steps ___ I'm also happy to add @Holaf as an owner on my github repository if that makes things easier for them to contribute code. Or happy to fold my changes into their repository, when/if they make it available. I don't want to fragment the community but I desperately needed to make these changes and its almost been a month waiting for code at this point.
-
Always do! Never hurts to get feedback from real world upgrade though.
-
did you take any precautions/upgrade prep other than backing up your flash drive? I need to upgrade from 6.11.5 as well.
-
Appreciate the learning experience but these pain points are pretty painful..if you have time -- everytime i restart the container (not update the image, just restart) using SD.Next is reinstalls everything. My server is low-power, 10-year 1.7ghz xenon...it takes 15+ minutes to get to a ready state every time I need to restart it due to a server error or just tinkering. It makes iteration extremely slowly and painful. If this is something I can prevent by adjusting SD.Next settings let me know but I have a hunch its due to the way the docker image is setup but I can't verify this since I can't see the Dockerfile! I'd prefer to get my hands dirty and help improve the experience/dockerfile myself since I've got tons of experience here but it feels like my hands are tied right now.

-
@Holaf please let me know if I can help with getting the code onto github, or really anywhere. There are many changes for SD.Next that could improve everyone's experience if we could make pull requests. It may also be useful for helping SD.Next get an official docker image working.
-
This didn't work for me but the comments in that issue were the clue I needed. For anyone else running into memory leaks when using SD.Next: 1. Exec into the container and install updated malloc library apt update apt -y install libgoogle-perftools-dev 2. Create the file /mnt/user/appdata/stable-diffusion/04-SD-Next/webui/webui-user.sh and add this contents: export LD_PRELOAD=libtcmalloc.so echo "libtcmalloc loaded" 3. Make the file executable Open unraid web terminal and run chmod +x /mnt/user/appdata/stable-diffusion/04-SD-Next/webui/webui-user.sh EDIT: @Holaf can you please add libgoogle-perftools-dev as a dependency in the image? OR add a hook into entry.sh so end-users can run a script as root on container start/creation so these kinds of modifications can be made without needing to modify the docker image.
-
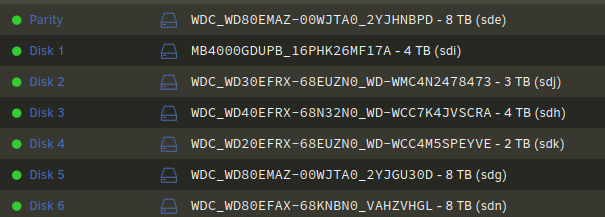
I've recently added new drives to my machine and have an end-goal for them. I'm looking for more eyes on my migration plan to get these drives into the array and hoping for confirmation/feedback that I'm doing this right/avoiding unnecessary risk/rebuilds. All unassigned drives have been pre-cleared. WDC_92U1 - 14TB - sdl WDC_UVHC - 14TB - sdm WDC_8YLD - 6TB - sdf Current array Goals Replace Parity 1 with larger drive Replace Parity 1 8TB - sde Parity 1 with unassigned WDC_92U1 - 14TB - sdl Add 14TB Data Add unassigned WDC_UVHC - 14TB - sdm Replace slowly dying data drive Replace Disk 1 (4TB - sdi) with unassigned WDC_8YLD - 6TB - sdf Add old 8TB - sde (old parity 1) as Data drive Using the steps below I believe I should be able to achieve this without losing parity protections and only incurring two parity rebuilds. Steps 1. Add 14TB Parity Parity disks do not need to be the same size but all need to be as large as the largest data disk. By adding as second parity I maintain array protection while rebuild is occurring and have additional protection during subsequent operations. Using directions from docs: Stop array Add WDC_92U1 - 14TB - sdl as Parity 2 Start array, wait for rebuild to finish 2. Replace 4TB slowly dying data drive Disk 1 shows error count in "array devices" but the disk is still green and my last parity check (10 days ago) finished with zero errors. Error count after 10 days is 469. It's been like this for the last couple of months and parity checks always finish without error. I think I should be OK to replace this directly with a new (larger) drive WDC_8YLD - 6TB - sdf. Additionally, I'll have two parity disks during this operation so "doubly" protected. Using directions from docs: Stop array Unassign Disk 1 - MB4000GDUPB_16PHK26MF17A - 4 TB (sdi) Start array to get unraid to present disk as emulated (normal or maintenance?) Stop array Assign new drive WDC_8YLD - 6TB - sdf as Disk 1 Start array, wait for rebuild to finish 3. Remove 8TB Parity In order to use the second 14TB data drive the parity drive(s) must be as large as it is. So I need to remove 8TB - sde parity. Using directions from docs: Stop array Set Parity 1 (WDC_WD80EMAZ-00WJTA02YJHNBPD - 8 TB - sde) to Unassigned Start array 4. Add remaining data drives Pre-clear old parity drive WDC_WD80EMAZ-00WJTA02YJHNBPD - 8 TB - sde Stop array Add unassigned WDC_WD80EMAZ-00WJTA02YJHNBPD - 8 TB - sde as data Add unassigned WDC_WUH721414ALE6L1_Y6GKUVHC - 14TB - sdm as data ________ How does my plan look? Is it sound? Do I understand the order of operations correctly? Thanks
-
Hi @Holaf and thanks for the amazing container. I'm using SD.Next with almost everything working correctly. However using Models -> CivitAI -> download for embeddings logs an error like this: 2023-11-14T17:42:13.998575208Z 17:42:13-994976 ERROR CivitAI download: name=easynegative.pt 2023-11-14T17:42:13.998614237Z url=https://civitai.com/api/download/models/9536path= 2023-11-14T17:42:13.998627355Z temp=models/Stable-diffusion/22863553.tmp size=0Mb 2023-11-14T17:42:13.998638689Z removed invalid download: bytes=25323 2023-11-14T17:42:14.001201822Z 2023-11-14T17:42:14.002561798Z Exception in thread Thread-68 (download_civit_model_thread): 2023-11-14T17:42:14.002596562Z Traceback (most recent call last): 2023-11-14T17:42:14.002618000Z File "/usr/lib/python3.10/threading.py", line 1016, in _bootstrap_inner 2023-11-14T17:42:14.002935406Z self.run() 2023-11-14T17:42:14.002967860Z File "/usr/lib/python3.10/threading.py", line 953, in run 2023-11-14T17:42:14.003280728Z self._target(*self._args, **self._kwargs) 2023-11-14T17:42:14.003312062Z File "/opt/stable-diffusion/04-SD-Next/webui/modules/modelloader.py", line 174, in download_civit_model_thread 2023-11-14T17:42:14.004375606Z os.rename(temp_file, model_file) 2023-11-14T17:42:14.004402584Z FileNotFoundError: [Errno 2] No such file or directory: 'models/Stable-diffusion/22863553.tmp' -> 'models/Stable-diffusion/easynegative.pt' I have no issues downloading from huggingface or downloading regular sd 1.5/lora models from civitai. Additionally, after manually moving files into appdata/stable-diffusion/models/embeddings and restarting the container it still does not move them into the correct folder in 04-SD-Next. 2023-11-14T17:52:43.096595854Z removing folder /opt/stable-diffusion/04-SD-Next/webui/models/VAE and create symlink 2023-11-14T17:52:43.109880467Z moving folder /opt/stable-diffusion/04-SD-Next/webui/embeddings to /opt/stable-diffusion/models/embeddings 2023-11-14T17:52:43.118850832Z sending incremental file list 2023-11-14T17:52:43.163582694Z 2023-11-14T17:52:43.163651074Z sent 155 bytes received 12 bytes 334.00 bytes/sec 2023-11-14T17:52:43.163666876Z total size is 100,167 speedup is 599.80 I have to manually move files appdata/stable-diffusion/models/embeddings -> appdata/04-SD-Next/webui/models/embeddings after which point they are recognized by SD.Next
-
2023-02-22 Update If you have an existing multi-scrobbler container and are updating you may need to update your unraid app configuration! See here for all 0.4.0 changes but the TLDR for unraid: Add Variable PUID=99 Add Variable PGID=100 Remove Path "Logs" Change Path "Config" Container Path from /home/node/config to /config


