


Progeny42
Members
-
Joined
-
Last visited
Everything posted by Progeny42
-
Unraid version is 6.12.4. I've created a new Ubuntu 20.04 VM, and I'm passing through one of the shares using the Unraid Share Mode Virtiofs Mode. I've mounted it in the VM as follows in the /etc/fstab. Repository /mnt/repository virtiofs defaults 0 0 If I make a change to a file on the Repository network share on my Windows desktop computer, and save the change, the updated file is not immediately available within the VM. For example, I could add a new line to the end of a file, and if I 'cat' or 'nano' the file in the VM, the change is not there. After randomly using 'cat', 'nano' or 'ls' on the /mnt/repository directory for a minute or so, the changes eventually appear, though I'm not convinced any of those commands are doing anything to help. If I watch an example file using 'watch -n1 cat /mnt/repository/test_file.txt', and change the contents on my remote machine, I've still not seen the changes appear for over 2 minutes now. Is this an artifcat of using virtiofs? In the past, I've used 9p, and not had the same Issue. I've not tried that yet to see if is any better. ---- Update In the event anyone else also suffered this issue, I've reverted to using 9p pass through instead. In the VM settings on Unraid, I changed the Unraid Share Mode to 9p Mode, and updated the /etc/fstab by replacing "virtiofs" with "9p". This now resolves my issue.
-
The latest version (2023.09.25.68.main) has created a regression whereby Datasets with spaces are no longer being detected by the plugin. I had installed version 2023.07.04 for the first time, and they did show, as per the release notes. Additionally, with destructive mode enabled, I'm unable to destory a Dataset with the plugin, and am presented with the error "Device or resource busy". However, if I run the command from the Unraid terminal (for example) zfs destroy tank/appdata/filebrowser it works fine
-
As of 7 hours ago, I'm getting the following alert pinged to me via email from Unraid: /bin/sh: line 1: 28292 Killed /usr/local/emhttp/plugins/dynamix/scripts/monitor &> /dev/null This is occurring every 25-30 minutes or so. The Unraid GUI is broken a bit now too; I can navigate between pages, but the syslog won't load, sometimes the Main tab won't load areas, the Docker and VMs tab won't load at all, and I cannot update Plugins. The day before, Unraid became unresponsive around 1:00am, and was no longer displaying an output, so I had to hard reset it. It is currently finishing up the parity check it initiated due to this. It's obviously a dynamix plugin causing this issue, but not sure which one uses the "monitor" script. I have not added, updated or removed any plugins in over 4 weeks, so seems odd that this is occurring now. The only thing that has changed in my machine is I added some new sticks of RAM, but that was 2 weeks ago. The more I write this, the more it sounds like it's a hardware fault, and not software, seeing as the OS is running in RAM. Unfortunately, I tried to get Diagnostic logs, but it's hanging (it's been running for over an hour now). I've attached all of the Dyanmix plugins that I currently have. Running on Unraid 6.9.1. I'll try pulling the extra RAM I added, and guess I'll have to monitor it for a few weeks to see if this happens again.
-
I am also having issues as of late as identifed by the File Activity tool, where Nextcloud is accessing an /appdata_{instanceId} directory and /files_encryption directory under /mnt/diskX/Nextcloud. This is causing a few of my disks to remain spun up. This did not use to be an issue. I use Nextcloud as a target for Backup, so I cannot change the share to use the cache. The Container is correctly configured using /data => /mnt/user/Nextcloud and /config => /mnt/user/appdata/nextcloud
-
*Bump* If 9p is a bad way to mount a drive, then would anyone care to explain what the correct way is for best performance?
-
@santiman717 Can you post a screenshot of the Container's configuration? (Remove or blur any emails or sensitive info)
-
I've been trialling Nextcloud as a cloud backup service for myself, and if successful, my family which live remotely. I'm using Duplicati to perform the backups, but that's not the point of this guide. The point is that when I backup files to Nextcloud, the Docker Image slowly fills up. I've never had it reach a point where the Image reaches 100%, but it's probably not a fun time. After searching the internet for hours trying to find anything, I eventually figured out what was required. For context, I'm running Nextcloud behind a Reverse Proxy, for which I'm using Swag (Let's Encrypt). Through trial and error, the behaviour I observed is that when uploading files (via WebDAV in my case), they get put in the /tmp folder of Swag. Once they are fully uploaded, they are copied across to Nextcloud's /temp directory. Therefore, both paths need to be added as Bind mounts for this to work. What To Do Head over to the Docker tab, and edit Nextcloud and add a new Path variable: Name: Temp Container Path: /tmp Host Path: /mnt/user/appdata/nextcloud/temp Next edit the Swag (or Let's Encrypt) container, and add a new Path variable: Name: Temp Container Path: /var/lib/nginx/tmp Host Path: /mnt/user/appdata/swag/temp And that's it! Really simple fix, but no one seemed to have an answer. Now when I backup my files, the Docker image no longer fills up.
-
Hmm not sure I can help you with that. It's not my software, I just made a template for it in unraid. Try contacting Snipe-IT directly about the issue
-
That'll likely be your problem. That App Key is too long. Make sure you use this command to generate a key in the Unraid terminal: openssl rand -base64 32 Then in the Container Edit menu, put: base64:yourappkeyhere
-
@Korshakov what is your App Key? This is the only time I've seen that issue.
-
@Dimtar Hey glad you figured it out. Yes, you will experience an error if the App Key is not valid as far as the Container is concerned. There's also nothing the log file to indicate that the App Key is the cause of the problem, so it's mostly just a trial an error thing. I'll add it to the original post as an update to warn people.
-
@argash Hey, glad to hear it helped someone! I've just checked CA, only saw my template in there, are you sure the second template isn't a previous install of yours? Out of interest, does your SMTP setup work?
-
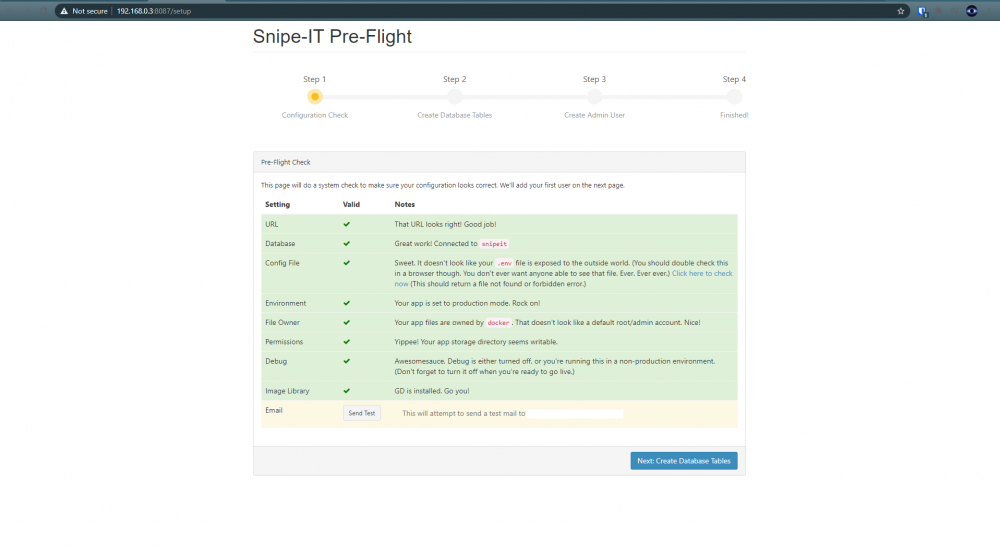
Snipe-IT is an Asset Management System. This guide will help you to install it and get it running. Database Backend Installing MariaDB Snipe-IT requires MySQL or MariaDB as its database backend. We’ll be using MariaDB. Head over to Community Applications and pull MariaDB. I left the Host Port as 3306, but ensure it doesn’t conflict with any existing containers. If you change it you will need to use the custom value in the Snipe-IT configuration later. You’ll need to setup a root password in Key 3, and it must be at least 4 characters long. Now Apply to install the container. Creating a Database and User Snipe-IT requires that we setup a Database and User in preperation for the installation, so let’s do that. In the Docker tab, click on mariadb and select the Console option, which will open a Bash shell into the container. To login to the database, you’ll need to execute the following command: mysql -u root -p It will now ask for the password. This is the root password that we just configured in the template. To create a database, user and password for Snipe-IT, execute the following commands: CREATE DATABASE databasename; CREATE USER username IDENTIFIED BY 'password'; GRANT ALL ON databasename.* TO 'username'; Disabling Strict Mode Snipe-IT requires that Strict Mode is disabled for installation and setup. To ensure we put it back correctly after installation, we’ll be collecting the current values first. Execute the following command in the Bash shell to select all values. SELECT @@SQL_MODE; Copy all of the modes. Mine were; STRICT_TRANS_TABLES,ERROR_FOR_DIVISION_BY_ZERO,NO_AUTO_CREATE_USER,NO_ENGINE_SUBSTITUTION Repeat this process for @@GLOBAL.SQL_MODE using the below command: SELECT @@GLOBAL.SQL_MODE; Now to disable Strict Mode, execute the following two commands: SET @@SQL_MODE = ''; SET @@GLOBAL.SQL_MODE = ''; Installing Snipe-IT I’ve put together a template for Snipe-IT in Community Applications, so it should just be a process of filling out the required values. Head over to Community Applications and search for snipe-it, and install it. There are quite a lot of options that need filling out, but they are all required. My configuration looks like this (fill out your own details where applicable) MySQL Database Name: databasename MySQL Username: username MySQL Password: password MySQL Database Host: 192.168.0.3 MySQL Database Port: 3306 SMTP Address: smtp.mail.yahoo.com SMTP Port: 465 SMTP From Address: [email protected] SMTP From Name: john doe SMTP Encryption: tls SMTP Username: [email protected] SMTP Password: your email password App Key: LEAVE THIS BLANK FOR NOW App URL: http://192.168.0.3:8087 App Timezone: Europe/London App Locale: en-GB Port: 8087 Ensure that Port and App URL use the same port number in the event that you change it. Ensure that MySQL Database Port is correct. Before hitting apply, we need to generate the App Key! Open the Unraid Terminal and run the following command: openssl rand -base64 32 This should produce something along the lines of: cbWIMLG/JSqLhEvZsRh7v37KfKL2CAwApn64oEEOTjI= Copy the value, and in the App Key field, enter base64:yourappkeyhere. Your App Key field should look like the following: base64:cbWIMLG/JSqLhEvZsRh7v37KfKL2CAwApn64oEEOTjI= Hit Apply to install the container. Setup Snipe-IT Once installed, go to the Docker tab and open the Web-UI for Snipe-IT. UPDATE: Whoops, looks like something went wrong. If you see the error "Whoops, looks like something went wrong.", this is likely an issue with your App Key (As experienced by myself and another member). Unfortunately, the Container log file won't say that the App Key is the problem. Go back in this guide, and ensure that your App Key is setup and valid. If the problem persists, check the Container log file for anything else, hopefully it will indicate why it's not loading properly. If everything went well, you should be presented with the Snipe-IT Pre-Flight page. Unfortunately, SMTP isn’t working for me, I’m not sure why, as I’ve setup SMTP using the same settings elsewhere. UPDATE: I've had confirmation that other email's are working, so it's likely just something to do with Yahoo accounts. Assuming all is green (except for Email), hit the Next: Create Database Tables button – BE PATIENT! I’m running this container on an SSD and it took nearly 2 minutes for this step to complete. Once complete, hit the Next: Create User button. At this point, fill out your details as appropriate, and then you should be presented with the User Interface. Re-Enabling Strict Mode We want to ensure that MariaDB maintains its integrity, especially if you currently / will use it for other uses. Open up a Bash shell for MariaDB again, and log in using the command from earlier. Once in, execute the following command, substituing your SQL_MODES save from earlier where applicable. My command looked like: SET @@SQL_MODE = 'STRICT_TRANS_TABLES,ERROR_FOR_DIVISION_BY_ZERO,NO_AUTO_CREATE_USER,NO_ENGINE_SUBSTITUTION'; Again, perform this command for @@GLOBAL.SQL_MODE. And that’s it, you should be all up and running! Now to spend hours inputting all my data…
-
When waking from S3 Sleep, all of the Disks are spun up. However, when I go to the Main tab, all of the Devices are shown as being in Standby Mode. For this reason, the drives never spin down after inactivity (mine is set to 15 minutes). I have to manually spin down the disks. Attached is the System Log. The Server starts up (usually) at 15:50 each day. I'm on Unraid Version 6.8.3. Dynamix S3 Sleep 2020.05.10 elysia-syslog-20200630-1505.zip
-
elysia-diagnostics-20200202-0826.zipI updated from 6.7.2 to 6.8.2. Since the update, after Unraid wakes up from sleep, my eth0 (Ethernet controller: Intel Corporation I211 Gigabit Network Connection (rev 03)) does not function correctly. I can access the GUI and ping fine the Unraid IP address, but using Windows Explorer to access any of the files has issues. I can browse the directories, but writing files to a share just hangs at 0%, and eventually fails with Windows saying it encountered a network error. A restart of Unraid resolves the issue. I can still transfer files fine using a Mellanox 10Gb card, so it's not all network interfaces that are affected.


