WowaDriver

Members
  • Posts

    70
  • Joined

  • Last visited

Everything posted by WowaDriver

  1. After I didn't get an answer if someone could already install the RC DSM 7.0 as VM, I decided to try an update from 6.2.3 to 6.2.4 (on the DS3617xs platform). The result is that I can no longer reach the DSM -> Brick. Can anyone report anything different?
  2. Does anyone tried out to install the actually RC DSM 7.0 ??
  3. Can you tell me in which file i have to put in these lines and where this is located, please?
  4. Erneut ein großes Dankeschön für deine Hilfestellung. Anhand deiner Tuts in der Rubrik "Häufig gestellte Fragen" habe ich den Container komplett entfernt und neuinstalliert. Jetzt geht wieder alles. Vielen Dank! Hatte da eh nur eine VM eingerichtet und da ist es so schneller gewesen zum Ziel zu gelangen.
  5. @mgutt Vielen Lieben Dank! Sehr informativ und eigentlich hätte ich das selbst finden müssen, vor allem wie gut ihr das mit @ich777 aufgebaut habt. Nur wie das immer so ist man überfliegt immer alles in der Schnelle und hat dann mehr Baustellen als einem lieb ist. Nicht ansprechbar: Ok. Versuche es nochmal anders zu erklären. In diesem Tutorial [Klick mich] zur Emby installation inkl. HW Transcoding wird ab Minute 5:16 beschrieben bzw. empfohlen für emby ein eigenes Share anzulegen worin ebenfalls wie ich verstanden habe der gesamte Container Inhalt gespeichert wird. Also Configs Metadaten und eben auc hdie Transcodings... So etwas habe ich nur für emby gemacht und diesen habe ich schon öfter geupdatet ohne das was verloren gegangen ist. Bei allen anderen Containern war dann eben nach dem Update alles auf Default. Selbst beim JDownloader waren die Settings weg, hätte damit echt nicht gerechnet. Somit frage ich mich ob ich sowas für jeden Container machen muss, damit die Daten nach Updates erhalten bleiben? Oder gibts es ebenfalls ein Guide wie man Container richtig updatet, sprich mit vorher Backup machen und anschließend wieder einspielen usw...?
  6. Hi und vielen Dank vorweg für deine Hilfestellung! Der Logauszug aus dem laufenenden guacamole Container welcher mit der br0 ip 192.168.178.19:8080 angesproche nwerden sollte: Ein Ping der Container IP ist erfolgreich: Woher die ganzen "shim-bro" kommen kann ich nicht sagen, dachte beim installieren der container werden dan entsprechnede Anpassungen manuell durchgeführt. Von meiner Seite aus habe ich da nie was angefasst. Wenn da etwas weg muss, dann bitte Bescheid geben. Ich selbst besitze zu diesem Thema noch nciht einmal ein gesundes Halbwissen... Tatsächlich nicht, da ich bei meinen banalen Container absolut keine Sorgen gemacht habe , dass bei einem normalen Update was passieren sollte. Man lernt nie aus. Dazu hätte ich dann noch eine Frage. Ist es üblich die Installationsverzeichnisse der Container zu ändern, damit diese bei einem Update nicht verloren gehen? Dies habe ich halt bei emby gemacht und dabei hat sich rausgestellt, dass dies der einzige Container ist, welcher seine Daten und configs behalten hat. Ich hatte es für emby nach einen Tutorial so gemacht gehabt um auch einfach permanent eine Sicherungskopie zu haben. Dachte bei gewöhnlichen Container wäre sowas nicht notwendig... Jetzt wo mir die augen geöffnet werden, natürlich nicht. Gelöscht hatte ich es in dem ich auf den Container geklickt habe und diesen mittels "remove" gelöscht habe. Danach sofort über die Applications Tools neu installiert mit gleichen Settings. Da hat sich dann wohl wie du schreibst gar nichts gelöscht richtig? Ist also ein Remove kein Remove mehr? Verwirrend ...
  7. Sorry für Doppelpost... konnte das Problem immer noch nicht lösen und wäre für jegliche Hilfestellung dankbar!
  8. Hallo Leute, da ich auch aus dem Deutsch sprachigem Raum komme und keinen extra Thread eröffnen wollte teile ich mein Problem mal hier. Das oben angesprochene Problem hatte ich so direkt nicht, da ich die Option "Host access to custom networks" von begin an aktiv hatte. Gleich vorab ich bin kein absoluter Unraid noob aber ein Pro bin ich auch nicht, somit eventuell sorry für banale Fragen oder MIssverständnisse Mein Problem ist ein anderes... Ich habe mehrere Container laufen, zb. emby, gucamole, nignixproxymanager, jdownloader usw. welche ich alle via Default Settings installiert habe. Einzig emby hatte ich eigene config Ordner angelegt gehabt welche auf einem anderen Speicherplatz liegen damit mir meiner config somit immer erhalten bleibt. Nun hatte ich nach etwa einem halben Jahr Nutzung entdeckt, dass meine container im Dockertab alle als veraltet und für ein update bereit stehen. Also habe ich alle einmal geupdatet und musste nun feststellen, dass bei allen containern (außer eben emby) der content weg ist und ich alles neu machen muss... das kanns ja nicht sein oder? Habe ich was falsch gemacht? Und nun zum Hauptproblem, guacamole ließ sich nicht mehr aufrufen sodass ich hier eine komplette neuinstallation durchgeführt habe. Dies hat nichts gebracht, ich komme einfach nicht auf die Oberfläche, weder via br0 mit eigener IP noch im bridge Modus (bei geändertem Port).... könnt ihr mir bitte bei den beiden Problemen helfen? Hier noch meine Routing Tabelle. Ich habe zwei nic's zum Bond zusammengefasst, was ich davor aber auc hschon gehabt habe... somit dürfte es daran nicht liegen. Bzgl. der Routing Tabelle muss ich passen da habe ich gar kein Wissen zu, vielleicht sieht jemand ja einen Fehler. Gerade nochmal rumprobiert. Zu Guacamole ist noch Adguard dazu gekommen welches ebensowenig erreichbar ist. Hier eine Übersicht meiner Container. Alle erreichbar bis auf die zwei genannten welche derzeit auf br0 eingestellt sind. Ich sehe eigentlich keine Protüberschneidung oder ähnliches... wie gesagt vor dem Updaten waren alle container ansprechbar, sowohl lokal als auch übern proxy.
  9. Hi again @ich777thanks for reply! Ok thanks i missed that the VFIO Plugin is now integrated... just deleted... I the case i when i bind it to VFIO you are right i can start the vm with the gpu but when i turn of the vm i cant use it with the docker... I try to find a workaround how to multiuse the one and only gpu for both scenarios ... the gpu runs for more than 80-90% of time for the emby docker container, but sometimes i need this one win10 vm with a dedicated gpu... for futher it is the plan to get a second gpu but actually i only have the one... Do you have a possible workaround for me mayby?
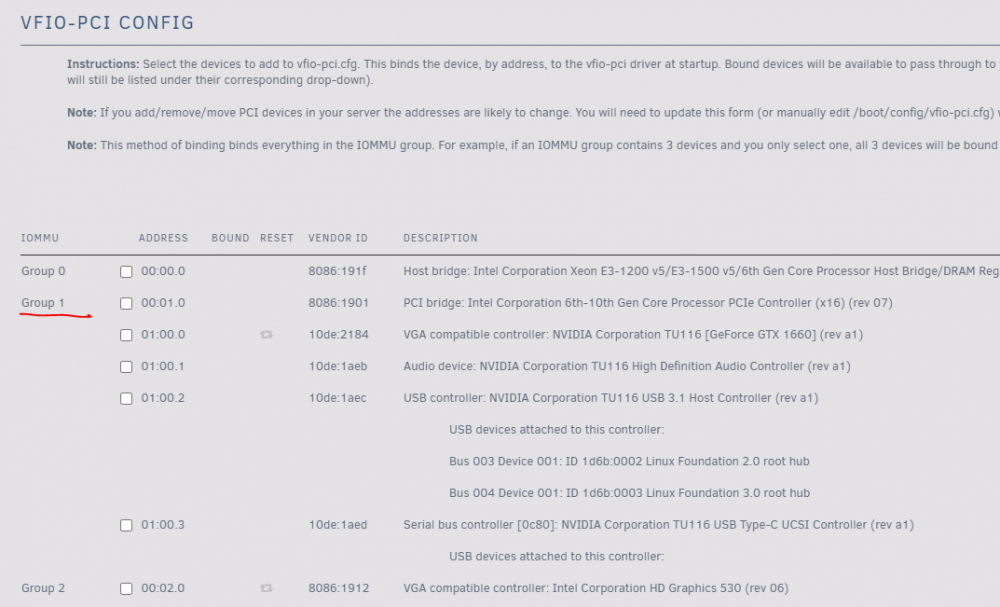
  10. I dont know why but when i press the download button to get the diagnostics i only get this screen and nothing other happens... It do not download the files... cant say what is the reason for... But i can give you a screen of my VIFO-PCI-CONFIG: So the answer is no, i only select the gpu in the win10 vm and made the entries like on the first post of this thread for the emby docker.
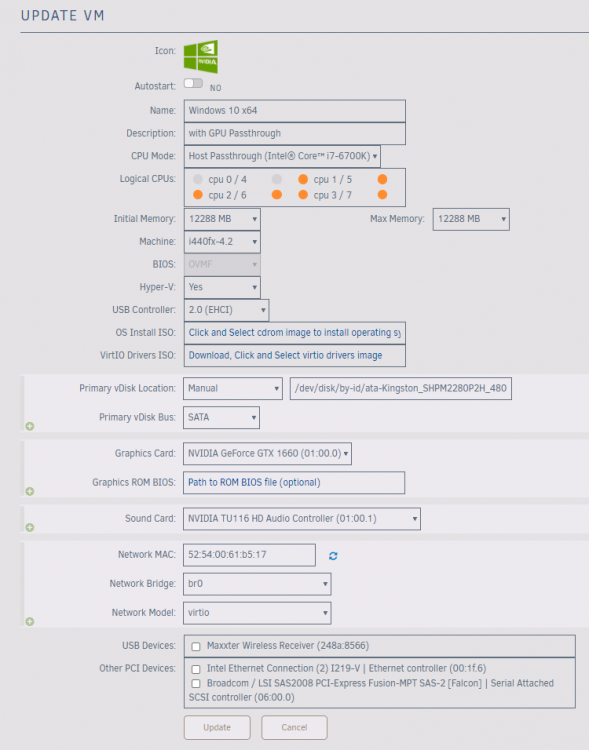
  11. Thanks for the explanation. You do a great support and great job! Weiter so! Ok now i've got an other error. After using the gpu in the emby docker i delete the entries in the the emby docker container to use the gpu with a win10 vm. The problem now is that cant start the vm when selecting the gpu... tried a restart but it didnt help... The IMMOU Group of my GTX1660 is: 01:00.0 and from gpu sound card 01:00:1 Error code: Execution error internal error: qemu unexpectedly closed the monitor: 2021-04-14T12:16:32.430601Z qemu-system-x86_64: -device vfio-pci,host=0000:01:00.0,id=hostdev0,bus=pci.0,addr=0x5: vfio 0000:01:00.0: group 1 is not viable Please ensure all devices within the iommu_group are bound to their vfio bus driver. Can you help me?
  12. Hi @all, first of all i would have to say thanks a lot for the plugin! In the quote above i found principally the answer to my question... Now i have a second one... in the old Nvidia Plugin by Linuxserver.io it was possible (like in the tut video of spaceinvader) to use one and the same nvidia gpu for the dockers in multiplay way and if it actually not in transcoding it was possible to use the same gpu in a win vm... in that case emby done an software transcode till the gpu will be free from the win vm... What do you think, is it possible to implement this feature back again? This will be extremely very nice :)
  13. Folks, I did it with a new installation using the Unraid VM surface. The main problem why my NVMe was not recognized when installing despite the virtio driver was that I appended the installation ISO and the Virtio ISO as USB and sata device for whatever reason ... After I created a new VM template and left it on the stadard IDE I was able to install everything without problems and everything works. Thank you for any help!
  14. Hi guys! I actually just get the same error message: VM creation error unsupported configuration: per-device boot elements cannot be used together with os/boot elements Can you tell me how you fixed it? The whole story about my nvme boot problem you can read in the last posts of this thread: Thanks a lot for any kind of help!
  15. Hi again and thanks a lot for the fast reply! just tried it up but it didn't work too... get the error: unsupported configuration: per-device boot elements cannot be used together with os/boot elements //EDIT: I have fixed the last error message... in the os part in the upper part of the xml i got this entrie: <os> <type arch='x86_64' machine='pc-i440fx-4.2'>hvm</type> <loader readonly='yes' type='pflash'>/usr/share/qemu/ovmf-x64/OVMF_CODE-pure-efi.fd</loader> <nvram>/etc/libvirt/qemu/nvram/60421af0-dea8-1f14-024e-0e533ed868cc_VARS-pure-efi.fd</nvram> <boot dev='hd'/> </os> That is an boot device selector in the upper part of the xml... and it doesn't allow to use a boot ordering in the bottom part where i passthrough the nvme... So i entered the first boot order to the nvme but still have the issue that i cant boot from the nvme... Is it possible there is a problem with, taht i installed the OS baremetall? Or that the Windows Installer doesn't see the nvme in the installation process? It doesn't matter whether I load the virtio scsi drivers or not?
  16. Ok maybe I have say it on the wrong way.... the nvme is connected to a normal M2 port on the motherboard. Furthermore my board has got 6 data port. But the manuell says in case of using a nvme in the M2 port the first port of the sata controller will disabled! That a reason of double using the same pci lanes of the board I think... so and what I saw in the Unraid device list I marked in the upper post. The Kingston nvme is listed as a SATA Controller... and here was my question if that can be a problem... But the way... today I deselected the nvme in the "VFIO-PCI CONFIG" Plugin Application und do a reboot. Now the nvme is listed like a normal "UNASSIGNED DEVICES" in the main tab with the others ssd's and hdd's which are not used by the array... but I tried to passthrough it like a normal way by edit the xml file of the vm incl. the boot order argument, without a positive result. I got still the same error message internal error: unknown pci source type 'boot' I don't really know what I can do next...
  17. Hi @sprange and thanks a lot for your reply! I have just tried this out but without a positive ending for my problem. When i boot the boot order line in the correct place in the xml of the passing through nvme i can't save the changes because i will get the following error: I dont know how to fix the error... tried many things which i read in other threads but still woithout a solution... Is it possible that i've got these problems because the Kingston NVMe is shown as a SATA controller in the device list? In the VM Template the same thing... My old Mainboard has 6 sata ports (onboard) and when i will use the one and only nvme port i have to lost the firt onboard sata port... so is it possible, that my mainboard is talking to unraid that my nvme is a sata card?
  18. The main problem i see i will not have the possibility to use the vm remotly becuase when it set up with gpu passthrough i cant connect with vnc to change/repair the boot secences... I would be really happy if someone can help me. Thanks a lot!
  19. Hello guys, first happy new year to all of you and i think i have similar problem so i will use this thread here. I try now to configure a win 10 vm which one is booting directly from a passthrough nvme... Let's start from the beginning: Unraid 6.8.2 Mainboard: Asus z170 pro gaming (Bios Verison i have to check at home...) CPU: i7-6700K RAM: 32gb NVMe: Kingston 480 GB Here my unraid flash drive settings: Server boot mode: Legacy Permit UEFI boot mode "deselected" Boot system in UEFI mode. Please check your system settings to support UEFI boot mode. 1. I add a new Win10 Template and configure the vm like in the screen below: You are right and of course with a mounted Win10 ISO-File and virtio driver iso and booted to the install setup. The problem was that i can't find the nvme no matter if with or without virtio drivers and the spaceinvander clover image as the primary device didn't helped out with the problem: So i decided to shut down the unraid server and install win10 baremetall directly to the nvme like a normal usb installation. After that i was able to boot to the vm (with the above shown vm settings and without the Win10 ISO-File and Virtio Driver ISO) only one time with the help of the spaceinvader clover image. Here you can see the first poped up dialog in terms of passingthrough the nvme: The next times i always crashed to the windows recovery after passing the clover bootloader (which is still the primary device ion the vm template): At this point all methods brings a restart and places me again to the recovery. So i only have the option to press "ESC" to get to the uefi and there i saw the nvme and the clover bootloader hdd (but only at this one time): So the vm started fine and all works like it should! But after a restart i crashed again into the recovery mode like the first time. Now i entered again the uefi but this time i noticed that the settings i save the last session have not safed and now the entries are different to the last time. The nvme was lost and only the clover bootloader was shown... after many restartes the same issue: At this point i shut down the vm and mounted again the Win10 ISO-File and boot to the Windows Installation Wizard: Here i choosed the option to repair the windows installation and got this screen, where i choose the first option to quit the setup and boot the vm: Here the vm starts fine again and work absolutly perfectly but when i restart the vm the scenario plays again from the beginning. Sometime when i'm in the position to choose at the last point the repair options the screens looks different and the option to quit the setup and boot the vm directly doesn't exits but in that case a have an button to close and go the uefi ... than i see the nvme and can again boot to the vm. But this method only works when i go the way over the "(WIn10 ISO-File and the repais options)"-way... when i go directly to the uefi i don't see the nvme... I dont now what to do... that is not a way i like to use my vm... please can someone help me? My VM XML Code: <?xml version='1.0' encoding='UTF-8'?> <domain type='kvm' id='52'> <name>Windows 10 x64</name> <uuid>60421af0-dea8-1f14-024e-0e533ed868cc</uuid> <description>Prodkutiv VM inkl. GPU passthrough</description> <metadata> <vmtemplate xmlns="unraid" name="Windows 10" icon="Win10_Nvidia.png" os="windows10"/> </metadata> <memory unit='KiB'>16777216</memory> <currentMemory unit='KiB'>16777216</currentMemory> <memoryBacking> <nosharepages/> </memoryBacking> <vcpu placement='static'>4</vcpu> <cputune> <vcpupin vcpu='0' cpuset='2'/> <vcpupin vcpu='1' cpuset='6'/> <vcpupin vcpu='2' cpuset='3'/> <vcpupin vcpu='3' cpuset='7'/> </cputune> <resource> <partition>/machine</partition> </resource> <os> <type arch='x86_64' machine='pc-i440fx-4.2'>hvm</type> <loader readonly='yes' type='pflash'>/usr/share/qemu/ovmf-x64/OVMF_CODE-pure-efi.fd</loader> <nvram>/etc/libvirt/qemu/nvram/60421af0-dea8-1f14-024e-0e533ed868cc_VARS-pure-efi.fd</nvram> </os> <features> <acpi/> <apic/> <hyperv> <relaxed state='on'/> <vapic state='on'/> <spinlocks state='on' retries='8191'/> <vendor_id state='on' value='none'/> </hyperv> </features> <cpu mode='host-passthrough' check='none'> <topology sockets='1' cores='2' threads='2'/> </cpu> <clock offset='localtime'> <timer name='hypervclock' present='yes'/> <timer name='hpet' present='no'/> </clock> <on_poweroff>destroy</on_poweroff> <on_reboot>restart</on_reboot> <on_crash>restart</on_crash> <devices> <emulator>/usr/local/sbin/qemu</emulator> <disk type='file' device='disk'> <driver name='qemu' type='raw' cache='writeback'/> <source file='/mnt/disk1/isos/spaces_win_clover.img' index='2'/> <backingStore/> <target dev='hdc' bus='sata'/> <boot order='1'/> <alias name='sata0-0-2'/> <address type='drive' controller='0' bus='0' target='0' unit='2'/> </disk> <disk type='file' device='cdrom'> <driver name='qemu' type='raw'/> <source file='/mnt/user/isos/CCSA_X64FRE_DE-DE_DV5.iso' index='1'/> <backingStore/> <target dev='hda' bus='usb'/> <readonly/> <boot order='2'/> <alias name='usb-disk0'/> <address type='usb' bus='0' port='2'/> </disk> <controller type='pci' index='0' model='pci-root'> <alias name='pci.0'/> </controller> <controller type='sata' index='0'> <alias name='sata0'/> <address type='pci' domain='0x0000' bus='0x00' slot='0x04' function='0x0'/> </controller> <controller type='virtio-serial' index='0'> <alias name='virtio-serial0'/> <address type='pci' domain='0x0000' bus='0x00' slot='0x05' function='0x0'/> </controller> <controller type='usb' index='0' model='ich9-ehci1'> <alias name='usb'/> <address type='pci' domain='0x0000' bus='0x00' slot='0x07' function='0x7'/> </controller> <controller type='usb' index='0' model='ich9-uhci1'> <alias name='usb'/> <master startport='0'/> <address type='pci' domain='0x0000' bus='0x00' slot='0x07' function='0x0' multifunction='on'/> </controller> <controller type='usb' index='0' model='ich9-uhci2'> <alias name='usb'/> <master startport='2'/> <address type='pci' domain='0x0000' bus='0x00' slot='0x07' function='0x1'/> </controller> <controller type='usb' index='0' model='ich9-uhci3'> <alias name='usb'/> <master startport='4'/> <address type='pci' domain='0x0000' bus='0x00' slot='0x07' function='0x2'/> </controller> <interface type='bridge'> <mac address='52:54:00:08:eb:63'/> <source bridge='br0'/> <target dev='vnet1'/> <model type='virtio'/> <alias name='net0'/> <address type='pci' domain='0x0000' bus='0x00' slot='0x03' function='0x0'/> </interface> <serial type='pty'> <source path='/dev/pts/1'/> <target type='isa-serial' port='0'> <model name='isa-serial'/> </target> <alias name='serial0'/> </serial> <console type='pty' tty='/dev/pts/1'> <source path='/dev/pts/1'/> <target type='serial' port='0'/> <alias name='serial0'/> </console> <channel type='unix'> <source mode='bind' path='/var/lib/libvirt/qemu/channel/target/domain-52-Windows 10 x64/org.qemu.guest_agent.0'/> <target type='virtio' name='org.qemu.guest_agent.0' state='connected'/> <alias name='channel0'/> <address type='virtio-serial' controller='0' bus='0' port='1'/> </channel> <input type='tablet' bus='usb'> <alias name='input0'/> <address type='usb' bus='0' port='1'/> </input> <input type='mouse' bus='ps2'> <alias name='input1'/> </input> <input type='keyboard' bus='ps2'> <alias name='input2'/> </input> <graphics type='vnc' port='5901' autoport='yes' websocket='5701' listen='0.0.0.0' keymap='de'> <listen type='address' address='0.0.0.0'/> </graphics> <sound model='ich9'> <alias name='sound0'/> <address type='pci' domain='0x0000' bus='0x00' slot='0x0a' function='0x0'/> </sound> <video> <model type='qxl' ram='65536' vram='65536' vgamem='16384' heads='1' primary='yes'/> <alias name='video0'/> <address type='pci' domain='0x0000' bus='0x00' slot='0x02' function='0x0'/> </video> <hostdev mode='subsystem' type='pci' managed='yes'> <driver name='vfio'/> <source> <address domain='0x0000' bus='0x05' slot='0x00' function='0x0'/> </source> <alias name='hostdev0'/> <address type='pci' domain='0x0000' bus='0x00' slot='0x06' function='0x0'/> </hostdev> <hostdev mode='subsystem' type='pci' managed='yes'> <driver name='vfio'/> <source> <address domain='0x0000' bus='0x0a' slot='0x00' function='0x0'/> </source> <alias name='hostdev1'/> <address type='pci' domain='0x0000' bus='0x00' slot='0x08' function='0x0'/> </hostdev> <memballoon model='none'/> </devices> <seclabel type='dynamic' model='dac' relabel='yes'> <label>+0:+100</label> <imagelabel>+0:+100</imagelabel> </seclabel> </domain> And my System Diveces: IOMMU: IOMMU group 0: [8086:191f] 00:00.0 Host bridge: Intel Corporation Xeon E3-1200 v5/E3-1500 v5/6th Gen Core Processor Host Bridge/DRAM Registers (rev 07) IOMMU group 1: [8086:1901] 00:01.0 PCI bridge: Intel Corporation Xeon E3-1200 v5/E3-1500 v5/6th Gen Core Processor PCIe Controller (x16) (rev 07) IOMMU group 2: [8086:1912] 00:02.0 VGA compatible controller: Intel Corporation HD Graphics 530 (rev 06) IOMMU group 3: [8086:a12f] 00:14.0 USB controller: Intel Corporation 100 Series/C230 Series Chipset Family USB 3.0 xHCI Controller (rev 31) IOMMU group 4: [8086:a13a] 00:16.0 Communication controller: Intel Corporation 100 Series/C230 Series Chipset Family MEI Controller #1 (rev 31) IOMMU group 5: [8086:a102] 00:17.0 SATA controller: Intel Corporation Q170/Q150/B150/H170/H110/Z170/CM236 Chipset SATA Controller [AHCI Mode] (rev 31) IOMMU group 6: [8086:a167] 00:1b.0 PCI bridge: Intel Corporation 100 Series/C230 Series Chipset Family PCI Express Root Port #17 (rev f1) IOMMU group 7: [8086:a169] 00:1b.2 PCI bridge: Intel Corporation 100 Series/C230 Series Chipset Family PCI Express Root Port #19 (rev f1) IOMMU group 8: [8086:a16a] 00:1b.3 PCI bridge: Intel Corporation 100 Series/C230 Series Chipset Family PCI Express Root Port #20 (rev f1) IOMMU group 9: [8086:a110] 00:1c.0 PCI bridge: Intel Corporation 100 Series/C230 Series Chipset Family PCI Express Root Port #1 (rev f1) IOMMU group 10: [8086:a114] 00:1c.4 PCI bridge: Intel Corporation 100 Series/C230 Series Chipset Family PCI Express Root Port #5 (rev f1) IOMMU group 11: [8086:a118] 00:1d.0 PCI bridge: Intel Corporation 100 Series/C230 Series Chipset Family PCI Express Root Port #9 (rev f1) IOMMU group 12: [8086:a145] 00:1f.0 ISA bridge: Intel Corporation Z170 Chipset LPC/eSPI Controller (rev 31) [8086:a121] 00:1f.2 Memory controller: Intel Corporation 100 Series/C230 Series Chipset Family Power Management Controller (rev 31) [8086:a170] 00:1f.3 Audio device: Intel Corporation 100 Series/C230 Series Chipset Family HD Audio Controller (rev 31) [8086:a123] 00:1f.4 SMBus: Intel Corporation 100 Series/C230 Series Chipset Family SMBus (rev 31) IOMMU group 13: [8086:15b8] 00:1f.6 Ethernet controller: Intel Corporation Ethernet Connection (2) I219-V (rev 31) IOMMU group 14: [10de:2184] 01:00.0 VGA compatible controller: NVIDIA Corporation TU116 [GeForce GTX 1660] (rev a1) IOMMU group 15: [10de:1aeb] 01:00.1 Audio device: NVIDIA Corporation TU116 High Definition Audio Controller (rev a1) IOMMU group 16: [10de:1aec] 01:00.2 USB controller: NVIDIA Corporation Device 1aec (rev a1) IOMMU group 17: [10de:1aed] 01:00.3 Serial bus controller [0c80]: NVIDIA Corporation TU116 [GeForce GTX 1650 SUPER] (rev a1) IOMMU group 18: [12d8:2304] 03:00.0 PCI bridge: Pericom Semiconductor PI7C9X2G304 EL/SL PCIe2 3-Port/4-Lane Packet Switch (rev 05) IOMMU group 19: [12d8:2304] 04:01.0 PCI bridge: Pericom Semiconductor PI7C9X2G304 EL/SL PCIe2 3-Port/4-Lane Packet Switch (rev 05) IOMMU group 20: [12d8:2304] 04:02.0 PCI bridge: Pericom Semiconductor PI7C9X2G304 EL/SL PCIe2 3-Port/4-Lane Packet Switch (rev 05) IOMMU group 21: [8086:10c9] 05:00.0 Ethernet controller: Intel Corporation 82576 Gigabit Network Connection (rev 01) IOMMU group 22: [8086:10c9] 05:00.1 Ethernet controller: Intel Corporation 82576 Gigabit Network Connection (rev 01) IOMMU group 23: [8086:10c9] 06:00.0 Ethernet controller: Intel Corporation 82576 Gigabit Network Connection (rev 01) IOMMU group 24: [8086:10c9] 06:00.1 Ethernet controller: Intel Corporation 82576 Gigabit Network Connection (rev 01) IOMMU group 25: [8086:10a7] 07:00.0 Ethernet controller: Intel Corporation 82575EB Gigabit Network Connection (rev 02) IOMMU group 26: [8086:10a7] 07:00.1 Ethernet controller: Intel Corporation 82575EB Gigabit Network Connection (rev 02) IOMMU group 27: [1b21:1242] 08:00.0 USB controller: ASMedia Technology Inc. ASM1142 USB 3.1 Host Controller IOMMU group 28: [1000:0072] 09:00.0 Serial Attached SCSI controller: Broadcom / LSI SAS2008 PCI-Express Fusion-MPT SAS-2 [Falcon] (rev 03) IOMMU group 29: [2646:0010] 0a:00.0 SATA controller: Kingston Technology Company, Inc. Device 0010 (rev 10) USB Devices: Bus 001 Device 001: ID 1d6b:0002 Linux Foundation 2.0 root hub Bus 001 Device 002: ID 0781:5571 SanDisk Corp. Cruzer Fit Bus 001 Device 003: ID 248a:8566 Maxxter Wireless Receiver Bus 002 Device 001: ID 1d6b:0003 Linux Foundation 3.0 root hub Bus 003 Device 001: ID 1d6b:0002 Linux Foundation 2.0 root hub Bus 004 Device 001: ID 1d6b:0003 Linux Foundation 3.0 root hub Bus 005 Device 001: ID 1d6b:0002 Linux Foundation 2.0 root hub Bus 006 Device 001: ID 1d6b:0003 Linux Foundation 3.0 root hub SCSI Devices: [0:0:0:0] disk SanDisk Cruzer Fit 1.26 /dev/sda 16.0GB [2:0:0:0] disk ATA TOSHIBA DT01ACA2 ABB0 /dev/sdb 2.00TB [3:0:0:0] disk ATA Samsung SSD 850 1B6Q /dev/sdc 250GB [4:0:0:0] disk ATA Samsung SSD 840 CB6Q /dev/sdd 250GB [5:0:0:0] disk ATA SanDisk SDSSDHII 00RL /dev/sde 120GB [6:0:0:0] disk ATA Samsung SSD 840 8B0Q /dev/sdf 120GB