





djismgaming
Members
-
Joined
-
Last visited
Everything posted by djismgaming
-
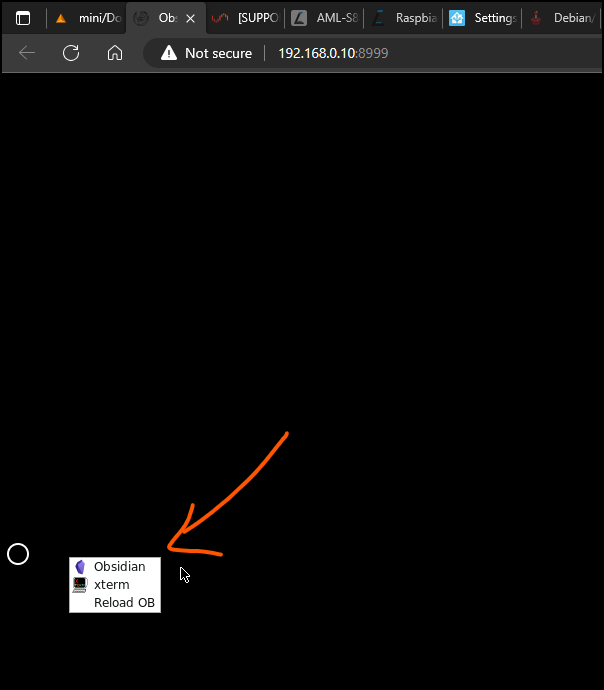
If you get to the screen, you could also right-click on the screen to reload the obsidian application if it's closed for some reason.
-
I re-installed from scratch and it's working. It does show a white screen while loading the obsidian application but only for 2-3 seconds on my old Intel® Core™ i7-3615QM CPU @ 2.30GHz Mac mini Late 2012
-
Application Name: tracker-add Application Site: https://hub.docker.com/r/andrewmhub/transmission-tracker-add Docker Image Repository: https://hub.docker.com/r/andrewmhub/transmission-tracker-add Github: https://github.com/AndrewMarchukov/tracker-add Please post any questions/issues relating to this docker you have in this thread. If you need help but are not using unRAID, then please do not post here, instead head to the application's GitHub repository and open an issue there. This application can automatically add extra trackers to your torrents. The list provided in the template adds trackers by IP. You can change the list to any list available online or your own published one. How good it works depends on the torrent being downloaded. I've had some have much more speed than without adding the trackers but other have not seen any change. YMMV 😉

-
Indeed, the only change is the image being used and the inclusion of the PUID and GUID options as this last image makes use of that. It makes it easier to modify data inside the vault from outside the obsidian-remote container. This also makes it possible to have a local Obsidian installation pointing to the same Vault on the server, from a PC/mobile phone on the network.
-
DEPRECATED, use linuxserver's version in the Community Applications Application Name: Obsidian Application Site: https://obsidian.md/ Docker Image Repository: https://hub.docker.com/r/braintobytes/obsidian-remote Github: https://github.com/BraintoByte/obsidian-remote Please post any questions/issues relating to this docker you have in this thread. If you need help but are not using unRAID, then please do not post here, instead head to the application's GitHub repository and open an issue there. Obsidian is a powerful knowledge base on top of a local folder of plain text Markdown files. NOTES: - When creating a vault, place it under '/vaults' dir, located in the root of the container (inside Obsidian). - This docker image allows you to run THE LATEST VERSION OF OBSIDIAN in a docker container and access it via your web browser. The original project was from sytone/obsidian-remote and it seemed deprecated as it was not running the latest version of Obsidian as this one does. SECURITY: - By no means this is secure for public exposure, it's full of security holes and RDP tricks that can be used against you, so if you do download it and run it, don't expose to the public interwebs! Do not expose this to the web unless you secure it with something like Authelia or a similar authentication process and know what you are doing!! DEPRECATED, use linuxserver's version in the Community Applications
-
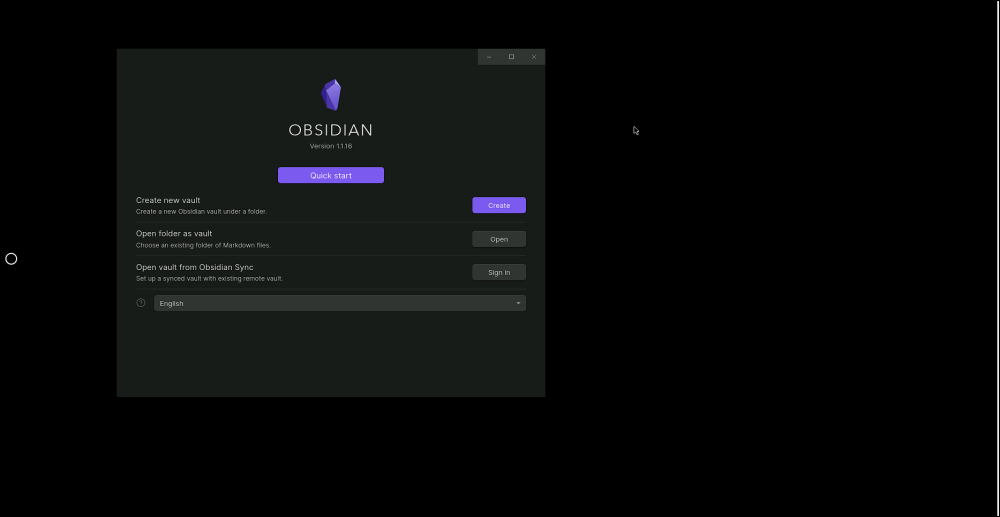
I changed the image to braintobytes/obsidian-remote. That image has the same configuration (it's a fork of sytone/obsidian-remote) but uses a python script to download the latest Obsidian version upon image creation. Check the Dockerfile for the update steps if reference is needed. This configuration is also missing the usual PUID=99 and PGID=100 variables for writing files in good permissions for the share, just in case you encounter issues while accessing the files from another Obsidian installation in your PC.
-
I see it worked! Thanks!
-
Thanks so much! All input is really appreciated. I've pushed the change to the repo now. I've made the addition here in the template: <Shell>sh</Shell> <Privileged>true</Privileged> <PrivilegedReq>true</PrivilegedReq> Should I remove the <Privileged> one? Or keep it?
-
Application Name: mbpfan Application Site: https://github.com/bplein/mbpfan Docker Image Repository: https://hub.docker.com/r/bplein/mbpfan Github: https://github.com/linux-on-mac/mbpfan Please post any questions/issues relating to this docker you have in this thread. If you need help but are not using unRAID, then please do not post here, instead head to the application's GitHub repository and open an issue there. PLEASE READ THIS, IMPORTANT TO MAKE THE CONTAINER WORK WITH YOUR MAC *** Must run as a privileged container *** Containerized mbpfan (for Macs running Linux, to control fans) NOTE: the executable in the container was compiled by bplein from https://github.com/linux-on-mac/mbpfan. Uses the Ubuntu repository version of https://github.com/linux-on-mac/mbpfan Need to create a configuration file with the following contents and mount it in the container as a volume in the container under /etc/mbpfan.conf: File contents of /mnt/user/appdata/mbpfan/mbpfan.conf (example on a Late 2012 i7 Mac mini, my unraid server) [general] # see https://ineed.coffee/3838/a-beginners-tutorial-for-mbpfan-under-ubuntu for the values min_fan_speed = 1800 # put the *lowest* value of "cat /sys/devices/platform/applesmc.768/fan*_min" max_fan_speed = 5500 # put the *highest* value of "cat /sys/devices/platform/applesmc.768/fan*_max" low_temp = 55 # try ranges 55-63, default is 63 high_temp = 66 # try ranges 58-66, default is 66 max_temp = 87 # take highest number returned by "cat /sys/devices/platform/coretemp.*/hwmon/hwmon*/temp*_max", divide by 1000 polling_interval = 7 # default is 7 seconds Edited March 22, 2023 by @djismgaming (initial post)
-
Glad to be of help
-
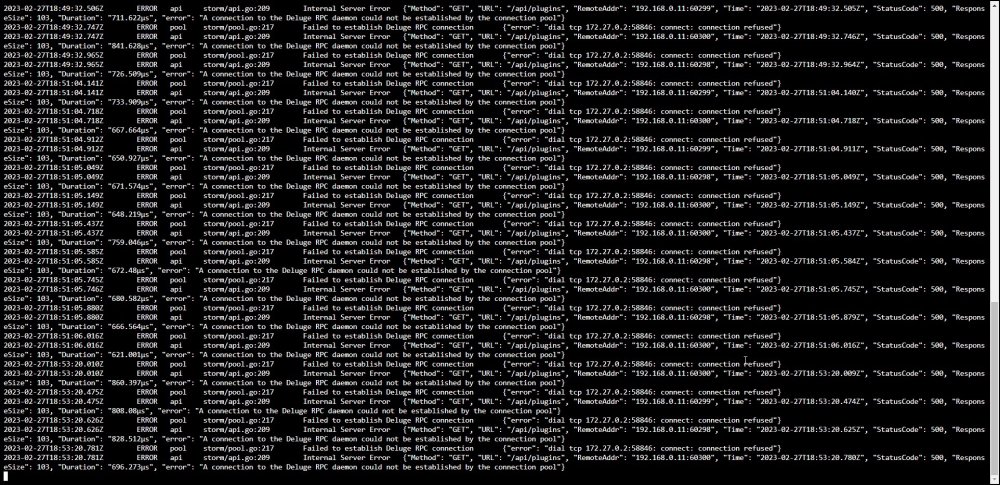
Finally found the culprit in the testing. In the notes on the container template there is this line: - Once that's setup you'll need to configure Deluge to allow remote RPC connections: - Open up core.conf in your Deluge configuration folder - set "allow_remote": true That was my issue on testing. Can you check if you followed that step? Remember to stop the deluge container while doing this change in the file. After the change, then start the container. It works now with the linuxserver image. Before, I was getting all these "connection refused" in storm's logs:
-
I've done more testing and I can most certainly say, the linuxserver container, somehow, does not work with storm. No issues with the binhex-deluge one. Weird indeed. Can you try with the binhex-deluge one on your side and let me know? I've tried the linuxserver version in the br0, in a custom set network (via command: docker network create test), set that test network on both containers, allso using the Bridge network. Everytime I just get the spinning wheel as you do.
-
If you want to continue using br0, then set a specific static IP for the deluge container in the "Fixed IP address". Then in storm, use that as the DELUGE_RPC_HOSTNAME.
-
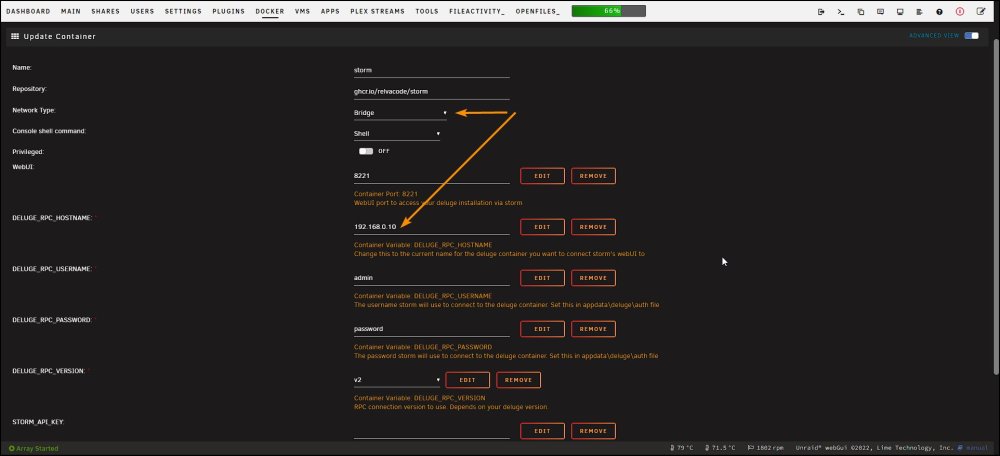
OK, I see an issue with the br0 network. This network is in your home subnet 192.168.0.0/24. This means the container will take an IP from your router (or DHCP server) via DHCP. The hostname resolution in docker will not function correctly. In your case it would be better to use a user-set custom docker network for this connection. (that will entail having all other apps that need connection to deluge in that same user created custom network) That is done via: docker network create <name of network here> For that to stick on reboot/array restart, you'll need to go to Settings > Docker > advanced view > Preserve user defined networks to YES. Another way would be to set both containers in the Bridge network (the containers will use your server IP) and use, in storm, the IP of your unraid server. (The way I have it setup for testing)
-
I'm setting up the same on my side to see. I've never used this br0 network so that will give me some insight.
-
I think I see your issue. I don’t know if hostname resolution works on the br0 network on unraid. You can create a custom docker network for that I guess. I need to test in the br0 network though. Also, are those user/password setup in the deluge container itself on appdata/deluge/auth file? (“deluge” being the directory where the deluge config resides)
-
I've not had this one myself as I just tried both and are working correctly in my setup (although not my daily torrent/webui apps). We'll need a little more data to help you out. How does your docker template look for the apps you use (torrent/storm webui)?
-
Hi team! I use a USB adapter with Realtek Semiconductor Corp. RTL8153 Gigabit Ethernet Adapter. It works good so far. Will driver "RTL8152/3/4/6 USB Drivers" give me something worthwhile to upgrade to it from those included in unraid? Thanks in advance for any input.
-
Thanks for this great plugin! I have a VM that does a lot of modifications to it's disk (homeassistant VM). Would it be possible to have an option to exclude domains also? Thanks again for this great plugin!
-
@ParaiseHeights From my comment on the start of the thread, there is a way which I use without any issue so far. As a summary: I use a cloudflare tunnel to swag (reverse proxy) towards my plex container. You could just add the linuxserver.io mod universal-cloudflared to the linuxserver/plex container too. Easier and no need for a reverse proxy. I tested it with a radarr container and works as advertised. I just removed it and setup one for swag so all my apps go through the tunnel without specific configuration of the mod on every single linuxserver-based container. Also, the reverse proxy makes it so it works for every container, not just linuxserver-based ones. https://github.com/linuxserver/docker-mods/tree/universal-cloudflared Here you can see all mods available to all linuxserver.io containers. The universal option works for any of their containers. https://mods.linuxserver.io/
-
Is there a way to run the "compose up" button that executes the command with the option --remove-orphans? There are times I comment a container in the config and the orphan errors keep appearing in the command execution. What I do at the moment is go to the CLI and nacigate to /boot/config/plugins/compose.manager/projects/apps. While inside that directory I then execute: docker compose up -d --remove-orphans It works great in that manual way. Any other update (not including commenting a container) works as expected with the "compose up" button.
-
Looking at the change 3 days ago, not much changed. The alpine version used in the container and some lightly updated way to get the ngrok URL to pass on to the Plex server. That should, in my opinion, not change how the template behaves. It does say in your logs "connection refused". Check the variables are correctly set and that port 4040 is forwarded to a good port on your host. Variable needed are: Open TCP port 4040 in the Unraid ngrok docker for the web interface NGROK_PORT = 32400 NGROK_AUTH = Ngrok Authtoken from their website after you've created an account PLEX_TOKEN = Plex Authtoken PLEX_BASE_URL = Plex server url like http://192.168.0.21:32400 NGROK_PROTOCOL = set as TCP
-
Logs show a connection to WebUI on port 4040 not being successful. That is the web interface for the container itself, the one you can use to inspect the connection and the status of it. I never used that portion of the software that much prior to the deprecation of the app on the Community Applications. Maybe some password/is being used for it now? There can be changes that are not accommodated in the version of the template you have for the application. I've deprecated this one as it was not updated for quite some time. Now I see a new version was created just 3 days ago on dockerhub. If someone creates another app using the template, maybe they can see what changed and accommodate the template to those changes in the container.
-
I’m not the application developer. Sorry. I just created the template for the CA in unraid. you can try the application url in the original post and open an issue on it. the developer may help.
-
Glad to be of help




