





Daburgers
Members
-
Joined
-
Last visited
Everything posted by Daburgers
-
Update: I think I may have resolved the issue by disabling both hibernate and sleep within the VM via elevated command: POWERCFG /X -monitor-timeout-ac 0 POWERCFG /X -monitor-timeout-dc 0 POWERCFG /X -disk-timeout-ac 0 POWERCFG /X -disk-timeout-dc 0 POWERCFG /X -standby-timeout-ac 0 POWERCFG /X -standby-timeout-dc 0 POWERCFG /X -hibernate-timeout-ac 0 POWERCFG /X -hibernate-timeout-dc 0 POWERCFG /H OFF I will continue to monitor to see if it happens again, but it's been an hour since I ran those commands and it hasn't paused! turning these off through system settings didn't seem to do the trick, but the above worked.
-
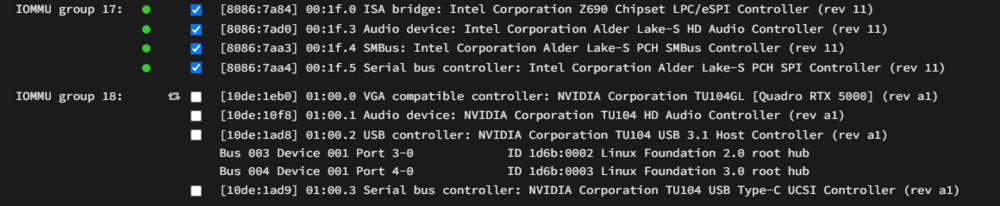
So I tried all 3 options under PCIe ACS override, but after each reboot, the audio card still remained in the same IOMMU group and when selecting the audio device, all 4 devices still get selected: Nevertheless, I bound the IOMMU group (the VM won't start unless I do), tired all 3 options rebooting each time, and then ran the VM. 10-15 minutes later it pauses each time.

-
Ah ok, all good. Will take a look later today when I get back from work. Thanks for the suggestion!
-
I checked this setting and it seems to be already set to disabled.
-
I have recently created a windows 11 VM which was working fine for a few days, but now suddenly it seems to pause on its own not long after starting. I have to force stop the VM and then start it again for it to work again. Aside from that it works fine. Any help on fixing this would be hugely appreciated! I have attached my unraid diags below but I am not sure what to look for. Happy to attach anything else that might be helpful. Looking at the VM log, I noticed this: 2025-04-08T20:50:15.549793Z qemu-system-x86_64: vfio: Cannot reset device 0000:00:1f.3, no available reset mechanism. 2025-04-08T20:50:15.555706Z qemu-system-x86_64: vfio: Cannot reset device 0000:00:1f.3, no available reset mechanism. It seems it has something to do with my intel audio device which I have bound so I can get audio. Just as a side note, I'm not using my GPU for the VM as I only have one and am using it for Plex transcoding. Thought I'd mention it in case it is important Full XML below: <?xml version='1.0' encoding='UTF-8'?> <domain type='kvm' id='6'> <name>Windows 11</name> <uuid>ee806a0f-fe16-972f-ca2b-6c8f8b10626b</uuid> <metadata> <vmtemplate xmlns="unraid" name="Windows 11" icon="windows11.png" os="windowstpm" webui="" storage="default"/> </metadata> <memory unit='KiB'>8388608</memory> <currentMemory unit='KiB'>8388608</currentMemory> <memoryBacking> <nosharepages/> <source type='memfd'/> <access mode='shared'/> </memoryBacking> <vcpu placement='static'>12</vcpu> <cputune> <vcpupin vcpu='0' cpuset='2'/> <vcpupin vcpu='1' cpuset='3'/> <vcpupin vcpu='2' cpuset='6'/> <vcpupin vcpu='3' cpuset='7'/> <vcpupin vcpu='4' cpuset='10'/> <vcpupin vcpu='5' cpuset='11'/> <vcpupin vcpu='6' cpuset='14'/> <vcpupin vcpu='7' cpuset='15'/> <vcpupin vcpu='8' cpuset='16'/> <vcpupin vcpu='9' cpuset='17'/> <vcpupin vcpu='10' cpuset='18'/> <vcpupin vcpu='11' cpuset='19'/> </cputune> <resource> <partition>/machine</partition> </resource> <os> <type arch='x86_64' machine='pc-q35-8.2'>hvm</type> <loader readonly='yes' type='pflash'>/usr/share/qemu/ovmf-x64/OVMF_CODE-pure-efi-tpm.fd</loader> <nvram>/etc/libvirt/qemu/nvram/ee806a0f-fe16-972f-ca2b-6c8f8b10626b_VARS-pure-efi-tpm.fd</nvram> </os> <features> <acpi/> <apic/> <hyperv mode='custom'> <relaxed state='on'/> <vapic state='on'/> <spinlocks state='on' retries='8191'/> <vpindex state='on'/> <synic state='on'/> <stimer state='on'/> <vendor_id state='on' value='none'/> </hyperv> </features> <cpu mode='host-passthrough' check='none' migratable='on'> <topology sockets='1' dies='1' clusters='1' cores='6' threads='2'/> <cache mode='passthrough'/> </cpu> <clock offset='localtime'> <timer name='hpet' present='no'/> <timer name='hypervclock' present='yes'/> </clock> <on_poweroff>destroy</on_poweroff> <on_reboot>restart</on_reboot> <on_crash>restart</on_crash> <devices> <emulator>/usr/local/sbin/qemu</emulator> <disk type='file' device='disk'> <driver name='qemu' type='raw' cache='writeback' discard='unmap'/> <source file='/mnt/user/VM/Windows 11/vdisk1.img' index='3'/> <backingStore/> <target dev='hdc' bus='virtio'/> <serial>vdisk1</serial> <boot order='1'/> <alias name='virtio-disk2'/> <address type='pci' domain='0x0000' bus='0x05' slot='0x00' function='0x0'/> </disk> <disk type='file' device='cdrom'> <driver name='qemu' type='raw'/> <source file='/mnt/user/VM/ISO/Win11_24H2_English_x64Bypass.iso' index='2'/> <backingStore/> <target dev='hda' bus='sata'/> <readonly/> <boot order='2'/> <alias name='sata0-0-0'/> <address type='drive' controller='0' bus='0' target='0' unit='0'/> </disk> <disk type='file' device='cdrom'> <driver name='qemu' type='raw'/> <source file='/mnt/user/VM/ISO/virtio-win-0.1.266-1.iso' index='1'/> <backingStore/> <target dev='hdb' bus='sata'/> <readonly/> <alias name='sata0-0-1'/> <address type='drive' controller='0' bus='0' target='0' unit='1'/> </disk> <controller type='usb' index='0' model='ich9-ehci1'> <alias name='usb'/> <address type='pci' domain='0x0000' bus='0x00' slot='0x07' function='0x7'/> </controller> <controller type='usb' index='0' model='ich9-uhci1'> <alias name='usb'/> <master startport='0'/> <address type='pci' domain='0x0000' bus='0x00' slot='0x07' function='0x0' multifunction='on'/> </controller> <controller type='usb' index='0' model='ich9-uhci2'> <alias name='usb'/> <master startport='2'/> <address type='pci' domain='0x0000' bus='0x00' slot='0x07' function='0x1' multifunction='on'/> </controller> <controller type='usb' index='0' model='ich9-uhci3'> <alias name='usb'/> <master startport='4'/> <address type='pci' domain='0x0000' bus='0x00' slot='0x07' function='0x2'/> </controller> <controller type='pci' index='0' model='pcie-root'> <alias name='pcie.0'/> </controller> <controller type='pci' index='1' model='pcie-root-port'> <model name='pcie-root-port'/> <target chassis='1' port='0x8'/> <alias name='pci.1'/> <address type='pci' domain='0x0000' bus='0x00' slot='0x01' function='0x0' multifunction='on'/> </controller> <controller type='pci' index='2' model='pcie-root-port'> <model name='pcie-root-port'/> <target chassis='2' port='0x9'/> <alias name='pci.2'/> <address type='pci' domain='0x0000' bus='0x00' slot='0x01' function='0x1'/> </controller> <controller type='pci' index='3' model='pcie-root-port'> <model name='pcie-root-port'/> <target chassis='3' port='0xa'/> <alias name='pci.3'/> <address type='pci' domain='0x0000' bus='0x00' slot='0x01' function='0x2'/> </controller> <controller type='pci' index='4' model='pcie-root-port'> <model name='pcie-root-port'/> <target chassis='4' port='0xb'/> <alias name='pci.4'/> <address type='pci' domain='0x0000' bus='0x00' slot='0x01' function='0x3'/> </controller> <controller type='pci' index='5' model='pcie-root-port'> <model name='pcie-root-port'/> <target chassis='5' port='0xc'/> <alias name='pci.5'/> <address type='pci' domain='0x0000' bus='0x00' slot='0x01' function='0x4'/> </controller> <controller type='pci' index='6' model='pcie-root-port'> <model name='pcie-root-port'/> <target chassis='6' port='0xd'/> <alias name='pci.6'/> <address type='pci' domain='0x0000' bus='0x00' slot='0x01' function='0x5'/> </controller> <controller type='pci' index='7' model='pcie-to-pci-bridge'> <model name='pcie-pci-bridge'/> <alias name='pci.7'/> <address type='pci' domain='0x0000' bus='0x01' slot='0x00' function='0x0'/> </controller> <controller type='virtio-serial' index='0'> <alias name='virtio-serial0'/> <address type='pci' domain='0x0000' bus='0x02' slot='0x00' function='0x0'/> </controller> <controller type='sata' index='0'> <alias name='ide'/> <address type='pci' domain='0x0000' bus='0x00' slot='0x1f' function='0x2'/> </controller> <filesystem type='mount' accessmode='passthrough'> <driver type='virtiofs' queue='1024'/> <binary path='/usr/libexec/virtiofsd' xattr='on'> <cache mode='always'/> <sandbox mode='chroot'/> </binary> <source dir='/mnt/vmsharedir/VM/SharedDir/'/> <target dir='vmshare'/> <alias name='fs0'/> <address type='pci' domain='0x0000' bus='0x03' slot='0x00' function='0x0'/> </filesystem> <interface type='bridge'> <mac address='52:54:00:3c:4c:d2'/> <source bridge='br0'/> <target dev='vnet5'/> <model type='virtio-net'/> <alias name='net0'/> <address type='pci' domain='0x0000' bus='0x04' slot='0x00' function='0x0'/> </interface> <serial type='pty'> <source path='/dev/pts/1'/> <target type='isa-serial' port='0'> <model name='isa-serial'/> </target> <alias name='serial0'/> </serial> <console type='pty' tty='/dev/pts/1'> <source path='/dev/pts/1'/> <target type='serial' port='0'/> <alias name='serial0'/> </console> <channel type='unix'> <source mode='bind' path='/run/libvirt/qemu/channel/6-Windows 11/org.qemu.guest_agent.0'/> <target type='virtio' name='org.qemu.guest_agent.0' state='disconnected'/> <alias name='channel0'/> <address type='virtio-serial' controller='0' bus='0' port='1'/> </channel> <input type='tablet' bus='usb'> <alias name='input0'/> <address type='usb' bus='0' port='1'/> </input> <input type='mouse' bus='ps2'> <alias name='input1'/> </input> <input type='keyboard' bus='ps2'> <alias name='input2'/> </input> <tpm model='tpm-tis'> <backend type='emulator' version='2.0' persistent_state='yes'/> <alias name='tpm0'/> </tpm> <graphics type='vnc' port='5901' autoport='yes' websocket='5701' listen='0.0.0.0' sharePolicy='ignore'> <listen type='address' address='0.0.0.0'/> </graphics> <audio id='1' type='none'/> <video> <model type='qxl' ram='65536' vram='65536' vgamem='16384' heads='1' primary='yes'/> <alias name='video0'/> <address type='pci' domain='0x0000' bus='0x00' slot='0x1e' function='0x0'/> </video> <hostdev mode='subsystem' type='pci' managed='yes'> <driver name='vfio'/> <source> <address domain='0x0000' bus='0x00' slot='0x1f' function='0x3'/> </source> <alias name='hostdev0'/> <address type='pci' domain='0x0000' bus='0x07' slot='0x01' function='0x0'/> </hostdev> <watchdog model='itco' action='reset'> <alias name='watchdog0'/> </watchdog> <memballoon model='none'/> </devices> <seclabel type='dynamic' model='dac' relabel='yes'> <label>+0:+100</label> <imagelabel>+0:+100</imagelabel> </seclabel> </domain> tower-diagnostics-20250409-1920.zip

-
Hi All, Working on a friends unraid server and noticed something odd. When they use qbittorrentvpn and add a torrent, that torrent gets added to the trackers peer list twice under two different IP's. One of the IP's is the correct external IP for qbittorrentvpn, but not idea where the 2nd one is coming from. I checked all the dockers and its not any of them. I also tested with binehx-delugevpn, but it only adds the torrent once under the correct ip. Edit: seemed to have fix itself after removing over half of my torrents that were seeding.
-
Thanks mate. I thought I'd kickoff the backup while I waited for a someone to reply and while the drives are currently able to mount, at least for now. Will do a memtest as soon as its done and report back if anything is found. If not, I'll reformat. Since I am just copying the contents of my appdata folder to one of my shares. Will it be as simple as copying and pasting it back in? appdata was all I had on those drives (plus some downloads which aren't important and will discard)
-
Hi All, I am having the same issue as most people here. I suspect the culprit has something to do with the docker "Immich" as I recently configured it AND with nvidia GPU. Everything was fine uploading images to Immich via external libraries (via my shares) until I added a library with a huge amount of images. The method I was using was add a library > scan for new items > search for items NOT in an album > finds a few hundred, but I scroll down so it loads more so I can add more at a time, otherwise it would take forever adding them. It was during this process it all the dockers stopped I have 2 x 2tb nvme's in a pool which I am using for my dockers. When the issue occurred, I noticed both of them said "Unmountable: Unsupported or no file system" I checked the logs and it looks like both nvme0n1 and nvme2n1 has some corrupted files. Sep 19 14:21:47 Tower kernel: BTRFS info (device nvme0n1p1): bdev /dev/nvme0n1p1 errs: wr 0, rd 0, flush 0, corrupt 111, gen 0 Sep 19 14:21:47 Tower kernel: BTRFS info (device nvme0n1p1): bdev /dev/nvme2n1p1 errs: wr 0, rd 0, flush 0, corrupt 75, gen 0 Also noticed form After reading through this forum, I'd thought I'd try out some of the suggestions: I ran the following: btrfs rescue zero-log /dev/nvme0n1p1 Output: Clearing log on /dev/nvme0n1p1, previous log_root 1952935706624, level 0 I did the same for the other nvme: btrfs rescue zero-log /dev/nvme2n1p1 Output: Clearing log on /dev/nvme2n1p1, previous log_root 0, level 0 This mounted my drives again, however, only a quarter of my dockers would seem to start but not actually run. If I stop the array again, and start it back up, both drives revert back to "Unmountable: Unsupported or no file system" I tried removing immich after it "starts", but i just get "Execution Error". Plex is using Nvidia gpu for transcoding, but it was never an issue and have been using it for years. I noticed my docker page seems to have a spasm every 2 seconds as well as thought the whole page is refreshing. I haven't tried unmounting and remounting so to speak as I'm not sure what effect that would have. Have attached my logs. I hope someone can help! tower-diagnostics-20240919-1703.zip
-
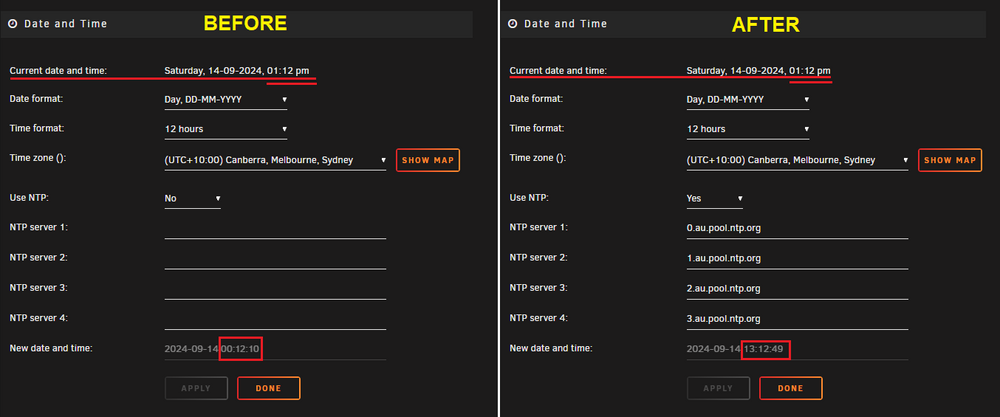
Managed to fix the issue: The issue was that the system time in unraid was incorrect - even though I had manually set it correctly. I noticed my server was actually powering down, but not at the right time. So that made me think it had to be my date & time settings. So I checked them again for the 4th time, and this is when I noticed the issue. Although they were set correctly, for some strange reason the "New date & time" at the bottom of the settings was not correct. So I decided to use NTP servers to see if that made any difference....and it did. The time adjusted correctly. I tested out my script again with a new schedule and BOOM - it worked. Attached is an image of my settings before and after I made the changes in case it helps someone else:
-
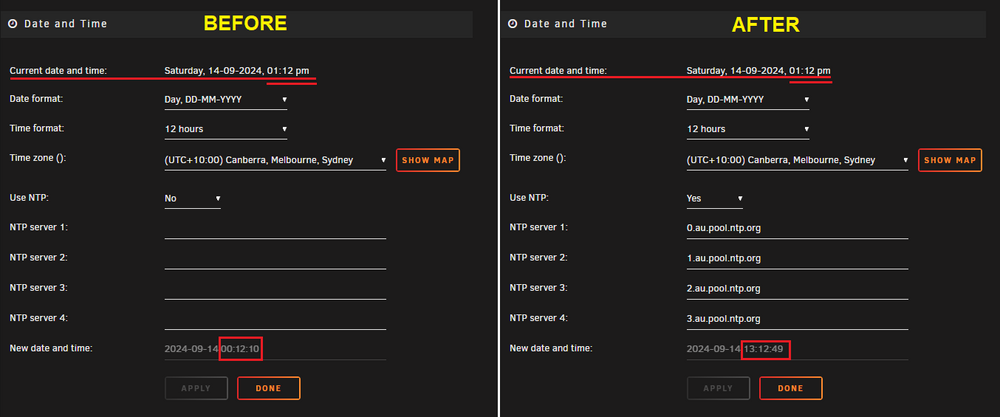
I managed to resolve the issue. For those who come across with the same issue, the issue was that the system time in unraid was incorrect - even though I had manually set it correctly. What happened was I noticed my server was actually powering down, but not at the right time. So that made me think it has to be my date & time settings. So I checked them again for the 4th time, and this is when I noticed the issue. The Time & Date were manually set, and correctly, but for some strange reason the "New date & time" at the bottom of the settings was not correct. So I decided to use NTP servers to see if that made any difference....and it did! The time adjusted correctly! I tested out my script again with a new schedule and BOOM - it worked! Attached is an image of my settings before and after I made the changes:
-
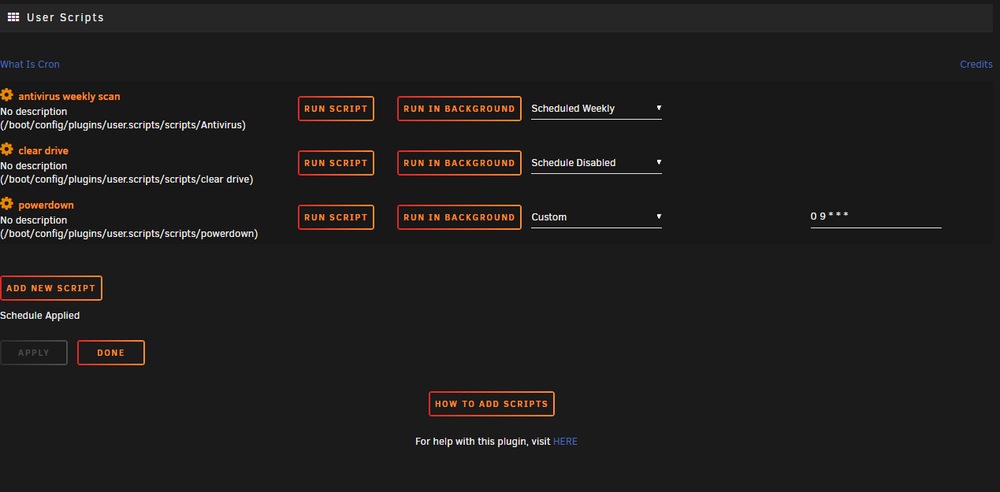
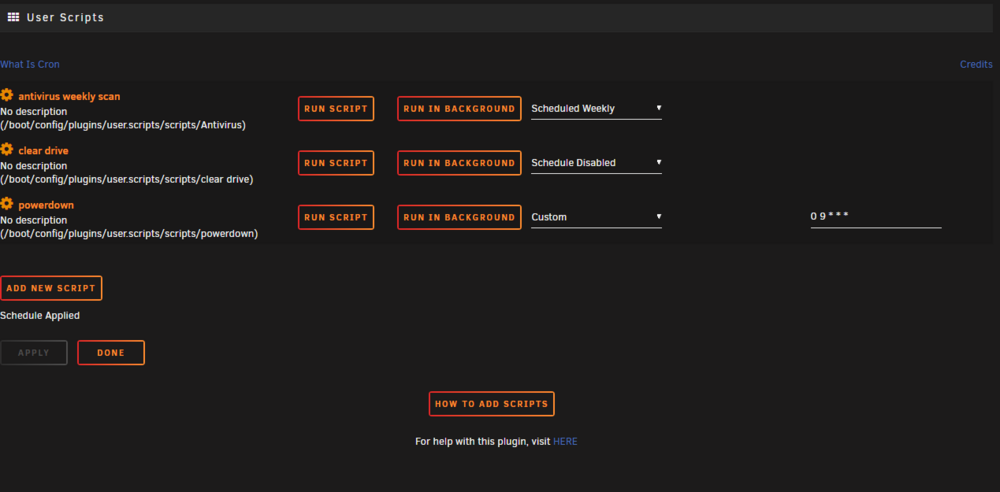
Hi All, I need help running scripts with custom cron schedule as they don't seem to be running at the schedule I set. I only have 2 scripts. An antivirus script and a clear drive script. I wanted to schedule the Antivirus script but didn't seem to run at the time i set. However, when I click 'run script', 'run in background', or using the pre-defined schedule (I used 'at stopping of array' for testing) they work without any issue. I tested again by making a new simple script with a custom cron schedule set: #!/bin/bash powerdown I set the cron schedule to: 0 9 * * * (fyi, It was 8:45am when I set the schedule) (9am every every day) I waited a few minutes after 9am but nothing happened (server did not power down) and no log was recorded. I did try at different times as well....9:05am, 11:30am - 5 9 * * * , 30 11 * * * , etc. Also tried every 30 seconds.... 30 * * * *) However, I was able to run the script when clicking 'run script', 'run in background', or using the pre-defined schedule as tested above and the device powered down accordingly. A log was created as well. I also made sure that the system date and time was also correct. So I am a bit stumped as to why it won't run. I have attached the unraid logs in case that helps. Also ran the commands below in case that helps - i did see some posts suggest running this and can see the script has been added to it. Would greatly appreciate any help. Please see below: root@Tower:~# crontab -l # If you don't want the output of a cron job mailed to you, you have to direct # any output to /dev/null. We'll do this here since these jobs should run # properly on a newly installed system. If a script fails, run-parts will # mail a notice to root. # # Run the hourly, daily, weekly, and monthly cron jobs. # Jobs that need different timing may be entered into the crontab as before, # but most really don't need greater granularity than this. If the exact # times of the hourly, daily, weekly, and monthly cron jobs do not suit your # needs, feel free to adjust them. # # Run hourly cron jobs at 47 minutes after the hour: 47 * * * * /usr/bin/run-parts /etc/cron.hourly 1> /dev/null # # Run daily cron jobs at 4:40 every day: 40 4 * * * /usr/bin/run-parts /etc/cron.daily 1> /dev/null # # Run weekly cron jobs at 4:30 on the first day of the week: 30 4 * * 0 /usr/bin/run-parts /etc/cron.weekly 1> /dev/null # # Run monthly cron jobs at 4:20 on the first day of the month: 20 4 1 * * /usr/bin/run-parts /etc/cron.monthly 1> /dev/null 8 9 * * * /usr/local/emhttp/plugins/nvidia-driver/include/update-check.sh &>/dev/null 2>&1 # Job for VM Backup plugin default: 0 3 * * 0 /usr/local/emhttp/plugins/vmbackup/runscript.php run_backup default > /dev/null 2>&1 root@Tower:~# cat /etc/cron.d/root # Generated docker monitoring schedule: 10 0 * * 1 /usr/local/emhttp/plugins/dynamix.docker.manager/scripts/dockerupdate check &> /dev/null # Generated system monitoring schedule: */1 * * * * /usr/local/emhttp/plugins/dynamix/scripts/monitor &> /dev/null # Generated mover schedule: 0 0 1 * * /usr/local/sbin/mover &> /dev/null # Generated plugins version check schedule: 10 0 * * 1 /usr/local/emhttp/plugins/dynamix.plugin.manager/scripts/plugincheck &> /dev/null # Generated array status check schedule: 20 0 * * * /usr/local/emhttp/plugins/dynamix/scripts/statuscheck &> /dev/null # Generated Unraid OS update check schedule: 11 0 1 * * /usr/local/emhttp/plugins/dynamix.plugin.manager/scripts/unraidcheck &> /dev/null # Generated cron settings for docker autoupdates 0 0 * * * /usr/local/emhttp/plugins/ca.update.applications/scripts/updateDocker.php >/dev/null 2>&1 # Generated cron settings for plugin autoupdates 0 0 * * * /usr/local/emhttp/plugins/ca.update.applications/scripts/updateApplications.php >/dev/null 2>&1 # CRON for CA background scanning of applications 57 * * * * php /usr/local/emhttp/plugins/community.applications/scripts/notices.php > /dev/null 2>&1 # Generated system data collection schedule: */1 * * * * /usr/local/emhttp/plugins/dynamix.system.stats/scripts/sa1 1 1 &> /dev/null # Generated cron schedule for user.scripts 0 9 * * * /usr/local/emhttp/plugins/user.scripts/startCustom.php /boot/config/plugins/user.scripts/scripts/powerdown/script > /dev/null 2>&1 tower-diagnostics-20240909-0934.zip
-
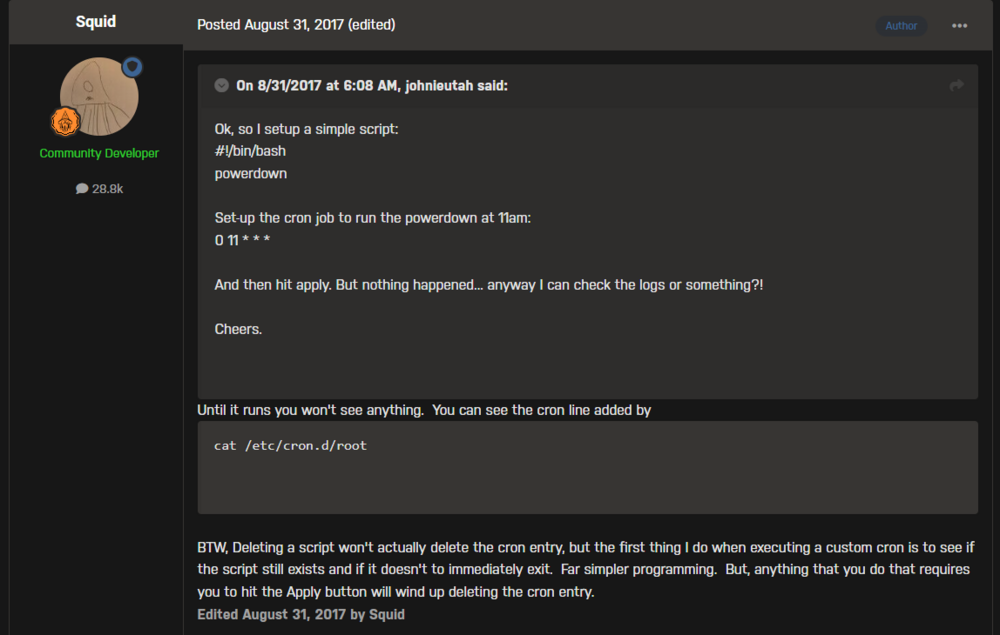
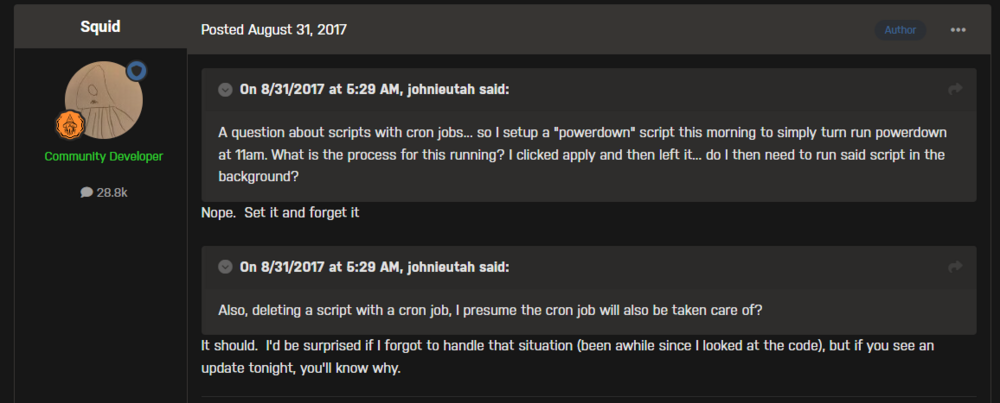
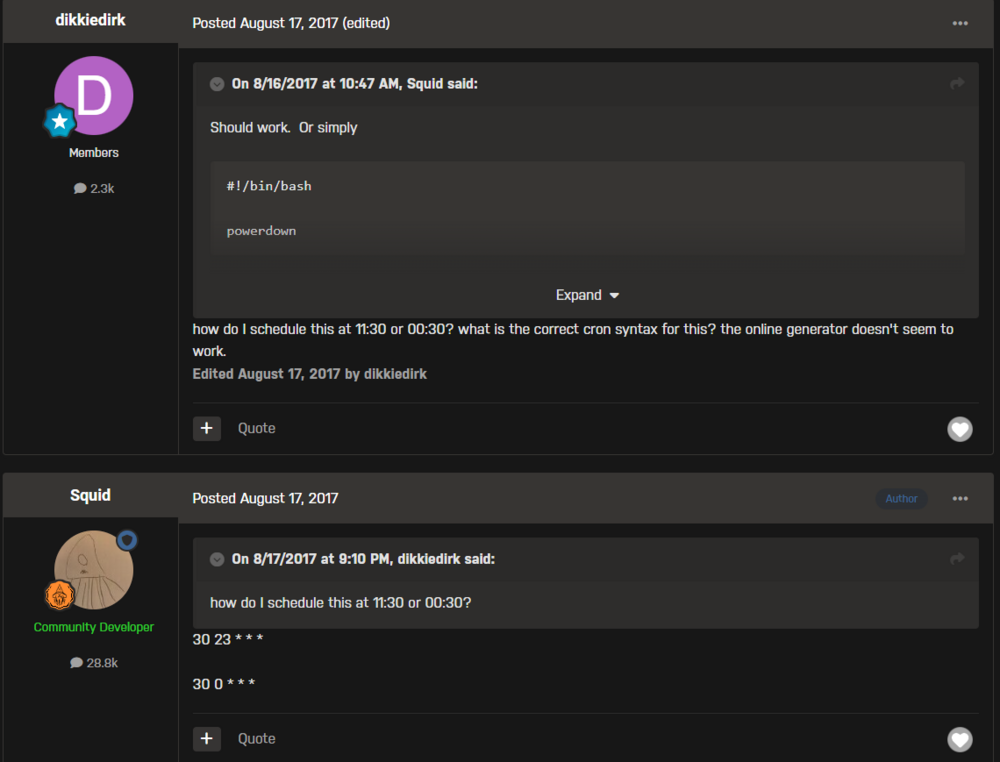
I probably should have posted this in that thread tbh! Thanks for sharing. I did find a fair few people with the same issue. Most didn't have provide an update as to if it worked or not. I assume they either forgot about it or gave up. This image below I also ran the same command I added in my first post. I can see the last line shows my cron line added. "until it runs you won't see anything". Not sure if this person had a different issue or the same issue but not explained properly. For me, I set the time to 9:00am. It would have been 8:45am at the time of setting the schedule up. At 9am, nothing happens. This one seems to be just a question. I assume they were having a similar issue as me but didn't go into detail or also forgot. Not sure: This is exactly thew issue I am having. I have it set exactly as this, but does not work. Unfortunately, I wasn't able to see if they managed to get it to work: Nevertheless, I will submit this question in that thread since it is specific to that plugin. Thanks again for sharing the link!
-
Hi All, I am having an issue where my user scripts will not work/run ONLY when using a custom cron schedule. I only have 3 scripts. An antivirus script, clear drive script and a simple script to power down the server. I first tried setting a custom cron schedule for the antivirus script, but nothing would happen. However, the script runs fine in the foreground, background, and by using the pre-defined schedule options (ie. at stopping of array, schedule hourly etc). So I made a new simple script to power down the server and it too would do nothing when I had a custom cron schedule set. The script to power down the server contains the following: #!/bin/bash powerdown I set the custom cron schedule to: 0 9 * * * (9am every every day - I did try different times as well....9:05am, 11:30am - 5 9 * * * , 30 11 * * * , etc) Nothing happens and no log recorded. To state the obvious, I made sure to set it at a time a well ahead of the current time, no joy! However, when I click 'run script', 'run in background', or using the pre-defined schedule (I used 'at stopping of array' for testing), the script ran each time without an issue and the device powered down accordingly. A log was created as well. I have attached the unraid logs in case that helps. Appreciate any assistance that anyone can offer! When reading through the forums on this kind of issue, someone with a somewhat similar issue was advised to run a couple of commands which may help find out what's going on, although I am not sure what to look for. I thought I'd include them in case it helps as well. Please see below: root@Tower:~# crontab -l # If you don't want the output of a cron job mailed to you, you have to direct # any output to /dev/null. We'll do this here since these jobs should run # properly on a newly installed system. If a script fails, run-parts will # mail a notice to root. # # Run the hourly, daily, weekly, and monthly cron jobs. # Jobs that need different timing may be entered into the crontab as before, # but most really don't need greater granularity than this. If the exact # times of the hourly, daily, weekly, and monthly cron jobs do not suit your # needs, feel free to adjust them. # # Run hourly cron jobs at 47 minutes after the hour: 47 * * * * /usr/bin/run-parts /etc/cron.hourly 1> /dev/null # # Run daily cron jobs at 4:40 every day: 40 4 * * * /usr/bin/run-parts /etc/cron.daily 1> /dev/null # # Run weekly cron jobs at 4:30 on the first day of the week: 30 4 * * 0 /usr/bin/run-parts /etc/cron.weekly 1> /dev/null # # Run monthly cron jobs at 4:20 on the first day of the month: 20 4 1 * * /usr/bin/run-parts /etc/cron.monthly 1> /dev/null 8 9 * * * /usr/local/emhttp/plugins/nvidia-driver/include/update-check.sh &>/dev/null 2>&1 # Job for VM Backup plugin default: 0 3 * * 0 /usr/local/emhttp/plugins/vmbackup/runscript.php run_backup default > /dev/null 2>&1 root@Tower:~# cat /etc/cron.d/root # Generated docker monitoring schedule: 10 0 * * 1 /usr/local/emhttp/plugins/dynamix.docker.manager/scripts/dockerupdate check &> /dev/null # Generated system monitoring schedule: */1 * * * * /usr/local/emhttp/plugins/dynamix/scripts/monitor &> /dev/null # Generated mover schedule: 0 0 1 * * /usr/local/sbin/mover &> /dev/null # Generated plugins version check schedule: 10 0 * * 1 /usr/local/emhttp/plugins/dynamix.plugin.manager/scripts/plugincheck &> /dev/null # Generated array status check schedule: 20 0 * * * /usr/local/emhttp/plugins/dynamix/scripts/statuscheck &> /dev/null # Generated Unraid OS update check schedule: 11 0 1 * * /usr/local/emhttp/plugins/dynamix.plugin.manager/scripts/unraidcheck &> /dev/null # Generated cron settings for docker autoupdates 0 0 * * * /usr/local/emhttp/plugins/ca.update.applications/scripts/updateDocker.php >/dev/null 2>&1 # Generated cron settings for plugin autoupdates 0 0 * * * /usr/local/emhttp/plugins/ca.update.applications/scripts/updateApplications.php >/dev/null 2>&1 # CRON for CA background scanning of applications 57 * * * * php /usr/local/emhttp/plugins/community.applications/scripts/notices.php > /dev/null 2>&1 # Generated system data collection schedule: */1 * * * * /usr/local/emhttp/plugins/dynamix.system.stats/scripts/sa1 1 1 &> /dev/null # Generated cron schedule for user.scripts 0 9 * * * /usr/local/emhttp/plugins/user.scripts/startCustom.php /boot/config/plugins/user.scripts/scripts/powerdown/script > /dev/null 2>&1 tower-diagnostics-20240909-0934.zip
-
Hi All, I need help adding a 2nd share (solely a 4k share) to my plex server. I have set up 2 new instances of radarr and sonarr just for 4k as per TRaSH guides (they need to have separate root locations for hardlinks to work) and now I need to link the new share to plex. The issue I am having is when I add a 2nd path to the plex docker settings, it doesn't work (the docker image becomes orphaned). My main media share consists of every from 1080p and below while the other share is solely 4k. Any ideas how to do this? My shares are "data" and "data4k" in unraid (data4k > media4k is the one I want to add) and the structures are below: plexmedia ├── torrents └── media ├── movies └── tv plexmedia4k ├── torrents4k └── media4k ├── movies4k └── tv4k UPDATE: Nevermind, rather than adding 2 separate share paths in the docker settings, I just changed the one that was already there by taking it back a level so it could see all my shares. For example: currently had: /mnt/user/plexmedia changed to : /mnt/user/
-
Hi All, I need help adding a 2nd share (solely a 4k share) to my plex server. I have set up 2 new instances of radarr and sonarr just for 4k as per TRaSH guides (they need to have separate root locations for hardlinks to work) and now I need to link the new share to plex. The issue I am having is when I add a 2nd path to the plex docker settings, it doesn't work (the docker image becomes orphaned). My main media share consists of every from 1080p and below while the other share is solely 4k. Any ideas how to do this? My shares are "data" and "data4k" in unraid (data4k > media4k is the one I want to add) and the structures are below: data ├── torrents └── media ├── movies └── tv data4k ├── torrents4k └── media4k ├── movies4k └── tv4k
-
@chris_netsmart did you manage to figure this out? I am considering the same thing
-
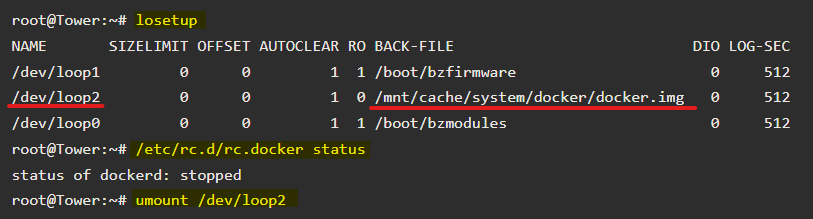
All good, I have just checked it and it looks like it worked! Only issue is I am trying to stop the array and its stuck "Array Stopping - Retry unmounting disk shares". Even though I dockers and VM's disabled Update: Ok so the script ran fine using those changes in the script: replace all 5 instances of "md${d:9}" with "md${d:9}p1" When I went to stop the array, it just hung there saying "Array Stopping - Retry unmounting disk shares". I read some forums about this issue on 6.12.# and they suggested the below which worked for some on 6.12.3: For me, I didn't have loop2 on my list which meant it was not running. Those on 6.12.4 also seemed to not have success with the above. Someone else suggested to run: This also didn't work for me. it just said it was "not mounted" which was correct. The Fix for me: In the end I just shutdown the array and powered it back on. The array was stopped already. I then went to Tools > new config > preserved all current assignments > then i was able to unassign the drive and start the array again. Everything seems to be in place as well. happy days!

-
Did this work for you? I recently upgraded to 6.12.4 and after running the original script, it would finish running almost instantly. After making the changes you suggested, it is now running fine. I'll check in the morning and if all goes well, I'll make an update here.
-
Thanks for FolderView, life is just never the same with it I faced an issue today after setting up all the folders I wanted, added svg icons for each, moved the dockers into the desired folders - happy days. I ended up with around 10 folders. Moments later, I decided to move one docker out of a folder and put into another folder. After adding it to a different folder, suddenly 80% of my folders just suddenly disappeared for no reason. Only 3 folders remained, the top 3 (the 3rd folder was where I removed the docker I wanted to move). Problem is, when I go to re-create the folders, there are no docks to select. It is like FolderView still thinks they are assigned to folders....even though there is none
-
Hi all, I just learned that Sonar v4 is actually thing! Learn something new every day. Is it still in beta release? I couldn't see much in the way of a full release being made. So I guess the big question is, if and when will Binhex-Sonarr be getting the upgrade/makeover to v4 ? Looking forward to it actually, having some more advanced custom formatting amongst other things is going to be sweet!
-
Thanks for that. 101 troubleshooting that I didn't even try. Oh the shame. Restarting allowed me to deregister...twice. After the 2nd attempt I was able to register again and happy days. But yeah, restarting was key! oh the shame burns deep!
-
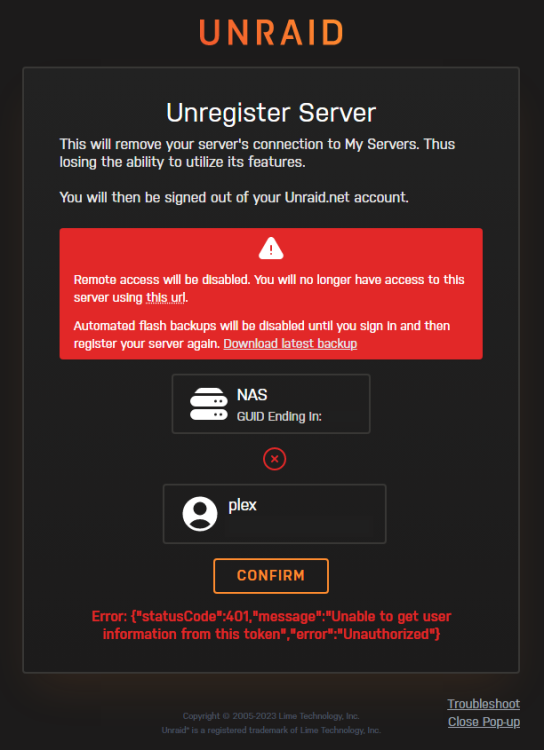
Hi all, I had sent a request to unraid support to have my diplsay name changed from plex to nasserver.cc. They changed it within the hour of the request and when I sign in to unraid.net, it all looks good. However, my display name in my unraid server is still showing the old name (plex). So I thought I'd try signing out of Unraid.net in my server, but I am getting the below error after I click confirm. Does anyone know how to get around this? Error: {"statusCode":401,"message":"Unable to get user information from this token","error":"Unauthorized"}
-
I am also having the same issue as b1ue, however my XML code seems to already include the above code. Also, it seems the overall XML code has changed a little bit since then. Please see my XML code below which I have not touched other than including the name of my VM as spaceinvader one mentions to do in his guide. Any help would be greatly appreciated: <?xml version='1.0' encoding='UTF-8'?> <domain type='kvm' xmlns:qemu='http://libvirt.org/schemas/domain/qemu/1.0'> <name>Macinabox BigSur</name> <uuid>7ffa8f70-d955-49a9-9c16-bd7fe9a6f82c</uuid> <description>MacOS Big Sur</description> <metadata> <vmtemplate xmlns="unraid" name="Windows 10" icon="default.png" os="osx"/> </metadata> <memory unit='KiB'>16777216</memory> <currentMemory unit='KiB'>16777216</currentMemory> <memoryBacking> <nosharepages/> </memoryBacking> <vcpu placement='static'>4</vcpu> <cputune> <vcpupin vcpu='0' cpuset='16'/> <vcpupin vcpu='1' cpuset='17'/> <vcpupin vcpu='2' cpuset='18'/> <vcpupin vcpu='3' cpuset='19'/> </cputune> <os> <type arch='x86_64' machine='pc-q35-4.2'>hvm</type> <loader readonly='yes' type='pflash'>/mnt/user/system/custom_ovmf/Macinabox_CODE-pure-efi.fd</loader> <nvram>/etc/libvirt/qemu/nvram/7ffa8f70-d955-49a9-9c16-bd7fe9a6f82c_VARS-pure-efi.fd</nvram> </os> <features> <acpi/> <apic/> </features> <cpu mode='host-passthrough' check='none' migratable='on'> <topology sockets='1' dies='1' cores='2' threads='2'/> <cache mode='passthrough'/> </cpu> <clock offset='utc'> <timer name='rtc' tickpolicy='catchup'/> <timer name='pit' tickpolicy='delay'/> <timer name='hpet' present='no'/> </clock> <on_poweroff>destroy</on_poweroff> <on_reboot>restart</on_reboot> <on_crash>restart</on_crash> <devices> <emulator>/usr/local/sbin/qemu</emulator> <disk type='file' device='disk'> <driver name='qemu' type='raw' cache='writeback'/> <source file='/mnt/user/VM/Macinabox BigSur/macos_disk.img'/> <target dev='hdc' bus='sata'/> <boot order='1'/> <address type='drive' controller='0' bus='0' target='0' unit='2'/> </disk> <controller type='sata' index='0'> <address type='pci' domain='0x0000' bus='0x00' slot='0x1f' function='0x2'/> </controller> <controller type='pci' index='0' model='pcie-root'/> <controller type='pci' index='1' model='pcie-root-port'> <model name='pcie-root-port'/> <target chassis='1' port='0x10'/> <address type='pci' domain='0x0000' bus='0x00' slot='0x02' function='0x0' multifunction='on'/> </controller> <controller type='pci' index='2' model='pcie-root-port'> <model name='pcie-root-port'/> <target chassis='2' port='0x11'/> <address type='pci' domain='0x0000' bus='0x00' slot='0x02' function='0x1'/> </controller> <controller type='pci' index='3' model='pcie-root-port'> <model name='pcie-root-port'/> <target chassis='3' port='0x12'/> <address type='pci' domain='0x0000' bus='0x00' slot='0x02' function='0x2'/> </controller> <controller type='pci' index='4' model='pcie-root-port'> <model name='pcie-root-port'/> <target chassis='4' port='0x13'/> <address type='pci' domain='0x0000' bus='0x00' slot='0x02' function='0x3'/> </controller> <controller type='virtio-serial' index='0'> <address type='pci' domain='0x0000' bus='0x02' slot='0x00' function='0x0'/> </controller> <controller type='usb' index='0' model='ich9-ehci1'> <address type='pci' domain='0x0000' bus='0x00' slot='0x07' function='0x7'/> </controller> <controller type='usb' index='0' model='ich9-uhci1'> <master startport='0'/> <address type='pci' domain='0x0000' bus='0x00' slot='0x07' function='0x0' multifunction='on'/> </controller> <controller type='usb' index='0' model='ich9-uhci2'> <master startport='2'/> <address type='pci' domain='0x0000' bus='0x00' slot='0x07' function='0x1'/> </controller> <controller type='usb' index='0' model='ich9-uhci3'> <master startport='4'/> <address type='pci' domain='0x0000' bus='0x00' slot='0x07' function='0x2'/> </controller> <interface type='bridge'> <mac address='52:54:00:29:53:5a'/> <source bridge='br0'/> <model type='virtio'/> <address type='pci' domain='0x0000' bus='0x01' slot='0x00' function='0x0'/> </interface> <serial type='pty'> <target type='isa-serial' port='0'> <model name='isa-serial'/> </target> </serial> <console type='pty'> <target type='serial' port='0'/> </console> <channel type='unix'> <target type='virtio' name='org.qemu.guest_agent.0'/> <address type='virtio-serial' controller='0' bus='0' port='1'/> </channel> <input type='tablet' bus='usb'> <address type='usb' bus='0' port='1'/> </input> <input type='mouse' bus='ps2'/> <input type='keyboard' bus='ps2'/> <graphics type='vnc' port='-1' autoport='yes' websocket='-1' listen='0.0.0.0' keymap='en-us'> <listen type='address' address='0.0.0.0'/> </graphics> <audio id='1' type='none'/> <video> <model type='qxl' ram='65536' vram='65536' vgamem='16384' heads='1' primary='yes'/> <address type='pci' domain='0x0000' bus='0x00' slot='0x01' function='0x0'/> </video> <memballoon model='virtio'> <address type='pci' domain='0x0000' bus='0x03' slot='0x00' function='0x0'/> </memballoon> </devices> <qemu:commandline> <qemu:arg value='-usb'/> <qemu:arg value='-device'/> <qemu:arg value='usb-kbd,bus=usb-bus.0'/> <qemu:arg value='-device'/> <qemu:arg value='************************'/> <qemu:arg value='-smbios'/> <qemu:arg value='type=2'/> <qemu:arg value='-cpu'/> <qemu:arg value='Penryn,kvm=on,vendor=GenuineIntel,+kvm_pv_unhalt,+kvm_pv_eoi,+hypervisor,+invtsc,+pcid,+ssse3,+sse4.2,+popcnt,+avx,+avx2,+aes,+fma,+fma4,+bmi1,+bmi2,+xsave,+xsaveopt,+rdrand,check'/> </qemu:commandline> </domain>
-
Yes actually, just recently there was a "my servers" app update. After updating this, the issue has gone. If this doesn't fix it for you, maybe remove the app and reinstall it.
-
Funnily enough, I have also had the same issue. Although, I didn't preclean etc. It was working to begin with but within a week it failed with read errors. It then becomes disabled/not detected. At first I thought it was the slot in my caddy that I had it connected in as the switch for that slot was off, must have bumped it. So I tried another slot and rebuilt the drive and it failed again a few days later. I am in the middle of processing an RMA for it as we speak. I am wondering if it has something to do with this type of drive? Only reason I bought it was because it was cheaper than the ironwolf range. Seagate also told me that they were designed more for windows storage/servers, but I couldn't find anything on the net which mentioned that. It is odd though as when i connect it to my main PC which is running Windows, it is detected and when I ran the extended test on SeaTools, it passed. I don't trust their diag tools. Have seen drives fail and other vendor diags consider pass the drive as working. Just annoying, I have crappy 2tb drives which I have owned for almost a decade and still going strong with no errors. I thought quality and integrity would have improved since then, especially around storage.





