





xDmOx
Members
-
Joined
-
Last visited
-
I found this when doing some research into the ITE IT87 Driver from CA https://github.com/frankcrawford/it87 "Fix it8689 control issues. Some Gigabyte motherboards with it8689 don't allow for manual control. This is a known issue and the fix is known but complex. For now, a BIOS curve workaround is required for manual control. If you truly want/need fan control for these boards set this curve in the BIOS for each fan channel: (Note that some boards don't allow for 90C so manual control may stop above that threshold temp)." My system temps and fans are detected Dynimax AutoFan Plugin, but they won't identify with the FanCTRL plugin. Based in the info above, I'm guessing this is why I'm not able to identify with the FanCTRL plugin. I'll toss my info here for @CkChong incase they return to active development. ALTERNATE SOLUTION - EXTERNAL HARDWARE FIX I've pretty much given up on getting this to work and have went with a different cooling method via hardware: https://www.amazon.com/dp/B0DHZQ8VZY https://www.amazon.com/dp/B0FK5666QQ I pretty much have this stack of 5 fans setup in front of my case and it passes additional cooling through the entire case - a significant temperature drop that keeps my drives around 30 degrees when idle and allows me to complete a full parity check without stopping during the hotter summer months. Yes, the fans are controllable via the included dial box - seriously the best money I've spent on my unRAID box (besides more drives) My board: Gigabyte Z690 GAMING X DDR4 CODE INPUT TO GRAB DEVICE INFO echo "=== hwmon devices ===" grep -H . /sys/class/hwmon/hwmon*/name echo ""echo "=== Available PWM controllers (safe check) ==="for d in /sys/class/hwmon/hwmon*; do name=$(cat "$d/name" 2>/dev/null) echo "-- $d ($name) --"ls "$d"/pwm* 2>/dev/null doneOUTPUT === hwmon devices === /sys/class/hwmon/hwmon0/name:nvme /sys/class/hwmon/hwmon1/name:gigabyte_wmi /sys/class/hwmon/hwmon2/name:coretemp /sys/class/hwmon/hwmon3/name:acpitz /sys/class/hwmon/hwmon4/name:it8689 === Available PWM controllers (safe check) === -- /sys/class/hwmon/hwmon0 (nvme) -- -- /sys/class/hwmon/hwmon1 (gigabyte_wmi) -- -- /sys/class/hwmon/hwmon2 (coretemp) -- -- /sys/class/hwmon/hwmon3 (acpitz) -- -- /sys/class/hwmon/hwmon4 (it8689) -- /sys/class/hwmon/hwmon4/pwm1 /sys/class/hwmon/hwmon4/pwm3_freq /sys/class/hwmon/hwmon4/pwm1_auto_channels_temp /sys/class/hwmon/hwmon4/pwm4 /sys/class/hwmon/hwmon4/pwm1_auto_point1_temp /sys/class/hwmon/hwmon4/pwm4_auto_channels_temp /sys/class/hwmon/hwmon4/pwm1_auto_point1_temp_hyst /sys/class/hwmon/hwmon4/pwm4_auto_point1_temp /sys/class/hwmon/hwmon4/pwm1_auto_point2_temp /sys/class/hwmon/hwmon4/pwm4_auto_point1_temp_hyst /sys/class/hwmon/hwmon4/pwm1_auto_point3_temp /sys/class/hwmon/hwmon4/pwm4_auto_point2_temp /sys/class/hwmon/hwmon4/pwm1_auto_slope /sys/class/hwmon/hwmon4/pwm4_auto_point3_temp /sys/class/hwmon/hwmon4/pwm1_auto_start /sys/class/hwmon/hwmon4/pwm4_auto_slope /sys/class/hwmon/hwmon4/pwm1_enable /sys/class/hwmon/hwmon4/pwm4_enable /sys/class/hwmon/hwmon4/pwm1_freq /sys/class/hwmon/hwmon4/pwm4_freq /sys/class/hwmon/hwmon4/pwm2 /sys/class/hwmon/hwmon4/pwm5 /sys/class/hwmon/hwmon4/pwm2_auto_channels_temp /sys/class/hwmon/hwmon4/pwm5_auto_channels_temp /sys/class/hwmon/hwmon4/pwm2_auto_point1_temp /sys/class/hwmon/hwmon4/pwm5_auto_point1_temp /sys/class/hwmon/hwmon4/pwm2_auto_point1_temp_hyst /sys/class/hwmon/hwmon4/pwm5_auto_point1_temp_hyst /sys/class/hwmon/hwmon4/pwm2_auto_point2_temp /sys/class/hwmon/hwmon4/pwm5_auto_point2_temp /sys/class/hwmon/hwmon4/pwm2_auto_point3_temp /sys/class/hwmon/hwmon4/pwm5_auto_point3_temp /sys/class/hwmon/hwmon4/pwm2_auto_slope /sys/class/hwmon/hwmon4/pwm5_auto_slope /sys/class/hwmon/hwmon4/pwm2_auto_start /sys/class/hwmon/hwmon4/pwm5_enable /sys/class/hwmon/hwmon4/pwm2_enable /sys/class/hwmon/hwmon4/pwm5_freq /sys/class/hwmon/hwmon4/pwm2_freq /sys/class/hwmon/hwmon4/pwm6 /sys/class/hwmon/hwmon4/pwm3 /sys/class/hwmon/hwmon4/pwm6_auto_channels_temp /sys/class/hwmon/hwmon4/pwm3_auto_channels_temp /sys/class/hwmon/hwmon4/pwm6_auto_point1_temp /sys/class/hwmon/hwmon4/pwm3_auto_point1_temp /sys/class/hwmon/hwmon4/pwm6_auto_point1_temp_hyst /sys/class/hwmon/hwmon4/pwm3_auto_point1_temp_hyst /sys/class/hwmon/hwmon4/pwm6_auto_point2_temp /sys/class/hwmon/hwmon4/pwm3_auto_point2_temp /sys/class/hwmon/hwmon4/pwm6_auto_point3_temp /sys/class/hwmon/hwmon4/pwm3_auto_point3_temp /sys/class/hwmon/hwmon4/pwm6_auto_slope /sys/class/hwmon/hwmon4/pwm3_auto_slope /sys/class/hwmon/hwmon4/pwm6_enable /sys/class/hwmon/hwmon4/pwm3_auto_start /sys/class/hwmon/hwmon4/pwm6_freq /sys/class/hwmon/hwmon4/pwm3_enable
-
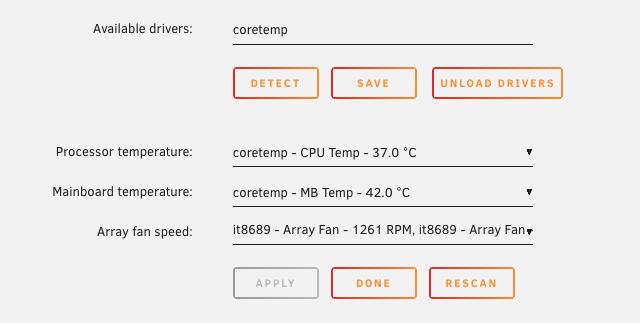
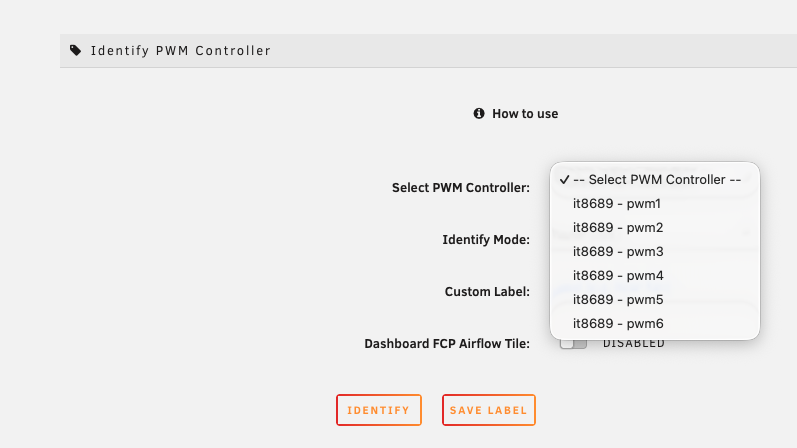
Thanks for getting back to me! You are correct with my Intel board - I knew I should have looked at that better. Good Catch! 1.) I did install the System Temp plugin - Detect and Load Driver does work 2.) BIOS has fan headers set to PWM (with the exception of the CPU Fan - That's set to Auto) 3.) Correct - The PWM Controllers load up, but the Identify function does not appear to work - I've tried all 6 controllers and all 3 identification types with no success. 4.) Your requested Output: === hwmon devices === /sys/class/hwmon/hwmon0/name:gigabyte_wmi /sys/class/hwmon/hwmon1/name:coretemp /sys/class/hwmon/hwmon2/name:nvme /sys/class/hwmon/hwmon3/name:acpitz /sys/class/hwmon/hwmon4/name:it8689 === Available PWM controllers (safe check) === -- /sys/class/hwmon/hwmon0 (gigabyte_wmi) -- -- /sys/class/hwmon/hwmon1 (coretemp) -- -- /sys/class/hwmon/hwmon2 (nvme) -- -- /sys/class/hwmon/hwmon3 (acpitz) -- -- /sys/class/hwmon/hwmon4 (it8689) -- /sys/class/hwmon/hwmon4/pwm1 /sys/class/hwmon/hwmon4/pwm3_freq /sys/class/hwmon/hwmon4/pwm1_auto_channels_temp /sys/class/hwmon/hwmon4/pwm4 /sys/class/hwmon/hwmon4/pwm1_auto_point1_temp /sys/class/hwmon/hwmon4/pwm4_auto_channels_temp /sys/class/hwmon/hwmon4/pwm1_auto_point1_temp_hyst /sys/class/hwmon/hwmon4/pwm4_auto_point1_temp /sys/class/hwmon/hwmon4/pwm1_auto_point2_temp /sys/class/hwmon/hwmon4/pwm4_auto_point1_temp_hyst /sys/class/hwmon/hwmon4/pwm1_auto_point3_temp /sys/class/hwmon/hwmon4/pwm4_auto_point2_temp /sys/class/hwmon/hwmon4/pwm1_auto_slope /sys/class/hwmon/hwmon4/pwm4_auto_point3_temp /sys/class/hwmon/hwmon4/pwm1_auto_start /sys/class/hwmon/hwmon4/pwm4_auto_slope /sys/class/hwmon/hwmon4/pwm1_enable /sys/class/hwmon/hwmon4/pwm4_enable /sys/class/hwmon/hwmon4/pwm1_freq /sys/class/hwmon/hwmon4/pwm4_freq /sys/class/hwmon/hwmon4/pwm2 /sys/class/hwmon/hwmon4/pwm5 /sys/class/hwmon/hwmon4/pwm2_auto_channels_temp /sys/class/hwmon/hwmon4/pwm5_auto_channels_temp /sys/class/hwmon/hwmon4/pwm2_auto_point1_temp /sys/class/hwmon/hwmon4/pwm5_auto_point1_temp /sys/class/hwmon/hwmon4/pwm2_auto_point1_temp_hyst /sys/class/hwmon/hwmon4/pwm5_auto_point1_temp_hyst /sys/class/hwmon/hwmon4/pwm2_auto_point2_temp /sys/class/hwmon/hwmon4/pwm5_auto_point2_temp /sys/class/hwmon/hwmon4/pwm2_auto_point3_temp /sys/class/hwmon/hwmon4/pwm5_auto_point3_temp /sys/class/hwmon/hwmon4/pwm2_auto_slope /sys/class/hwmon/hwmon4/pwm5_auto_slope /sys/class/hwmon/hwmon4/pwm2_auto_start /sys/class/hwmon/hwmon4/pwm5_enable /sys/class/hwmon/hwmon4/pwm2_enable /sys/class/hwmon/hwmon4/pwm5_freq /sys/class/hwmon/hwmon4/pwm2_freq /sys/class/hwmon/hwmon4/pwm6 /sys/class/hwmon/hwmon4/pwm3 /sys/class/hwmon/hwmon4/pwm6_auto_channels_temp /sys/class/hwmon/hwmon4/pwm3_auto_channels_temp /sys/class/hwmon/hwmon4/pwm6_auto_point1_temp /sys/class/hwmon/hwmon4/pwm3_auto_point1_temp /sys/class/hwmon/hwmon4/pwm6_auto_point1_temp_hyst /sys/class/hwmon/hwmon4/pwm3_auto_point1_temp_hyst /sys/class/hwmon/hwmon4/pwm6_auto_point2_temp /sys/class/hwmon/hwmon4/pwm3_auto_point2_temp /sys/class/hwmon/hwmon4/pwm6_auto_point3_temp /sys/class/hwmon/hwmon4/pwm3_auto_point3_temp /sys/class/hwmon/hwmon4/pwm6_auto_slope /sys/class/hwmon/hwmon4/pwm3_auto_slope /sys/class/hwmon/hwmon4/pwm6_enable /sys/class/hwmon/hwmon4/pwm3_auto_start /sys/class/hwmon/hwmon4/pwm6_freq /sys/class/hwmon/hwmon4/pwm3_enable
-
@CkChong Thank you for making this robust plugin! Motherboard: Gigabyte Technology Co., Ltd. Z690 GAMING X DDR4 I'm in the process of trying to get this up and running, but I'm not able to identify any of my fans using the identify command (they don't respond to any of the commands). Using your Github command to identify hardware monitoring devices: echo "=== hwmon devices ===" grep -H . /sys/class/hwmon/hwmon*/name echo "" echo "=== k10temp sensors ===" kdir=$(dirname "$(grep -l k10temp /sys/class/hwmon/hwmon*/name 2>/dev/null)") if [ -n "$kdir" ]; then ls "$kdir"/temp*_label "$kdir"/temp*_input 2>/dev/null echo "" echo "---- labels and values ----" paste -d' ' <(cat "$kdir"/temp*_label 2>/dev/null) <(cat "$kdir"/temp*_input 2>/dev/null) else echo "k10temp not found under /sys/class/hwmon" fi OUTPUT: /sys/class/hwmon/hwmon0/name:gigabyte_wmi /sys/class/hwmon/hwmon1/name:coretemp /sys/class/hwmon/hwmon2/name:nvme /sys/class/hwmon/hwmon3/name:acpitz /sys/class/hwmon/hwmon4/name:it8689 I did install ITE IT87 Driver by ich777 and I'm still not having any luck with detecting and identify my fans with your plugin. Is there something I need to change or have set in the motherboard BIOS?
-
So this plugin was on my micro project list for some time now and after having looked through the recent posts in this thread... Good grief. I'm seeing: * Confusion around the setup and configuration of the plugin * A non-intuitive UI (I definitely agree) * Resource demanding (which I imagine any hash integrity tool will be with a massive file collection) * Unreliable error reporting (this is the straw that broke it for me - if error notifications are invalid then why use this tool) Is there a reliable alternative or are there plans from the LimeTech Team to release a reliable tool in the future? Is this tool even still actively being developed by @bonienl
-
Background - Previous Parity Check (non-correcting) came back with 0 errors - Upgraded Parity Drive to a larger size (pre-cleared with no issues) - Repurposed the previous Parity Drive into a new Data Drive to expand the Array - The new Data Drive is empty and ready for future use - Parity Rebuild came back with 0 errors Issue - A scheduled Parity Check (non-correcting) kicks off and within 15 minutes I get 5 errors Oct 7 01:00:07 server kernel: mdcmd (47): check NOCORRECT Oct 7 01:00:07 server kernel: Oct 7 01:00:07 server kernel: md: recovery thread: check P ... Oct 7 01:14:42 server kernel: md: recovery thread: P incorrect, sector=408944536 Oct 7 01:14:42 server kernel: md: recovery thread: P incorrect, sector=408944544 Oct 7 01:14:42 server kernel: md: recovery thread: P incorrect, sector=408944552 Oct 7 01:14:42 server kernel: md: recovery thread: P incorrect, sector=408944560 Oct 7 01:14:42 server kernel: md: recovery thread: P incorrect, sector=408944568 - The Parity Check (non-correcting) just finished with no additional errors reported - No SMART alerts Next Steps - I'm confident the data on the Data Drives is valid and good. - Outside of updating a few files with newer versions occasionally and adding additional new files, the data doesn't have a high degree of utilization. What should I do next? Thanks in advance for any assistance / insight provided <3
-
@KluthR When backing up Plex - is your database file backed up when excluding the Cache, Media, and Metadata folders? Thank you for this plugin by the way!
-
Random question for people that have done a RESTORE of their Plex Docker. By excluding the Cache, Media, and Metadata folders from your backup - did your Collections and Plex settings also restore correctly? I have a lot of Collections created and sorting out which folders to exclude from the backup to reduce the save file size.
-
I didn't see any mention of this in the 6.12.8 changelog, but looking at the Linux Kernel bug details, this appears to still be an ongoing issue: Adaptec 71605z hangs with aacraid: Host adapter abort request after update to linux 6.4.0 https://bugzilla.kernel.org/show_bug.cgi?id=217599 Just wanted to give a heads up to other Adaptec 7 Series card owners that were thinking about updating. Don't.
-
Thanks for all the work you've put into this plugin! I'm looking at getting up and running with this plugin since I recently lost my appdata folder due to partition failure of my cache drive. I have some quick questions: 1.) In the event you need to restore a backup - I'm guessing it's a manual process with the compressed filed created with this plugin? 2.) Isn't the Collections and Tags you've attached to media stored in the Library/Application Support/Plex Media Server/Metadata ? 3.) Are the docker configurations backed up as well? Cheers!
-
Looks like everything has recovered nicely! Thanks for the help everyone - I'm marking this as solved. SOLUTION: 1.) Rolled back to unRAID 6.12.4 due to RAID card Linux kernel bug (Adaptec Series 7) 2.) Rebuilt disabled drive on top of itself after verifying it was good 3.) Ran non-corrective parity-check to verify if previously reported errors were false due to the Linux kernel bug 4.) Reinstalled Day & Night plugin to stop syslog spamming (unrelated issue)

-
Excellent! Many thanks and so far, no issues with the plug-in. - Tonight is the last night it will run for my quarterly parity check - I have the parity check running from 1am - 9am to reduce impact to PLEX traffic - It will take a total of 4 evenings to finish a parity check of a 14TB drive - I do have the heat pause options configured and enabled - this is an excellent option and it's been working great! - When temperatures are within 2 degrees of warning threshold, it pauses until an 8 degree drop and then starts back up again. I would even say this should be a required plugin, given how powerful and useful it is.
-
@itimpi Thank you for this awesome plugin! Question for ya. I just kicked off my first parity check with the PCT plugin installed and have my parity checks scheduled from 1am to 9pm until the check is done. My first increment paused at 28% and my question to you is can you transfer, remove, add files to the data drives during this pause and not cause issues with the pending parity check resumption?
-
That's a good idea. I was just hoping to avoid multiple checks and putting unneeded load on the disks with repeated parity scans - especially since it takes about a day to finish a parity check. As for the docker.img being 200G - great question! I could probably scale it back down to 40GB. I was planning on adding additional docker apps in the near future as I get this new box up and running.
-
Fixed the plugin spamming - easy enough - uninstalled the plugin and then reinstalled it via the Apps tab. I had my address info entered into the original installation of the plugin, but disabled the plugin - the plugin didn't seem to acknowledge that and just kept spamming. All fixed now. That just leaves the parity topic to sort out.
-
Happy New Years @trurl! Attached as requested. Looking at the syslogs file - I see a ton of lines flooding me about the Day & Night plugin exit status 255 from user root /usr/local/emhttp/plugins/dynamix.day.night/scripts/dynamix.day.night &> /dev/null I'll dig into the issue above a bit later, but I wanted to make sure I'm on the right corrective path with next steps with understanding what I should do about kicking off a parity check post downgrading UNRAID from 6.12.6 to 6.12.4 due to my RAID cards being impacted by the Linux kernel bug. I suspect I have 2 options: 1.) Run the parity check with corrections checked 2.) Run the parity check with corrections unchecked I'm trying to get better understanding of those two options and their impact on my scenario. Thank you for your help and guidance! origaminet-diagnostics-20240102-1646.zip

